ആമുഖം
This manual provides detailed instructions for the proper setup, operation, and maintenance of your Kodak EasyShare M893IS Digital Camera. Please read this manual thoroughly before using your camera to ensure optimal performance and longevity.
1. സജ്ജീകരണം
1.1. ബാറ്ററി ഇൻസ്റ്റാളേഷനും ചാർജിംഗും
The Kodak EasyShare M893IS uses a rechargeable Lithium-Ion battery. Ensure the battery is fully charged before first use.
- Locate the battery compartment door on the bottom or side of the camera.
- Slide the latch to open the compartment.
- Insert the Li-Ion battery with the contacts facing inward, ensuring it clicks into place.
- ബാറ്ററി കമ്പാർട്ട്മെന്റ് വാതിൽ സുരക്ഷിതമായി അടയ്ക്കുക.
- Connect the camera to a power source using the provided USB cable for in-camera charging. The charging indicator light will show the charging status.

ചിത്രം 1.1: വശം view of the camera, indicating the general location of the battery compartment.
1.2. മെമ്മറി കാർഡ് ഇൻസ്റ്റാളേഷൻ
The camera supports SD/SDHC memory cards (not included). A memory card is required to store photos and videos.
- Open the battery compartment door. The memory card slot is usually located next to the battery.
- Insert the SD/SDHC card into the slot with the metal contacts facing the correct direction (refer to the diagram inside the compartment). Push until it clicks into place.
- ബാറ്ററി കമ്പാർട്ട്മെൻ്റ് വാതിൽ അടയ്ക്കുക.
2. നിങ്ങളുടെ ക്യാമറ പ്രവർത്തിപ്പിക്കൽ
2.1. Camera Controls Overview
Familiarize yourself with the main controls of your Kodak EasyShare M893IS camera.

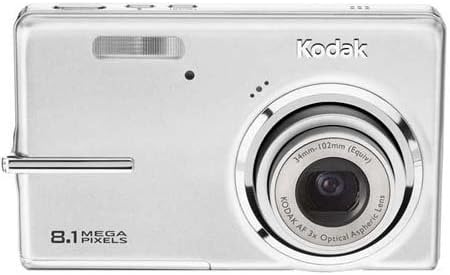
ചിത്രം 2.1: മുൻഭാഗം view of the camera. Key components include the lens, flash, and microphone.
- പവർ ബട്ടൺ: Located on the top panel, turns the camera on/off.
- ഷട്ടർ ബട്ടൺ: Press halfway to focus, fully to capture a photo.
- സൂം ലിവർ: Controls the 3x optical zoom and 5x digital zoom.
- മോഡ് ഡയൽ/ബട്ടൺ: Selects shooting modes (e.g., Auto, Program, Scene modes).
- LCD സ്ക്രീൻ: 2.7-inch display for framing shots, reviewചിത്രങ്ങളും നാവിഗേറ്റിംഗ് മെനുകളും.
- Directional Pad/OK Button: മെനു നാവിഗേഷനും തിരഞ്ഞെടുപ്പിനും ഉപയോഗിക്കുന്നു.
- മെനു ബട്ടൺ: ക്യാമറ ക്രമീകരണങ്ങളും ഓപ്ഷനുകളും ആക്സസ് ചെയ്യുന്നു.
- Review/Playback Button: Displays captured photos and videos.
- ഇല്ലാതാക്കുക ബട്ടൺ: Removes unwanted images or videos.
- പങ്കിടൽ ബട്ടൺ: For easy sharing options (if configured).
ചിത്രം 2.2: പിൻഭാഗം view of the camera, showing the 2.7-inch LCD and control buttons.
2.2. ഫോട്ടോ എടുക്കൽ
- Turn on the camera by pressing the Power button.
- Select your desired shooting mode using the Mode dial/button. Common modes include:
- സ്വയമേവ: മിക്ക സാഹചര്യങ്ങൾക്കുമായി ക്യാമറ യാന്ത്രികമായി ക്രമീകരണങ്ങൾ ക്രമീകരിക്കുന്നു.
- സീൻ മോഡുകൾ: Specific settings for various scenarios like 'Night mode' or 'Sports'.
- Frame your shot using the LCD screen. Use the zoom lever to adjust the 3x optical zoom or 5x digital zoom.
- Press the Shutter button halfway down to allow the camera to focus (Contrast Detection Auto Focus, Multi-zone, Center Spot options available). A green frame indicates focus lock.
- Press the Shutter button fully to capture the image. The camera features optical image stabilization to reduce blur.
- For low-light conditions, adjust the flash mode (Auto, On, Off, Slow Synch) or utilize the High ISO (up to 1600) setting.
2.3. വീഡിയോകൾ റെക്കോർഡുചെയ്യുന്നു
- Switch the camera to video recording mode (refer to your camera's mode dial/menu for the video icon).
- Frame your subject on the LCD screen.
- Press the Shutter button to start recording. Press it again to stop.
- Videos are recorded in VGA resolution (640 x 480 at 15 fps or 320 x 240 at 30 fps) in MJPEG format.
2.4. റീviewമീഡിയ കൈകാര്യം ചെയ്യലും കൈകാര്യം ചെയ്യലും
- Re അമർത്തുകview/Playback button to view നിങ്ങളുടെ ഫോട്ടോകളും വീഡിയോകളും.
- Use the directional pad to scroll through your media.
- To delete an unwanted item, select it and press the Delete button. Confirm deletion when prompted.
- Connect the camera to a computer via USB to transfer files.
3. പരിപാലനം
3.1. ക്യാമറ വൃത്തിയാക്കൽ
- ലെൻസ്: Use a soft, lint-free cloth specifically designed for camera lenses. Gently wipe in a circular motion. Avoid using harsh chemicals.
- LCD സ്ക്രീൻ: Wipe with a soft, dry microfiber cloth. For stubborn smudges, slightly dampen വെള്ളമുള്ള തുണി അല്ലെങ്കിൽ ഒരു സ്ക്രീൻ ക്ലീനർ.
- ക്യാമറ ബോഡി: പൊടിയും വിരലടയാളങ്ങളും തുടച്ചുമാറ്റാൻ മൃദുവായതും ഉണങ്ങിയതുമായ തുണി ഉപയോഗിക്കുക.
3.2. ബാറ്ററി പരിചരണം
- ഉപയോഗത്തിലില്ലാത്തപ്പോൾ തണുത്തതും ഉണങ്ങിയതുമായ സ്ഥലത്ത് ബാറ്ററി സൂക്ഷിക്കുക.
- ബാറ്ററിയുടെ ആയുസ്സ് വർദ്ധിപ്പിക്കുന്നതിന് ഇടയ്ക്കിടെ പൂർണ്ണമായും ഡിസ്ചാർജ് ചെയ്യുന്നത് ഒഴിവാക്കുക.
- ക്യാമറ ദീർഘനേരം സൂക്ഷിക്കുകയാണെങ്കിൽ, ബാറ്ററി നീക്കം ചെയ്യുക.
3.3. സംഭരണം
Store the camera in a protective case or bag to prevent scratches and damage from dust or moisture. Avoid extreme temperatures.
4. പ്രശ്നപരിഹാരം
| പ്രശ്നം | സാധ്യമായ കാരണം | പരിഹാരം |
|---|---|---|
| ക്യാമറ ഓണാകുന്നില്ല. | ബാറ്ററി ഡിസ്ചാർജ് ചെയ്തിരിക്കുന്നു അല്ലെങ്കിൽ തെറ്റായി ചേർത്തിരിക്കുന്നു. | Charge the battery. Ensure the battery is inserted correctly with contacts aligned. |
| ഫോട്ടോകൾ മങ്ങിയതാണ്. | ക്യാമറ കുലുക്കം, വിഷയ ചലനം, അല്ലെങ്കിൽ തെറ്റായ ഫോക്കസ്. | Hold the camera steady. Ensure the subject is within the camera's focus range. Use optical image stabilization. Increase ISO in low light. |
| "മെമ്മറി കാർഡ് പിശക്" എന്ന സന്ദേശം. | Memory card is full, corrupted, or incorrectly inserted. | Insert a new or empty SD/SDHC card. Reinsert the card. Format the card (this will erase all data). |
| ഫ്ലാഷ് കത്തുന്നില്ല. | Flash is set to "Off" or battery is low. | Change flash mode to "Auto" or "On". Charge the battery. |
| ഫോട്ടോകൾ കമ്പ്യൂട്ടറിലേക്ക് മാറ്റാൻ കഴിയില്ല. | Incorrect USB connection or driver issues. | Ensure USB cable is securely connected to both camera and computer. Try a different USB port. Check computer's device manager for driver issues. |
5 സ്പെസിഫിക്കേഷനുകൾ
| ഫീച്ചർ | വിശദാംശങ്ങൾ |
|---|---|
| മോഡലിൻ്റെ പേര് | Easyshare M893IS |
| ഫോട്ടോ സെൻസർ റെസല്യൂഷൻ | 8.1 എം.പി |
| ഒപ്റ്റിക്കൽ സൂം | 3x |
| ഡിജിറ്റൽ സൂം | 5x |
| ഇമേജ് സ്റ്റെബിലൈസേഷൻ | ഒപ്റ്റിക്കൽ |
| സ്ക്രീൻ വലിപ്പം | 2.7 ഇഞ്ച് എൽസിഡി |
| പിന്തുണച്ചു File ഫോർമാറ്റ് | JPEG (Stills), MJPEG (Video) |
| വീഡിയോ റെസല്യൂഷൻ | 640 x 480 (15 fps), 320 x 240 (30 fps) |
| ISO സെൻസിറ്റിവിറ്റി | വികസിപ്പിച്ച ISO കുറഞ്ഞത് 80, വികസിപ്പിച്ച ISO പരമാവധി 1600 |
| കുറഞ്ഞ ഷട്ടർ സ്പീഡ് | 4 സെക്കൻഡ് |
| പരമാവധി ഷട്ടർ സ്പീഡ് | 1/2000 സെക്കൻഡ് |
| ഫ്ലാഷ് മോഡുകൾ | Auto, On, Off, Slow Synch |
| ബാറ്ററി തരം | ലിഥിയം അയോൺ |
| കണക്റ്റിവിറ്റി | USB |
| Compatible Flash Memory | SD, SDHC (up to 32 GB) |
| ഇനത്തിൻ്റെ ഭാരം | 0.35 പൗണ്ട് |
| നിറം | വെള്ളി |
6. വാറൻ്റി വിവരങ്ങൾ
Your Kodak EasyShare M893IS Digital Camera is covered by a 1-വർഷ പരിമിത വാറൻ്റി വാങ്ങിയ തീയതി മുതൽ. സാധാരണ ഉപയോഗത്തിലുള്ള നിർമ്മാണ വൈകല്യങ്ങളും പ്രവർത്തനക്ഷമതയും ഈ വാറന്റി ഉൾക്കൊള്ളുന്നു. ദുരുപയോഗം, അപകടങ്ങൾ, അനധികൃത പരിഷ്കാരങ്ങൾ അല്ലെങ്കിൽ ബാഹ്യ കാരണങ്ങൾ എന്നിവ മൂലമുണ്ടാകുന്ന നാശനഷ്ടങ്ങൾക്ക് ഇത് പരിരക്ഷ നൽകുന്നില്ല.
Please retain your proof of purchase for warranty claims. For detailed terms and conditions, refer to the warranty card included with your product or visit the official Kodak support webസൈറ്റ്.
7. ഉപഭോക്തൃ പിന്തുണ
If you encounter any issues not covered in the troubleshooting section or require further assistance, please contact Kodak Customer Support.
- ഓൺലൈൻ പിന്തുണ: ഔദ്യോഗിക കൊഡാക്ക് പിന്തുണാ കേന്ദ്രം സന്ദർശിക്കുക webപതിവുചോദ്യങ്ങൾ, ഡ്രൈവറുകൾ, സോഫ്റ്റ്വെയർ ഡൗൺലോഡുകൾ എന്നിവയ്ക്കുള്ള സൈറ്റ്.
- ടെലിഫോൺ പിന്തുണ: Refer to your product packaging or the Kodak webപ്രാദേശിക കോൺടാക്റ്റ് നമ്പറുകൾക്കായുള്ള സൈറ്റ്.
- When contacting support, please have your camera model (M893IS) and serial number ready.