
Fallsbrook
Project Source Fallsbrook 5 Light Brushed Nickel Chandelier User Manual
Model: Fallsbrook | Brand: Generic
1. ആമുഖം
Thank you for choosing the Project Source Fallsbrook 5-Light Chandelier. This manual provides detailed instructions for the safe installation, operation, and maintenance of your new lighting fixture. Please read all instructions carefully before beginning installation and retain this manual for future reference.
This elegant 5-light chandelier features a brushed nickel finish and frosted glass shades, designed to enhance the ambiance of your space. It is hardwired and uses medium base (E-26) A19 type light bulbs.

Figure 1.1: The Project Source Fallsbrook 5-Light Chandelier, showcasing its brushed nickel finish and five frosted glass shades.
2 പ്രധാനപ്പെട്ട സുരക്ഷാ വിവരങ്ങൾ
- മുന്നറിയിപ്പ്: To avoid electric shock, ensure power is turned off at the circuit breaker or fuse box before installation, servicing, or changing bulbs.
- എല്ലാ വൈദ്യുത കണക്ഷനുകളും പ്രാദേശിക കോഡുകൾ, ഓർഡിനൻസുകൾ, അല്ലെങ്കിൽ ദേശീയ വൈദ്യുത കോഡ് (NEC) എന്നിവ അനുസരിച്ചായിരിക്കണം. വൈദ്യുത വയറിംഗ് സ്ഥാപിക്കുന്നതിൽ നിങ്ങൾക്ക് പരിചയമില്ലെങ്കിൽ യോഗ്യതയുള്ള ഒരു ഇലക്ട്രീഷ്യനെ സമീപിക്കുക.
- ഈ ഫിക്ചർ ഇൻഡോർ ഉപയോഗത്തിന് മാത്രമുള്ളതാണ്. വെള്ളത്തിനോ ഈർപ്പത്തിനോ വിധേയമാകരുത്.
- നിർദ്ദിഷ്ട ബൾബ് തരവും വാട്ടും മാത്രം ഉപയോഗിക്കുകtage. വിശദാംശങ്ങൾക്ക് "സ്പെസിഫിക്കേഷനുകൾ" വിഭാഗം കാണുക.
- പരമാവധി വാട്ട് കവിയരുത്tage rating for each bulb socket.
- Always handle the fixture and bulbs with care. Allow bulbs to cool before touching.
- കത്തുന്ന വസ്തുക്കൾ ലൈറ്റ് ഫിക്ചറിൽ നിന്ന് അകറ്റി നിർത്തുക.
3. സജ്ജീകരണവും ഇൻസ്റ്റാളേഷനും
3.1 ആവശ്യമായ ഉപകരണങ്ങൾ (ഉൾപ്പെടുത്തിയിട്ടില്ല)
- ഫിലിപ്സ് ഹെഡ് സ്ക്രൂഡ്രൈവർ
- ഫ്ലാറ്റ്ഹെഡ് സ്ക്രൂഡ്രൈവർ
- വയർ സ്ട്രിപ്പറുകൾ
- ഇലക്ട്രിക്കൽ ടേപ്പ്
- ഗോവണി
- സുരക്ഷാ ഗ്ലാസുകൾ
3.2 ഇൻസ്റ്റലേഷൻ ഘട്ടങ്ങൾ
- പവർ ഓഫ് ചെയ്യുക: Locate the circuit breaker or fuse box that supplies power to the light fixture location. Turn off the power completely. Verify power is off using a voltagഇ ടെസ്റ്റർ.
- ഇൻസ്റ്റാളേഷനായി തയ്യാറെടുക്കുക: Carefully unpack all components from the packaging. Lay them out on a clean, flat surface to ensure all parts are present and undamaged.
- Assemble Fixture Body: Attach the arms to the central body of the chandelier if they are not pre-assembled. Ensure all connections are secure.
- ചെയിൻ നീളം ക്രമീകരിക്കുക: The chandelier comes with an adjustable chain. Determine the desired hanging height for your fixture. Use pliers to open and remove excess chain links as needed. Ensure enough chain remains to support the fixture and allow for electrical wiring.
- മൗണ്ടിംഗ് ബ്രാക്കറ്റ് ഇൻസ്റ്റലേഷൻ: Secure the mounting bracket to the electrical junction box in the ceiling using the provided screws. Ensure the bracket is firmly attached and can support the weight of the chandelier.
- ഇലക്ട്രിക്കൽ കണക്ഷനുകൾ:
- Connect the bare copper ground wire from the fixture to the bare copper or green ground wire from the junction box. Secure with a wire nut.
- Connect the ribbed (or white) wire from the fixture to the white (neutral) wire from the junction box. Secure with a wire nut.
- Connect the smooth (or black) wire from the fixture to the black (hot) wire from the junction box. Secure with a wire nut.
- Wrap all wire nut connections with electrical tape for added security.
- സുരക്ഷിത മേലാപ്പ്: Carefully push the wired fixture up towards the ceiling, tucking all wires into the junction box. Slide the canopy (ceiling plate) up the chain and secure it to the mounting bracket using the provided screws or nuts.
- ഗ്ലാസ് ഷേഡുകൾ ഇൻസ്റ്റാൾ ചെയ്യുക: Carefully place each frosted glass shade onto its respective socket. Ensure they are seated properly and securely.
- ലൈറ്റ് ബൾബുകൾ സ്ഥാപിക്കുക: Screw in five (5) A19 type medium base (E-26) light bulbs (not included) into each socket. Do not exceed the maximum wattage specified in the "Specifications" section.
- പവർ പുന ore സ്ഥാപിക്കുക: Once installation is complete and all connections are secure, return to the circuit breaker or fuse box and restore power. Test the light fixture.

Figure 3.1: The chandelier installed, demonstrating its hanging chain and overall appearance in a room setting.
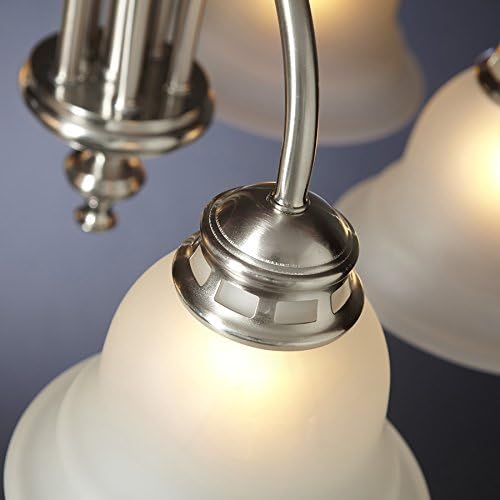
ചിത്രം 3.2: ഒരു ക്ലോസ്-അപ്പ് view of one of the frosted glass shades, showing the detail of the fixture's arm and bulb socket.
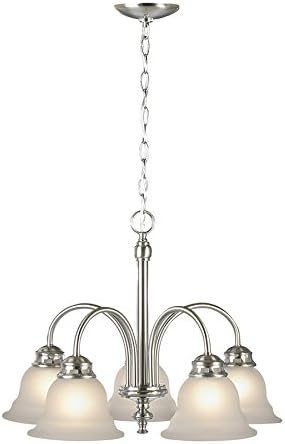
Figure 3.3: An alternative perspective of the chandelier, highlighting its full form and the arrangement of its five lights.
4. പ്രവർത്തന നിർദ്ദേശങ്ങൾ
The Project Source Fallsbrook Chandelier is designed for simple operation via a standard wall switch (not included). Once properly installed and wired, simply toggle the wall switch to turn the light fixture ON or OFF.
കുറിപ്പ്: This fixture is not dimmable. Using dimmable bulbs with a non-dimmable fixture or a dimmer switch may cause damage to the bulbs or the fixture, or result in improper operation.
5. പരിചരണവും പരിപാലനവും
- വൃത്തിയാക്കൽ: To clean the fixture, ensure power is turned off and the fixture is cool. Wipe the brushed nickel finish with a soft, dry cloth. Do not use abrasive cleaners, polishes, or solvents as they may damage the finish.
- Glass Shades: The frosted glass shades can be gently wiped with a damp cloth. For stubborn spots, a mild glass cleaner can be used, applied to the cloth first, not directly to the shade. Ensure shades are completely dry before restoring power.
- ബൾബ് മാറ്റിസ്ഥാപിക്കൽ: Always turn off power at the circuit breaker before replacing bulbs. Allow old bulbs to cool before removing. Replace with the same type and wattage bulbs as specified.
- പതിവ് പരിശോധന: സുരക്ഷിതമായി തുടരുന്നുവെന്ന് ഉറപ്പാക്കാൻ എല്ലാ കണക്ഷനുകളും മൗണ്ടിംഗ് ഹാർഡ്വെയറും ഇടയ്ക്കിടെ പരിശോധിക്കുക.
6. പ്രശ്നപരിഹാരം
| പ്രശ്നം | സാധ്യമായ കാരണം | പരിഹാരം |
|---|---|---|
| ലൈറ്റ് ഓണാക്കില്ല. |
|
|
| വെളിച്ചം മിന്നിമറയുന്നു അല്ലെങ്കിൽ മങ്ങുന്നു. |
|
|
| ഫിക്സ്ചർ ഹമ്മുകൾ. |
|
|
7 സ്പെസിഫിക്കേഷനുകൾ
| ശേഖരത്തിൻ്റെ പേര് | Fallsbrook |
| നിരകളുടെ എണ്ണം | 1 |
| വീതി | 22.44 ഇഞ്ച് |
| ഉയരം | 16.54 ഇഞ്ച് |
| ഭാരം | 9.96 പൗണ്ട് |
| ലൈറ്റ് ബൾബ് അടിസ്ഥാന തരം | Medium base (E-26) |
| ശുപാർശ ചെയ്യുന്ന ലൈറ്റ് ബൾബ് ആകൃതി | A19 |
| തൂക്കിയിടുന്ന ഉപകരണത്തിൻ്റെ തരം | ചെയിൻ |
| മൗണ്ടിംഗ് ഹാർഡ്വെയർ ഉൾപ്പെടുത്തിയിട്ടുണ്ട് | അതെ |
| UL സുരക്ഷാ ലിസ്റ്റിംഗ് | അതെ |
| CSA Safety Listing | ഇല്ല |
| ETL സുരക്ഷാ ലിസ്റ്റിംഗ് | ഇല്ല |
| Hardwired or Plug-In | ഹാർഡ് വയർഡ് |
| എനർജി സ്റ്റാർ യോഗ്യത | ഇല്ല |
| നിർമ്മാതാവിൻ്റെ നിറം/ഫിനിഷ് | ബ്രഷ് ചെയ്ത നിക്കൽ |
| മങ്ങിയത് | ഇല്ല |
| ശൈലി | പരമ്പരാഗത |
| പ്രകാശ സ്രോതസ്സുകളുടെ എണ്ണം | 5 |
| യു.പി.സി | 841796002294 |
| ASIN | B0050DVG1E |
8. വാറൻ്റിയും പിന്തുണയും
8.1 ലിമിറ്റഡ് വാറൻ്റി
This Project Source Fallsbrook Chandelier is covered by a limited warranty against defects in materials and workmanship. The duration and terms of the warranty may vary. Please retain your proof of purchase for warranty claims. For specific warranty details, refer to the documentation included with your purchase or contact the manufacturer directly.
8.2 ഉപഭോക്തൃ പിന്തുണ
If you have any questions regarding the installation, operation, or maintenance of your chandelier, or if you require technical assistance, please contact the manufacturer's customer support. Contact information is typically found on the product packaging or the manufacturer's official webസൈറ്റ്.
For general inquiries, you may also refer to the product page on Amazon.com for additional resources or frequently asked questions related to ASIN: B0050DVG1E.
Ask a question about this manual
Ask about setup, troubleshooting, compatibility, parts, safety, or missing instructions. Manuals+ will review the question and use this page’s manual context to help answer it.