
1. ആമുഖം
This manual provides essential information for the safe and efficient operation of your Technical Pro AX2000 2-Channel Professional Power Amplifier. The AX2000 is designed to deliver reliable audio amplification for various professional applications, including studio monitoring, small stage sound systems, and mobile DJ setups. Please read this manual thoroughly before using the amplifier to ensure proper setup and performance.
2. പ്രധാന സുരക്ഷാ നിർദ്ദേശങ്ങൾ
Always follow these basic safety precautions when operating the AX2000 ampജീവപര്യന്തം:
- ഊർജ്ജ സ്രോതസ്സ്: Connect the unit only to a 110V AC power outlet. Ensure the power cord is not damaged or pinched.
- വെൻ്റിലേഷൻ: Do not block ventilation openings. Ensure adequate airflow around the unit to prevent overheating. The amplifier features dual cooling fans for thermal management.
- ജലവും ഈർപ്പവും: ഈ ഉപകരണം മഴയിലോ ഈർപ്പത്തിലോ തുറന്നുകാട്ടരുത്. പാത്രങ്ങൾ പോലുള്ള ദ്രാവകങ്ങൾ നിറച്ച വസ്തുക്കൾ ഉപകരണത്തിൽ വയ്ക്കരുത്.
- ചൂട്: റേഡിയേറ്ററുകൾ, ഹീറ്റ് രജിസ്റ്ററുകൾ, സ്റ്റൗകൾ അല്ലെങ്കിൽ മറ്റ് ഉപകരണങ്ങൾ (ഉൾപ്പെടെ) പോലുള്ള താപ സ്രോതസ്സുകൾക്ക് സമീപം യൂണിറ്റ് സ്ഥാപിക്കരുത്. ampലൈഫയറുകൾ) ചൂട് ഉത്പാദിപ്പിക്കുന്നത്.
- സേവനം: Do not attempt to service this unit yourself. Refer all servicing to qualified service personnel. Opening the unit may expose you to dangerous voltages അല്ലെങ്കിൽ മറ്റ് അപകടങ്ങൾ.
- വൃത്തിയാക്കൽ: വൃത്തിയാക്കുന്നതിന് മുമ്പ് വാൾ ഔട്ട്ലെറ്റിൽ നിന്ന് യൂണിറ്റ് പ്ലഗ് അൺപ്ലഗ് ചെയ്യുക. വൃത്തിയാക്കാൻ ഉണങ്ങിയ തുണി ഉപയോഗിക്കുക.
- ഗ്രൗണ്ടിംഗ്: This unit must be grounded. Do not defeat the safety purpose of the polarized or grounding-type plug.
3. പാക്കേജ് ഉള്ളടക്കം
പാക്കേജിൽ എല്ലാ ഇനങ്ങളും ഉണ്ടെന്ന് ഉറപ്പാക്കുക:
- Technical Pro AX2000 2-Channel Professional Power Ampജീവപര്യന്തം
- എസി പവർ കോർഡ്
- ഉപയോക്തൃ മാനുവൽ (ഈ പ്രമാണം)
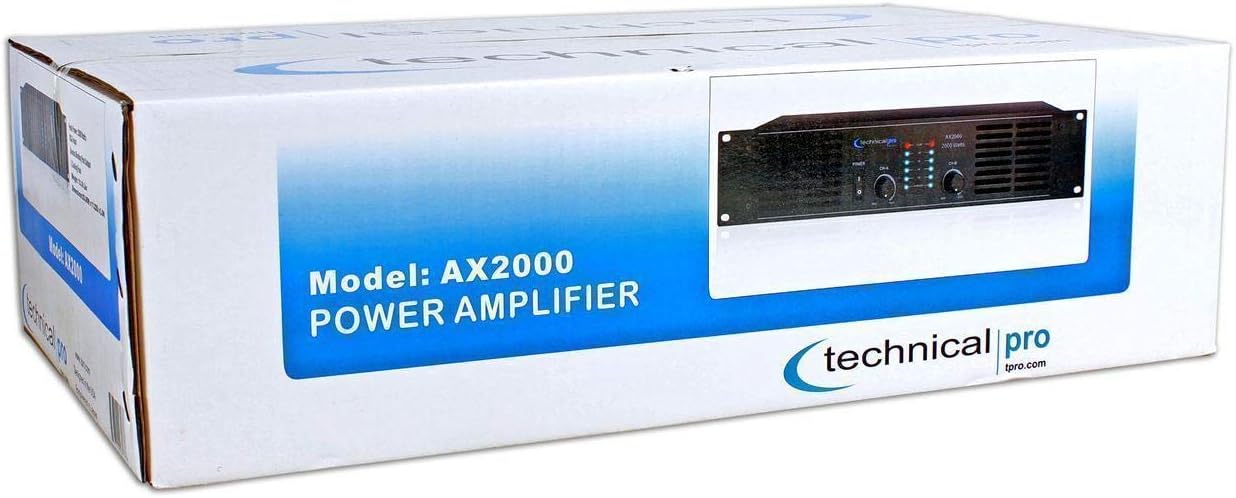
Figure 3.1: Packaging box for the Technical Pro AX2000 amplifier, showing the product image and model number.

Figure 3.2: Included AC power cord with a standard three-prong plug for connecting the ampഊർജ്ജ സ്രോതസ്സിലേക്കുള്ള ലൈഫയർ.
4. ഉൽപ്പന്നം കഴിഞ്ഞുview
4.1 ഫ്രണ്ട് പാനൽ

ചിത്രം 4.1: മുൻഭാഗം view of the Technical Pro AX2000 amplifier, displaying controls and indicators.
- വൈദ്യുതി സ്വിച്ച്: ടോഗിൾ ചെയ്യുന്നു ampലൈഫയറിന്റെ പവർ ഓൺ അല്ലെങ്കിൽ ഓഫ്.
- Channel A Volume Control: Adjusts the output level for Channel A.
- Channel B Volume Control: Adjusts the output level for Channel B.
- Level Indicators (Blue LED Meters): Display the audio signal level for each channel.
- Clip Indicators (Red LED): Illuminates when the input signal is too high, indicating potential audio clipping.
4.2 പിൻ പാനൽ
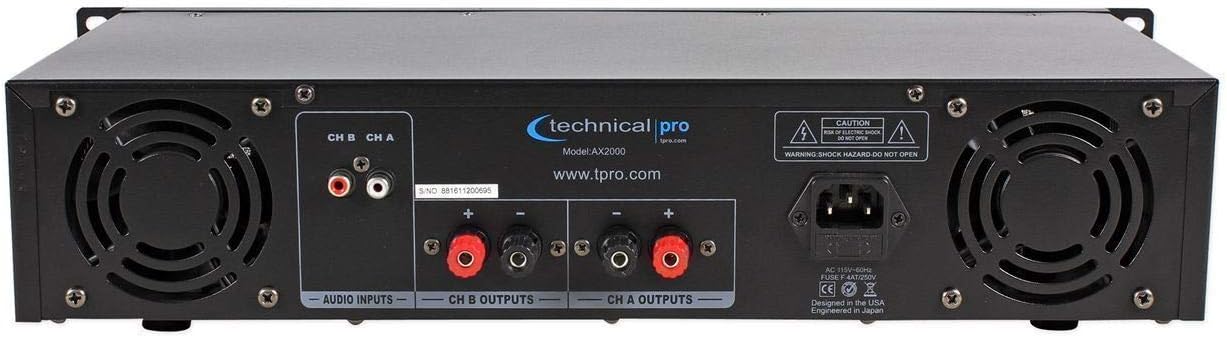
ചിത്രം 4.2: പിൻഭാഗം view of the Technical Pro AX2000 amplifier, showing input, output, and power connections.
- Audio Inputs (RCA): നിങ്ങളുടെ ഓഡിയോ ഉറവിടം ബന്ധിപ്പിക്കുക (ഉദാ. മിക്സർ, പ്രീ-amplifier) to these RCA jacks for Channel A and Channel B.
- Channel A Outputs (Banana Binding Post): Connect your speakers to these binding posts for Channel A.
- Channel B Outputs (Banana Binding Post): Connect your speakers to these binding posts for Channel B.
- എസി പവർ ഇൻലെറ്റ്: Connect the provided AC power cord here.
- കൂളിംഗ് ഫാനുകൾ: Dual fans for maintaining optimal operating temperature.
5. സജ്ജീകരണം
5.1 റാക്ക് മൗണ്ടിംഗ്
The AX2000 is designed for standard 19-inch rack mounting. Secure the amplifier using appropriate rack screws (not included) to prevent movement and ensure proper ventilation within the rack. The unit occupies 2U of rack space.
5.2 ഓഡിയോ ഉറവിടങ്ങൾ ബന്ധിപ്പിക്കുന്നു
Use RCA cables to connect your audio source (e.g., mixer, CD player, audio interface) to the RCA input jacks on the rear panel. Ensure that Channel A input is connected to the left channel output of your source and Channel B input to the right channel output.
5.3 സ്പീക്കറുകൾ ബന്ധിപ്പിക്കുന്നു
Connect your passive speakers to the banana binding post outputs on the rear panel. Ensure correct polarity (+ to + and - to -) for each channel. The banana binding posts are compatible with banana plugs or bare wire connections.
5.4 പവർ കണക്ഷൻ
After all audio connections are made, connect the provided AC power cord to the AC power inlet on the rear panel of the amplifier and then to a grounded 110V AC power outlet.
6. പ്രവർത്തന നിർദ്ദേശങ്ങൾ
6.1 പവർ ഓൺ/ഓഫ്
- Ensure all volume controls on the amplifier are set to their minimum position before powering on.
- Press the Power Switch on the front panel to turn the amplifier on. The power indicator will illuminate.
- To power off, press the Power Switch again.
6.2 Adjusting Volume Levels
Slowly turn up the Channel A and Channel B Volume Controls to achieve the desired output level. Adjust the volume gradually to avoid sudden loud sounds.
6.3 Monitoring Signal Levels
Observe the blue LED level meters on the front panel to monitor the audio signal strength. If the red CLIP indicator illuminates, it means the input signal is too strong, and clipping is occurring. Reduce the input level from your source or the amplifier's volume controls to prevent distortion and potential speaker damage.
7. പരിപാലനം
7.1 വൃത്തിയാക്കൽ
യുടെ പുറംഭാഗം പതിവായി വൃത്തിയാക്കുക amplifier with a soft, dry cloth. Do not use liquid cleaners or solvents. Ensure the unit is unplugged from the power source before cleaning.
7.2 കൂളിംഗ് സിസ്റ്റം
Periodically check the cooling fan vents for dust accumulation. Use a soft brush or compressed air to clear any obstructions. Proper ventilation is crucial for the amplifier's longevity and stable operation.
8. പ്രശ്നപരിഹാരം
| പ്രശ്നം | സാധ്യമായ കാരണം | പരിഹാരം |
|---|---|---|
| ശക്തിയില്ല | Power cord not connected; Power switch off; Outlet not active | Check power cord connection; Turn power switch on; Test outlet with another device |
| ശബ്ദ ഔട്ട്പുട്ട് ഇല്ല | Input cables disconnected; Speaker cables disconnected or incorrect polarity; Volume controls too low; Source device not playing | Verify all audio cable connections; Check speaker wiring and polarity; Increase amplifier volume; Ensure audio source is active and playing |
| Distorted sound / Clip LED on | ഇൻപുട്ട് സിഗ്നൽ വളരെ കൂടുതലാണ്; Amplifier overloaded | Reduce input level from the audio source; Lower amplifier volume controls |
| അമിതമായ ഫാൻ ശബ്ദം | Dust in fan vents; High operating temperature | Clean fan vents; Ensure adequate ventilation around the unit |
9 സ്പെസിഫിക്കേഷനുകൾ
| ഫീച്ചർ | സ്പെസിഫിക്കേഷൻ |
|---|---|
| മോഡൽ | AX2000 |
| പീക്ക് പവർ | 2000 വാട്ട്സ് |
| RMS Power @ 2 ohms | 600 വാട്ട്സ് |
| RMS Power @ 4 ohms | 460 വാട്ട്സ് |
| RMS Power @ 8 ohms | 240 വാട്ട്സ് |
| ചാനലുകളുടെ എണ്ണം | 2 |
| ഫ്രീക്വൻസി പ്രതികരണം | 20Hz - 20KHz |
| സിഗ്നൽ ടു നോയ്സ് റേഷ്യോ | 79dB |
| ഇൻപുട്ട് ഇംപെഡൻസ് | 10 k ohm unbalanced |
| ഇൻപുട്ടുകൾ | ആർസിഎ |
| ഔട്ട്പുട്ടുകൾ | Banana binding post |
| വാല്യംtage | 110 വോൾട്ട് |
| തണുപ്പിക്കൽ | ഡ്യുവൽ കൂളിംഗ് സ്പീഡ് ഫാനുകൾ |
| സൂചകങ്ങൾ | Iridescent blue LED meter, Power, Level & Clipping indicators per channel |
| അളവുകൾ (L x W x H) | 19 x 8 x 3.5 ഇഞ്ച് |
| ഭാരം | 9 പൗണ്ട് |
| മൗണ്ടിംഗ് തരം | Rackmount (2U) |
| നിറം | കറുപ്പ് |
| പാലിക്കൽ | FCC |
10. വാറണ്ടിയും പിന്തുണയും
10.1 വാറൻ്റി വിവരങ്ങൾ
The Technical Pro AX2000 ampലൈഫയർ ഒരു കൂടെ വരുന്നു 1 വർഷത്തെ പരിമിത വാറൻ്റി from the date of purchase. This warranty covers manufacturing defects and workmanship under normal use. It does not cover damage caused by misuse, accident, unauthorized modification, or improper installation. Please retain your proof of purchase for warranty claims.
10.2 ഉപഭോക്തൃ പിന്തുണ
For technical assistance, service inquiries, or further information regarding your Technical Pro AX2000 amplifier, please visit the official Technical Pro webസൈറ്റിൽ ബന്ധപ്പെടുക അല്ലെങ്കിൽ അവരുടെ ഉപഭോക്തൃ പിന്തുണാ വിഭാഗവുമായി ബന്ധപ്പെടുക. കോൺടാക്റ്റ് വിശദാംശങ്ങൾ സാധാരണയായി നിർമ്മാതാവിന്റെ വെബ്സൈറ്റിൽ കാണാം. webസൈറ്റ് അല്ലെങ്കിൽ ഉൽപ്പന്ന പാക്കേജിംഗ്.
ഓൺലൈൻ ഉറവിടങ്ങൾ: For additional support and product information, please visit the Technical Pro Store on Amazon or the official Technical Pro webസൈറ്റ്.