
1. ആമുഖം
This manual provides detailed instructions for the safe and efficient operation of your Vivitek Qumi Q5 Pocket DLP Projector. Please read this manual thoroughly before using the projector and retain it for future reference. The Vivitek Qumi Q5 is a compact, high-definition LED projector designed for portability and versatility, featuring 500 lumens brightness, WXGA resolution, and various connectivity options.
2 പ്രധാനപ്പെട്ട സുരക്ഷാ വിവരങ്ങൾ
പ്രൊജക്ടറിന് കേടുപാടുകൾ സംഭവിക്കാതിരിക്കാനും ഉപയോക്തൃ സുരക്ഷ ഉറപ്പാക്കാനും ഇനിപ്പറയുന്ന സുരക്ഷാ മുൻകരുതലുകൾ പാലിക്കുക:
- വെന്റിലേഷൻ ദ്വാരങ്ങൾ തടയരുത്. പ്രൊജക്ടറിന് ചുറ്റും മതിയായ വായുസഞ്ചാരം ഉറപ്പാക്കുക.
- l ചെയ്യുമ്പോൾ പ്രൊജക്ടർ ലെൻസിലേക്ക് നേരിട്ട് നോക്കരുത്amp ഓണാണ്. തിളക്കമുള്ള വെളിച്ചം കണ്ണിന് കേടുപാടുകൾ വരുത്തിയേക്കാം.
- പ്രൊജക്ടറിനൊപ്പം നൽകിയിരിക്കുന്ന പവർ അഡാപ്റ്റർ മാത്രം ഉപയോഗിക്കുക.
- തീപിടുത്തമോ വൈദ്യുതാഘാതമോ ഉണ്ടാകാനുള്ള സാധ്യത കുറയ്ക്കുന്നതിന് പ്രൊജക്ടറിൽ മഴയോ ഈർപ്പമോ ഏൽക്കരുത്.
- പ്രൊജക്ടർ ഒരു സ്ഥിരതയുള്ള, നിരപ്പായ പ്രതലത്തിൽ സ്ഥാപിക്കുക.
- Unplug the projector from the power outlet before cleaning or when not in use for extended periods.
- എല്ലാ സേവനങ്ങളും യോഗ്യതയുള്ള സേവന ഉദ്യോഗസ്ഥർക്ക് റഫർ ചെയ്യുക.
3. പാക്കേജ് ഉള്ളടക്കം
താഴെ ലിസ്റ്റ് ചെയ്തിരിക്കുന്ന എല്ലാ ഇനങ്ങളും നിങ്ങളുടെ പാക്കേജിൽ ഉൾപ്പെടുത്തിയിട്ടുണ്ടെന്ന് ഉറപ്പാക്കുക:
- Vivitek Qumi Q5 Projector
- പവർ അഡാപ്റ്റർ
- Universal I/O to VGA Cable
- HDMI കേബിൾ
- 3.5mm AV-in Cable
- ചുമക്കുന്ന സഞ്ചി
- റിമോട്ട് കൺട്രോൾ
- ദ്രുത ആരംഭ ഗൈഡ്
- വാറൻ്റി കാർഡ്
4. ഉൽപ്പന്നം കഴിഞ്ഞുview
Familiarize yourself with the various components and features of your Vivitek Qumi Q5 projector.
4.1 ഫ്രണ്ട് View

ചിത്രം 4.1: ഫ്രണ്ട് view of the Vivitek Qumi Q5 projector, showing the lens and ventilation grilles.
The front of the projector features the projection lens and air vents for cooling. Ensure these vents are not obstructed during operation.
4.2 ടോപ്പ് View

ചിത്രം 4.2: മുകളിൽ view of the Vivitek Qumi Q5 projector, highlighting the touch-sensitive control panel.
The top panel includes touch-sensitive controls for navigation and menu selection. The "Qumi" logo is also visible.
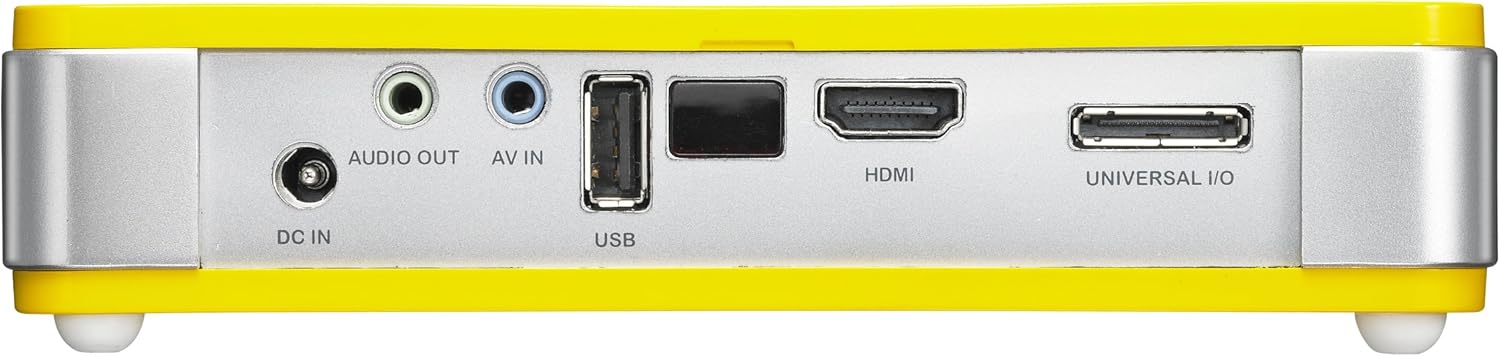
4.3 പിൻഭാഗം View (Connectivity Ports)

ചിത്രം 4.3: പിൻഭാഗം view of the Vivitek Qumi Q5 projector, displaying all input and output ports.
The rear panel houses all essential connectivity ports:
- DC IN: പവർ അഡാപ്റ്റർ ബന്ധിപ്പിക്കുന്നതിന്.
- ഓഡിയോ: ട്ട്: ബാഹ്യ സ്പീക്കറുകൾക്കോ ഹെഡ്ഫോണുകൾക്കോ വേണ്ടി 3.5mm ജാക്ക്.
- AV IN: 3.5mm jack for composite video and stereo audio input.
- USB: USB സംഭരണ ഉപകരണങ്ങൾ ബന്ധിപ്പിക്കുന്നതിന്.
- എച്ച്ഡിഎംഐ: High-Definition Multimedia Interface for digital video and audio input.
- UNIVERSAL I/O: Multi-purpose port for VGA and other analog inputs via adapter.
5. സജ്ജീകരണം
Follow these steps to set up your Vivitek Qumi Q5 projector.
5.1 Powering On the Projector
- പവർ അഡാപ്റ്റർ കണക്റ്റുചെയ്യുക ഡിസി ഐഎൻ പ്രൊജക്ടറിൽ പോർട്ട്.
- ഒരു മതിൽ ഔട്ട്ലെറ്റിലേക്ക് പവർ അഡാപ്റ്റർ പ്ലഗ് ചെയ്യുക.
- Press the power button on the projector or remote control to turn on the device. The power indicator light will illuminate.
5.2 ഇൻപുട്ട് സ്രോതസ്സുകൾ ബന്ധിപ്പിക്കുന്നു
The Qumi Q5 supports various input sources:
- എച്ച്ഡിഎംഐ: Connect an HDMI cable from your source device (e.g., laptop, Blu-ray player) to the HDMI പ്രൊജക്ടറിൽ പോർട്ട്.
- വി.ജി.എ: Use the supplied Universal I/O to VGA cable to connect your computer's VGA output to the UNIVERSAL I/O തുറമുഖം.
- എവി (കോമ്പോസിറ്റ്): Use the supplied 3.5mm AV-in cable to connect composite video and stereo audio devices to the AV IN തുറമുഖം.
- USB: ഇതിലേക്ക് ഒരു USB ഫ്ലാഷ് ഡ്രൈവ് ചേർക്കുക USB port to play media fileനേരിട്ട്.
- വയർലെസ് (ഓപ്ഷണൽ): If using an optional WiFi USB dongle, insert it into the USB port for wireless connectivity. Refer to the dongle's instructions for setup.
5.3 ഫോക്കസ് ക്രമീകരിക്കൽ
Locate the focus wheel on the side of the projector. Rotate the wheel until the projected image appears sharp and clear on your screen or wall.
ചിത്രം 5.3: വശം view of the Vivitek Qumi Q5, indicating the location of the focus adjustment wheel.
6. പ്രൊജക്ടർ പ്രവർത്തിപ്പിക്കൽ
6.1 മെനു നാവിഗേറ്റ് ചെയ്യുന്നു
Use the touch-sensitive buttons on the top panel or the remote control to navigate the projector's on-screen display (OSD) menu. The menu allows you to adjust image settings, input sources, and other system configurations.
6.2 ഇൻപുട്ട് ഉറവിടം തിരഞ്ഞെടുക്കൽ
Press the "Source" button on the remote control or navigate through the OSD menu to select the desired input source (HDMI, VGA, AV, USB, or Wireless).
6.3 Image Adjustments
Within the OSD menu, you can adjust various image parameters:
- തെളിച്ചം/തീവ്രത: Adjust for optimal image visibility.
- നിറം/നിറം: Fine-tune color reproduction.
- വീക്ഷണ അനുപാതം: Select between 4:3, 16:9, or other available ratios to match your content.
- കീസ്റ്റോൺ തിരുത്തൽ: Correct trapezoidal distortion if the projector is not perfectly perpendicular to the screen.
6.4 Playing Media from USB
When a USB drive is inserted, the projector's media player interface will typically launch automatically. You can browse and play supported video, audio, and image fileയുഎസ്ബി ഡ്രൈവിൽ നിന്ന് നേരിട്ട്.
6.5 3D പ്രവർത്തനം
The Qumi Q5 is 3D-ready via DLP Link technology. To view 3D content, you will need compatible 3D source material, a 3D-capable player, and active DLP Link 3D glasses (sold separately).
7. പരിപാലനം
ശരിയായ അറ്റകുറ്റപ്പണികൾ നിങ്ങളുടെ പ്രൊജക്ടറിന്റെ ദീർഘായുസ്സും മികച്ച പ്രകടനവും ഉറപ്പാക്കുന്നു.
7.1 പ്രൊജക്ടർ വൃത്തിയാക്കൽ
- പുറം: മൃദുവായ, ലിൻ്റ് രഹിത തുണി ഉപയോഗിക്കുകampവെള്ളം അല്ലെങ്കിൽ മൃദുവായ ക്ലീനിംഗ് ലായനി ഉപയോഗിച്ചാണ്. അബ്രാസീവ് ക്ലീനറുകളോ ലായകങ്ങളോ ഉപയോഗിക്കരുത്.
- ലെൻസ്: Gently wipe the lens with a lens cleaning cloth or lens paper. Avoid touching the lens surface with your fingers.
- വെന്റുകൾ: Use a soft brush or compressed air to clear dust from the ventilation openings.
7.2 LED ലൈറ്റ് സോഴ്സ്
The Qumi Q5 utilizes an LED light source with an estimated operational life of up to 30,000 hours, significantly reducing the need for lamp replacement compared to traditional projectors.
7.3 സംഭരണം
When not in use for extended periods, store the projector in its carrying pouch in a cool, dry place, away from direct sunlight and extreme temperatures.
8. പ്രശ്നപരിഹാരം
നിങ്ങൾ നേരിട്ടേക്കാവുന്ന പൊതുവായ പ്രശ്നങ്ങൾക്കുള്ള പരിഹാരങ്ങൾക്കായി ഈ വിഭാഗം പരിശോധിക്കുക.
| പ്രശ്നം | സാധ്യമായ കാരണം | പരിഹാരം |
|---|---|---|
| ചിത്രമൊന്നും പ്രദർശിപ്പിച്ചിട്ടില്ല. |
|
|
| ചിത്രം മങ്ങിയതാണ്. |
|
|
| ഓഡിയോ ഇല്ല. |
|
|
| പ്രൊജക്ടർ അമിതമായി ചൂടാകുകയോ ഓഫാകുകയോ ചെയ്യുന്നു. |
|
|
9 സ്പെസിഫിക്കേഷനുകൾ
Key technical specifications for the Vivitek Qumi Q5 projector:
- മോഡൽ: Qumi Q5
- പ്രദർശന സാങ്കേതികവിദ്യ: DLP Pico chipset
- പ്രാദേശിക റെസലൂഷൻ: WXGA (1280 x 720)
- തെളിച്ചം: 500 Lumens വരെ
- പ്രകാശ സ്രോതസ്സ്: LED (Estimated 30,000 hours operation)
- കണക്റ്റിവിറ്റി: HDMI, Universal I/O (VGA), AV mini-jack, USB, Audio-out mini-jack, Wireless (via optional USB dongle)
- ആന്തരിക മെമ്മറി: 4 ജിബി
- 3D തയ്യാറാണ്: Yes, via DLP Link
- അളവുകൾ: 4 x 6.3 x 1.3 ഇഞ്ച് (10.16 x 16.00 x 3.30 സെ.മീ)
- ഭാരം: 1.1 പൗണ്ട് (0.5 കി.ഗ്രാം)
- വൈദ്യുതി വിതരണം: ബാഹ്യ പവർ അഡാപ്റ്റർ
10. വാറൻ്റിയും പിന്തുണയും
Your Vivitek Qumi Q5 projector is covered by a limited warranty. Please refer to the included Warranty Card for specific terms and conditions, including warranty period and coverage details. For technical support, service, or further inquiries, please visit the official Vivitek webസൈറ്റിൽ ബന്ധപ്പെടുകയോ അവരുടെ ഉപഭോക്തൃ സേവന വിഭാഗവുമായി ബന്ധപ്പെടുകയോ ചെയ്യുക. വാറന്റി ക്ലെയിമുകൾക്കുള്ള വാങ്ങലിന്റെ തെളിവായി നിങ്ങളുടെ വാങ്ങൽ രസീത് സൂക്ഷിക്കുക.