
COXO B00C9ED06Q
കോക്സോ സി-റൂട്ട് VI 2in1 ഡെന്റൽ എൻഡോഡോണ്ടിക് എൻഡോ അപെക്സ് ലൊക്കേറ്റർ & പൾപ്പ് ടെസ്റ്റർ യൂസർ മാനുവൽ
Model: B00C9ED06Q
1. ആമുഖം
The Coxo C-root VI is a versatile 2-in-1 dental instrument designed for precise endodontic measurements. It combines the functionalities of an Apex Locator and a Pulp Tester, providing dental professionals with an efficient tool for root canal procedures and pulp vitality assessment. This manual provides essential information for the proper setup, operation, maintenance, and troubleshooting of the device.
2. ഉൽപ്പന്നം കഴിഞ്ഞുview
The C-root VI features a compact design with a clear color LCD display for easy reading of measurements. Its intuitive interface allows for seamless switching between Apex Locator and Pulp Tester modes.

ചിത്രം 2.1: മുൻഭാഗം view of the Coxo C-root VI displaying the Pulp Tester mode.
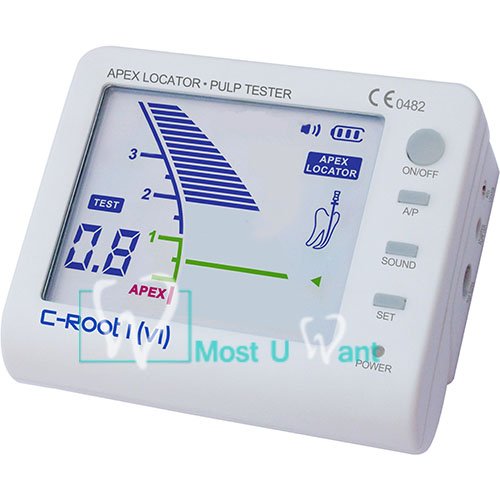
ചിത്രം 2.2: മുൻഭാഗം view of the Coxo C-root VI displaying the Apex Locator mode.
3 പ്രധാന സവിശേഷതകൾ
- 2-ഇൻ-1 പ്രവർത്തനം: Combines Apex Locator and Pulp Tester in a single device.
- ഡിജിറ്റ് ഡിസ്പ്ലേ: Provides clear digital display of distance measurements.
- കളർ എൽസിഡി ഡിസ്പ്ലേ: Enhanced visibility and readability of measurement data.
- Accurate Current-Stabilized Technology: Ensures reliable and precise measurements.
- Rechargeable Li-Battery: Offers convenience and portability for clinical use.
4. ഘടകങ്ങളും അനുബന്ധ ഉപകരണങ്ങളും
The Coxo C-root VI package typically includes the main unit and various accessories necessary for its operation.
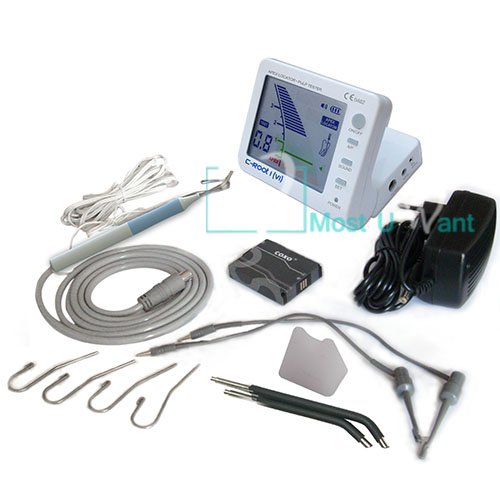
Figure 4.1: Complete kit contents of the Coxo C-root VI.
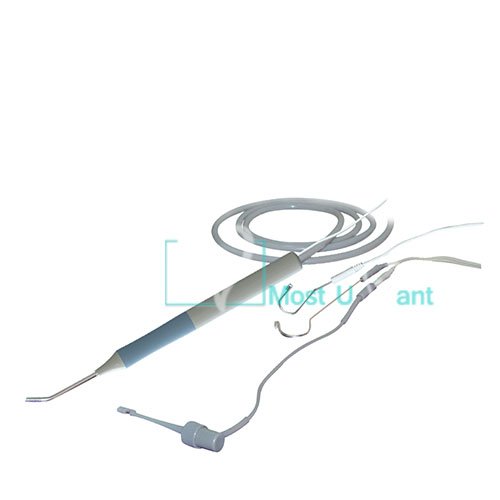
ചിത്രം 4.2: വിശദമായി view ഉൾപ്പെടുത്തിയ ആക്സസറികളുടെ.
Standard Package Contents:
- Coxo C-root VI Main Unit
- Measuring Cable
- File ക്ലിപ്പ് (x2)
- Lip Hook (x4)
- Pulp Tester Probe
- അഡാപ്റ്റർ/ചാർജർ
- ഉപയോക്തൃ മാനുവൽ (ഈ പ്രമാണം)
5. സജ്ജീകരണം
5.1 പ്രാരംഭ ചാർജിംഗ്
- Connect the provided adapter to the 'CHARGE' port on the side of the C-root VI unit.
- അനുയോജ്യമായ പവർ ഔട്ട്ലെറ്റിലേക്ക് അഡാപ്റ്റർ പ്ലഗ് ചെയ്യുക.
- The 'CHARGE' indicator light will illuminate, indicating that the device is charging. Allow the device to fully charge before first use (typically 2-3 hours).
5.2 കണക്റ്റിംഗ് ആക്സസറികൾ
- For Apex Locator Function: Connect the measuring cable to the 'APEX LOCATOR' port. Attach a file clip to one end of the measuring cable and a lip hook to the other end.
- For Pulp Tester Function: Connect the pulp tester probe to the 'PULP TESTER' port.
6. പ്രവർത്തന നിർദ്ദേശങ്ങൾ
6.1 പൊതു പ്രവർത്തനം
- ഓൺ/ഓഫ് ബട്ടൺ: ഉപകരണം ഓൺ അല്ലെങ്കിൽ ഓഫ് ചെയ്യാൻ അമർത്തുക.
- A/P Button: Press to switch between Apex Locator mode and Pulp Tester mode.
- സൗണ്ട് ബട്ടൺ: Toggles the audible alert on or off.
- SET ബട്ടൺ: Used for calibration or setting specific parameters within each mode (refer to specific mode instructions).
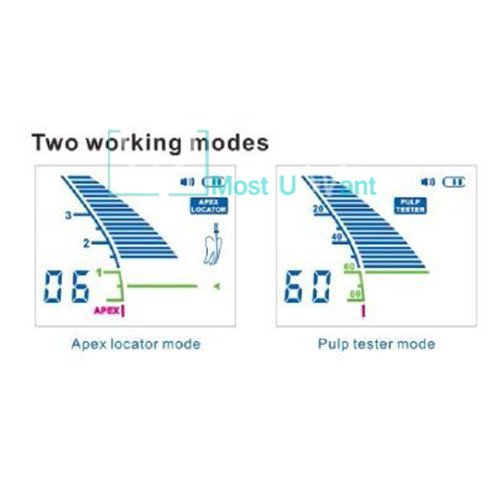
Figure 6.1: Comparison of Apex Locator and Pulp Tester display modes.
6.2 Apex Locator Mode
This mode is used to accurately determine the working length of the root canal.
- Ensure the device is powered on and in Apex Locator mode (indicated on the display).
- അറ്റാച്ചുചെയ്യുക file clip to the endodontic file and the lip hook to the patient's lip.
- Carefully insert the endodontic file into the root canal.
- Observe the color LCD display. The numerical value and graphical representation will indicate the file's position relative to the apex.
- The 'APEX' indicator and an audible alert (if enabled) will signal when the file reaches the apical foramen.
6.3 Pulp Tester Mode
This mode assesses the vitality of the dental pulp by delivering a controlled electrical stimulus.
- Ensure the device is powered on and in Pulp Tester mode (indicated on the display).
- Apply a conductive medium (e.g., toothpaste) to the tip of the pulp tester probe.
- Place the probe tip on the tooth surface to be tested, avoiding contact with gingival tissue or metallic restorations.
- Gradually increase the stimulus intensity using the 'SET' button or designated controls until a patient response is observed or the maximum level is reached.
- Note the numerical reading on the display at which the patient responds. This reading indicates the pulp's vitality level.
7. പരിപാലനവും പരിചരണവും
Proper maintenance ensures the longevity and accuracy of your Coxo C-root VI device.
- വൃത്തിയാക്കൽ: After each use, wipe the main unit with a soft cloth dampened with a mild disinfectant. Do not immerse the unit in liquid.
- Accessory Sterilization: ദി file clips, lip hooks, and pulp tester probe should be sterilized according to standard dental practice guidelines (e.g., autoclaving for reusable components). Refer to the specific instructions for each accessory.
- സംഭരണം: Store the device in a clean, dry environment, away from direct sunlight and extreme temperatures.
- ബാറ്ററി കെയർ: ബാറ്ററിയുടെ ആരോഗ്യം നിലനിർത്താൻ, ഉപകരണം പതിവായി ഉപയോഗിക്കുന്നില്ലെങ്കിൽ പോലും, ബാറ്ററി പതിവായി റീചാർജ് ചെയ്യുക. ദീർഘനേരം ബാറ്ററി പൂർണ്ണമായും ഡിസ്ചാർജ് ചെയ്യുന്നത് ഒഴിവാക്കുക.
8. പ്രശ്നപരിഹാരം
This section addresses common issues you might encounter with the Coxo C-root VI.
| പ്രശ്നം | സാധ്യമായ കാരണം | പരിഹാരം |
|---|---|---|
| ഉപകരണം പവർ ഓണാക്കുന്നില്ല. | ബാറ്ററി ചാർജ് കുറവാണ്; പവർ ബട്ടൺ ശരിയായി അമർത്തിയിട്ടില്ല. | Charge the device fully. Press and hold the ON/OFF button firmly. |
| Inaccurate Apex Locator readings. | Poor contact; Dry canal; Damaged cable/clip. | Ensure good contact between file clip/lip hook and patient. Ensure canal is moist. Check cables and clips for damage. |
| Pulp Tester not eliciting response. | No conductive medium; Probe not making contact; Pulp non-vital. | Apply conductive medium to probe tip. Ensure firm contact with tooth. Consider pulp vitality status. |
| ഡിസ്പ്ലേ മങ്ങിയതോ മിന്നിമറയുന്നതോ ആണ്. | കുറഞ്ഞ ബാറ്ററി. | ഉപകരണം റീചാർജ് ചെയ്യുക. |
9 സാങ്കേതിക സവിശേഷതകൾ
| മോഡൽ നമ്പർ | B00C9ED06Q |
| നിർമ്മാതാവ് | കോക്സോ |
| മാതൃരാജ്യം | ഇന്ത്യ |
| ഇനത്തിൻ്റെ ഭാരം | 839 ഗ്രാം |
| പാക്കേജ് അളവുകൾ | 20.07 x 16.26 x 8.38 സെ.മീ |
| പവർ ഉറവിടം | റീചാർജ് ചെയ്യാവുന്ന ലി-ബാറ്ററി |
| പ്രദർശിപ്പിക്കുക | കളർ എൽസിഡി |
10. വാറൻ്റിയും പിന്തുണയും
For detailed warranty information and technical support, please refer to the warranty card included with your product or contact the manufacturer, COXO, directly. Keep your purchase receipt as proof of purchase for any warranty claims.
Manufacturer Contact Information: Please refer to the packaging or the official COXO webഏറ്റവും പുതിയ കോൺടാക്റ്റ് വിശദാംശങ്ങൾക്കായി സൈറ്റ്.
Ask a question about this manual
Ask about setup, troubleshooting, compatibility, parts, safety, or missing instructions. Manuals+ will review the question and use this page’s manual context to help answer it.