
1. ആമുഖം
This manual provides detailed instructions for the setup, operation, and maintenance of your TechniSat DIGITRADIO 51 DAB+ Alarm Clock Radio. Please read this manual thoroughly before using the device to ensure proper functionality and safety.
2 സുരക്ഷാ വിവരങ്ങൾ
- Ensure the power adapter is connected to a readily accessible power outlet.
- വെള്ളം ഒഴുകുന്നതിനോ തെറിക്കുന്നതിനോ ഉപകരണം തുറന്നുകാട്ടരുത്.
- പാത്രത്തിൽ ദ്രാവകങ്ങൾ നിറച്ച വസ്തുക്കൾ ഉപകരണത്തിൽ സ്ഥാപിക്കരുത്.
- താപ സ്രോതസ്സുകൾക്ക് സമീപം അല്ലെങ്കിൽ നേരിട്ട് സൂര്യപ്രകാശത്തിൽ ഉപകരണം സ്ഥാപിക്കുന്നത് ഒഴിവാക്കുക.
- ഉപകരണം നൽകിയ പവർ അഡാപ്റ്റർ മാത്രം ഉപയോഗിക്കുക.
- ഉപകരണം സ്വയം തുറക്കാനോ നന്നാക്കാനോ ശ്രമിക്കരുത്. എല്ലാ സേവനങ്ങളും യോഗ്യതയുള്ള ഉദ്യോഗസ്ഥരെ ഏൽപ്പിക്കുക.
- ഉണങ്ങിയതും മൃദുവായതുമായ തുണി ഉപയോഗിച്ച് മാത്രം ഉപകരണം വൃത്തിയാക്കുക.
3. പാക്കേജ് ഉള്ളടക്കം
പാക്കേജിൽ എല്ലാ ഇനങ്ങളും ഉണ്ടെന്ന് ഉറപ്പാക്കുക:
- TechniSat DIGITRADIO 51 Alarm Clock Radio (Black)
- പവർ അഡാപ്റ്റർ
- Wired Antenna
- ഇൻസ്ട്രക്ഷൻ മാനുവൽ
4. ഉൽപ്പന്നം കഴിഞ്ഞുview
4.1 ഫ്രണ്ട് View

ചിത്രം 1: മുൻഭാഗം view of the DIGITRADIO 51, featuring the central speaker and the clear LCD display.
4.2 മുകളിലെ നിയന്ത്രണ പാനൽ

Figure 2: Top control panel with various buttons for radio functions, alarm settings, and volume control.
- DAB/FM ബട്ടൺ: Switches between DAB+ and FM radio modes.
- Presets (1, 2): Stores and recalls favorite radio stations.
- < / > Buttons: Navigates menus or tunes radio frequencies.
- Select/Menu Button: തിരഞ്ഞെടുപ്പുകൾ സ്ഥിരീകരിക്കുന്നു അല്ലെങ്കിൽ മെനുവിൽ പ്രവേശിക്കുന്നു.
- വോളിയം +/- ബട്ടണുകൾ: ഓഡിയോ വോളിയം ക്രമീകരിക്കുന്നു.
- Alarm (1, 2) Buttons: അലാറം 1 അല്ലെങ്കിൽ അലാറം 2 സജ്ജമാക്കി സജീവമാക്കുന്നു.
- സ്ലീപ്പ് ബട്ടൺ: സ്ലീപ്പ് ടൈമർ ഫംഗ്ഷൻ സജീവമാക്കുന്നു.
- Snooze Buttons: Temporarily silences an active alarm.
- പവർ ബട്ടൺ: ഉപകരണം ഓണാക്കുകയോ ഓഫാക്കുകയോ ചെയ്യുന്നു.
4.3 പിൻ കണക്ഷനുകൾ
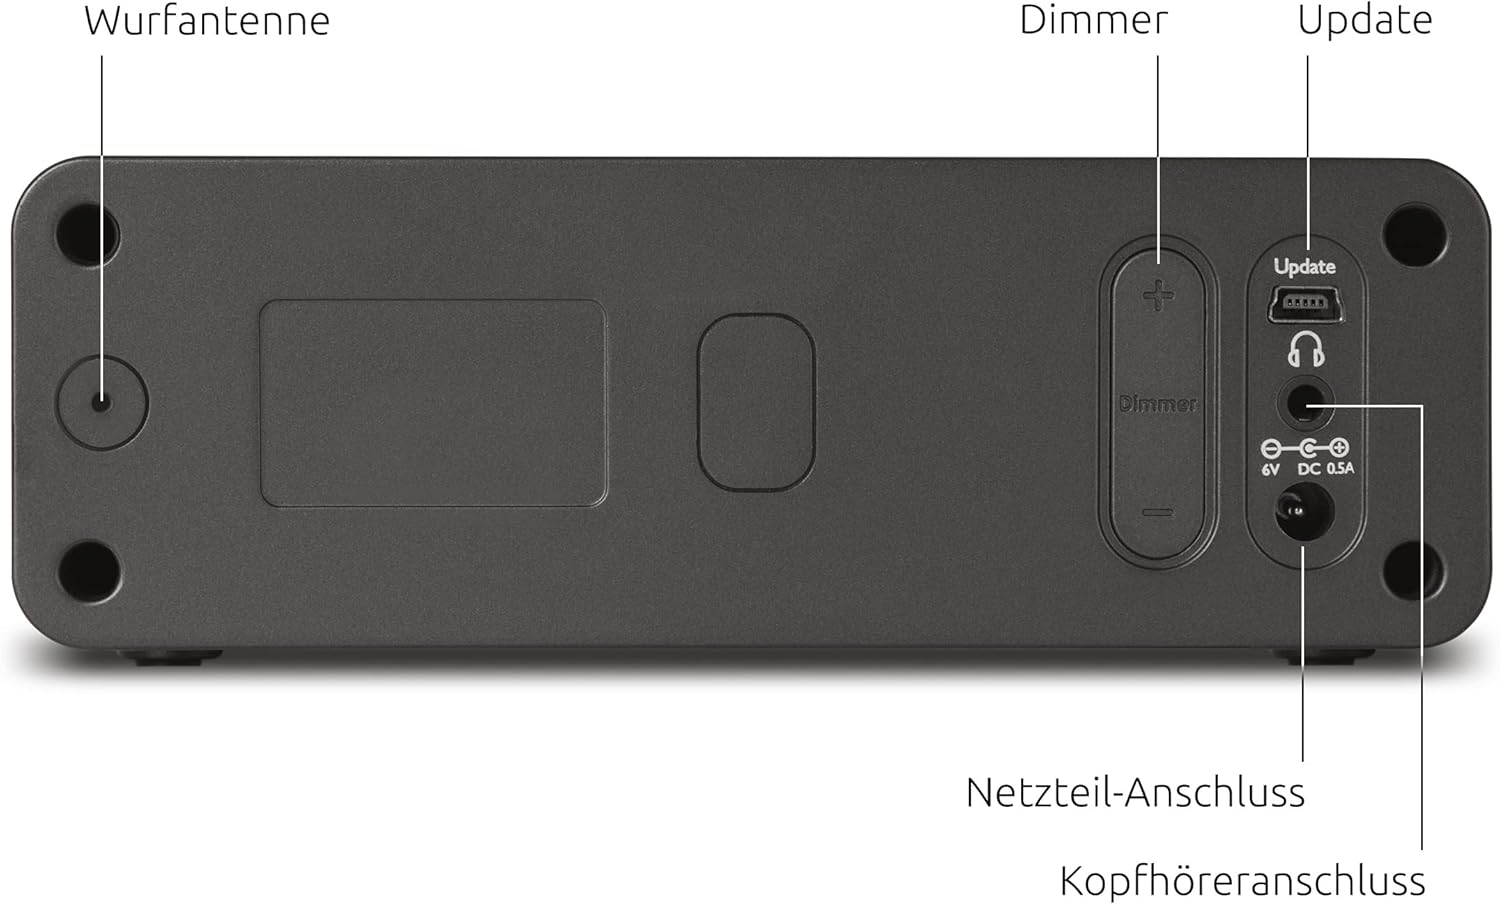
Figure 3: Rear panel connections, including the wired antenna, dimmer controls, USB port for updates, headphone jack, and power input.
- Wired Antenna Input: Connect the supplied wired antenna for optimal radio reception.
- Dimmer Controls (+/-): LCD ഡിസ്പ്ലേയുടെ തെളിച്ചം ക്രമീകരിക്കുന്നു.
- Update (USB) Port: For future firmware updates.
- ഹെഡ്ഫോൺ കണക്ഷൻ: സ്വകാര്യ ശ്രവണത്തിനായി 3.5mm ജാക്ക്.
- പവർ അഡാപ്റ്റർ കണക്ഷൻ: Connect the external power adapter here.
4.4 ഡിസ്പ്ലേ സവിശേഷതകൾ

ചിത്രം 4: വിശദമായി view of the LCD display, highlighting its dimmable feature, time display, and information about the current radio program.
- മങ്ങിയത്: The display brightness can be adjusted.
- സമയ പ്രദർശനം: നിലവിലെ സമയം കാണിക്കുന്നു.
- LCD സാങ്കേതികവിദ്യ: Provides clear text and icons.
- വിവര പ്രദർശനം: Shows radio station name, program details, and alarm status.
4.5 പ്രധാന സവിശേഷതകൾ കഴിഞ്ഞുview

ചിത്രം 5: ഓവർview of comfort functions including dual alarm, customizable alarm schedules, sleep timer, and multiple snooze options.
5. സജ്ജീകരണം
5.1 പവർ കണക്ഷൻ
- Connect the power adapter cable to the 'Power Adapter Connection' port on the rear of the radio.
- Plug the power adapter into a standard wall outlet (230V, 50Hz).
5.2 ആന്റിന കണക്ഷൻ
- Uncoil the wired antenna completely.
- Insert the antenna connector into the 'Wired Antenna Input' on the rear of the radio.
- Position the antenna for optimal reception.
5.3 Initial Power On and Station Scan
- Press the Power button on the top panel to turn on the radio.
- The radio will typically perform an automatic scan for DAB+ stations upon first use. This may take a few minutes.
- The time and date will usually be set automatically via the DAB+ signal.
6. പ്രവർത്തന നിർദ്ദേശങ്ങൾ
6.1 Switching Between DAB+ and FM
അമർത്തുക DAB/FM button to toggle between DAB+ digital radio and FM analog radio modes.
6.2 റേഡിയോ സ്റ്റേഷനുകൾ ട്യൂൺ ചെയ്യുന്നു
- DAB+ Mode: ഉപയോഗിക്കുക < ഒപ്പം > buttons to browse available DAB+ stations. Press തിരഞ്ഞെടുക്കുക/മെനു നിങ്ങളുടെ തിരഞ്ഞെടുപ്പ് സ്ഥിരീകരിക്കാൻ.
- എഫ്എം മോഡ്: ഉപയോഗിക്കുക < ഒപ്പം > buttons to manually tune to FM frequencies. The radio may automatically stop at strong signals.
6.3 Saving and Recalling Presets
- ആവശ്യമുള്ള റേഡിയോ സ്റ്റേഷനിലേക്ക് ട്യൂൺ ചെയ്യുക.
- അതിലൊന്ന് അമർത്തിപ്പിടിക്കുക Preset (1 or 2) buttons until the display confirms the station has been saved.
- To recall a saved station, simply press the corresponding Preset (1 or 2) ബട്ടൺ ചുരുക്കത്തിൽ.
6.4 വോളിയം ക്രമീകരിക്കൽ
അമർത്തുക വോളിയം + or വ്യാപ്തം - buttons to increase or decrease the audio output.
6.5 അലാറങ്ങൾ സജ്ജീകരിക്കൽ
The DIGITRADIO 51 features two independent alarms (Alarm 1 and Alarm 2).
- ഒന്നുകിൽ അമർത്തിപ്പിടിക്കുക അലാറം 1 or അലാറം 2 അലാറം സജ്ജീകരണം നൽകുന്നതിനുള്ള ബട്ടൺ.
- ഉപയോഗിക്കുക < ഒപ്പം > buttons to adjust the hour and minute, then press തിരഞ്ഞെടുക്കുക/മെനു ഓരോ ക്രമീകരണവും സ്ഥിരീകരിക്കാൻ.
- Set the alarm source (DAB, FM, or Buzzer).
- Choose the alarm frequency (Daily, Weekdays, Weekends, or Once).
- അലാറം വോളിയം ക്രമീകരിക്കുക.
- അമർത്തുക തിരഞ്ഞെടുക്കുക/മെനു to save the alarm settings.
- To activate/deactivate an alarm, briefly press the corresponding അലാറം 1 or അലാറം 2 ബട്ടൺ. സജീവമാകുമ്പോൾ ഡിസ്പ്ലേയിൽ ഒരു അലാറം ഐക്കൺ ദൃശ്യമാകും.
6.6 സ്നൂസ് ഫംഗ്ഷൻ
When an alarm sounds, press any സ്നൂസ് ചെയ്യുക button to temporarily silence the alarm for a set period (e.g., 9 minutes). The alarm will sound again after the snooze period.
6.7 Display Dimming
ഉപയോഗിക്കുക ഡിമ്മർ + ഒപ്പം ഡിമ്മർ - buttons on the rear of the device to adjust the brightness level of the LCD display.
6.8 സ്ലീപ്പ് ടൈമർ
സ്ലീപ്പ് ടൈമർ റേഡിയോയെ ഒരു നിശ്ചിത സമയത്തേക്ക് പ്ലേ ചെയ്യാൻ അനുവദിക്കുന്നു, തുടർന്ന് സ്വയമേവ ഓഫാകും.
- അമർത്തുക ഉറങ്ങുക ബട്ടൺ.
- ആവർത്തിച്ച് അമർത്തുക ഉറങ്ങുക button to cycle through the available sleep timer durations (e.g., 15, 30, 45, 60, 90 minutes, or Off).
- തിരഞ്ഞെടുത്ത സമയത്തിന് ശേഷം റേഡിയോ സ്വയമേവ ഓഫാകും.
6.9 ഹെഡ്ഫോൺ ഉപയോഗം
Connect standard 3.5mm headphones to the 'Headphone Connection' jack on the rear of the device for private listening. The internal speaker will be muted automatically.
7. പരിപാലനം
7.1 വൃത്തിയാക്കൽ
- വൃത്തിയാക്കുന്നതിന് മുമ്പ് എല്ലായ്പ്പോഴും പവർ ഔട്ട്ലെറ്റിൽ നിന്ന് ഉപകരണം അൺപ്ലഗ് ചെയ്യുക.
- പുറംഭാഗങ്ങൾ തുടയ്ക്കാൻ മൃദുവായതും ഉണങ്ങിയതും ലിന്റ് രഹിതവുമായ ഒരു തുണി ഉപയോഗിക്കുക.
- ലിക്വിഡ് ക്ലീനറുകൾ, അബ്രാസീവ് ക്ലീനറുകൾ, കെമിക്കൽ സ്പ്രേകൾ എന്നിവ ഉപയോഗിക്കരുത്, കാരണം ഇവ ഫിനിഷിനോ ആന്തരിക ഘടകങ്ങൾക്കോ കേടുവരുത്തും.
8. പ്രശ്നപരിഹാരം
| പ്രശ്നം | സാധ്യമായ കാരണം | പരിഹാരം |
|---|---|---|
| പവർ ഇല്ല / ഡിസ്പ്ലേ ഓഫ് | പവർ അഡാപ്റ്റർ ബന്ധിപ്പിച്ചിട്ടില്ല അല്ലെങ്കിൽ തകരാറുണ്ട്. | Check power adapter connection to the radio and wall outlet. Ensure the outlet is functional. |
| No DAB+ or FM reception / Poor sound quality | Antenna not connected or poorly positioned. Weak signal in your area. | Ensure the wired antenna is fully connected and uncoiled. Try repositioning the antenna or the radio. Perform a new station scan. |
| അലാറം മുഴങ്ങുന്നില്ല | Alarm not activated. Incorrect alarm time or source set. Volume too low. | Verify the alarm is activated (icon on display). Check alarm time, source, and volume settings. |
| Display is too bright/dim | ഡിമ്മർ ക്രമീകരണത്തിന് ക്രമീകരണം ആവശ്യമാണ്. | Use the Dimmer +/- buttons on the rear of the device to adjust brightness. |
9 സ്പെസിഫിക്കേഷനുകൾ

ചിത്രം 6: പ്ലേസ്മെന്റ് റഫറൻസിനായുള്ള ഉൽപ്പന്ന അളവുകൾ.
- ബ്രാൻഡ്: ടെക്നിസാറ്റ്
- മോഡൽ: DIGITRADIO 51 (0000/4981)
- ട്യൂണർ സാങ്കേതികവിദ്യ: DAB+, FM
- സ്പീക്കർ ഔട്ട്പുട്ട് പവർ: 1.5 വാട്ട്സ്
- ഡിസ്പ്ലേ തരം: LCD, Dimmable
- ഊർജ്ജ സ്രോതസ്സ്: കോർഡഡ് ഇലക്ട്രിക്
- വാല്യംtage: 230 വോൾട്ട്
- ആവൃത്തി: 50 Hz
- കണക്റ്റിവിറ്റി: 3.5mm Audio (Headphone)
- ഉൽപ്പന്ന അളവുകൾ (W x D x H): 14.9 x 12.6 x 4.9 സെ.മീ
- ഇനത്തിൻ്റെ ഭാരം: 436 ഗ്രാം
- മെറ്റീരിയൽ: പ്ലാസ്റ്റിക്
- പ്രത്യേക സവിശേഷതകൾ: Dual Alarm, Snooze Function, Auto Shut-Off Timer
10. വാറൻ്റിയും പിന്തുണയും
For warranty information and technical support, please refer to the documentation provided with your purchase or visit the official TechniSat webസൈറ്റ്. ഏതെങ്കിലും വാറന്റി ക്ലെയിമുകൾക്ക് നിങ്ങളുടെ വാങ്ങലിന്റെ തെളിവ് സൂക്ഷിക്കുക.