VILTROX JY-610C
Viltrox JY-610C Mini Flash Light User Manual
Model: JY-610C
1. ആമുഖം
The Viltrox JY-610C is a compact and lightweight mini speedlite designed for Canon DSLR cameras. It supports E-TTL, Manual (M), and Multi (Stroboscopic) flash modes, offering versatile lighting control. This manual provides detailed instructions for the proper setup, operation, and maintenance of your JY-610C flash unit.
2 സുരക്ഷാ വിവരങ്ങൾ
- Do not disassemble or attempt to repair the unit yourself. Refer to qualified service personnel.
- Keep the unit dry. Do not expose it to rain or moisture.
- നിർദ്ദിഷ്ട AA ബാറ്ററികൾ മാത്രം ഉപയോഗിക്കുക. പഴയതും പുതിയതുമായ ബാറ്ററികളോ വ്യത്യസ്ത തരം ബാറ്ററികളോ കൂട്ടിക്കലർത്തരുത്.
- Avoid direct eye exposure to the flash light, especially at close range, as it can cause temporary vision impairment.
- കുട്ടികൾക്ക് ലഭ്യമാകാതെ സൂക്ഷിക്കുക.
3. പാക്കേജ് ഉള്ളടക്കം
പാക്കേജിൽ എല്ലാ ഇനങ്ങളും ഉണ്ടെന്ന് ഉറപ്പാക്കുക:
- Viltrox JY-610C Mini Speedlite
- ചുമക്കുന്ന ബാഗ്
- User Manual (English and Chinese)
Note: AA batteries are not included and must be purchased separately.
4. ഉൽപ്പന്നം കഴിഞ്ഞുview
Familiarize yourself with the components and controls of the Viltrox JY-610C Mini Flash Light.
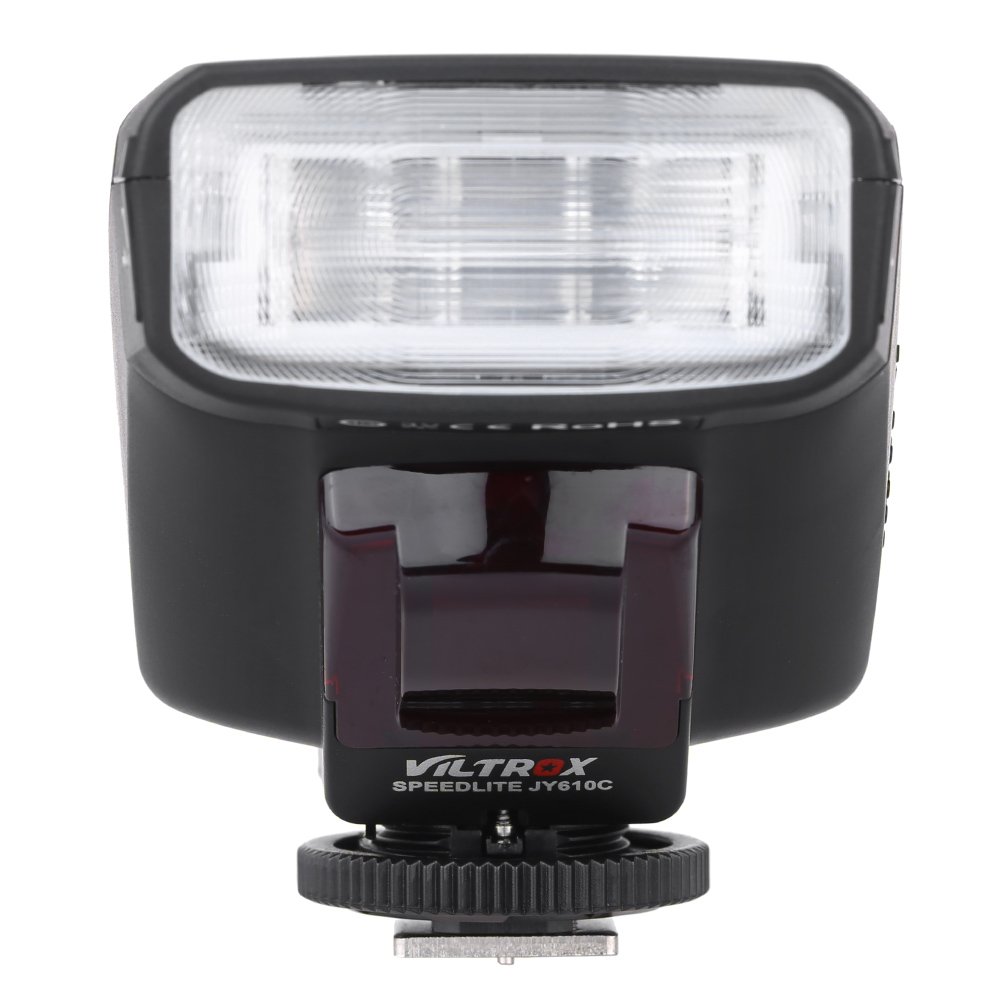
ചിത്രം 4.1: മുൻഭാഗം View
This image shows the front of the Viltrox JY-610C flash unit, highlighting the LCD display, control buttons (Pilot, Mode, T/CH/D, Hz/GR, ON/OFF), and the hot shoe mount with its locking mechanism.

ചിത്രം 4.2: മുകളിൽ View
മുകളിൽ view of the Viltrox JY-610C, displaying the "SPEEDLITE JY610C" branding and the flash head. This perspective shows the compact design of the unit.

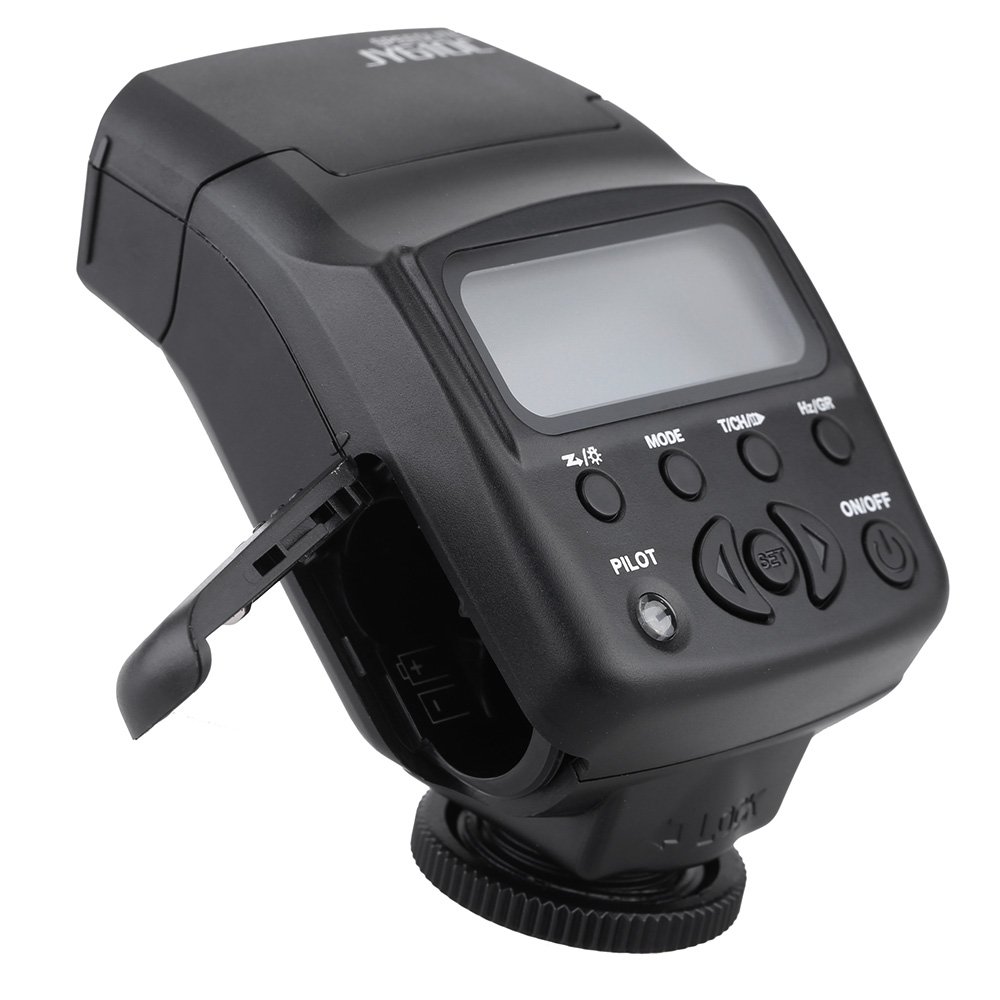
ചിത്രം 4.3: വശം View with Battery Compartment Open
This image illustrates the side of the flash unit with the battery compartment door open, revealing the slots for AA batteries. This is where batteries are inserted or replaced.
ചിത്രം 4.4: പിൻഭാഗം View
പിൻഭാഗം view of the Viltrox JY-610C, showing the hot shoe connection point for mounting on a camera, the slave sensor (red window), and regulatory markings. The locking ring for secure attachment is also visible.

Figure 4.5: LCD Display Modes
This composite image shows the Viltrox JY-610C flash unit alongside close-ups of its LCD screen displaying different operational modes: Manual (M) with power setting, Multi (Stroboscopic) with frequency and flash count, and E-TTL with exposure compensation. This demonstrates the user interface for mode selection and settings adjustment.
4.1. നിയന്ത്രണ പാനൽ
- LCD സ്ക്രീൻ: Displays current settings and mode.
- ഓൺ/ഓഫ് ബട്ടൺ: യൂണിറ്റ് ഓണാക്കുകയോ ഓഫാക്കുകയോ ചെയ്യുന്നു.
- മോഡ് ബട്ടൺ: Cycles through E-TTL, M (Manual), and Multi (Stroboscopic) flash modes.
- T/CH/D Button: Used for setting channels/groups in slave mode or other parameters.
- Hz/GR Button: Used for setting frequency in Multi mode or groups.
- PILOT Button: Test flash button. Also serves as a flash-ready indicator (red light).
- ദിശാസൂചന ബട്ടണുകൾ (മുകളിലേക്ക്/താഴേക്ക്/ഇടത്/വലത്): മെനുകൾ നാവിഗേറ്റ് ചെയ്ത് ക്രമീകരണങ്ങൾ ക്രമീകരിക്കുക.
- SET ബട്ടൺ: തിരഞ്ഞെടുക്കലുകൾ സ്ഥിരീകരിക്കുന്നു.
5. സജ്ജീകരണം
5.1. ബാറ്ററി ഇൻസ്റ്റാളേഷൻ
- Open the battery compartment cover located on the side of the flash unit (refer to Figure 4.3).
- Insert two (2) AA-size batteries according to the polarity indicators inside the compartment.
- ബാറ്ററി കമ്പാർട്ട്മെൻ്റ് കവർ സുരക്ഷിതമായി അടയ്ക്കുക.
Note: Ensure batteries are inserted correctly to prevent damage to the unit.
5.2. ക്യാമറയിലേക്ക് മൌണ്ട് ചെയ്യുന്നു
- Slide the hot shoe mount of the JY-610C into the hot shoe of your Canon DSLR camera.
- Rotate the locking ring clockwise until the flash unit is securely fastened to the camera's hot shoe. Do not overtighten.
- To remove, rotate the locking ring counter-clockwise and slide the flash unit off the hot shoe.
6 ഓപ്പറേറ്റിംഗ് മോഡുകൾ
അമർത്തുക മോഡ് button to cycle through the available flash modes: E-TTL, M (Manual), and Multi (Stroboscopic).
6.1. E-TTL Mode (Automatic Flash)
In E-TTL mode, the flash output is automatically controlled by the camera to achieve optimal exposure. This mode is ideal for general photography.
- അമർത്തുക മോഡ് until "E-TTL" appears on the LCD screen (refer to Figure 4.5).
- You can adjust Flash Exposure Compensation (FEC) using the directional buttons (e.g., +1/3, +2/3, etc.) if needed. Press സെറ്റ് സ്ഥിരീകരിക്കാൻ.
- The flash will fire automatically based on the camera's metering.
6.2. Manual (M) Mode
Manual mode allows you to set the flash output power manually, providing precise control over lighting.
- അമർത്തുക മോഡ് until "M" appears on the LCD screen (refer to Figure 4.5).
- Use the directional buttons to adjust the flash output from 1/1 (full power) to 1/128, with 22 levels of fine tuning.
- അമർത്തുക സെറ്റ് to confirm the power setting.
6.3. Multi (Stroboscopic) Mode
Multi mode fires the flash multiple times during a single exposure, creating stroboscopic effects for capturing motion.
- അമർത്തുക മോഡ് until "Multi" appears on the LCD screen (refer to Figure 4.5).
- Use the directional buttons to set the flash frequency (Hz) and the number of flashes.
- അമർത്തുക സെറ്റ് സ്ഥിരീകരിക്കാൻ.
6.4. Slave Modes (S1/S2)
The JY-610C can function as an optical slave unit, triggered by another flash.
- S1 മോഡ്: The flash will fire in response to the first flash it detects. Suitable for manual flash triggers.
- S2 മോഡ്: The flash will ignore the pre-flash from a master E-TTL flash and fire on the main flash. Suitable for E-TTL master flashes.
- To activate slave mode, press and hold the T/CH/D button until "SLAVE" appears, then use directional buttons to select S1 or S2.
- The unit supports 4 channels in 3 groups for more complex multi-flash setups.
7. വിപുലമായ സവിശേഷതകൾ
7.1. എക്സ്പോഷർ നഷ്ടപരിഹാരം
In E-TTL mode, you can adjust the flash exposure compensation to fine-tune the brightness of your subject. Use the directional buttons to increase or decrease the exposure value.
7.2. Front-Curtain Sync / Rear-Curtain Sync
The JY-610C supports both front-curtain and rear-curtain sync. This setting is typically controlled via your camera's flash menu. Consult your camera's manual for specific instructions on how to enable these features.
- ഫ്രണ്ട്-കർട്ടൻ സമന്വയം: The flash fires immediately after the shutter opens.
- പിൻ-കർട്ടൻ സമന്വയം: The flash fires just before the shutter closes. Useful for creating motion blur effects with the flash freezing the subject at the end of the exposure.
7.3. Adjustable Vertical Angle
The flash head can be tilted vertically to angles of 60, 75, and 90 degrees. This allows for bounce flash photography, directing the light off a ceiling or wall for softer, more natural illumination.
8. പരിപാലനം
- വൃത്തിയാക്കൽ: ഫ്ലാഷ് യൂണിറ്റ് വൃത്തിയാക്കാൻ മൃദുവായതും ഉണങ്ങിയതുമായ ഒരു തുണി ഉപയോഗിക്കുക. കഠിനമായ അഴുക്കിന്, അല്പം ഡി.amp cloth can be used, followed by a dry cloth. Do not use strong detergents or solvents.
- സംഭരണം: When not in use for extended periods, remove the batteries to prevent leakage and store the unit in its carrying bag in a cool, dry place.
- ബാറ്ററി കെയർ: Replace batteries when the recycle time becomes excessively long or the flash-ready indicator does not light up.
9. പ്രശ്നപരിഹാരം
| പ്രശ്നം | സാധ്യമായ കാരണം | പരിഹാരം |
|---|---|---|
| ഫ്ലാഷ് കത്തുന്നില്ല. |
|
|
| Long recycle time. |
|
|
| Flash output is too bright/dark. |
|
|
| Slave mode not triggering. |
|
|
10 സ്പെസിഫിക്കേഷനുകൾ
| ഫീച്ചർ | വിശദാംശങ്ങൾ |
|---|---|
| ഗൈഡ് നമ്പർ | GN27 (ISO 100/m) |
| ഫ്ലാഷ് മോഡ് | E-TTL / M / Multi |
| സ്ലേവ് മോഡ് | Slave / S1 / S2 (4 channels in 3 groups) |
| ഫ്ലാഷ് നിയന്ത്രണം | 8 levels of output control (1/128 - 1/1), 22 levels of fine tuning |
| ഫ്ലാഷ്-റെഡി ഇൻഡിക്കേറ്റർ | ചുവന്ന പൈലറ്റ് ലൈറ്റ് |
| ഫലപ്രദമായ ഫ്ലാഷ് റേഞ്ച് | 0.7 - 19.3m (Quick flash: 0.7 - 11.1m) |
| റീസൈക്കിൾ സമയം | 0.1 - 4s |
| ഫ്ലാഷ് ടൈംസ് | 100 - 680 times (with fresh AA batteries) |
| വൈദ്യുതി വിതരണം | 2 x AA ബാറ്ററികൾ (ഉൾപ്പെടുത്തിയിട്ടില്ല) |
| ഇനത്തിൻ്റെ വലിപ്പം | 8.5 x 6 x 4.5cm / 3.3 x 2.4 x 1.8in |
| ഇനത്തിൻ്റെ ഭാരം | 145g / 5.1oz |
| ക്രമീകരിക്കാവുന്ന ലംബ ആംഗിൾ | 60 / 75 / 90 degrees |
| Sync Support | Front-curtain sync / Rear-curtain sync |
| എക്സ്പോഷർ നഷ്ടപരിഹാരം | പിന്തുണച്ചു |
11. വാറൻ്റിയും പിന്തുണയും
For warranty information and technical support, please refer to the warranty card included with your product or visit the official Viltrox webവാറന്റി ക്ലെയിമുകൾക്കുള്ള വാങ്ങലിന്റെ തെളിവായി നിങ്ങളുടെ വാങ്ങൽ രസീത് സൂക്ഷിക്കുക.
Ask a question about this manual
Ask about setup, troubleshooting, compatibility, parts, safety, or missing instructions. Manuals+ will review the question and use this page’s manual context to help answer it.