
TrueCut 18" .325"x.050"
TrueCut Chainsaw Bar & Chain Combo Replacement Manual
For Dolmar Models 109, 110, 111, 112, 113, 114, 115, 116, PS420
ഉൽപ്പന്നം കഴിഞ്ഞുview
This manual provides essential information for the installation, operation, and maintenance of your TrueCut Replacement Chainsaw Bar and Chain Combo. This high-quality replacement part is designed to ensure optimal performance for compatible Dolmar chainsaw models.
പ്രധാന സവിശേഷതകളിൽ ഇവ ഉൾപ്പെടുന്നു:
- Top Quality TrueCut Replacement Part
- Nose Sprocket Teeth for smooth operation
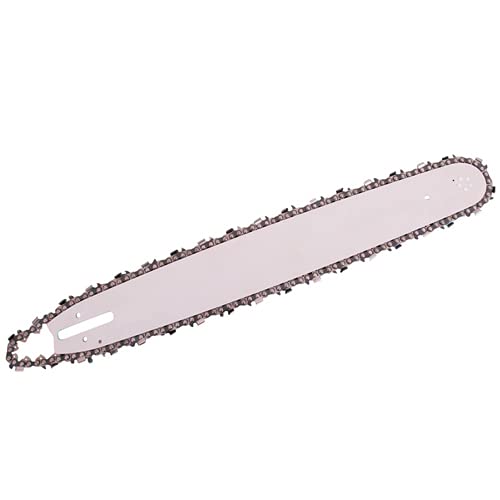
Figure 1: TrueCut Chainsaw Bar and Chain Combo. This image displays the complete replacement bar and chain assembly, ready for installation on a compatible chainsaw.
സുരക്ഷാ വിവരങ്ങൾ
Always prioritize safety when working with chainsaws. Read and understand your chainsaw's original operating manual before attempting any installation or maintenance. Wear appropriate personal protective equipment (PPE), including safety glasses, gloves, hearing protection, and sturdy footwear.
- Ensure the chainsaw is turned off and the spark plug cap is disconnected before handling the bar or chain.
- Allow the engine and bar to cool down before maintenance.
- Handle the chain with care; it is sharp.
സജ്ജീകരണവും ഇൻസ്റ്റാളേഷനും
This section outlines the general steps for replacing your chainsaw bar and chain. Refer to your specific chainsaw model's manual for detailed instructions.
ആവശ്യമായ ഉപകരണങ്ങൾ:
- Chainsaw wrench (often included with chainsaw)
- കയ്യുറകൾ
- വൃത്തിയുള്ള തുണി
ഇൻസ്റ്റലേഷൻ ഘട്ടങ്ങൾ:
- ചെയിൻസോ തയ്യാറാക്കുക: Ensure the chainsaw is off, the spark plug cap is removed, and the chain brake is disengaged.
- Remove Side Cover: Loosen the bar nuts on the side cover and remove the cover. This will expose the clutch and drive sprocket.
- Remove Old Bar and Chain: Carefully remove the old chain from the drive sprocket and then slide the old bar off the mounting studs.
- ശുദ്ധമായ ഘടകങ്ങൾ: Clean any sawdust, debris, or old oil from the clutch area, bar mounting studs, and oil port.
- Install New Bar: Slide the new TrueCut bar onto the mounting studs. Ensure the bar's adjustment pin aligns with the hole in the bar.
- പുതിയ ചെയിൻ ഇൻസ്റ്റാൾ ചെയ്യുക: Place the new TrueCut chain around the drive sprocket, ensuring the cutting teeth are facing the correct direction (usually forward on the top of the bar). Guide the chain into the groove of the new bar.
- Replace Side Cover: Reinstall the side cover and hand-tighten the bar nuts. Do not fully tighten yet.
- ചെയിൻ ടെൻഷൻ ക്രമീകരിക്കുക: Using the chain tensioning screw (usually located on the side cover or near the bar studs), adjust the chain tension. The chain should be snug against the bottom of the bar, but you should still be able to pull it around the bar by hand without excessive force. It should not sag underneath the bar.
- Tighten Bar Nuts: ടെൻഷൻ ശരിയായാൽ, ബാർ നട്ടുകൾ പൂർണ്ണമായും മുറുക്കുക.
- അന്തിമ പരിശോധന: Verify the chain moves freely and the tension is correct. Reconnect the spark plug cap.
പ്രവർത്തന മാർഗ്ഗനിർദ്ദേശങ്ങൾ
Proper operation ensures the longevity of your TrueCut bar and chain and safe use of your chainsaw.
- ചെയിൻ ലൂബ്രിക്കേഷൻ: Always ensure the chainsaw's oil reservoir is filled with appropriate bar and chain oil. The chain and bar require constant lubrication during operation to prevent excessive wear and heat buildup.
- Chain Tension Check: Before each use, check the chain tension. A loose chain can derail, and a too-tight chain can cause premature wear to the bar, chain, and sprocket.
- Sharp Chain: Operate only with a sharp chain. A dull chain increases effort, causes excessive vibration, and can damage the bar.
- Proper Cutting Technique: Use proper cutting techniques as outlined in your chainsaw's manual to avoid kickback and ensure efficient cutting.
മെയിൻ്റനൻസ്
Regular maintenance extends the life of your TrueCut bar and chain and maintains cutting efficiency.
- ചെയിൻ മൂർച്ച കൂട്ടൽ: Sharpen the chain regularly. A sharp chain cuts efficiently and reduces strain on the chainsaw engine. Follow the manufacturer's guidelines for the correct file size and sharpening angle for your chain.
- Bar Cleaning: Periodically remove the bar and clean the guide groove to remove sawdust and debris. This ensures proper chain movement and lubrication.
- Bar Flipping: To promote even wear, flip the guide bar over periodically (e.g., every 8-10 hours of use).
- Sprocket Nose Lubrication: If your bar has a sprocket nose, ensure it is lubricated regularly using a grease gun designed for chainsaw bar noses.
- Inspect Drive Sprocket: Check the chainsaw's drive sprocket for wear. A worn sprocket can damage the chain and bar.
ട്രബിൾഷൂട്ടിംഗ്
| പ്രശ്നം | സാധ്യമായ കാരണം | പരിഹാരം |
|---|---|---|
| ചെയിൻ കാര്യക്ഷമമായി മുറിക്കുന്നില്ല | Dull chain, incorrect chain tension, insufficient lubrication | Sharpen chain, adjust tension, check oil reservoir and oil flow |
| ബാറിൽ നിന്ന് ചെയിൻ പാളം തെറ്റുന്നു | Loose chain tension, worn drive sprocket, damaged bar groove | Adjust chain tension, inspect/replace drive sprocket, inspect/replace bar |
| Bar overheating or smoking | Insufficient lubrication, incorrect chain tension, clogged oil port | Check oil reservoir, adjust tension, clean oil port and bar groove |
| അമിതമായ വൈബ്രേഷൻ | Dull chain, bent bar, worn drive sprocket | Sharpen chain, inspect/replace bar, inspect/replace drive sprocket |
സ്പെസിഫിക്കേഷനുകൾ
| ആട്രിബ്യൂട്ട് | വിശദാംശങ്ങൾ |
|---|---|
| ബ്രാൻഡ് | TrueCut |
| ഉൽപ്പന്ന തരം | Chainsaw Bar & Chain Combo Replacement |
| അനുയോജ്യമായ മോഡലുകൾ | Dolmar Models 109, 110, 111, 112, 113, 114, 115, 116, PS420 |
| ബാർ നീളം | 18 ഇഞ്ച് |
| Chain Pitch & Gauge | .325" x .050" |
| ഉൽപ്പന്ന അളവുകൾ | 6 x 6 x 6 ഇഞ്ച് |
| ഇനത്തിൻ്റെ ഭാരം | 2.88 പൗണ്ട് |
| നിർമ്മാതാവ് | TrueCut |
| ASIN | B01LTGGJ9Y |
വാറൻ്റിയും പിന്തുണയും
Specific warranty information for this TrueCut Replacement Chainsaw Bar and Chain Combo is not provided in the product details. For warranty claims, technical support, or further inquiries, please contact the manufacturer, TrueCut, directly.
It is recommended to retain your purchase receipt as proof of purchase for any warranty-related matters.
Ask a question about this manual
Ask about setup, troubleshooting, compatibility, parts, safety, or missing instructions. Manuals+ will review the question and use this page’s manual context to help answer it.