
Instapark PWT-07
Instapark PWT-07 Digital Programmable Water Timer User Manual
Model: PWT-07
ആമുഖം
This manual provides detailed instructions for the setup, operation, maintenance, and troubleshooting of your Instapark PWT-07 Digital Programmable Water Timer. Please read this manual thoroughly before using the device to ensure proper function and longevity.
സുരക്ഷാ വിവരങ്ങൾ
- Use only 1.5V AA alkaline batteries. Do not mix old and new batteries, or different battery types.
- Ensure the battery compartment is securely closed to maintain the IP66 waterproof rating.
- Do not expose the timer to extreme temperatures or direct sunlight for prolonged periods, which may affect battery life and device performance.
- Disconnect the timer from the faucet and drain it before freezing temperatures to prevent damage.
- This device is designed for outdoor use with standard ¾” (GHS) threaded faucets.
പാക്കേജ് ഉള്ളടക്കം
പാക്കേജിൽ എല്ലാ ഇനങ്ങളും ഉണ്ടെന്ന് ഉറപ്പാക്കുക:
- Instapark PWT-07 Water Timer
- ഉപയോക്തൃ മാനുവൽ (ഈ പ്രമാണം)
- വാറൻ്റി കാർഡ്
Note: 2 AA alkaline batteries are required and not included.
ഉൽപ്പന്ന സവിശേഷതകൾ
- Single-station digital programmable faucet water timer.
- Impulse solenoid valve for reliable operation.
- Compatible with standard ¾” (GHS) threaded outdoor hose faucets.
- User-friendly interface with a single oversized rotary dial and 4 pushbuttons.
- Large, easy-to-read LCD display (2.1” x 1”).
- വാട്ടർപ്രൂഫ് റേറ്റിംഗ്: IP66.
- Built-in rain delay function (24, 48, or 72 hours).
- Manual watering option without interrupting programmed schedules.
- Detachable battery compartment for easy battery replacement.
- Low power consumption, up to 4,000 on/off cycles per battery set.
സജ്ജമാക്കുക
1. ബാറ്ററി ഇൻസ്റ്റാളേഷൻ
The Instapark PWT-07 requires two (2) 1.5V AA alkaline batteries (not included).
- ടൈമറിന്റെ പിൻഭാഗത്ത് ബാറ്ററി കമ്പാർട്ട്മെന്റ് കണ്ടെത്തുക.
- തുറക്കാൻ ബാറ്ററി കമ്പാർട്ട്മെന്റ് കവർ താഴേക്ക് സ്ലൈഡ് ചെയ്യുക.
- ശരിയായ പോളാരിറ്റി (+/-) ഉറപ്പാക്കിക്കൊണ്ട് രണ്ട് പുതിയ AA ആൽക്കലൈൻ ബാറ്ററികൾ ഇടുക.
- സുരക്ഷിതമായി ക്ലിക്ക് ചെയ്യുന്നതുവരെ ബാറ്ററി കമ്പാർട്ട്മെന്റ് കവർ തിരികെ സ്ഥലത്തേക്ക് സ്ലൈഡ് ചെയ്യുക.
- The LCD display should illuminate, indicating successful battery installation. If the display shows a low battery indicator, remove the batteries, wait for the screen to go completely dark, then reinsert them.
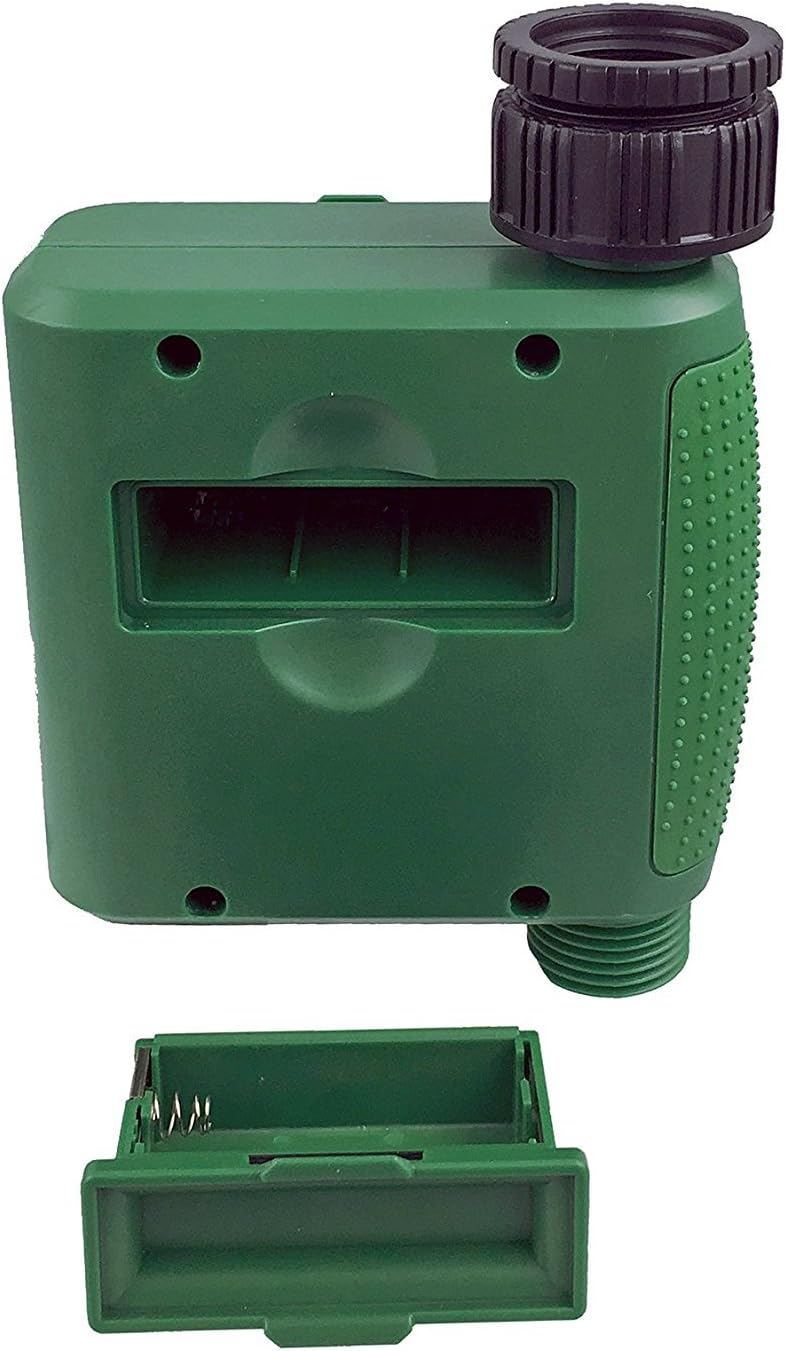
ചിത്രം 1: കവർ നീക്കം ചെയ്ത ബാറ്ററി കമ്പാർട്ട്മെന്റ്.
2. Mounting the Timer
Attach the timer to your outdoor faucet:
- Ensure the faucet is clean and free of debris.
- Screw the timer's inlet (top connector) onto a standard ¾” (GHS) outdoor hose faucet. Hand-tighten only to prevent damage. Do not overtighten.
- Connect your garden hose or irrigation system to the timer's outlet (bottom connector). Hand-tighten securely.
- Turn on the faucet fully. The timer is designed to operate under pressure.

Figure 2: Instapark PWT-07 mounted on a faucet.
പ്രവർത്തന നിർദ്ദേശങ്ങൾ
The timer features a large rotary dial and four buttons: സെറ്റ്, +, -, ഒപ്പം മാനുവൽ.

Figure 3: Control panel and LCD display.
1. നിലവിലെ സമയം ക്രമീകരിക്കുക
- റോട്ടറി ഡയൽ ഇതിലേക്ക് തിരിക്കുക ക്ലോക്ക് സജ്ജമാക്കുക.
- ഉപയോഗിക്കുക + ഒപ്പം - buttons to adjust the current hour. Press സെറ്റ് സ്ഥിരീകരിക്കാൻ.
- ഉപയോഗിക്കുക + ഒപ്പം - buttons to adjust the current minute. Press സെറ്റ് സ്ഥിരീകരിക്കാൻ.
2. Programming Watering Schedule
The timer allows you to set a start time, duration, and frequency for watering.
ആരംഭ സമയം സജ്ജമാക്കുക:
- റോട്ടറി ഡയൽ ഇതിലേക്ക് തിരിക്കുക സമയം ആരംഭിക്കുക.
- ഉപയോഗിക്കുക + ഒപ്പം - buttons to set the desired watering start hour. Press സെറ്റ് സ്ഥിരീകരിക്കാൻ.
- ഉപയോഗിക്കുക + ഒപ്പം - buttons to set the desired watering start minute. Press സെറ്റ് സ്ഥിരീകരിക്കാൻ.
എത്ര ദൈർഘ്യം (ദൈർഘ്യം) സജ്ജമാക്കുക:
- റോട്ടറി ഡയൽ ഇതിലേക്ക് തിരിക്കുക എത്രകാലം.
- ഉപയോഗിക്കുക + ഒപ്പം - buttons to set the watering duration (from 5 seconds to 360 minutes). Press സെറ്റ് സ്ഥിരീകരിക്കാൻ.
എത്ര തവണ (ആവൃത്തി) സജ്ജമാക്കുക:
- റോട്ടറി ഡയൽ ഇതിലേക്ക് തിരിക്കുക എത്ര ഇട്ടവിട്ട്.
- ഉപയോഗിക്കുക + ഒപ്പം - buttons to select the watering frequency (e.g., every 10 seconds, 30 seconds, 1 minute, 3 minutes, 5 minutes, 1 hour, 2 hours, 4 hours, 12 hours, 1 day, 2 days, 3 days, 4 days, 5 days, 6 days, 7 days). Press സെറ്റ് സ്ഥിരീകരിക്കാൻ.
After setting all parameters, turn the rotary dial to പ്രവർത്തിപ്പിക്കുക to activate the programmed schedule.
3. മാനുവൽ നനവ്
നിങ്ങളുടെ പ്രോഗ്രാം ചെയ്ത ഷെഡ്യൂളിനെ ബാധിക്കാതെ സ്വമേധയാ വെള്ളം നനയ്ക്കാൻ:
- ഡയൽ സജ്ജമാക്കിയിട്ടുണ്ടെന്ന് ഉറപ്പാക്കുക പ്രവർത്തിപ്പിക്കുക or ഓഫ്.
- അമർത്തുക മാനുവൽ ബട്ടൺ. ഡിസ്പ്ലേ ഒരു ഡിഫോൾട്ട് മാനുവൽ നനവ് ദൈർഘ്യം കാണിക്കും.
- ഉപയോഗിക്കുക + ഒപ്പം - ആവശ്യമുള്ള മാനുവൽ നനവ് ദൈർഘ്യം ക്രമീകരിക്കുന്നതിനുള്ള ബട്ടണുകൾ.
- അമർത്തുക സെറ്റ് to start manual watering. The timer will run for the selected duration and then automatically shut off.
- To stop manual watering prematurely, press the മാനുവൽ വീണ്ടും ബട്ടൺ.
4. മഴ വൈകൽ പ്രവർത്തനം
The rain delay function allows you to pause your watering schedule for a set period without losing your program settings.
- ഡയൽ സജ്ജമാക്കിയിട്ടുണ്ടെന്ന് ഉറപ്പാക്കുക പ്രവർത്തിപ്പിക്കുക.
- അമർത്തിപ്പിടിക്കുക - button for 3 seconds. The display will show "DELAY" and a default delay duration.
- ഉപയോഗിക്കുക + ഒപ്പം - buttons to select a delay duration of 24, 48, or 72 hours.
- അമർത്തുക സെറ്റ് മഴയുടെ കാലതാമസം സജീവമാക്കാൻ. കാലതാമസ കാലയളവ് അവസാനിച്ചതിന് ശേഷം ടൈമർ അതിന്റെ പ്രോഗ്രാം ചെയ്ത ഷെഡ്യൂൾ പുനരാരംഭിക്കും.
- To cancel the rain delay, press and hold the - ബട്ടൺ വീണ്ടും 3 സെക്കൻഡ്.
മെയിൻ്റനൻസ്
- ബാറ്ററി മാറ്റിസ്ഥാപിക്കൽ: Replace batteries when the low battery indicator appears on the LCD. Always use new AA alkaline batteries.
- വൃത്തിയാക്കൽ: പരസ്യം ഉപയോഗിച്ച് ടൈമർ മായ്ക്കുകamp തുണി. ഉരച്ചിലുകളുള്ള ക്ലീനറുകളോ ലായകങ്ങളോ ഉപയോഗിക്കരുത്.
- ശീതകാലം: Before the first frost, disconnect the timer from the faucet. Remove the batteries and store the timer indoors in a dry, frost-free location. Failure to do so may result in damage from freezing water.
- ഫിൽട്ടർ സ്ക്രീൻ: Periodically check the filter screen inside the inlet connector for debris. Clean if necessary to ensure proper water flow.
ട്രബിൾഷൂട്ടിംഗ്
| പ്രശ്നം | സാധ്യമായ കാരണം | പരിഹാരം |
|---|---|---|
| Timer does not turn on / LCD is blank. | ഡെഡ് അല്ലെങ്കിൽ തെറ്റായി ഇൻസ്റ്റാൾ ചെയ്ത ബാറ്ററികൾ. | Replace with new AA alkaline batteries, ensuring correct polarity. If still blank, remove batteries, wait for screen to fully clear, then reinsert. |
| Water does not turn on at scheduled time. |
|
|
| Water does not turn off. |
|
|
| കണക്ഷനുകളിൽ നിന്ന് വെള്ളം ചോരുന്നു. |
|
|
| Low battery indicator flashes even with new batteries. | Firmware not booting correctly after battery change. | Remove batteries, wait for the LCD screen to go completely dark (may take a few minutes), then reinsert new batteries. |
സ്പെസിഫിക്കേഷനുകൾ
| മോഡൽ | PWT-07 |
| പവർ ഉറവിടം | 2 x 1.5V AA Alkaline Batteries (not included) |
| വാൽവ് തരം | ഇംപൾസ് സോളിനോയിഡ് വാൽവ് |
| പ്രവർത്തന ജല സമ്മർദ്ദം | 14.5 മുതൽ 116 വരെ psi |
| സ്റ്റാൻഡ്ബൈ കറൻ്റ് | <100 µA |
| വെള്ളമൊഴിക്കുന്നതിന്റെ ആവൃത്തി ക്രമീകരണങ്ങൾ | 10s, 30s, 1m, 3m, 5m, 1h, 2h, 4h, 12h, 1d, 2d, 3d, 4d, 5d, 6d, 7d (16 settings) |
| വെള്ളമൊഴിക്കൽ ദൈർഘ്യ ക്രമീകരണങ്ങൾ | 5s, 10s, 15s, 20s, 25s, 30s, 35s, 40s, 45s, 50s, 55s, 1-360m |
| ടൈം ഡിസ്പ്ലേ ഫോർമാറ്റ് | 24-മണിക്കൂർ |
| വാട്ടർപ്രൂഫ് റേറ്റിംഗ് | IP66 |
| മെറ്റീരിയൽ | എബിഎസ് പ്ലാസ്റ്റിക് |
| ഉൽപ്പന്ന അളവുകൾ | 4.25"D x 6"W x 2.6"H |
| ഇനത്തിൻ്റെ ഭാരം | 14.2 ഔൺസ് |
വാറൻ്റിയും പിന്തുണയും
The Instapark PWT-07 Digital Programmable Water Timer is backed by a standard 1-year manufacturer's warranty from the date of purchase. This warranty covers defects in materials and workmanship under normal use.
For warranty claims, technical support, or any questions regarding your product, please contact Instapark customer service. Please have your purchase receipt and product model number (PWT-07) available when contacting support.
Contact information for Instapark customer service can typically be found on the manufacturer's webസൈറ്റ് അല്ലെങ്കിൽ നിങ്ങളുടെ വാങ്ങൽ ഡോക്യുമെന്റേഷൻ.
Ask a question about this manual
Ask about setup, troubleshooting, compatibility, parts, safety, or missing instructions. Manuals+ will review the question and use this page’s manual context to help answer it.