
1. ആമുഖം
This manual provides comprehensive instructions for the installation, operation, and maintenance of your ASUS Prime Z270M-PLUS motherboard. Please read this manual thoroughly before installing or using the product to ensure correct setup and optimal performance.
2 സുരക്ഷാ വിവരങ്ങൾ
Observe the following safety precautions to prevent damage to the motherboard and injury to yourself:
- ഏതെങ്കിലും ഘടകങ്ങളിൽ സ്പർശിക്കുന്നതിന് മുമ്പ് എല്ലായ്പ്പോഴും മതിൽ ഔട്ട്ലെറ്റിൽ നിന്ന് പവർ കോർഡ് വിച്ഛേദിക്കുക.
- Wear an anti-static wrist strap or frequently touch a grounded object to discharge static electricity before handling components.
- സെൻസിറ്റീവ് ഭാഗങ്ങൾ സ്പർശിക്കാതിരിക്കാൻ ഘടകങ്ങൾ അവയുടെ അരികുകളിൽ തന്നെ കൈകാര്യം ചെയ്യുക.
- നിങ്ങളുടെ പിസി കേസിനുള്ളിൽ അമിതമായി ചൂടാകുന്നത് തടയാൻ ശരിയായ വായുസഞ്ചാരം ഉറപ്പാക്കുക.
- മദർബോർഡ് ഈർപ്പം, കടുത്ത താപനില എന്നിവയിൽ നിന്ന് അകറ്റി നിർത്തുക.
3. പാക്കേജ് ഉള്ളടക്കം
നിങ്ങളുടെ പാക്കേജിൽ എല്ലാ ഇനങ്ങളും ഉണ്ടെന്ന് ഉറപ്പാക്കുക:
- ASUS Prime Z270M-PLUS Motherboard
- SATA കേബിൾ(കൾ)
- ഉപയോക്തൃ മാനുവൽ
4. ഉൽപ്പന്നം കഴിഞ്ഞുview
The ASUS Prime Z270M-PLUS is a micro-ATX motherboard designed for Intel LGA 1151 socket processors. It features robust hardware safeguards, advanced cooling controls, and high-speed connectivity options.
പ്രധാന സവിശേഷതകൾ:
- 5X സംരക്ഷണം III: Hardware-level safeguards to ensure component longevity and reliability against electrical overloads.
- LED പ്രകാശം: Customizable lighting control for PCIe slots.
- Fan Xpert 4 Core: Advanced fan controls for optimized cooling and reduced noise.
- Dual Native M.2 and NVMe PCIe RAID Support: Provides high-speed storage solutions.
- യുഎസ്ബി ടൈപ്പ്-സി: Convenient and reversible connectivity.
- DDR4 പിന്തുണ: Supports memory speeds up to 3866 MHz.
- ഓഡിയോ: Realtek ALC887 8-channel high-definition audio.
- മൾട്ടി-ജിപിയു പിന്തുണ: Features AMD CrossFireX Technology.

ചിത്രം 4.1: മുകളിൽ നിന്ന് താഴേക്ക് view of the ASUS Prime Z270M-PLUS motherboard, highlighting the CPU socket, RAM slots, and PCIe slots.

ചിത്രം 4.2: കോണാകൃതിയിലുള്ളത് view of the ASUS Prime Z270M-PLUS motherboard, showcasing its various components and heatsinks.
5. സജ്ജീകരണം
5.1. സിപിയു ഇൻസ്റ്റലേഷൻ
- മദർബോർഡിൽ LGA 1151 സോക്കറ്റ് കണ്ടെത്തുക.
- സിപിയു സോക്കറ്റ് ലിവർ തുറന്ന് ലോഡ് പ്ലേറ്റ് ഉയർത്തുക.
- സിപിയു സോക്കറ്റുമായി ശ്രദ്ധാപൂർവ്വം വിന്യസിക്കുക, സിപിയുവിലെ സ്വർണ്ണ ത്രികോണം സോക്കറ്റിലെ ത്രികോണവുമായി പൊരുത്തപ്പെടുന്നുണ്ടെന്ന് ഉറപ്പാക്കുക.
- നിർബന്ധിച്ച് അമർത്താതെ സിപിയു സോക്കറ്റിൽ സൌമ്യമായി വയ്ക്കുക.
- ലോഡ് പ്ലേറ്റ് അടച്ച് ലിവർ അതിന്റെ സ്ഥാനത്ത് ഉറപ്പിക്കുന്നത് വരെ താഴേക്ക് അമർത്തുക.
5.2. മെമ്മറി (റാം) ഇൻസ്റ്റലേഷൻ
The motherboard supports DDR4 memory up to 64GB with speeds up to 3866 MHz.
- DIMM സ്ലോട്ടിന്റെ രണ്ടറ്റത്തുമുള്ള ക്ലിപ്പുകൾ തുറക്കുക.
- DIMM സ്ലോട്ടിലെ കീ ഉപയോഗിച്ച് DDR4 മെമ്മറി മൊഡ്യൂളിലെ നോച്ച് വിന്യസിക്കുക.
- ക്ലിപ്പുകൾ ശരിയായി സ്ഥാപിക്കുന്നതുവരെ മെമ്മറി മൊഡ്യൂൾ സ്ലോട്ടിലേക്ക് ദൃഢമായി തിരുകുക.
5.3. സംഭരണ ഉപകരണ ഇൻസ്റ്റാളേഷൻ
The motherboard supports SATA III devices and NVMe PCIe M.2 drives.
- SATA ഉപകരണങ്ങൾ: Connect SATA data cables from your storage drives (HDDs/SSDs) to the SATA III ports on the motherboard. Connect power cables from your power supply to the drives.
- M.2 ഉപകരണങ്ങൾ: Locate the M.2 slot. Insert the M.2 drive at an angle and secure it with the provided screw.
5.4. എക്സ്പാൻഷൻ കാർഡ് ഇൻസ്റ്റാളേഷൻ
The motherboard features PCIe 3.0 slots for graphics cards and other expansion cards.
- Align the expansion card with the appropriate PCIe slot.
- കാർഡ് ശരിയായി സ്ഥാപിക്കുന്നതുവരെയും റിട്ടൻഷൻ ക്ലിപ്പ് ലോക്ക് ആകുന്നതുവരെയും ദൃഢമായി താഴേക്ക് അമർത്തുക.
- Secure the card to the PC case with a screw.
5.5. പവർ കണക്ഷനുകൾ
നിങ്ങളുടെ പവർ സപ്ലൈയിൽ നിന്ന് 24-പിൻ ATX പവർ കണക്ടറും 8-പിൻ ATX 12V പവർ കണക്ടറും മദർബോർഡിലെ അനുബന്ധ പോർട്ടുകളിലേക്ക് ബന്ധിപ്പിക്കുക.
5.6. ഫ്രണ്ട് പാനൽ കണക്ഷനുകൾ
Connect the cables from your PC case's front panel (USB ports, audio jacks, power button, reset button, LED indicators) to the corresponding headers on the motherboard. Refer to the motherboard diagram in your physical manual for exact header locations.
5.7. പിൻഭാഗത്തെ I/O പാനൽ
ബാഹ്യ ഉപകരണങ്ങളെ ബന്ധിപ്പിക്കുന്നതിന് പിൻഭാഗത്തെ I/O പാനൽ വിവിധ പോർട്ടുകൾ നൽകുന്നു.
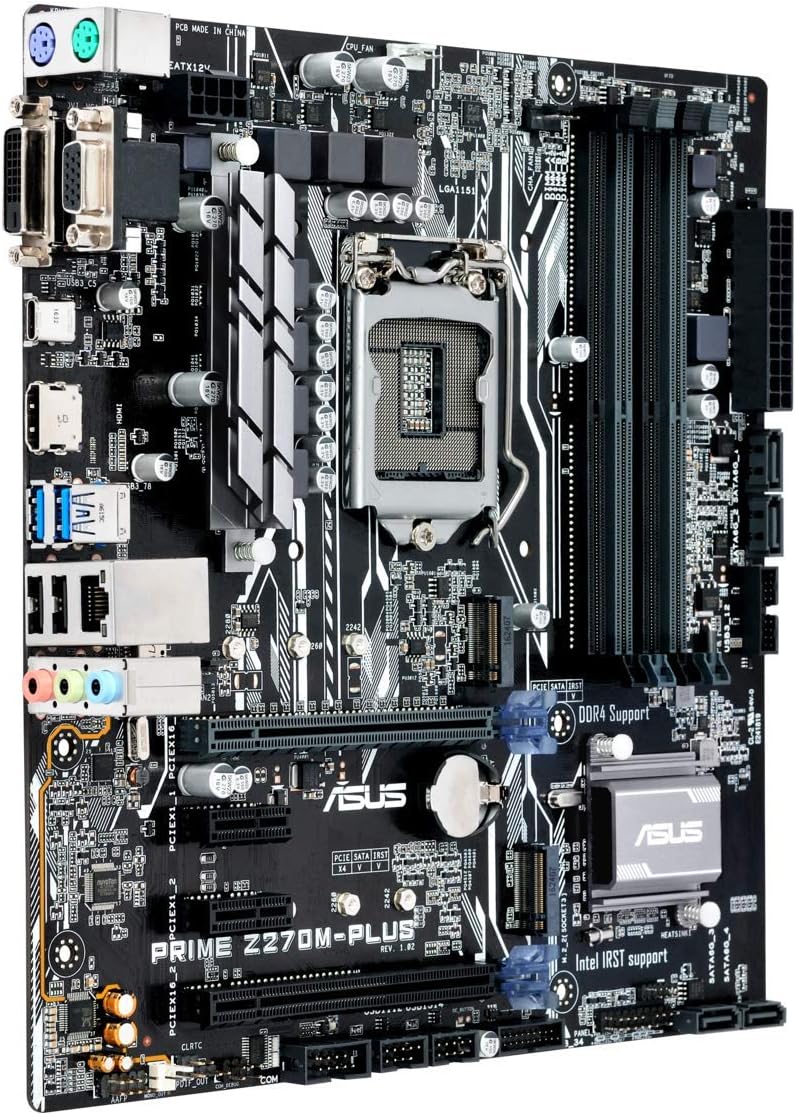
Figure 5.1: Rear I/O panel of the ASUS Prime Z270M-PLUS motherboard, showing various connectivity ports.
Common ports include:
- PS/2 Keyboard/Mouse Combo Port
- DVI-D പോർട്ട്
- വിജിഎ പോർട്ട്
- HDMI പോർട്ട്
- USB 3.0 പോർട്ടുകൾ
- USB 2.0 പോർട്ടുകൾ
- LAN (RJ-45) Port
- Audio Jacks (Line In, Line Out, Microphone)
6. പ്രവർത്തിക്കുന്നു
6.1. പ്രാരംഭ ബൂട്ടും BIOS/UEFI സജ്ജീകരണവും
Upon the first power-on, the system will typically enter the BIOS/UEFI setup utility. Here you can configure system settings, boot order, and monitor hardware status. Press the DEL key during startup to enter the BIOS/UEFI.
6.2. ഡ്രൈവർ ഇൻസ്റ്റാളേഷൻ
After installing your operating system, install the necessary drivers for the motherboard components (chipset, audio, LAN, graphics, etc.). These drivers are typically provided on a support DVD or can be downloaded from the ASUS official webസൈറ്റ്.
6.3. System Boot
Once the operating system and drivers are installed, your system should boot normally. Ensure all peripherals are connected correctly.
7. പരിപാലനം
7.1. വൃത്തിയാക്കൽ
അമിതമായി ചൂടാകുന്നതിനും ഘടകങ്ങൾ തകരാറിലാകുന്നതിനും കാരണമാകുന്ന പൊടിപടലങ്ങൾ തടയാൻ നിങ്ങളുടെ പിസി കേസും മദർബോർഡും പതിവായി വൃത്തിയാക്കുക. ഫാനുകൾ, ഹീറ്റ്സിങ്കുകൾ, മറ്റ് ഘടകങ്ങൾ എന്നിവയിൽ നിന്ന് പൊടി നീക്കം ചെയ്യാൻ കംപ്രസ് ചെയ്ത വായു ഉപയോഗിക്കുക. വൃത്തിയാക്കുന്നതിന് മുമ്പ് സിസ്റ്റം ഓഫ് ചെയ്തിട്ടുണ്ടെന്നും അൺപ്ലഗ് ചെയ്തിട്ടുണ്ടെന്നും ഉറപ്പാക്കുക.
7.2. ബയോസ് അപ്ഡേറ്റുകൾ
ASUS പിന്തുണ ഇടയ്ക്കിടെ പരിശോധിക്കുക website for BIOS updates. BIOS updates can improve system stability, add support for new hardware, or fix bugs. Follow the instructions provided by ASUS carefully when performing a BIOS update to avoid system damage.
8. പ്രശ്നപരിഹാരം
If you encounter issues with your motherboard, consider the following general troubleshooting steps:
- ശക്തിയില്ല: Ensure all power cables (24-pin ATX, 8-pin CPU) are securely connected. Check your power supply unit (PSU) for functionality.
- ഡിസ്പ്ലേ ഇല്ല: Verify that your graphics card is properly seated and connected to the monitor. If using integrated graphics, ensure your monitor is connected to the motherboard's video output. Try reseating RAM modules.
- സിസ്റ്റം അസ്ഥിരത/ക്രാഷുകൾ: Check for overheating. Ensure all drivers are up to date. Test memory modules individually.
- ഘടകം കണ്ടെത്തിയില്ല: Ensure the component (e.g., hard drive, expansion card) is correctly installed and all necessary cables are connected. Check BIOS settings to ensure the component is enabled.
- ബയോസ് റീസെറ്റ്: If system settings become unmanageable, you can clear the CMOS by removing the CMOS battery for a few minutes or using the Clear CMOS jumper (refer to your physical manual for location).
9 സ്പെസിഫിക്കേഷനുകൾ
| ഫീച്ചർ | സ്പെസിഫിക്കേഷൻ |
|---|---|
| മോഡലിൻ്റെ പേര് | Prime Z270M-PLUS |
| സിപിയു സോക്കറ്റ് | LGA 1151 |
| അനുയോജ്യമായ പ്രോസസ്സറുകൾ | Celeron, Core i3, Core i5, Core i7, Pentium (14nm CPUs) |
| ചിപ്സെറ്റ് | ഇൻ്റൽ Z270 |
| മെമ്മറി ടെക്നോളജി | DDR4 |
| Max. Memory Capacity | 64 ജിബി |
| മെമ്മറി ക്ലോക്ക് സ്പീഡ് | 3866 MHz വരെ |
| സംഭരണ ഇന്റർഫേസുകൾ | SATA III, Dual Native M.2 (NVMe PCIe support) |
| വിപുലീകരണ സ്ലോട്ടുകൾ | PCIe 3.0 |
| USB പോർട്ടുകൾ | USB 3.0, USB 2.0, USB Type-C |
| വീഡിയോ ഔട്ട്പുട്ട് | HDMI, DVI-D, VGA (via integrated graphics) |
| ഓഡിയോ | Realtek ALC887 8-ചാനൽ ഹൈ ഡെഫനിഷൻ ഓഡിയോ |
| ലാൻ | 1x ജിഗാബൈറ്റ് ഇഥർനെറ്റ് |
| ഫോം ഫാക്ടർ | mATX (23 x 20 x 2 cm) |
| ഭാരം | 900 ഗ്രാം |
| നിർമ്മാതാവിന്റെ മോഡൽ നമ്പർ | B990M80 |
10. വാറൻ്റി വിവരങ്ങൾ
The product warranty for the ASUS Prime Z270M-PLUS motherboard is not applicable as per the provided product information. Please refer to your point of purchase or local ASUS support for specific warranty terms and conditions that may apply in your region.
11. പിന്തുണ
കൂടുതൽ സഹായം, സാങ്കേതിക പിന്തുണ, അല്ലെങ്കിൽ ഡ്രൈവർ ഡൗൺലോഡുകൾ എന്നിവയ്ക്കായി, ദയവായി ഔദ്യോഗിക ASUS പിന്തുണ സന്ദർശിക്കുക. website. You can also find additional resources and FAQs there.
ASUS ഒഫീഷ്യൽ Webസൈറ്റ്: www.asus.com
ASUS Brand Store: ASUS Spain Store on Amazon