ആമുഖം
This manual provides essential information for the assembly, operation, maintenance, and troubleshooting of your Omnirax Nova Compact Audio/Video Workstation. Please read these instructions carefully before beginning assembly or use to ensure proper function and longevity of your workstation.
സജ്ജീകരണവും അസംബ്ലിയും
Unpack all components and verify that all parts are present. Refer to the diagram below for component identification and assembly sequence. It is recommended to assemble the workstation on a soft, clean surface to prevent scratches.
- Attach the main support legs to the primary desktop surface using the provided hardware. Ensure all screws are tightened securely.
- Mount the upper shelf to the main desktop using the designated risers and hardware.
- Install the 2-space rack rails into the designated slots on the main desktop.
- If using the optional KMSNV Keyboard Shelf, attach it to the underside of the main desktop as per its separate instructions.
- Place the workstation in its desired location, ensuring it is level and stable.
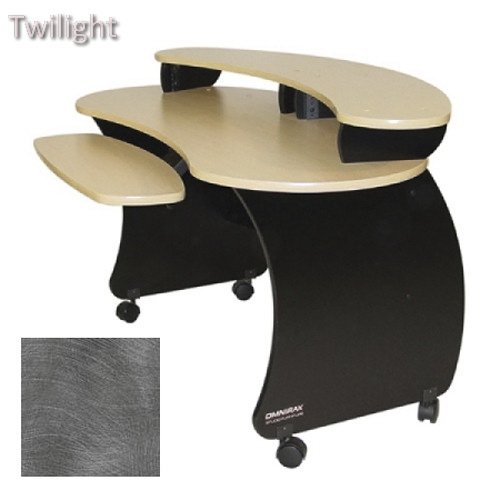
Figure 1: Workstation Dimensions and Components. This diagram illustrates the overall dimensions of the Omnirax Nova Compact Audio/Video Workstation, including its height (32-1/2 inches), width (53-1/2 inches), and depth (28 inches). It also highlights the 2-space rack rails, the upper shelf (12 inches deep), and the main desktop (13-3/4 inches deep), along with the optional KMSNV Keyboard Shelf. The upper shelf is elevated 4 inches above the main desktop.
പ്രവർത്തന നിർദ്ദേശങ്ങൾ
The Omnirax Nova Compact Workstation is designed to accommodate various audio and video equipment. Utilize the 2-space rack rails for standard rack-mountable gear. The upper shelf is suitable for monitors, speakers, or other smaller devices, while the main desktop provides ample space for mixers, control surfaces, or keyboards. The optional keyboard shelf offers an ergonomic solution for keyboard and mouse placement.
- ഉപകരണങ്ങൾ സ്ഥാപിക്കൽ: Distribute equipment weight evenly across the surfaces. Place heavier items on the main desktop or within the rack spaces.
- കേബിൾ മാനേജുമെന്റ്: Utilize cable ties or clips (not included) to organize and secure cables, preventing tangles and ensuring a tidy workspace.
- എർണോണോമിക്സ്: Adjust your chair and monitor height to maintain a comfortable and ergonomic posture while working.
മെയിൻ്റനൻസ്
Regular maintenance will help preserve the appearance and structural integrity of your workstation.
- വൃത്തിയാക്കൽ: മൃദുവായ, ഡി ഉപയോഗിച്ച് ഉപരിതലങ്ങൾ തുടയ്ക്കുകamp തുണി. കഠിനമായ അടയാളങ്ങൾക്ക്, നേരിയതും ഉരച്ചിലുകൾ ഇല്ലാത്തതുമായ ഒരു ക്ലീനർ ഉപയോഗിക്കുക. ഫിനിഷിന് കേടുവരുത്തുന്ന കഠിനമായ രാസവസ്തുക്കളോ ഉരച്ചിലുകളുള്ള വസ്തുക്കളോ ഒഴിവാക്കുക.
- ഹാർഡ്വെയർ പരിശോധന: എല്ലാ സ്ക്രൂകളും ഫാസ്റ്റനറുകളും ഇറുകിയതായി ഉറപ്പാക്കാൻ ഇടയ്ക്കിടെ പരിശോധിക്കുക. സ്ഥിരത നിലനിർത്താൻ ആവശ്യമെങ്കിൽ വീണ്ടും മുറുക്കുക.
- പരിസ്ഥിതി വ്യവസ്ഥകൾ: Avoid exposing the workstation to extreme temperatures, humidity, or direct sunlight, which can cause warping or discoloration.
ട്രബിൾഷൂട്ടിംഗ്
If you encounter issues with your workstation, refer to the following common solutions:
- Wobbling Workstation:
- എല്ലാ അസംബ്ലി സ്ക്രൂകളും പൂർണ്ണമായും മുറുക്കിയിട്ടുണ്ടെന്ന് ഉറപ്പാക്കുക.
- Verify that the workstation is placed on a level surface. Adjust floor glides if present.
- Difficulty with Rack Equipment Installation:
- Confirm that your equipment is standard 19-inch rack-mountable.
- Ensure rack screws are properly aligned with the rack rails. Do not overtighten.
സ്പെസിഫിക്കേഷനുകൾ
| ഫീച്ചർ | വിശദാംശങ്ങൾ |
|---|---|
| മൊത്തത്തിലുള്ള അളവുകൾ (W x D x H) | 53-1/2" x 28" x 32-1/2" |
| Main Desktop Depth | 13-3/4" |
| Upper Shelf Depth | 12" |
| Upper Shelf Clearance | 4" above main desktop |
| റാക്ക് സ്പെയ്സുകൾ | 2-space (standard 19-inch) |
| ഓപ്ഷണൽ ആക്സസറികൾ | KMSNV Keyboard Shelf |
| മെറ്റീരിയൽ | Wood laminate, metal frame |
വാറൻ്റിയും പിന്തുണയും
Omnirax products are manufactured to high standards. For specific warranty details, please refer to the warranty card included with your purchase or visit the official Omnirax website. For technical support, assembly assistance, or to inquire about replacement parts, please contact Omnirax customer service through their official channels.
വാറൻ്റി ക്ലെയിമുകൾക്കായി നിങ്ങളുടെ വാങ്ങിയതിൻ്റെ തെളിവ് സൂക്ഷിക്കുക.