
1. ആമുഖം
Thank you for choosing the TechniSat VIOLA 2 Portable DAB/FM Radio. This compact and versatile radio allows you to enjoy high-quality digital DAB+ and traditional FM radio broadcasts wherever you are. This manual provides essential information for setting up, operating, and maintaining your device to ensure optimal performance and longevity.

Image 1.1: The TechniSat VIOLA 2 radio positioned on a wooden table in an outdoor setting, highlighting its portability.
2 സുരക്ഷാ വിവരങ്ങൾ
ഉപകരണം ഉപയോഗിക്കുന്നതിന് മുമ്പ് ദയവായി ഈ സുരക്ഷാ നിർദ്ദേശങ്ങൾ ശ്രദ്ധാപൂർവ്വം വായിക്കുകയും ഭാവിയിലെ റഫറൻസിനായി സൂക്ഷിക്കുകയും ചെയ്യുക.
- വൈദ്യുതി വിതരണം: നൽകിയിരിക്കുന്ന പവർ അഡാപ്റ്റർ മാത്രം ഉപയോഗിക്കുക. വോളിയം ഉറപ്പാക്കുകtagഇ നിങ്ങളുടെ പ്രദേശത്തിന്റെ ആവശ്യകതകളുമായി പൊരുത്തപ്പെടുന്നു.
- ബാറ്ററികൾ: Use 4 x AA-LR6 batteries. Do not mix old and new batteries, or different types of batteries. Remove batteries if the device will not be used for an extended period.
- ജലവും ഈർപ്പവും: Do not expose the device to rain, moisture, or dripping/splashing liquids. Do not place objects filled with liquids, such as vases, on the device.
- ചൂട്: റേഡിയേറ്ററുകൾ, ഹീറ്റ് രജിസ്റ്ററുകൾ, സ്റ്റൗകൾ, അല്ലെങ്കിൽ മറ്റ് ഉപകരണങ്ങൾ (ഉൾപ്പെടെ) പോലുള്ള താപ സ്രോതസ്സുകളിൽ നിന്ന് ഉപകരണം അകറ്റി നിർത്തുക. ampലൈഫയറുകൾ) ചൂട് ഉത്പാദിപ്പിക്കുന്നത്.
- വെൻ്റിലേഷൻ: മതിയായ വായുസഞ്ചാരം ഉറപ്പാക്കുക. വായുസഞ്ചാര ദ്വാരങ്ങളൊന്നും തടയരുത്.
- വൃത്തിയാക്കൽ: Disconnect the power before cleaning. Use a soft, dry cloth. Do not use liquid cleaners or aerosol cleaners.
- സേവനം: ഈ ഉൽപ്പന്നം സ്വയം സേവിക്കാൻ ശ്രമിക്കരുത്. യോഗ്യതയുള്ള സേവന ഉദ്യോഗസ്ഥർക്ക് എല്ലാ സേവനങ്ങളും റഫർ ചെയ്യുക.
3. പാക്കേജ് ഉള്ളടക്കം
പെട്ടി ശ്രദ്ധാപൂർവ്വം അൺപാക്ക് ചെയ്ത് എല്ലാ ഇനങ്ങളും ഉണ്ടെന്നും നല്ല നിലയിലാണെന്നും ഉറപ്പാക്കുക:
- TechniSat VIOLA 2 Portable DAB/FM Radio
- പവർ അഡാപ്റ്റർ (6V DC)
- ഉപയോക്തൃ മാനുവൽ (ഈ പ്രമാണം)
Note: 4 x AA-LR6 batteries are required for portable use and are not included in the package.
4. ഉൽപ്പന്നം കഴിഞ്ഞുview
Familiarize yourself with the various parts and controls of your VIOLA 2 radio.

ചിത്രം 4.1: മുൻഭാഗം view of the TechniSat VIOLA 2, displaying the speaker grille, LCD screen, and control buttons.
4.1 ഫ്രണ്ട് പാനൽ നിയന്ത്രണങ്ങൾ
- സ്പീക്കർ: ഓഡിയോ ഔട്ട്പുട്ടിനായി ഇന്റഗ്രേറ്റഡ് സ്പീക്കർ.
- LCD ഡിസ്പ്ലേ: Two-line display showing station information, time, and menu options.
- ഓൺ/ഓഫ് ബട്ടൺ: ഉപകരണം ഓൺ അല്ലെങ്കിൽ ഓഫ് ചെയ്യുന്നു.
- വോളിയം/നോബ് നൽകുക: Rotate to adjust volume, press to confirm selections.
- Tune +/- Buttons: Used for manual tuning or navigating menus.
- DAB/FM ബട്ടൺ: Switches between DAB+ and FM radio modes.
- വിവരം/മെനു ബട്ടൺ: Displays additional information or accesses the menu settings.

ചിത്രം 4.2: വിശദമായ view of the control buttons and rotary knob on the TechniSat VIOLA 2, illustrating its simple operation.
4.2 പിൻ പാനൽ കണക്ഷനുകൾ

Image 4.3: The rear panel of the radio, showing the headphone output and the DC 6V power input.
- ഹെഡ്ഫോൺ ജാക്ക് (3.5 മിമി): സ്വകാര്യ ശ്രവണത്തിനായി.
- DC 6V ഇൻപുട്ട്: നൽകിയിരിക്കുന്ന പവർ അഡാപ്റ്റർ ഇവിടെ ബന്ധിപ്പിക്കുക.
- ബാറ്ററി കമ്പാർട്ട്മെൻ്റ്: 4 x AA ബാറ്ററികൾക്കായി പിന്നിൽ സ്ഥിതിചെയ്യുന്നു.
- ടെലിസ്കോപ്പിക് ആന്റിന: ഒപ്റ്റിമൽ റേഡിയോ സ്വീകരണത്തിനായി നീട്ടുക.
5. സജ്ജീകരണം
5.1 ഉപകരണം പവർ ചെയ്യുന്നു
The VIOLA 2 can be powered by the included mains adapter or by batteries for portable use.
5.1.1 മെയിൻ പവർ
- Insert the small plug of the power adapter into the DC 6V input on the rear of the radio.
- ഒരു സാധാരണ മതിൽ ഔട്ട്ലെറ്റിലേക്ക് പവർ അഡാപ്റ്റർ പ്ലഗ് ചെയ്യുക.
5.1.2 ബാറ്ററി പവർ
- Open the battery compartment cover on the rear of the radio.
- Insert 4 x AA-LR6 batteries, ensuring correct polarity (+/-).
- ബാറ്ററി കമ്പാർട്ട്മെൻ്റ് കവർ സുരക്ഷിതമായി അടയ്ക്കുക.
5.2 ആന്റിന ക്രമീകരണം
For optimal reception, fully extend the telescopic antenna. Adjust its position and angle to achieve the best signal quality, especially in FM mode or areas with weaker DAB+ signals.
6. പ്രവർത്തന നിർദ്ദേശങ്ങൾ
6.1 ഓൺ/ഓഫ് ചെയ്യുന്നു
അമർത്തുക ഓൺ/ഓഫ് റേഡിയോ ഓണാക്കാനോ ഓഫാക്കാനോ ഉള്ള ബട്ടൺ.
6.2 Mode Selection (DAB/FM)
അമർത്തുക DAB/FM button to switch between DAB+ digital radio mode and FM analog radio mode.
6.3 സ്റ്റേഷനുകൾക്കായുള്ള സ്കാനിംഗ്
6.3.1 DAB+ Auto Scan
When you first turn on the radio in DAB+ mode, it will automatically perform a full scan for available stations. If you move to a new location or wish to refresh the station list:
- Ensure the radio is in DAB+ mode.
- അമർത്തിപ്പിടിക്കുക വിവരം/മെനു മെനുവിൽ പ്രവേശിക്കാനുള്ള ബട്ടൺ.
- തിരിക്കുക വോളിയം/എന്റർ knob to select "Full Scan" and press the knob to confirm.
- The radio will scan and update the station list.
6.3.2 FM Auto Scan
എഫ്എം മോഡിൽ:
- റേഡിയോ എഫ്എം മോഡിലാണെന്ന് ഉറപ്പാക്കുക.
- അമർത്തിപ്പിടിക്കുക ട്യൂൺ +/- buttons. The radio will scan for the next available station.
6.4 വോളിയം നിയന്ത്രണം
തിരിക്കുക വോളിയം/എന്റർ knob to adjust the listening volume.
6.5 ഹെഡ്ഫോൺ ഉപയോഗം
Connect standard 3.5mm headphones to the headphone jack on the rear of the radio for private listening. The internal speaker will automatically mute when headphones are connected.
6.6 വിവരങ്ങൾ പ്രദർശിപ്പിക്കുക

Image 6.1: A close-up of the radio's two-line LCD display, showing current station and program information.
The two-line LCD display provides various information depending on the mode:
- DAB+ Mode: Station name, program type, scrolling text (DLS), signal strength, time, date.
- എഫ്എം മോഡ്: Frequency, station name (if RDS available), program type (if RDS available), time, date.
അമർത്തുക വിവരം/മെനു button repeatedly to cycle through available display information.
7. പരിപാലനം
7.1 വൃത്തിയാക്കൽ
Wipe the radio with a soft, dry, lint-free cloth. Do not use abrasive cleaners, waxes, or solvents as they may damage the finish.
7.2 ബാറ്ററി മാറ്റിസ്ഥാപിക്കൽ
When the battery indicator on the display shows low power, replace all four AA batteries with new ones. Ensure the radio is turned off or connected to mains power before replacing batteries.
8. പ്രശ്നപരിഹാരം
| പ്രശ്നം | സാധ്യമായ കാരണം | പരിഹാരം |
|---|---|---|
| ശക്തിയില്ല | പവർ അഡാപ്റ്റർ ബന്ധിപ്പിച്ചിട്ടില്ല; ബാറ്ററികൾ തീർന്നു അല്ലെങ്കിൽ തെറ്റായി ചേർത്തിരിക്കുന്നു. | പവർ അഡാപ്റ്റർ കണക്ഷൻ പരിശോധിക്കുക; ബാറ്ററികൾ മാറ്റിസ്ഥാപിക്കുക അല്ലെങ്കിൽ ശരിയായ പോളാരിറ്റി ഉറപ്പാക്കുക. |
| ശബ്ദമില്ല | Volume too low; Headphones connected; Mute activated. | Increase volume; Disconnect headphones; Check for mute function (if applicable). |
| Poor reception (DAB+/FM) | Antenna not extended or poorly positioned; Weak signal area. | Fully extend and adjust the telescopic antenna; Try moving the radio to a different location. Perform a full scan in DAB+ mode. |
| DAB+ stations missing | Not all stations scanned; Moved to a new area. | Perform a full scan (see Section 6.3.1). |
| ഡിസ്പ്ലേ പ്രവർത്തിക്കുന്നില്ല | Device off; Faulty unit. | ഉപകരണം ഓണാണെന്ന് ഉറപ്പാക്കുക; പ്രശ്നം നിലനിൽക്കുകയാണെങ്കിൽ, ഉപഭോക്തൃ പിന്തുണയുമായി ബന്ധപ്പെടുക. |
9 സ്പെസിഫിക്കേഷനുകൾ
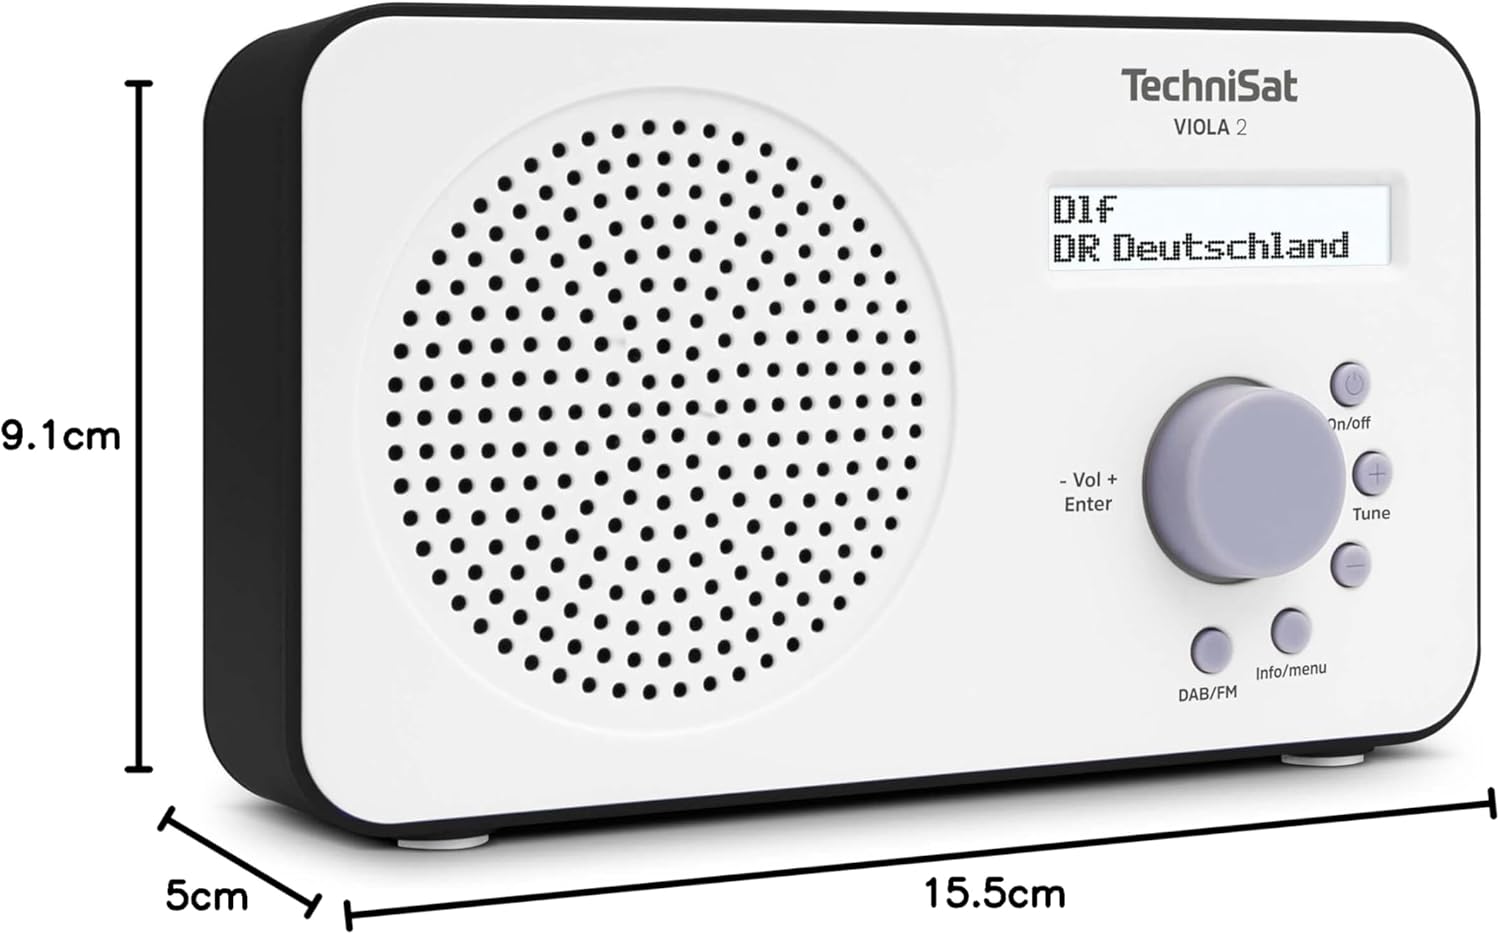
Image 9.1: The TechniSat VIOLA 2 radio with its physical dimensions indicated.
- മോഡൽ: VIOLA 2
- നിർമ്മാതാവ്: ടെക്നിസാറ്റ്
- മോഡൽ നമ്പർ: 0000/3906
- ഉൽപ്പന്ന അളവുകൾ (W x D x H): 15.5 x 5 x 9.1 സെ.മീ
- ഭാരം: 338 ഗ്രാം
- പിന്തുണയ്ക്കുന്ന റേഡിയോ ബാൻഡുകൾ: DAB+, FM (with RDS and PLL)
- ട്യൂണർ സാങ്കേതികവിദ്യ: DAB/FM
- സ്പീക്കർ ഔട്ട്പുട്ട്: 1 വാട്ട് ആർഎംഎസ്
- ഡിസ്പ്ലേ: Two-line LCD with backlight
- കണക്റ്റിവിറ്റി: 3.5mm Headphone Jack (AUX)
- ഊർജ്ജ സ്രോതസ്സ്: Corded Electric (6V DC adapter) and Battery Powered
- ബാറ്ററികൾ: 4 x AA-LR6 (not included)
- പ്രത്യേക സവിശേഷതകൾ: Automatic station search, electronic volume control
- മാതൃരാജ്യം: ചൈന
10. വാറൻ്റിയും പിന്തുണയും
TechniSat products are designed for reliability and performance. For warranty information, please refer to the warranty card included with your purchase or visit the official TechniSat website. If you encounter any issues not covered in this manual, please contact TechniSat customer support for assistance.
You can find contact details and further support resources on the official TechniSat webസൈറ്റ്: www.technisat.com