
ആമുഖം
This manual provides comprehensive instructions for the safe and efficient operation of your Uten 16-Stitch Electric Sewing Machine, Model FR machine a coudre 508. Designed for both beginners and experienced users, this portable machine offers 16 built-in stitch patterns, double thread, and double speed functionality for a variety of sewing projects. Please read this manual thoroughly before first use and keep it for future reference.
പ്രധാനപ്പെട്ട സുരക്ഷാ നിർദ്ദേശങ്ങൾ
- Always unplug the sewing machine from the electrical outlet immediately after use and before cleaning, servicing, or removing any parts.
- Keep fingers away from the needle, hand wheel, and other moving parts during operation.
- Never operate the machine with any air openings blocked. Keep ventilation openings of the sewing machine free from lint, dust, and loose cloth.
- Use only the power adapter supplied with the machine.
- മേൽനോട്ടമില്ലാതെ യന്ത്രം പ്രവർത്തിപ്പിക്കാൻ കുട്ടികളെ അനുവദിക്കരുത്.
- ഒരു തുറസ്സിലും ഒരു വസ്തുവും ഇടുകയോ തിരുകുകയോ ചെയ്യരുത്.
- വെളിയിൽ ഉപയോഗിക്കരുത്.
- എയറോസോൾ (സ്പ്രേ) ഉൽപ്പന്നങ്ങൾ ഉപയോഗിക്കുന്നിടത്തോ ഓക്സിജൻ നൽകുന്നിടത്തോ പ്രവർത്തിക്കരുത്.
- വിച്ഛേദിക്കുന്നതിന്, എല്ലാ നിയന്ത്രണങ്ങളും ഓഫ് സ്ഥാനത്തേക്ക് മാറ്റുക, തുടർന്ന് ഔട്ട്ലെറ്റിൽ നിന്ന് പ്ലഗ് നീക്കം ചെയ്യുക.
ഉൽപ്പന്ന ഘടകങ്ങൾ
Familiarize yourself with the various parts of your sewing machine before operation.
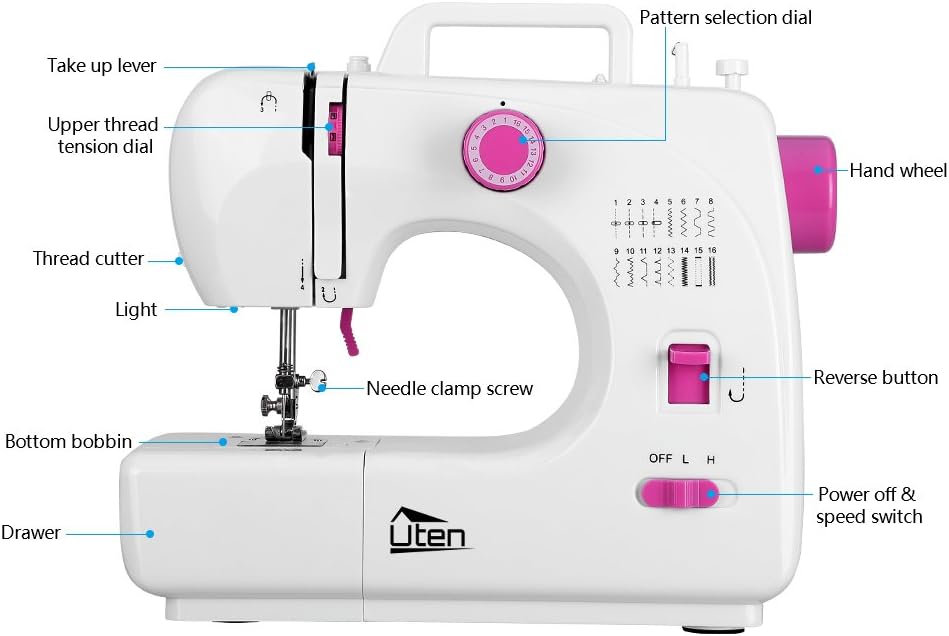
Figure 1: Front Components Overview
This image highlights the main operational parts on the front of the sewing machine, including the take-up lever, thread tension dial, thread cutter, light, needle clamp screw, bottom bobbin area, accessory drawer, pattern selection dial, hand wheel, reverse button, and power/speed switch.

Figure 2: Top and Rear Components Overview
This image shows the components located on the top and rear of the sewing machine, such as the bobbin winder pin, bobbin winder stop, bobbin winder tension disk, presser foot lifter, presser foot, foot pedal input, and DC power input.
സജ്ജമാക്കുക
1. പവർ കണക്ഷൻ
- Ensure the machine is switched off (Power off & speed switch in 'OFF' position).
- Connect the foot pedal cable to the 'FOOT PEDAL' input on the side of the machine.
- Connect the power adapter cable to the 'DC 12V 1.5A' input.
- അനുയോജ്യമായ ഒരു ഇലക്ട്രിക്കൽ ഔട്ട്ലെറ്റിലേക്ക് പവർ അഡാപ്റ്റർ പ്ലഗ് ചെയ്യുക.

Figure 3: Power and Foot Pedal Connection
This image illustrates how to connect the foot pedal and the DC power adapter to the respective input ports on the side of the sewing machine.
2. ബോബിൻ വൈൻഡിംഗ്
- സ്പൂൾ പിന്നിൽ ഒരു സ്പൂൾ ത്രെഡ് വയ്ക്കുക.
- Guide the thread through the bobbin winder tension disk.
- Place an empty bobbin onto the bobbin winder pin.
- Wind the thread clockwise around the bobbin a few times manually.
- Push the bobbin winder pin to the right.
- Turn on the machine and press the foot pedal (or use the speed switch) to start winding. Stop when the bobbin is full.
- Cut the thread and push the bobbin winder pin back to the left. Remove the wound bobbin.
3. അപ്പർ ത്രെഡിംഗ്
- പ്രസ്സർ ഫുട്ട് ലിഫ്റ്റർ ഉയർത്തുക.
- Raise the needle to its highest position by turning the hand wheel towards you.
- സ്പൂൾ പിന്നിൽ ഒരു സ്പൂൾ ത്രെഡ് വയ്ക്കുക.
- ആദ്യത്തെ ത്രെഡ് ഗൈഡിലൂടെ ത്രെഡ് ഗൈഡ് ചെയ്യുക.
- Pass the thread down through the tension control assembly.
- ത്രെഡ് മുകളിലേക്കും ടേക്ക്-അപ്പ് ലിവറിലൂടെ വലത്തുനിന്ന് ഇടത്തോട്ടും നയിക്കുക.
- Guide the thread down through the remaining thread guides.
- Thread the needle from front to back. Pull about 15 cm (6 inches) of thread through the needle eye.
4. Lower Bobbin Insertion
- ബോബിൻ കവർ പ്ലേറ്റ് തുറക്കുക.
- നൂൽ എതിർ ഘടികാരദിശയിൽ അഴിക്കുന്നുണ്ടെന്ന് ഉറപ്പാക്കിക്കൊണ്ട്, മുറിവ് ബോബിൻ ബോബിൻ കേസിൽ തിരുകുക.
- Pull the thread through the small slot in the bobbin case.
- Hold the upper thread lightly with one hand. Turn the hand wheel towards you to lower and raise the needle. The needle will catch the bobbin thread and bring it up through the needle plate.
- Pull both upper and lower threads to the back under the presser foot.
- ബോബിൻ കവർ പ്ലേറ്റ് അടയ്ക്കുക.
പ്രവർത്തന നിർദ്ദേശങ്ങൾ
1. Turning On/Off and Speed Selection
- To turn on the machine, slide the 'Power off & speed switch' to 'L' (Low speed) or 'H' (High speed).
- To turn off the machine, slide the switch to 'OFF'.
- The machine can be operated either by the foot pedal or by the speed switch. When using the foot pedal, ensure the speed switch is in 'OFF' position.
2. Stitch Pattern Selection
- Turn the 'Pattern selection dial' to choose one of the 16 available stitch patterns.
- Ensure the needle is in its highest position before changing stitch patterns to prevent needle breakage.

Figure 4: Stitch Pattern Selection
This image displays the stitch pattern selection dial and a visual guide to the 16 built-in stitch patterns available on the machine.
3. റിവേഴ്സ് തയ്യൽ
- To reinforce the beginning and end of a seam, press and hold the 'Reverse button'. The machine will sew backward.
- Release the button to resume forward sewing.
4. തയ്യൽ അടിസ്ഥാനകാര്യങ്ങൾ
- പ്രഷർ പാദത്തിനടിയിൽ തുണി വയ്ക്കുക.
- പ്രഷർ ഫൂട്ട് ലിഫ്റ്റർ താഴ്ത്തുക.
- Slowly press the foot pedal or slide the speed switch to 'L' or 'H' to start sewing.
- Guide the fabric gently with both hands, keeping it flat. Do not pull or push the fabric forcefully.
- When finished, raise the needle to its highest position, lift the presser foot, and gently pull the fabric away.
- Use the 'Thread cutter' on the side of the machine to cut the threads.
5. Using the Sewing Light
- The built-in light illuminates the sewing area for better visibility. It turns on automatically when the machine is powered on.
മെയിൻ്റനൻസ്
1. വൃത്തിയാക്കൽ
- വൃത്തിയാക്കുന്നതിന് മുമ്പ് എല്ലായ്പ്പോഴും മെഷീൻ അൺപ്ലഗ് ചെയ്യുക.
- ബോബിൻ ഭാഗത്ത് നിന്ന് പൊടിയും ലിന്റും നീക്കം ചെയ്യാനും നായ്ക്കൾക്ക് ഭക്ഷണം നൽകാനും മൃദുവായ ബ്രഷ് ഉപയോഗിക്കുക.
- ഒരു സോഫ്റ്റ്, ഡി ഉപയോഗിച്ച് മെഷീൻ്റെ പുറംഭാഗം തുടയ്ക്കുകamp തുണി. കഠിനമായ രാസവസ്തുക്കൾ ഉപയോഗിക്കരുത്.
2 സൂചി മാറ്റിസ്ഥാപിക്കൽ
- മെഷീൻ അൺപ്ലഗ് ചെയ്തിട്ടുണ്ടെന്ന് ഉറപ്പാക്കുക.
- സൂചി cl അഴിക്കുകamp എതിർ ഘടികാരദിശയിൽ തിരിച്ച് സ്ക്രൂ ചെയ്യുക.
- പഴയ സൂചി നീക്കം ചെയ്യുക.
- മെഷീനിന്റെ പിൻഭാഗത്തേക്ക് അഭിമുഖമായി പരന്ന വശം വരുന്ന തരത്തിൽ ഒരു പുതിയ സൂചി തിരുകുക, അത് കഴിയുന്നിടത്തോളം മുകളിലേക്ക് തള്ളുക.
- സൂചി മുറുക്കുക clamp സുരക്ഷിതമായി സ്ക്രൂ ചെയ്യുക.
3. Presser Foot Replacement
- മെഷീൻ അൺപ്ലഗ് ചെയ്തിട്ടുണ്ടെന്ന് ഉറപ്പാക്കുക.
- പ്രസ്സർ ഫുട്ട് ലിഫ്റ്റർ ഉയർത്തുക.
- Press the presser foot release lever (usually located at the back of the presser foot holder) to detach the current presser foot.
- Align the new presser foot with the presser foot holder and lower the presser foot lifter until it snaps into place.
ട്രബിൾഷൂട്ടിംഗ്
| പ്രശ്നം | സാധ്യമായ കാരണം | പരിഹാരം |
|---|---|---|
| മെഷീൻ ആരംഭിക്കുന്നില്ല | Power not connected; Speed switch in 'OFF' position; Foot pedal not connected or faulty. | Check power adapter and foot pedal connections. Ensure speed switch is set to 'L' or 'H' (if not using foot pedal) or 'OFF' (if using foot pedal). |
| തുന്നലുകൾ ഒഴിവാക്കി | Incorrect needle size or type; Needle bent or dull; Incorrect threading; Fabric too thick. | Replace needle with correct type/size. Re-thread the machine carefully. Use appropriate needle for fabric thickness. |
| ത്രെഡ് ബ്രേക്കുകൾ | Incorrect thread tension; Poor quality thread; Needle bent or dull; Incorrect threading. | Adjust upper thread tension. Use good quality thread. Replace needle. Re-thread the machine. |
| Fabric puckering | Thread tension too high; Stitch length too short for fabric. | Reduce upper thread tension. Increase stitch length. |
| ബോബിൻ നൂലിന്റെ കുരുക്കുകൾ | Bobbin incorrectly inserted; Upper thread tension too loose. | Re-insert bobbin correctly, ensuring thread unwinds counter-clockwise. Increase upper thread tension. |
സ്പെസിഫിക്കേഷനുകൾ
- ബ്രാൻഡ്: Uten
- മോഡൽ: FR machine a coudre 508
- നിറം: വെള്ള
- മെറ്റീരിയൽ: സ്റ്റെയിൻലെസ്സ് സ്റ്റീൽ, പ്ലാസ്റ്റിക്
- ഉൽപ്പന്ന ഭാരം: 7.5 പൗണ്ട് (ഏകദേശം 3.4 കിലോഗ്രാം)
- ഊർജ്ജ സ്രോതസ്സ്: Electric (Cable)
- സ്റ്റിച്ച് പാറ്റേണുകൾ: 16 ബിൽറ്റ്-ഇൻ
- ഫീച്ചറുകൾ: Double thread, Double speed, Reverse sewing, Built-in light, Replaceable presser foot
വാറൻ്റിയും പിന്തുണയും
Information regarding product warranty and customer support was not provided in the product details. Please refer to your purchase documentation or contact the retailer for specific warranty terms and support options.