
E-DC90053
Advanced Portable Dash Car Camcorder Full HD 1080 - User Manual
ആമുഖം
Thank you for choosing the Advanced Portable Dash Car Camcorder. This device is designed to provide reliable recording of road conditions in Full HD 1080p, helping to document events and protect your interests. This manual provides detailed instructions for setup, operation, and maintenance to ensure optimal performance of your dash cam.
സുരക്ഷാ വിവരങ്ങൾ
- Do not operate the device while driving. Adjust settings only when the vehicle is safely parked.
- ഡാഷ് ക്യാം സുരക്ഷിതമായി ഘടിപ്പിച്ചിട്ടുണ്ടെന്നും ഡ്രൈവറുടെ വാഹനത്തിന് തടസ്സമാകുന്നില്ലെന്നും ഉറപ്പാക്കുക. view അല്ലെങ്കിൽ എയർബാഗ് വിന്യാസത്തിൽ ഇടപെടുക.
- ഉപകരണത്തെ തീവ്രമായ താപനിലയിലോ, ദീർഘനേരം നേരിട്ടുള്ള സൂര്യപ്രകാശത്തിലോ, അമിതമായ ഈർപ്പത്തിലോ തുറന്നുകാട്ടുന്നത് ഒഴിവാക്കുക.
- Use only the provided power adapter and cables. Using unauthorized accessories may damage the device and void the warranty.
- Keep the lens clean to ensure clear video recordings.
പാക്കേജ് ഉള്ളടക്കം
താഴെ പറയുന്ന ഇനങ്ങൾക്കായി ബോക്സ് ചെക്ക് ചെയ്യുക:
- 1 x Advanced Portable Dash Car Camcorder (Full HD 1080)
- 1 x DC Car Charger
- 1 x Suction Holder
- 1 x മൈക്രോ USB ചാർജിംഗ് കേബിൾ
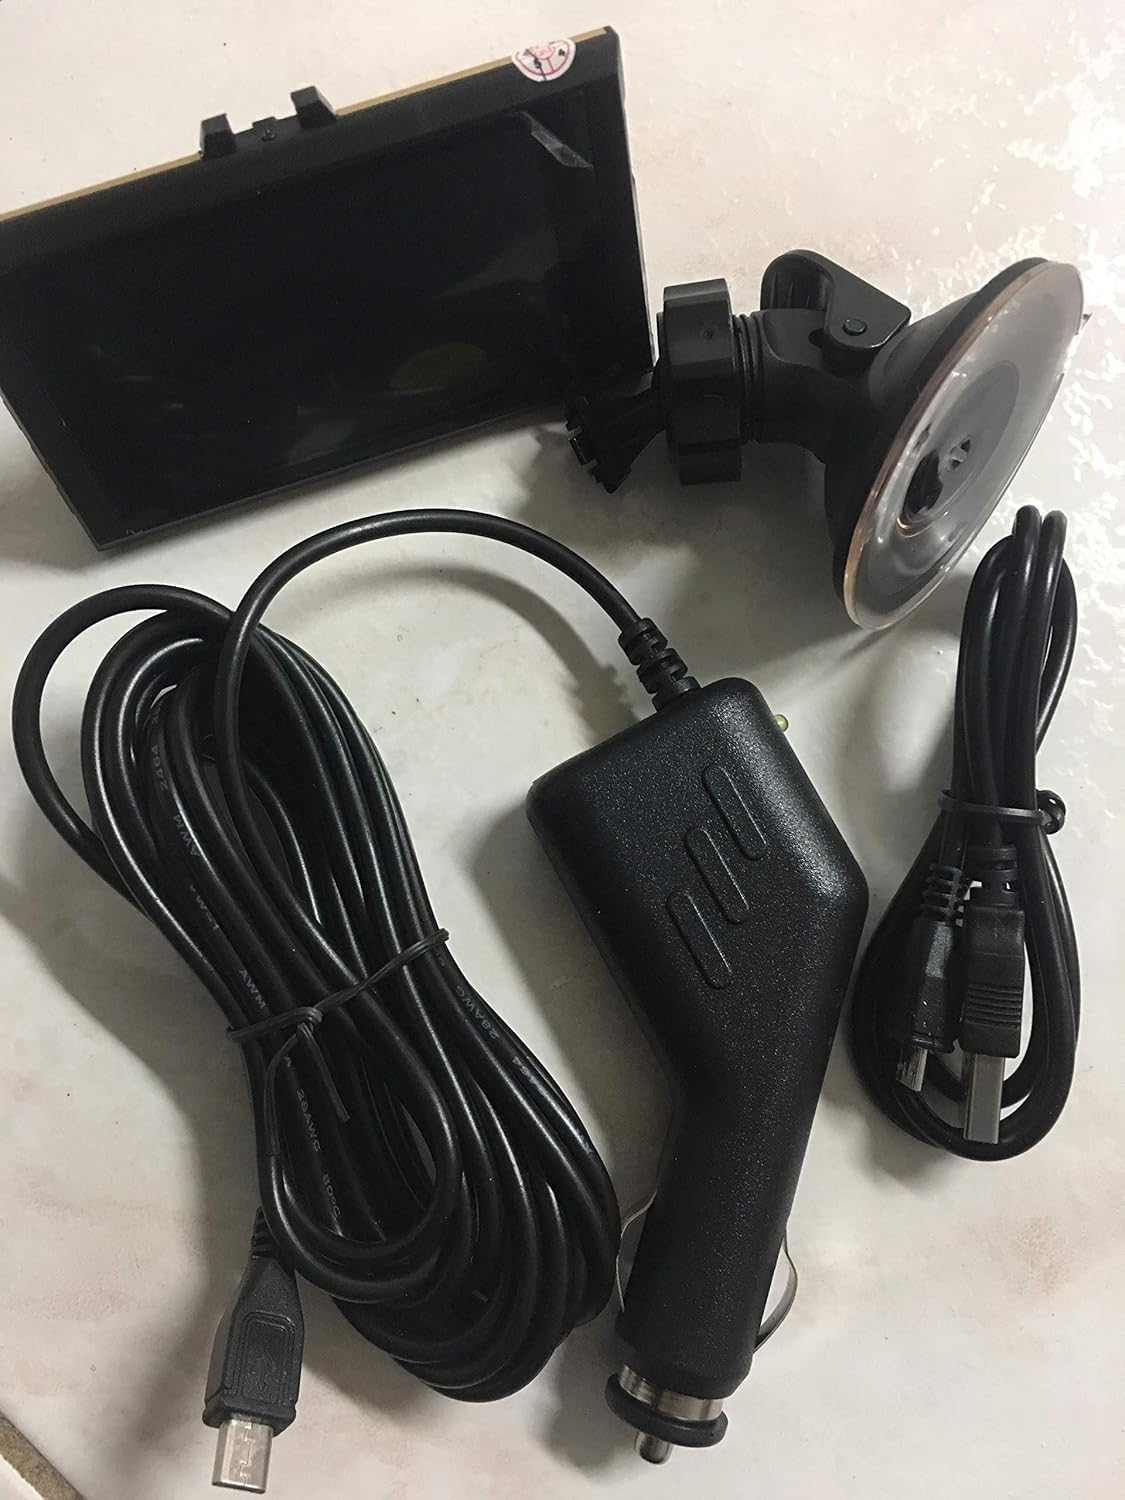
Image: All components included in the package, neatly arranged. This includes the main dash cam unit, the car charger, the suction cup mount, and a micro USB cable.
ഉൽപ്പന്നം കഴിഞ്ഞുview
Familiarize yourself with the various parts of your dash cam.

ചിത്രം: മുൻഭാഗം view of the dash cam, highlighting the main lens and the "FHD 1080P" marking on the device body. The device has a gold and black finish.

Image: Top-down perspective of the dash cam, providing a clearer view of the camera lens and the microphone (MIC) input. This angle also shows the mounting slot at the top.
പ്രധാന ഘടകങ്ങൾ:
- ലെൻസ്: വീഡിയോ foo ക്യാപ്ചർ ചെയ്യുന്നുtage.
- 3" എൽസിഡി സ്ക്രീൻ: വേണ്ടി viewലൈവ് ഫൂtage, പ്ലേബാക്ക്, മെനു നാവിഗേഷൻ.
- മൗണ്ടിംഗ് സ്ലോട്ട്: For attaching the suction holder.
- മൈക്രോഫോൺ (MIC): Records audio inside the vehicle.
- USB പോർട്ട്: For power connection and data transfer.
- മെമ്മറി കാർഡ് സ്ലോട്ട്: For inserting a microSD card (not included).
സജ്ജമാക്കുക
1. ഡാഷ് കാം മൌണ്ട് ചെയ്യുന്നു
- ഡാഷ് ക്യാം സ്ഥാപിക്കാൻ ഉദ്ദേശിക്കുന്ന വിൻഡ്ഷീൽഡ് ഭാഗം വൃത്തിയാക്കുക.
- Attach the suction holder to the dash cam's mounting slot.
- Press the suction cup firmly against the windshield and flip the lever to secure it. Ensure it does not obstruct your view.
- Adjust the angle of the dash cam to ensure the lens captures the road ahead clearly.
2. പവർ ബന്ധിപ്പിക്കുന്നു
- Connect the Micro USB charging cable to the dash cam's USB port.
- Plug the DC Car Charger into your vehicle's cigarette lighter socket.
- Route the cable neatly to avoid interference with driving. The dash cam will typically power on automatically when the vehicle starts and power off when the engine is turned off.
3. Inserting a Memory Card (Not Included)
A microSD card (Class 10 or higher, up to 32GB recommended) is required for recording. Insert the card into the designated slot until it clicks into place. Ensure the dash cam is powered off before inserting or removing the memory card.
പ്രവർത്തന നിർദ്ദേശങ്ങൾ
പവർ ഓൺ/ഓഫ്
- സ്വയമേവ: The dash cam will power on and begin recording automatically when connected to vehicle power and the engine starts. It will power off when the engine is turned off.
- മാനുവൽ: Press and hold the Power button (if available) to manually turn the device on or off.
റെക്കോർഡുചെയ്യൽ മോഡുകൾ
- തുടർച്ചയായ റെക്കോർഡിംഗ്: The dash cam records continuously in short segments (e.g., 1, 3, or 5 minutes). When the memory card is full, the oldest unlocked files will be overwritten (Loop Recording).
- ചലനം കണ്ടെത്തൽ: When enabled, the dash cam will automatically start recording if motion is detected in front of the vehicle while parked. This feature is typically used for parking surveillance.
- ജി-സെൻസർ (ഗ്രാവിറ്റി സെൻസർ): In the event of a sudden impact or collision, the G-Sensor will automatically lock the current video file, preventing it from being overwritten by loop recording. The sensitivity of the G-Sensor can usually be adjusted in the settings.
മെനു നാവിഗേഷൻ
Use the buttons on the dash cam (typically Mode, Up, Down, OK/Record) to navigate through the menu options on the 3" LCD screen. Refer to the on-screen prompts for specific functions.
പ്ലേബാക്ക്
ലേക്ക് view recorded videos:
- Stop recording (if currently recording).
- Enter Playback Mode (usually by pressing the Mode button).
- Use the Up/Down buttons to select the desired video file.
- Press the OK button to play the video.
തീയതിയും സമയവും ക്രമീകരണം
It is important to set the correct date and time for accurate timestamps on your recordings. Access the System Settings menu to adjust these parameters.
മെയിൻ്റനൻസ്
ഉപകരണം വൃത്തിയാക്കുന്നു
- ഡാഷ്ക്യാം ബോഡി വൃത്തിയാക്കാൻ മൃദുവായതും ഉണങ്ങിയതുമായ തുണി ഉപയോഗിക്കുക.
- ലെൻസിന്, ലെൻസ് ക്ലീനിംഗ് തുണി അല്ലെങ്കിൽ ഒപ്റ്റിക്സിനായി പ്രത്യേകം രൂപകൽപ്പന ചെയ്ത മൈക്രോഫൈബർ തുണി ഉപയോഗിക്കുക. അബ്രാസീവ് ക്ലീനറുകളോ ലായകങ്ങളോ ഉപയോഗിക്കരുത്.
മെമ്മറി കാർഡ് മാനേജ്മെന്റ്
- It is recommended to format the memory card regularly (e.g., once a month) within the dash cam's settings to ensure optimal performance and prevent data corruption. Formatting will erase all data on the card, so back up important fileകൾ ആദ്യം.
- Replace the memory card if you experience frequent recording errors or file അഴിമതി.
ട്രബിൾഷൂട്ടിംഗ്
| പ്രശ്നം | സാധ്യമായ പരിഹാരം |
|---|---|
| ഡാഷ് ക്യാം പവർ ഓൺ ചെയ്യുന്നില്ല. |
|
| റെക്കോർഡിംഗ് അപ്രതീക്ഷിതമായി നിലയ്ക്കുന്നു. |
|
| വീഡിയോ footage മങ്ങിയതോ അവ്യക്തമോ ആണ്. |
|
| G-Sensor is too sensitive/not sensitive enough. |
|
സ്പെസിഫിക്കേഷനുകൾ
| ഫീച്ചർ | വിശദാംശങ്ങൾ |
|---|---|
| വീഡിയോ ക്യാപ്ചർ റെസല്യൂഷൻ | 1080p ഫുൾ എച്ച്ഡി |
| ഡിസ്പ്ലേ സ്ക്രീൻ | 3" എൽസിഡി |
| View ആംഗിൾ | 170 ഡിഗ്രി |
| പ്രത്യേക സവിശേഷതകൾ | G-Sensor, Motion Detection, Cycle Recording |
| കണക്റ്റിവിറ്റി ടെക്നോളജി | USB |
| മൗണ്ടിംഗ് തരം | സക്ഷൻ മൗണ്ട് |
| നിറം | സ്വർണ്ണം |
| ഇനത്തിൻ്റെ ഭാരം | 9 ഔൺസ് |
| ബ്രാൻഡ് | ജനറിക് |
| Model Number (Identified from packaging) | E-DC90053 |
വാറൻ്റിയും പിന്തുണയും
For warranty information or technical support, please refer to the contact details provided by your retailer or the product packaging. As this is a Generic branded product, specific warranty terms may vary by seller.
For general inquiries, you may also refer to the product's ASIN: B07N7YMPRM.
Ask a question about this manual
Ask about setup, troubleshooting, compatibility, parts, safety, or missing instructions. Manuals+ will review the question and use this page’s manual context to help answer it.