1. ആമുഖം
The Samson AirLine 99m AH9 Headset Wireless System is a compact and versatile wireless microphone solution designed for active performers, presenters, and educators. This system provides high-definition audio transmission without the need for cables or belt packs, offering freedom of movement and ease of use. It operates on a frequency-agile UHF band, ensuring reliable performance across 100 selectable channels.
The system comprises three main components:
- AH9 Micro Transmitter: A lightweight, rechargeable transmitter integrated into the headset.
- AR99m Micro Receiver: A compact receiver with multiple output options for versatile connectivity.
- DE10x Headset Microphone: ഒരു ലോ-പ്രോfile, comfortable headset microphone designed for clear vocal reproduction.
2. സിസ്റ്റം ഘടകങ്ങൾ കഴിഞ്ഞുview

ചിത്രം 2.1: The complete Samson AirLine 99m AH9 Headset Wireless System, showing the AR99m receiver, AH9 micro transmitter, and DE10x headset microphone.

ചിത്രം 2.2: ക്ലോസ് അപ്പ് view of the AH9 micro transmitter integrated with the DE10x headset microphone. The green light indicates power status.

ചിത്രം 2.3: മുകളിൽ view of the AR99m micro receiver, showing the volume knob, SET button, channel display, and status indicators (READY, IR, PEAK).
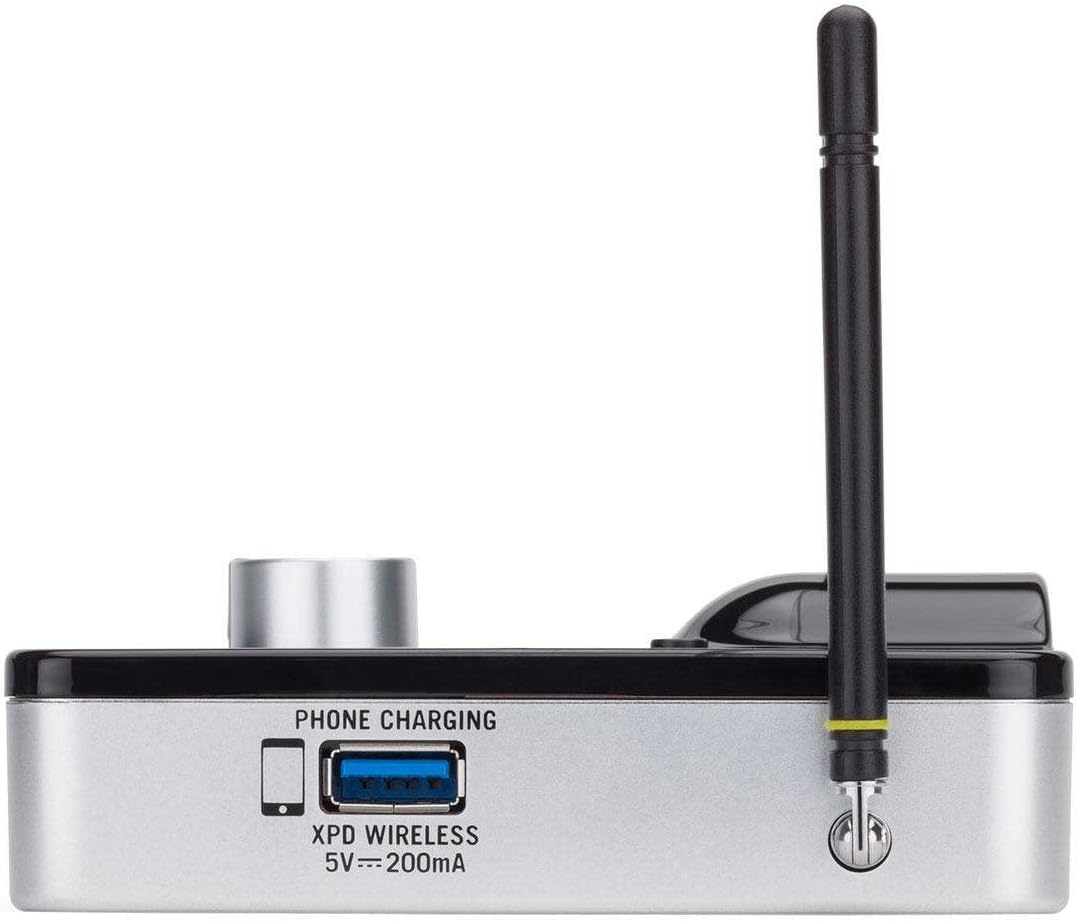
ചിത്രം 2.4: വശം view of the AR99m micro receiver, highlighting the 'PHONE CHARGING' USB port (5V --- 200mA) and antenna connection.

ചിത്രം 2.5: കോണാകൃതിയിലുള്ളത് view of the AR99m micro receiver, showing the DC IN port, 1/8" unbalanced output, and XLR balanced output.

ചിത്രം 2.6: പിൻഭാഗം view of the AH9 micro transmitter, showing the charging contacts and the integrated headset cable connection.

ചിത്രം 2.7: പിൻഭാഗം view of the AR99m micro receiver, detailing the DC IN (15V === 600mA), 1/4" unbalanced output, and XLR balanced output ports.

ചിത്രം 2.8: The DE10x headset microphone, showing its lightweight design and adjustable ear hooks.
3. സജ്ജീകരണ നിർദ്ദേശങ്ങൾ
3.1. Charging the AH9 Micro Transmitter
- Connect the supplied USB charging cable to the AH9 micro transmitter.
- Plug the other end of the USB cable into a standard USB power adapter (not included) or a powered USB port.
- The LED indicator on the AH9 will show charging status. A full charge provides up to 8 hours of operation.
3.2. Connecting the AR99m Micro Receiver
- Connect the included power adapter to the DC IN port (15V === 600mA) on the AR99m receiver.
- ഒരു എസി ഔട്ട്ലെറ്റിൽ പവർ അഡാപ്റ്റർ പ്ലഗ് ചെയ്യുക.
- Connect the AR99m receiver to your audio mixer, PA system, or recording device using one of the following outputs:
- സമതുലിതമായ XLR ഔട്ട്പുട്ട്: പ്രൊഫഷണൽ ഓഡിയോ ഉപകരണങ്ങൾക്ക്.
- Unbalanced 1/4" Output: For standard instrument inputs or line-level inputs.
- Unbalanced 1/8" Output: For consumer-grade audio devices or computer inputs.
- Extend the antennas on the AR99m receiver for optimal signal reception.
3.3. Wearing the DE10x Headset Microphone
- Carefully place the headset over your ears, ensuring a comfortable and secure fit.
- Position the microphone element approximately 1-2 inches from the corner of your mouth for best sound quality.
- Use the included windscreens to reduce plosives and wind noise, if necessary.
4. പ്രവർത്തന നിർദ്ദേശങ്ങൾ
4.1. പവർ ഓൺ/ഓഫ്
- AH9 Micro Transmitter: Press and hold the power button on the transmitter until the LED illuminates. Press and hold again to power off.
- AR99m Micro Receiver: Turn the VOLUME knob clockwise to power on. Turn counter-clockwise until it clicks to power off.
4.2. Channel Selection and Pairing
The AirLine 99m system features 100 operating channels across a 24MHz bandwidth.
- Turn on the AR99m receiver. The channel display will show the current channel.
- അമർത്തുക സെറ്റ് button on the AR99m receiver to cycle through available channels. Select a clear channel with no interference.
- Once a channel is selected on the receiver, turn on the AH9 transmitter.
- The AH9 transmitter will automatically scan and pair with the receiver on the selected channel. The 'READY' indicator on the receiver will illuminate when a successful connection is established.
4.3. വോളിയം ക്രമീകരിക്കുന്നു
ഉപയോഗിക്കുക വോളിയം knob on the AR99m receiver to adjust the output level of the wireless system. Start with a low volume and gradually increase it to avoid sudden loud audio.
4.4. Monitoring Signal Status
- READY Indicator: Illuminates when the transmitter and receiver are successfully paired and receiving a signal.
- PEAK Indicator: Illuminates when the audio input from the transmitter is too high, indicating potential clipping. Reduce the input gain on your mixer or adjust the microphone position if this occurs.
- IR സൂചകം: Used during initial setup for infrared pairing (if applicable, though this model typically auto-pairs).
5. പരിപാലനം
- വൃത്തിയാക്കൽ: Use a soft, dry cloth to clean the surfaces of the transmitter and receiver. Avoid using abrasive cleaners or solvents.
- ബാറ്ററി കെയർ: Recharge the AH9 transmitter regularly. For long-term storage, ensure the battery is partially charged (around 50%) to prolong its lifespan.
- സംഭരണം: നേരിട്ടുള്ള സൂര്യപ്രകാശത്തിൽ നിന്നും കടുത്ത താപനിലയിൽ നിന്നും അകന്ന് തണുത്തതും വരണ്ടതുമായ സ്ഥലത്ത് സിസ്റ്റം സൂക്ഷിക്കുക.
- വിൻഡ്സ്ക്രീനുകൾ: Replace windscreens on the DE10x headset microphone as needed to maintain hygiene and acoustic performance.
6. പ്രശ്നപരിഹാരം
| പ്രശ്നം | സാധ്യമായ കാരണം | പരിഹാരം |
|---|---|---|
| റിസീവറിൽ നിന്ന് ശബ്ദമില്ല |
|
|
| Interference or dropouts |
|
|
| വികലമായ ഓഡിയോ |
|
|
| ചെറിയ ബാറ്ററി ലൈഫ് |
|
|
7 സ്പെസിഫിക്കേഷനുകൾ
| ഫീച്ചർ | വിശദാംശങ്ങൾ |
|---|---|
| മോഡൽ നമ്പർ | SW9A9SDE10-K |
| ഓപ്പറേറ്റിംഗ് ചാനലുകൾ | 100 (across 24MHz bandwidth) |
| പ്രവർത്തന ശ്രേണി | 300 അടി വരെ (കാഴ്ചയുടെ രേഖ) |
| AH9 Transmitter Battery Life | Up to 8 hours (Lithium-Ion, rechargeable) |
| AR99m Receiver Outputs | Balanced XLR, Unbalanced 1/4", Unbalanced 1/8" |
| മൈക്രോഫോൺ തരം | DE10x Headset Microphone |
| ആക്സസറികൾ ഉൾപ്പെടുത്തിയിട്ടുണ്ട് | 4 Windscreens, USB charging cable, Power adapter |
| ഇനത്തിൻ്റെ ഭാരം | 1 പൗണ്ട് |
| ഉൽപ്പന്ന അളവുകൾ | 3 x 3 x 3 ഇഞ്ച് |
| മെറ്റീരിയൽ തരം | പ്ലാസ്റ്റിക് |
| പവർ ഉറവിടം | ബാറ്ററി പവർ |
| അനുയോജ്യമായ ഉപകരണങ്ങൾ | Mixers, Audio Interfaces, PA Systems, Computers, Recording Devices |
8. വാറൻ്റിയും പിന്തുണയും
For warranty information and technical support, please refer to the official Samson Technologies webസൈറ്റിൽ ബന്ധപ്പെടുകയോ അവരുടെ ഉപഭോക്തൃ സേവനവുമായി നേരിട്ട് ബന്ധപ്പെടുകയോ ചെയ്യുക. ഏതെങ്കിലും വാറന്റി ക്ലെയിമുകൾക്ക് വാങ്ങിയതിന്റെ തെളിവായി നിങ്ങളുടെ വാങ്ങൽ രസീത് സൂക്ഷിക്കുക.
ഓൺലൈൻ ഉറവിടങ്ങൾ: സന്ദർശിക്കുക Samson Brand Store on Amazon കൂടുതൽ ഉൽപ്പന്ന വിവരങ്ങൾക്കും പിന്തുണയ്ക്കും.