
Audiovox AVXSB10UHD
VOXX AVXSB10UHD Rear Seat Entertainment System
ഉപയോക്തൃ നിർദ്ദേശ മാനുവൽ
1. ആമുഖം
This manual provides comprehensive instructions for the installation, operation, and maintenance of your Audiovox VOXX AVXSB10UHD Rear Seat Entertainment System. This system features two 10.1-inch touchscreen monitors designed to provide an immersive entertainment experience for rear-seat passengers.
പ്രധാന സവിശേഷതകൾ:
- Two 10.1-inch capacitive touchscreens
- Built-in DVD player in one monitor
- Multiple A/V inputs: HDMI, USB, and microSD
- Wireless headphone support (two pairs included)
- Universal mounting brackets and hard-wire kit for installation
2. പാക്കേജ് ഉള്ളടക്കം
ഇൻസ്റ്റാളേഷൻ ആരംഭിക്കുന്നതിന് മുമ്പ്, പാക്കേജിൽ എല്ലാ ഘടകങ്ങളും ഉണ്ടെന്ന് ദയവായി ഉറപ്പാക്കുക:
- 2 x 10.1" Touchscreen Monitors (one with integrated DVD player)
- 2 x Wireless Over-the-Ear Dual-channel IR Headphones
- യൂണിവേഴ്സൽ മൗണ്ടിംഗ് ബ്രാക്കറ്റുകൾ
- ഹാർഡ് വയർ കിറ്റ്
- 1 x USB port (integrated)
- 1 x Micro SD port (integrated)
- 1 x HDMI port (integrated)
- User Instruction Manual (this document)
3. സജ്ജീകരണവും ഇൻസ്റ്റാളേഷനും
Professional installation is recommended for this product. Ensure the vehicle's power is disconnected before beginning any wiring.
3.1 Mounting the Monitors
The system includes universal mounting brackets designed for secure attachment to the vehicle's headrest posts. Follow these steps:
- Identify suitable headrest posts for mounting.
- Attach the universal mounting brackets to the headrest posts, ensuring a secure and stable fit.
- Carefully slide the monitors onto the installed brackets until they click into place.
- ക്രമീകരിക്കുക viewing angle of each monitor for optimal passenger comfort.
3.2 വയറിംഗ് കണക്ഷനുകൾ
The hard-wire kit provides the necessary connections for power and audio/video signals. Refer to the wiring diagram included with the kit for specific connections.
- പവർ കണക്ഷൻ: Connect the power wires to the vehicle's electrical system (12V DC). Ensure proper grounding.
- ഓഡിയോ/വീഡിയോ ഇൻപുട്ടുകൾ: Connect external devices (e.g., gaming consoles, smartphones) to the HDMI, USB, or microSD ports as needed.
- ഓഡിയോ ഔട്ട്പുട്ട്: The system supports wireless IR headphones. Ensure headphones are charged and paired according to their individual instructions.
പ്രധാനപ്പെട്ടത്: Incorrect wiring can damage the system or vehicle. If unsure, consult a qualified automotive electronics technician.
4. പ്രവർത്തന നിർദ്ദേശങ്ങൾ
The VOXX AVXSB10UHD system features intuitive touchscreen controls and a user-friendly interface.
4.1 പവർ ഓൺ/ഓഫ്
Press and hold the power button located on the monitor's bezel to turn the unit on or off. The system will typically power on automatically when the vehicle's ignition is turned on.
4.2 ഇന്റർഫേസ് നാവിഗേറ്റ് ചെയ്യൽ
The main screen displays various input options and applications. Tap on an icon to select it.
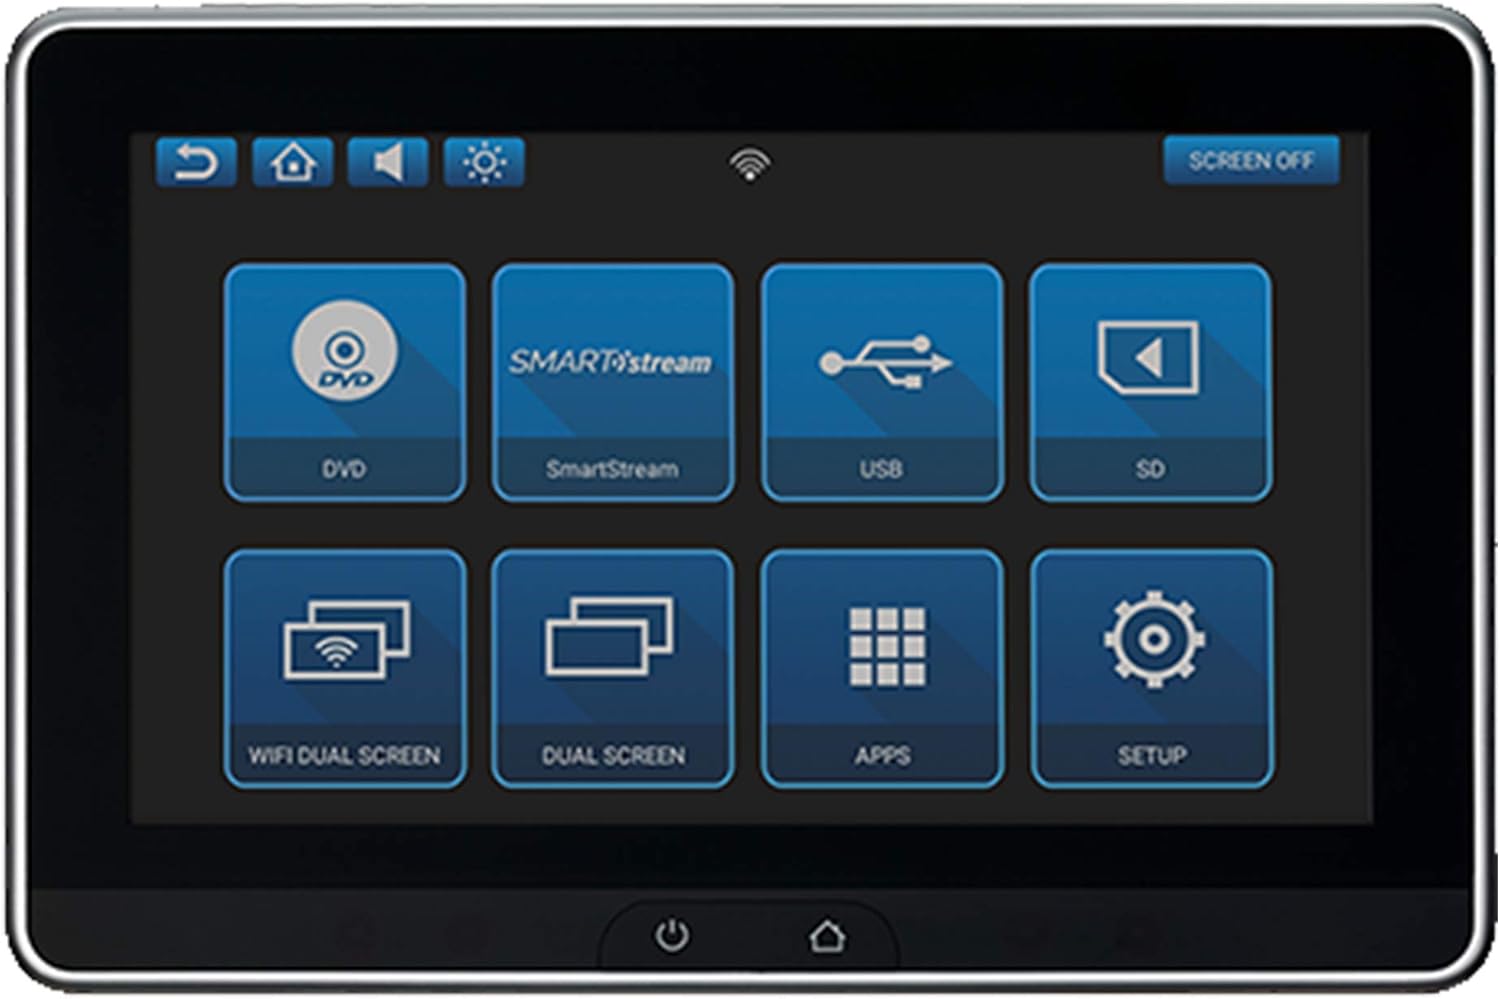
Figure 1: Main interface screen with various input and application options. Icons include HDMI, SmartStream, USB, SD, WiFi Dual Screen, Dual Screen, Apps, and Setup.

Figure 2: Main interface screen of the monitor with the built-in DVD player, showing the DVD icon alongside other options like SmartStream, USB, SD, WiFi Dual Screen, Dual Screen, Apps, and Setup.
4.3 ഇൻപുട്ട് ഉറവിടങ്ങൾ
- ഡിവിഡി പ്ലയർ: Insert a DVD into the slot on the monitor equipped with the DVD player. Select the "DVD" icon on the screen to begin playback.
- എച്ച്ഡിഎംഐ: Connect an HDMI-compatible device (e.g., smartphone, tablet, game console) to the HDMI input. Select the "HDMI" icon.
- USB: മീഡിയ അടങ്ങുന്ന ഒരു USB ഡ്രൈവ് ചേർക്കുക files into the USB port. Select the "USB" icon to browse and play content.
- മൈക്രോ എസ്ഡി: Insert a microSD card containing media files into the microSD slot. Select the "SD" icon to browse and play content.
- SmartStream: Utilize the SmartStream feature for wireless content sharing. Refer to the SmartStream specific instructions for pairing devices.
- WiFi Dual Screen: Connect to a Wi-Fi network to enable internet browsing and app usage. This feature also allows for screen mirroring between the two monitors or from a compatible external device.
- Dual Screen: This option allows for synchronized playback across both monitors or independent content viewing.
4.4 Using Applications (Apps)
The system supports various applications. Select the "Apps" icon to access installed applications. You can download additional applications via the Google Play Store when connected to Wi-Fi.

Figure 3: The dual monitor system installed in a vehicle, demonstrating the ability to control the system from the front seat using a smartphone app (for Android and Apple devices). Various entertainment app icons are shown, indicating the system's multimedia capabilities.
4.5 വയർലെസ് ഹെഡ്ഫോണുകൾ
The included wireless IR headphones provide private listening. Ensure the headphones are powered on and set to the correct channel (A or B) to match the monitor's audio output. Refer to the headphone's separate manual for detailed pairing and usage instructions.
5. പരിപാലനം
To ensure the longevity and optimal performance of your entertainment system, follow these maintenance guidelines:
- വൃത്തിയാക്കൽ: Use a soft, lint-free cloth to clean the touchscreen monitors. For stubborn smudges, slightly dampതുണിയിൽ വെള്ളം അല്ലെങ്കിൽ സ്ക്രീൻ-സേഫ് ക്ലീനർ ഉപയോഗിക്കുക. ഉരച്ചിലുകൾ ഉള്ള വസ്തുക്കളോ കഠിനമായ രാസവസ്തുക്കളോ ഒഴിവാക്കുക.
- പൊടി നീക്കം: Regularly wipe down the exterior of the units to prevent dust buildup, especially around vents and ports.
- സോഫ്റ്റ്വെയർ അപ്ഡേറ്റുകൾ: Periodically check for software updates through the system's settings menu when connected to Wi-Fi. Keeping the software updated can improve performance and add new features.
- സംഭരണം: If the vehicle will be stored for an extended period, ensure the system is powered off.
6. പ്രശ്നപരിഹാരം
This section addresses common issues you might encounter with your VOXX AVXSB10UHD system.
| പ്രശ്നം | സാധ്യമായ കാരണം | പരിഹാരം |
|---|---|---|
| No power to monitors. | അയഞ്ഞ വൈദ്യുതി കണക്ഷൻ, ഫ്യൂസ് പൊട്ടി, വാഹനത്തിന്റെ ഇഗ്നിഷൻ ഓഫാണ്. | Check all power connections. Inspect vehicle's fuse box for a blown fuse and replace if necessary. Ensure vehicle ignition is on. |
| സ്ക്രീനിൽ ചിത്രമൊന്നുമില്ല. | Incorrect input selected, source device not connected or powered on, damaged cable. | Verify the correct input source is selected. Ensure the external device is properly connected and powered on. Check cables for damage. |
| ഹെഡ്ഫോണുകളിൽ നിന്ന് ശബ്ദമില്ല. | Headphones not powered on, incorrect channel selected, low headphone battery. | Turn on headphones. Ensure headphones are set to the correct IR channel (A or B). Replace or recharge headphone batteries. |
| DVD not playing. | Disc inserted incorrectly, disc damaged/dirty, region code incompatibility. | Ensure disc is inserted correctly. Clean the disc. Verify the disc's region code is compatible with the player. |
| വൈഫൈ കണക്ഷൻ പ്രശ്നങ്ങൾ. | Out of range, incorrect password, network interference. | Move closer to the Wi-Fi source. Re-enter Wi-Fi password. Try connecting to a different network if available. |
ഈ പരിഹാരങ്ങൾ പരീക്ഷിച്ചതിനുശേഷവും പ്രശ്നം നിലനിൽക്കുകയാണെങ്കിൽ, ദയവായി ഉപഭോക്തൃ പിന്തുണയുമായി ബന്ധപ്പെടുക.
7 സ്പെസിഫിക്കേഷനുകൾ
| ഫീച്ചർ | വിശദാംശങ്ങൾ |
|---|---|
| മോഡൽ നമ്പർ | AVXSB10UHD |
| സ്ക്രീൻ വലിപ്പം | 10.1 ഇഞ്ച് (26 സെ.മീ. ദൃശ്യമായ ഡയഗണൽ) |
| ഡിസ്പ്ലേ തരം | എൽഇഡി, എൽസിഡി |
| നിറം | കറുപ്പ് |
| പിന്തുണയ്ക്കുന്ന മീഡിയ തരം | DVD, USB, MicroSD, HDMI |
| ഉൽപ്പന്ന അളവുകൾ | 14 x 16 x 12 ഇഞ്ച് |
| ഇനത്തിൻ്റെ ഭാരം | 20 പൗണ്ട് |
| നിർമ്മാതാവ് | ഓഡിയോവോക്സ് |
| ആദ്യം ലഭ്യമായത് | 15 മാർച്ച് 2019 |
8. വാറൻ്റിയും പിന്തുണയും
8.1 വാറൻ്റി വിവരങ്ങൾ
This Audiovox product is covered by a manufacturer's warranty. Please refer to the warranty card included in your product packaging for specific terms, conditions, and duration. Retain your proof of purchase for warranty claims.
8.2 ഉപഭോക്തൃ പിന്തുണ
For technical assistance, troubleshooting beyond this manual, or warranty inquiries, please contact Audiovox customer support. Contact information can typically be found on the manufacturer's official webസൈറ്റ് അല്ലെങ്കിൽ ഉൽപ്പന്ന പാക്കേജിംഗിൽ.
ഓൺലൈൻ ഉറവിടങ്ങൾ: Visit the official Audiovox website for FAQs, updated manuals, and support contact details.
Ask a question about this manual
Ask about setup, troubleshooting, compatibility, parts, safety, or missing instructions. Manuals+ will review the question and use this page’s manual context to help answer it.