ALONEFIRE H38
Alonefire H38 Tactical LED Flashlight User Manual
മോഡൽ: H38
1. ആമുഖം
Thank you for choosing the Alonefire H38 Tactical LED Flashlight. This high-performance flashlight is designed for reliability and versatility, featuring a powerful LED, multiple lighting modes, USB recharging, and a power output function. Please read this manual carefully to ensure proper use and maintenance of your device.
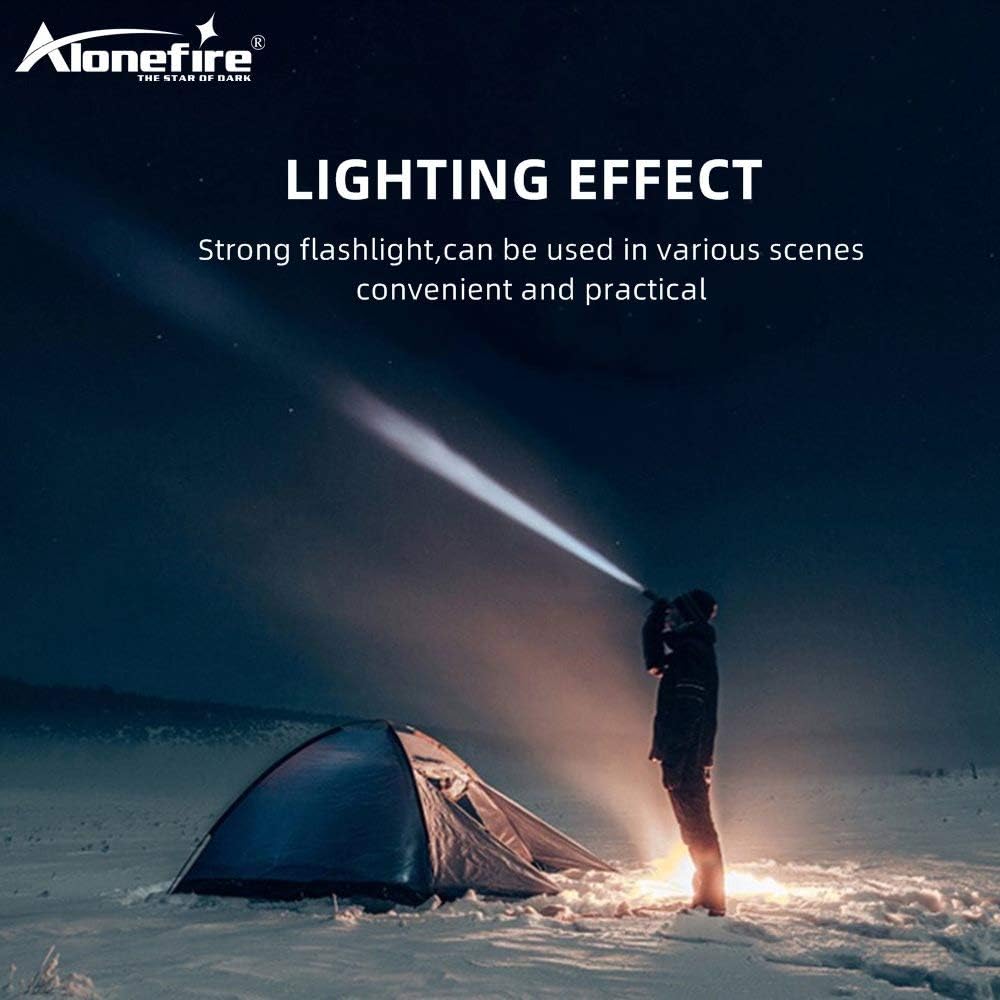
Figure 1: Alonefire H38 providing strong illumination in a dark environment.
2 സുരക്ഷാ വിവരങ്ങൾ
- നേത്ര സുരക്ഷ: എൽഇഡി ലൈറ്റിലേക്ക് നേരിട്ട് നോക്കുകയോ ആളുകളുടെയോ മൃഗങ്ങളുടെയോ കണ്ണുകളിലേക്ക് നേരിട്ട് പ്രകാശിപ്പിക്കുകയോ ചെയ്യരുത്. ഉയർന്ന തീവ്രതയുള്ള പ്രകാശം താൽക്കാലിക കാഴ്ച വൈകല്യത്തിനോ സ്ഥിരമായ കണ്ണിന് കേടുപാടിനോ കാരണമാകും.
- ചൂട്: The flashlight may become warm during prolonged use, especially on high brightness modes. Handle with care.
- ബാറ്ററി കൈകാര്യം ചെയ്യൽ: Use only recommended Lithium-ion batteries. Do not mix old and new batteries, or different types of batteries. Do not attempt to disassemble, puncture, or short-circuit the battery.
- ജല പ്രതിരോധം: The flashlight has an IP5 water resistance rating, meaning it is protected against low-pressure water jets from any direction. It is suitable for use in rainy conditions but should not be submerged in water.
- കുട്ടികൾ: കുട്ടികൾക്ക് ലഭ്യമാകാതെ സൂക്ഷിക്കുക.
3. പാക്കേജ് ഉള്ളടക്കം
പാക്കേജിൽ ഇനിപ്പറയുന്ന ഇനങ്ങൾ ഉണ്ടോ എന്ന് പരിശോധിക്കുക:
- Alonefire H38 Tactical LED Flashlight
- യുഎസ്ബി ചാർജിംഗ് കേബിൾ
- റിസ്റ്റ് സ്ട്രാപ്പ്
- Battery Tube (for AAA batteries, if applicable)
- Lithium-ion Battery (if included, otherwise sold separately)

Figure 2: Included components of the Alonefire H38 package.
4. ഉൽപ്പന്നം കഴിഞ്ഞുview
Familiarize yourself with the different parts of your Alonefire H38 flashlight:

Figure 3: Labeled components of the Alonefire H38 Flashlight.
- എൽഇഡി എൽamp: പ്രാഥമിക പ്രകാശ സ്രോതസ്സ്.
- Zoomable Zone: Adjustable head for wide floodlight or focused spotlight.
- വൈദ്യുതി സ്വിച്ച്: ഫ്ലാഷ്ലൈറ്റ് ഓൺ/ഓഫ് ചെയ്യാനും മോഡുകളിലൂടെ കടന്നുപോകാനുമുള്ള ബട്ടൺ.
- ചാർജിംഗ് സൂചകം: LEDs that show charging status and battery level.
- Copper Contactor: Ensures stable electrical connection with the battery.
- Anti-skip Handle: Textured surface for a secure grip.
- ലി-അയൺ ബാറ്ററി: റീചാർജ് ചെയ്യാവുന്ന പവർ സ്രോതസ്സ്.
5. സജ്ജീകരണം
5.1. ബാറ്ററി ഇൻസ്റ്റാളേഷൻ
- ഫ്ലാഷ്ലൈറ്റിന്റെ ടെയിൽ ക്യാപ്പ് അഴിക്കുക.
- Insert the Lithium-ion battery with the positive (+) end facing towards the head of the flashlight.
- If using AAA batteries (not included), place them into the provided battery tube and insert the tube into the flashlight.
- ടെയിൽ ക്യാപ് സുരക്ഷിതമായി തിരികെ സ്ക്രൂ ചെയ്യുക.
5.2. പ്രാരംഭ ചാർജിംഗ്
Before first use, fully charge the flashlight.
- Locate the micro USB charging port, usually hidden under a rubber cover on the side of the flashlight.
- Connect the small end of the USB charging cable to the flashlight's micro USB port.
- Connect the larger end of the USB cable to a USB power source (e.g., wall adapter, computer USB port, power bank).
- The charging indicator lights will illuminate to show the charging progress. Once fully charged, all indicator lights will typically be solid blue.

Figure 4: Charging the Alonefire H38 via micro USB port.
6. പ്രവർത്തന നിർദ്ദേശങ്ങൾ
6.1. പവർ ഓൺ/ഓഫ്, മോഡ് തിരഞ്ഞെടുക്കൽ

Figure 5: The five lighting modes of the Alonefire H38.
- ഓണാക്കാൻ: Press the power switch button once. The flashlight will turn on in the last used mode.
- To Change Modes: With the flashlight on, press the power switch button repeatedly to cycle through the 5 modes: High > Medium > Low > Strobe > SOS.
- ഓഫാക്കാൻ: പവർ സ്വിച്ച് ബട്ടൺ ഏകദേശം 2 സെക്കൻഡ് അമർത്തിപ്പിടിക്കുക.
6.2. സൂം ഫംഗ്ഷൻ
The Alonefire H38 features an adjustable zoom function:
- To Zoom In (Spotlight): Extend the head of the flashlight forward. This narrows the beam for a more focused, long-distance light.
- To Zoom Out (Floodlight): Retract the head of the flashlight backward. This widens the beam for broader area illumination.
6.3. Power Output (Power Bank Function)
The flashlight can also serve as a temporary power bank to charge other devices.
- Locate the USB output port, usually next to the micro USB input port.
- Connect your device (e.g., smartphone) to the USB output port using its charging cable.
- ഫ്ലാഷ്ലൈറ്റ് നിങ്ങളുടെ ഉപകരണം ചാർജ് ചെയ്യാൻ തുടങ്ങും.

Figure 6: Using the Alonefire H38 as a power bank to charge a smartphone.

Figure 7: The Alonefire H38 flashlight with an attached wrist strap for secure handling.
7. പരിപാലനം
- വൃത്തിയാക്കൽ: ഫ്ലാഷ്ലൈറ്റ് ബോഡി മൃദുവായ, ഡി ഉപയോഗിച്ച് തുടയ്ക്കുക.amp തുണി. ഉരച്ചിലുകളുള്ള ക്ലീനറുകളോ ലായകങ്ങളോ ഉപയോഗിക്കരുത്.
- ലൂബ്രിക്കേഷൻ: Periodically apply silicone grease to the O-rings and threads to maintain water resistance and smooth operation.
- ബാറ്ററി കെയർ: If the flashlight will not be used for an extended period, remove the battery to prevent leakage and damage. Store batteries in a cool, dry place.
- സംഭരണം: Store the flashlight in a cool, dry environment away from direct sunlight and extreme temperatures.
8. പ്രശ്നപരിഹാരം
| പ്രശ്നം | സാധ്യമായ കാരണം | പരിഹാരം |
|---|---|---|
| ടോർച്ച് ഓണാകുന്നില്ല. | ബാറ്ററി തീർന്നു അല്ലെങ്കിൽ തെറ്റായി ചേർത്തിരിക്കുന്നു. | Recharge the battery or check its orientation. Ensure the tail cap is fully tightened. |
| വെളിച്ചം മങ്ങുന്നു അല്ലെങ്കിൽ മിന്നിമറയുന്നു. | കുറഞ്ഞ ബാറ്ററി ചാർജ്. | ബാറ്ററി പൂർണ്ണമായും റീചാർജ് ചെയ്യുക. |
| ഫ്ലാഷ്ലൈറ്റ് ചാർജ് ചെയ്യുന്നില്ല. | Faulty USB cable or power source. Charging port cover not fully open. | Try a different USB cable or power source. Ensure the charging port is clean and accessible. |
| സൂം പ്രവർത്തനം കഠിനമാണ്. | Dirt or lack of lubrication. | Clean the zoom mechanism and apply a small amount of silicone grease. |
9 സ്പെസിഫിക്കേഷനുകൾ
| ഫീച്ചർ | വിശദാംശങ്ങൾ |
|---|---|
| ബ്രാൻഡ് | എലോൺഫയർ |
| മോഡൽ | H38 |
| പ്രകാശ സ്രോതസ്സ് | എൽഇഡി |
| ല്യൂമെൻ ഔട്ട്പുട്ട് | 5000 lm വരെ |
| ലൈറ്റിംഗ് മോഡുകൾ | High, Medium, Low, Strobe, SOS (5 modes) |
| മെറ്റീരിയൽ | അലുമിനിയം അലോയ് |
| അളവുകൾ (L x W x H) | 4.69 x 0.91 x 0.91 cm (approx. 162mm - 178mm length) |
| ഭാരം | 53.8 ഗ്രാം |
| ബാറ്ററി തരം | 1 Lithium-ion (requires) |
| വാല്യംtage | 5 വോൾട്ട് |
| വാട്ടർപ്രൂഫ് റേറ്റിംഗ് | IP5 |
| പ്രത്യേക സവിശേഷതകൾ | USB Rechargeable, Power Output (Power Bank), Zoomable |
10. വാറൻ്റിയും പിന്തുണയും
10.1. വാറൻ്റി വിവരങ്ങൾ
For specific warranty details, please refer to the documentation provided at the time of purchase or contact your retailer. The manufacturer typically offers a warranty against defects in materials and workmanship for a specified period.
10.2. ഉപഭോക്തൃ പിന്തുണ
If you encounter any issues or have questions not covered in this manual, please contact Alonefire customer service or your point of purchase for assistance. Keep your purchase receipt as proof of purchase.
Ask a question about this manual
Ask about setup, troubleshooting, compatibility, parts, safety, or missing instructions. Manuals+ will review the question and use this page’s manual context to help answer it.