
1. ആമുഖം
This manual provides essential information for the safe and efficient operation, maintenance, and troubleshooting of your Numatic HVR-169 Henry Parquet vacuum cleaner. Please read these instructions carefully before using the appliance and retain them for future reference.
2 സുരക്ഷാ വിവരങ്ങൾ
- Always disconnect the vacuum cleaner from the power supply before cleaning or performing any maintenance.
- Do not use the appliance to pick up liquids, flammable materials, or hot ashes.
- Ensure the dust bag and filters are correctly installed before operation.
- മുടി, അയഞ്ഞ വസ്ത്രങ്ങൾ, വിരലുകൾ, ശരീരത്തിൻ്റെ എല്ലാ ഭാഗങ്ങളും തുറസ്സുകളിൽ നിന്നും ചലിക്കുന്ന ഭാഗങ്ങളിൽ നിന്നും അകറ്റി നിർത്തുക.
- മേൽനോട്ടമോ നിർദ്ദേശമോ നൽകിയിട്ടില്ലെങ്കിൽ, ശാരീരികമോ ഇന്ദ്രിയപരമോ മാനസികമോ ആയ കഴിവുകൾ കുറഞ്ഞവർ, അല്ലെങ്കിൽ അനുഭവപരിചയമോ അറിവോ ഇല്ലാത്തവർ എന്നിവർക്ക് ഈ ഉപകരണം ഉപയോഗിക്കാൻ ഉദ്ദേശിച്ചുള്ളതല്ല.
- കേടായ കോർഡോ പ്ലഗോ ഉപയോഗിച്ച് വാക്വം ക്ലീനർ പ്രവർത്തിപ്പിക്കരുത്.
3. ഉൽപ്പന്ന ഘടകങ്ങൾ
The Numatic HVR-169 Henry Parquet vacuum cleaner comes with various components designed for effective cleaning across different surfaces. Familiarize yourself with these parts for optimal use.
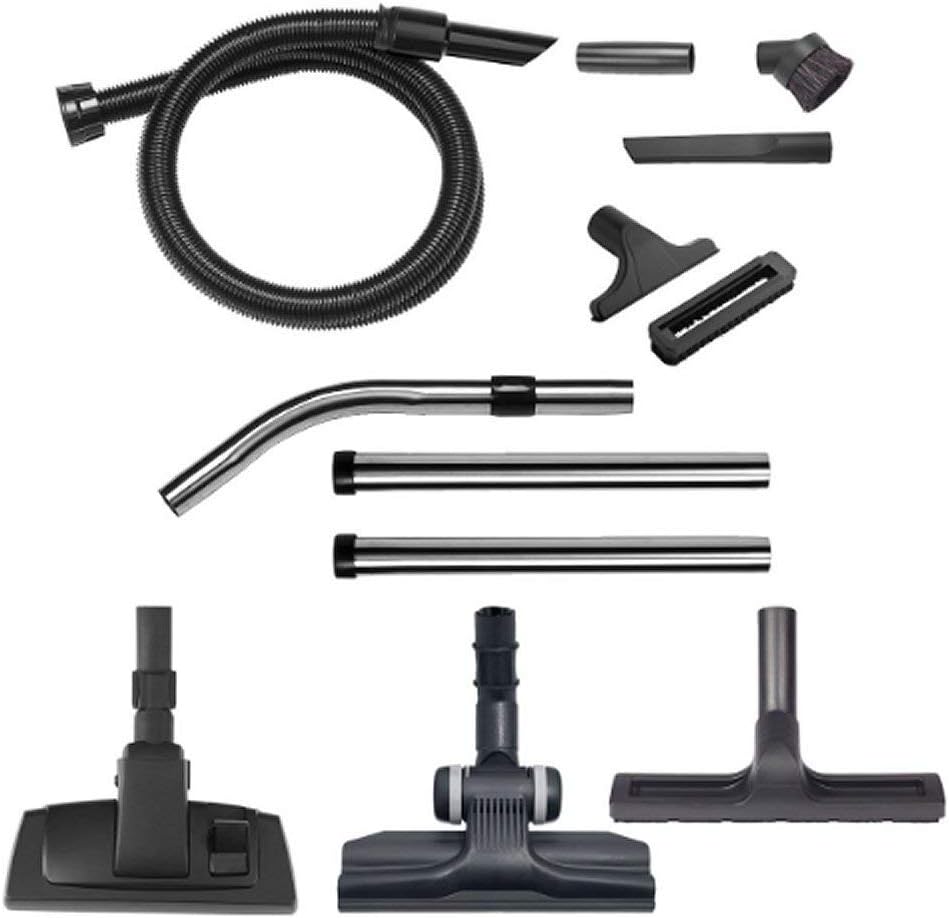
ചിത്രം 1: കഴിഞ്ഞുview of Numatic HVR-169 Henry Parquet vacuum cleaner components. This includes the flexible hose, curved and straight extension wands, a crevice tool, a dusting brush, an upholstery tool, and three distinct floor tools, one of which is specifically designed for parquet floors.
- ഫ്ലെക്സിബിൾ ഹോസ്: Connects to the vacuum cleaner and provides the main suction path.
- Curved Metal Wand: Used for comfortable handling and attachment of accessories.
- Straight Metal Extension Wands (x2): Extend reach for floor cleaning and high-level dusting.
- വിള്ളൽ ഉപകരണം: ഇടുങ്ങിയ വിടവുകൾ, മൂലകൾ, അരികുകൾ എന്നിവയ്ക്ക് അനുയോജ്യം.
- ഡസ്റ്റിംഗ് ബ്രഷ്: For delicate surfaces, shelves, and intricate areas.
- അപ്ഹോൾസ്റ്ററി ഉപകരണം: Designed for cleaning fabric surfaces like sofas and curtains.
- Parquet Floor Tool: Features soft bristles for gentle and effective cleaning of hard floors, especially parquet.
- Combination Floor Tool: A versatile tool for both carpets and hard floors, often with a switch to adjust brush height.
4. സജ്ജീകരണം
- അൺപാക്ക് ചെയ്യുന്നു: പാക്കേജിംഗിൽ നിന്ന് എല്ലാ ഘടകങ്ങളും ശ്രദ്ധാപൂർവ്വം നീക്കം ചെയ്യുക.
- Dust Bag Installation: Open the vacuum cleaner head. Ensure a dust bag is correctly fitted inside the drum. If not, insert a new Numatic HepaFlo bag, ensuring the collar is securely seated in the inlet.
- ഹോസ് കണക്ഷൻ: Insert the flexible hose into the suction inlet on the front of the vacuum cleaner until it clicks securely into place.
- വടി അസംബ്ലി: Connect the two straight metal extension wands to the curved metal wand. Then, attach the curved metal wand to the end of the flexible hose.
- Floor Tool Attachment: Select the appropriate floor tool (e.g., Parquet Floor Tool for hard floors) and attach it to the end of the assembled wands.
5. പ്രവർത്തന നിർദ്ദേശങ്ങൾ
- പവർ കണക്ഷൻ: Extend the power cable from the cable rewind system. Plug the power cord into a suitable mains socket.
- പവർ ഓൺ/ഓഫ്: Press the red 'ON/OFF' switch located on the top of the vacuum cleaner to start or stop the appliance.
- അറ്റാച്ചുമെൻ്റുകൾ ഉപയോഗിക്കുന്നു:
- For floors, use the assembled wands and a floor tool.
- For upholstery, remove the wands and attach the upholstery tool directly to the curved wand or hose end.
- For crevices and tight spaces, use the crevice tool.
- പൊടി തുടയ്ക്കാൻ, പൊടി തുടയ്ക്കുന്ന ബ്രഷ് ഉപയോഗിക്കുക.
- കേബിൾ റിവൈൻഡ്: When finished, unplug the vacuum cleaner. Gently press the foot pedal or pull the cable slightly to activate the automatic cable rewind system. Guide the cable to prevent tangling.
6. പരിപാലനം
പതിവ് അറ്റകുറ്റപ്പണികൾ മികച്ച പ്രകടനം ഉറപ്പാക്കുകയും നിങ്ങളുടെ വാക്വം ക്ലീനറിന്റെ ആയുസ്സ് വർദ്ധിപ്പിക്കുകയും ചെയ്യുന്നു.
6.1. ഡസ്റ്റ് ബാഗ് മാറ്റിസ്ഥാപിക്കൽ
- വൈദ്യുതി വിതരണത്തിൽ നിന്ന് വാക്വം ക്ലീനർ വിച്ഛേദിക്കുക.
- Unclip the head of the vacuum cleaner and lift it off.
- Carefully remove the full dust bag by pulling the cardboard collar away from the inlet. Seal the bag if it has a sealing mechanism.
- Insert a new Numatic HepaFlo dust bag, ensuring the collar is fully seated in the inlet.
- Replace the vacuum cleaner head and secure the clips.
6.2. ഫിൽട്ടർ ക്ലീനിംഗ്
The main filter (usually a large cloth filter) should be checked periodically. If it appears dirty, gently shake or brush off loose dust. Do not wash the main filter unless specifically instructed by Numatic, as this can damage it.
6.3. Hose and Attachment Cleaning
Check the hose and attachments regularly for blockages. If a blockage is found, disconnect the component and carefully remove the obstruction. Wipe attachments with a damp ആവശ്യമെങ്കിൽ തുണി.
7. പ്രശ്നപരിഹാരം
| പ്രശ്നം | സാധ്യമായ കാരണം | പരിഹാരം |
|---|---|---|
| വാക്വം ക്ലീനർ ഓണാക്കുന്നില്ല. | വൈദ്യുതി വിതരണം ഇല്ല. | Check if the plug is correctly inserted and the wall socket is functional. |
| വലിച്ചെടുക്കൽ നഷ്ടം. | Full dust bag or blocked hose/filter. | Replace the dust bag. Check the hose, wands, and floor tool for blockages. Inspect and clean the main filter. |
| പ്രവർത്തന സമയത്ത് അസാധാരണമായ ശബ്ദം. | Foreign object in the fan or motor area. | Immediately switch off and unplug. Check for any visible obstructions in the hose or attachments. If the noise persists, contact customer support. |
8 സ്പെസിഫിക്കേഷനുകൾ
- ബ്രാൻഡ്: ന്യൂമാറ്റിക്
- മോഡൽ നമ്പർ: HVR16911
- ഉൽപ്പന്നത്തിൻ്റെ പേര്: Henry Parquet
- ശക്തി: 620 വാട്ട്സ്
- ഇനത്തിൻ്റെ ഭാരം: ഏകദേശം 1 കിലോഗ്രാം
9. വാറൻ്റിയും പിന്തുണയും
For warranty information, please refer to the documentation provided with your purchase or visit the official Numatic website. If you encounter issues not covered in this manual or require further assistance, please contact Numatic customer support.