
1. ആമുഖം
വാങ്ങിയതിന് നന്ദി.asing the CHEREEKI Digital LED Alarm Clock Model 8808. This manual provides detailed instructions for the proper use, setup, and maintenance of your new alarm clock. Please read this manual thoroughly before use and retain it for future reference.
2 സുരക്ഷാ വിവരങ്ങൾ
- Keep the clock away from heat sources and high humidity environments.
- Use only a 5V/1A or 5V/2A adapter for charging via the USB port.
- ഉപകരണം സ്വയം വേർപെടുത്താനോ നന്നാക്കാനോ ശ്രമിക്കരുത്. സേവനത്തിനായി യോഗ്യതയുള്ള ഉദ്യോഗസ്ഥരെ ബന്ധപ്പെടുക.
- Ensure the power switch is OFF when the clock is not in use for extended periods.
3. പാക്കേജ് ഉള്ളടക്കം
- 1 x CHEREEKI Digital LED Alarm Clock
- 1 x യുഎസ്ബി ചാർജിംഗ് കേബിൾ (അഡാപ്റ്റർ ഉൾപ്പെടുത്തിയിട്ടില്ല)
- 1 x ഉപയോക്തൃ മാനുവൽ
4. ഉൽപ്പന്നം കഴിഞ്ഞുview
The CHEREEKI Digital LED Alarm Clock Model 8808 features a large LED display, dual alarms, temperature display, adjustable brightness, sound activation, and a USB charging port. It is designed for clear visibility and ease of use.

ചിത്രം 4.1: മുൻഭാഗം view of the CHEREEKI Digital LED Alarm Clock highlighting its key features and dimensions.
പ്രധാന സവിശേഷതകൾ:
- സ്നൂസുള്ള ഡ്യുവൽ അലാറങ്ങൾ: Set two separate alarms with a 5-minute snooze function.
- USB Charging & Built-in Battery: Powered via USB cable (adapter not included) with an integrated rechargeable battery for settings backup during power outages.
- Temperature Display & Adjustable Brightness: Displays temperature in Celsius. Features automatic 3-level brightness adjustment and manual adjustment.
- Sound Activated Display: The LED screen activates with sound (e.g., clap, tap) or by pressing the SNOOZE/LIGHT button, turning off automatically after 6 seconds when not connected to power.
- 10 Music Options & 4 Volume Levels: Choose from 10 different ringtones and adjust the alarm volume.
- 12/24 മണിക്കൂർ ഫോർമാറ്റ്: Supports both 12-hour and 24-hour time display.
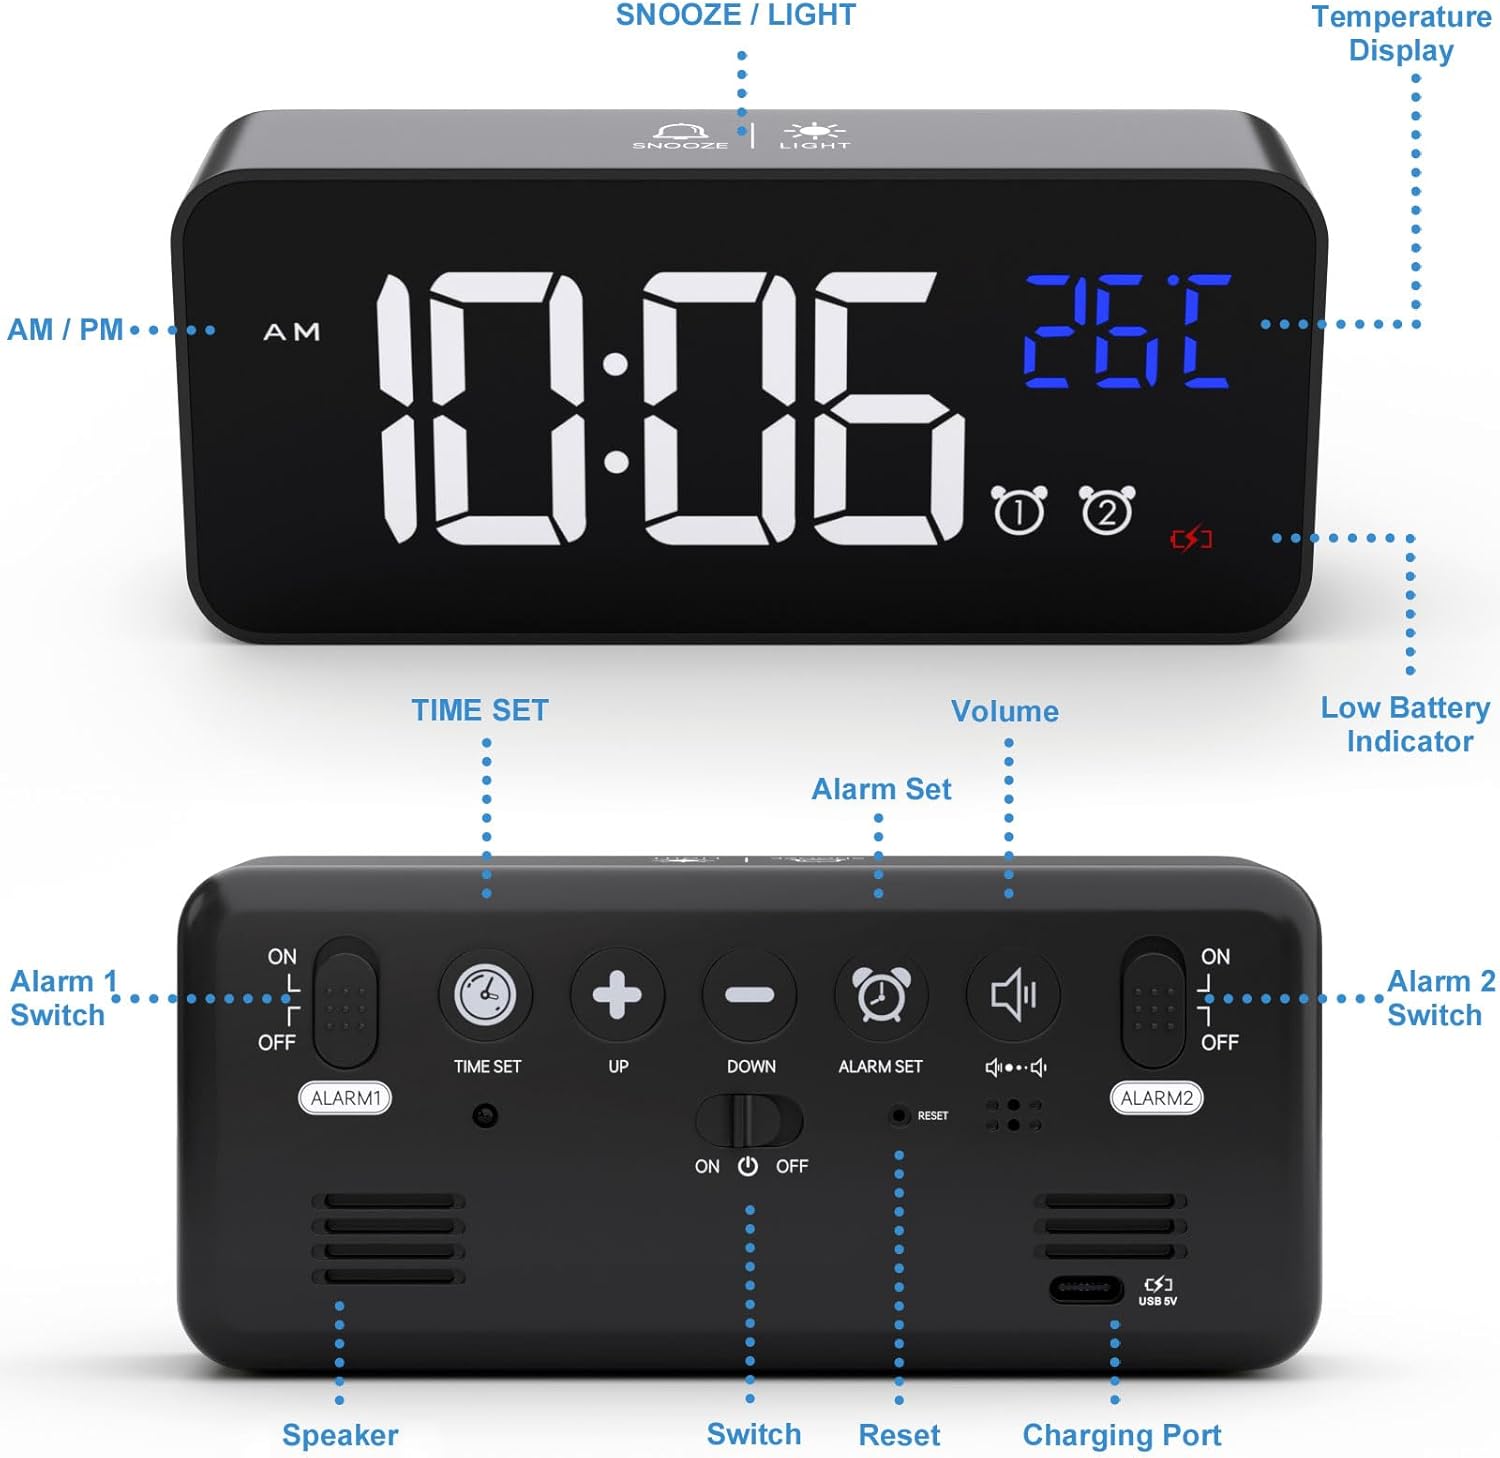
Figure 4.2: Rear panel controls and ports of the alarm clock.
5. സജ്ജീകരണം
5.1 ക്ലോക്കിന് പവർ നൽകുന്നു
Connect the provided USB charging cable to the clock's charging port and to a 5V/1A or 5V/2A USB adapter (not included) or a USB port. The clock has a built-in rechargeable battery that saves your settings during power outages.

Figure 5.1: Powering the alarm clock via USB.
കുറിപ്പ്: When powered by USB, the display remains continuously on. When running on battery power, the display will turn off after 6 seconds to conserve energy. It can be reactivated by sound or by pressing any button.
5.2 Initial Setup (Removing Protective Film)
For optimal display clarity, please remove the protective film from the screen when using the clock for the first time.
6. ഓപ്പറേഷൻ
6.1 സമയം ക്രമീകരിക്കുന്നു
- അമർത്തിപ്പിടിക്കുക ടൈം സെറ്റ് button on the back of the clock. The hour digits will start flashing.
- ഉപയോഗിക്കുക UP ഒപ്പം താഴേക്ക് മണിക്കൂർ ക്രമീകരിക്കാനുള്ള ബട്ടണുകൾ.
- അമർത്തുക ടൈം സെറ്റ് again to switch to minute adjustment. The minute digits will flash.
- ഉപയോഗിക്കുക UP ഒപ്പം താഴേക്ക് മിനിറ്റ് ക്രമീകരിക്കാൻ ബട്ടണുകൾ.
- അമർത്തുക ടൈം സെറ്റ് സമയ ക്രമീകരണ മോഡ് സ്ഥിരീകരിച്ച് പുറത്തുകടക്കാൻ ഒരിക്കൽ കൂടി.
Video 6.1: Demonstration of how to set the time on the alarm clock (0:00-0:18 in video).
6.2 അലാറങ്ങൾ സജ്ജീകരിക്കൽ (അലാറം 1 & അലാറം 2)
The clock supports two independent alarms. Use the അലാറം 1 ഓൺ/ഓഫ് ഒപ്പം അലാറം 2 ഓൺ/ഓഫ് switches on the back to enable or disable each alarm.
- To set Alarm 1, slide the അലാറം 1 ഓൺ/ഓഫ് 'ഓൺ' എന്നതിലേക്ക് മാറുക.
- അമർത്തിപ്പിടിക്കുക അലാറം സെറ്റ് ബട്ടൺ. അലാറം മണിക്കൂർ അക്കങ്ങൾ മിന്നിമറയും.
- ഉപയോഗിക്കുക UP ഒപ്പം താഴേക്ക് അലാറം സമയം ക്രമീകരിക്കാനുള്ള ബട്ടണുകൾ.
- അമർത്തുക അലാറം സെറ്റ് again to switch to minute adjustment. The alarm minute digits will flash.
- ഉപയോഗിക്കുക UP ഒപ്പം താഴേക്ക് അലാറം മിനിറ്റ് ക്രമീകരിക്കാനുള്ള ബട്ടണുകൾ.
- അമർത്തുക അലാറം സെറ്റ് once more to confirm and exit alarm setting mode.
- Repeat the process for Alarm 2 using the അലാറം 2 ഓൺ/ഓഫ് സ്വിച്ച്.
Video 6.2: Demonstration of how to set the alarms on the clock (0:19-1:04 in video).
6.3 Adjusting Alarm Volume and Ringtones
The clock offers 10 different ringtones and 4 adjustable volume levels.
- While in alarm setting mode (after setting the time for an alarm), press the അലാറം സെറ്റ് button to cycle through the 10 ringtones.
- വോളിയം ക്രമീകരിക്കാൻ, അമർത്തുക വോളിയം button repeatedly until the desired volume level (L01-L04) is displayed.

Figure 6.3: Available ringtones and volume levels.
Video 6.3: Demonstration of how to adjust the alarm volume (1:05-1:19 in video).
6.4 Snooze Function and Stopping Alarms
ഒരു അലാറം മുഴങ്ങുമ്പോൾ, നിങ്ങൾക്ക് 5 മിനിറ്റ് കൂടി ഉറങ്ങാൻ സ്നൂസ് ഫംഗ്ഷൻ സജീവമാക്കാം.
- To activate snooze: Press the സ്നൂസ് / ലൈറ്റ് button on the top of the clock. The alarm will pause and sound again after 5 minutes.
- To stop the alarm: Press any other button on the clock (except സ്നൂസ് / ലൈറ്റ്) to turn off the alarm for the day.

Figure 6.4: Dual alarms and snooze function in use.
Video 6.4: Demonstration of snooze and stopping alarms (1:20-1:37 in video).
6.5 ഡിസ്പ്ലേ തെളിച്ചം ക്രമീകരിക്കൽ
The clock features both automatic and manual brightness adjustment.
6.5.1 Automatic Brightness Adjustment
When connected to power, the LED display automatically adjusts its brightness:
- 7:00 AM - 6:59 PM: High brightness.
- 7:00 PM - 11:59 PM: ഇടത്തരം തെളിച്ചം.
- 12:00 AM - 6:59 AM: കുറഞ്ഞ തെളിച്ചം.
Video 6.5: Demonstration of automatic brightness adjustment throughout the day (2:07-2:38 in video).
6.5.2 Manual Brightness Adjustment
You can manually adjust the brightness to your preference:
- അമർത്തുക സ്നൂസ് / ലൈറ്റ് button on the top of the clock to cycle through 4 levels of brightness.
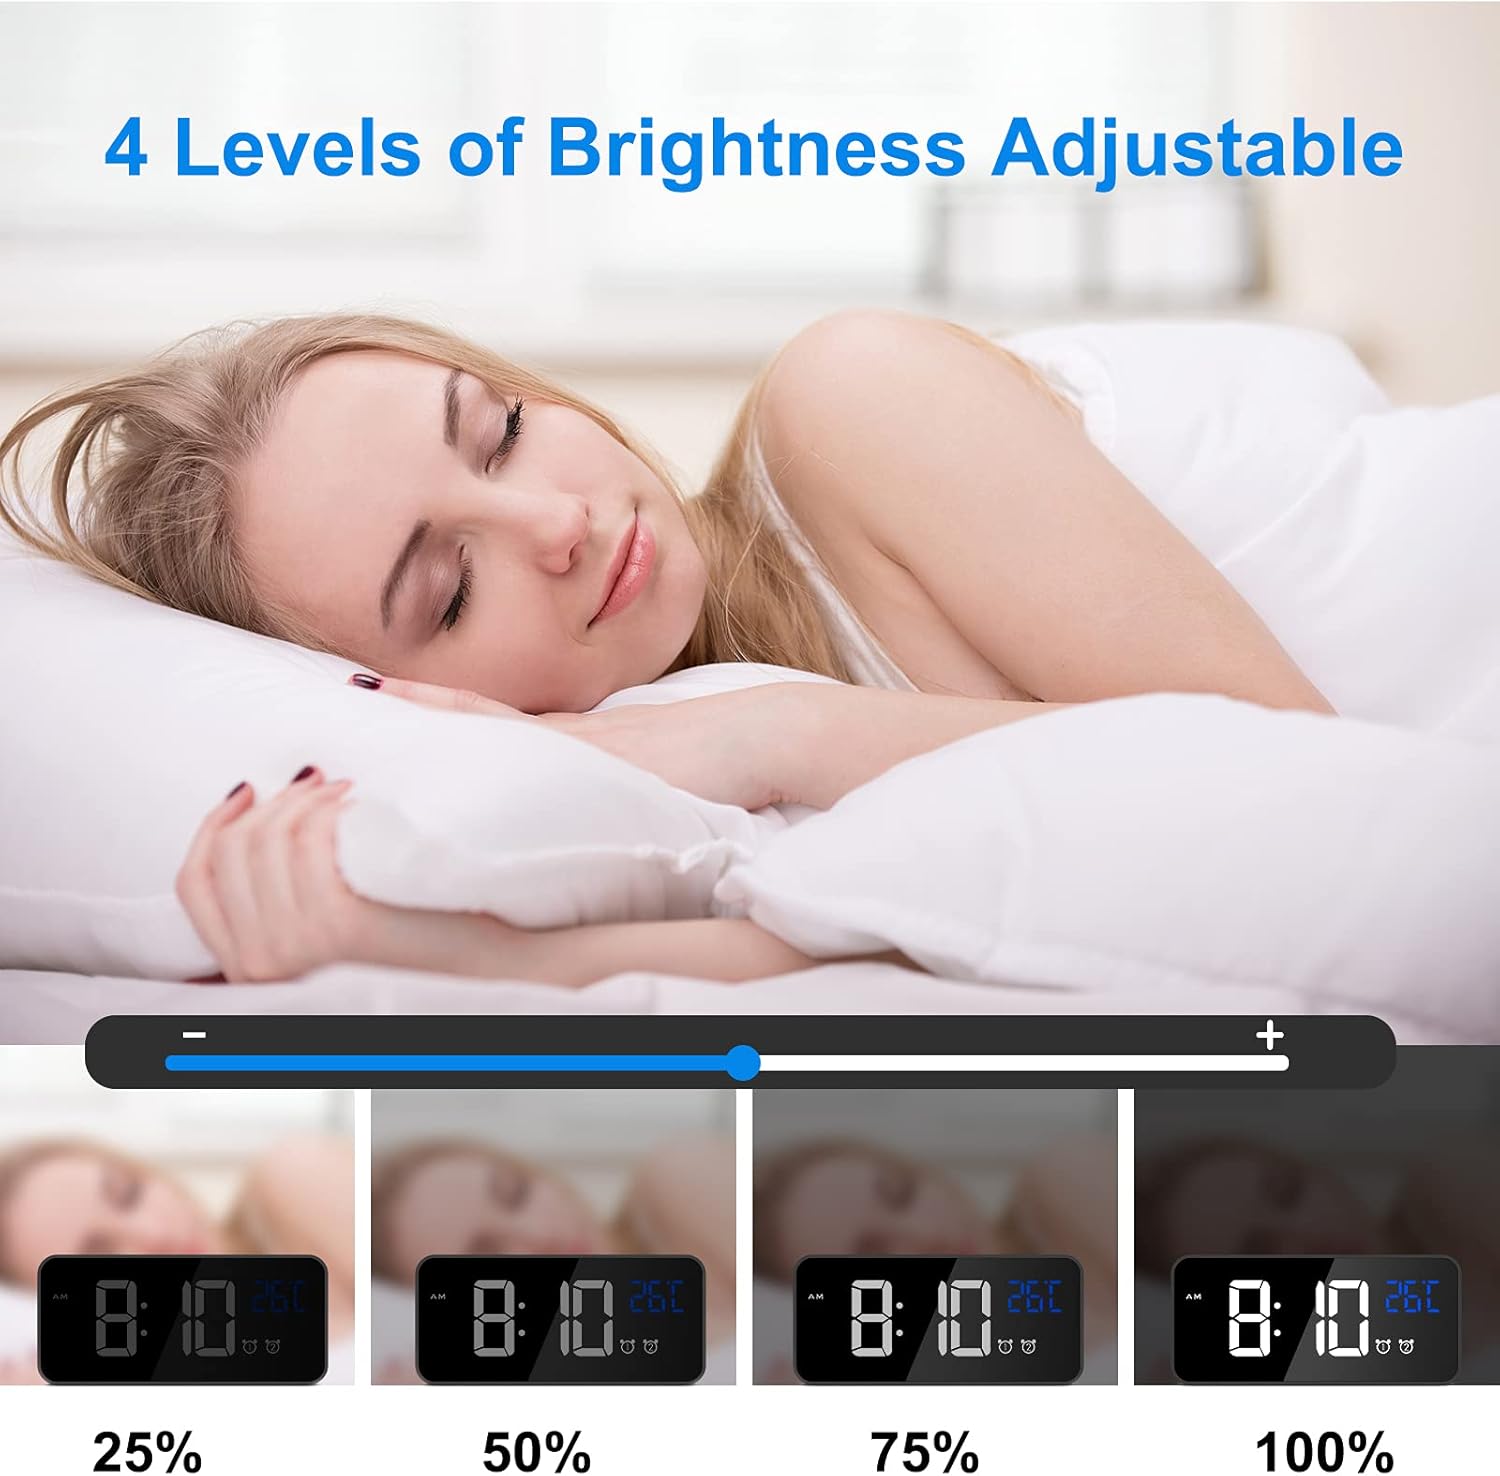
Figure 6.5: Manual brightness adjustment levels.
Video 6.6: Demonstration of manual brightness adjustment (1:38-2:06 in video).
6.6 Sound Activated Display (Battery Mode)
When the clock is running on battery power (not connected to USB), the display will turn off after 6 seconds to save energy. You can activate the display by making a sound (e.g., clapping, tapping the table) louder than 90dB, or by pressing the സ്നൂസ് / ലൈറ്റ് ബട്ടൺ.

Figure 6.6: Sound activated display feature.
6.7 12/24 മണിക്കൂർ ഫോർമാറ്റ്
12 മണിക്കൂർ മുതൽ 24 മണിക്കൂർ വരെയുള്ള സമയ ഫോർമാറ്റുകൾക്കിടയിൽ മാറാൻ, അമർത്തുക 12/24എച്ച് ക്ലോക്കിന്റെ പിൻഭാഗത്തുള്ള ബട്ടൺ.

Figure 6.7: Switching between 12-hour and 24-hour display formats.
6.8 താപനില ഡിസ്പ്ലേ
The clock automatically displays the ambient temperature in Celsius.

Figure 6.8: Temperature display feature.
7. പരിപാലനം
- മൃദുവായതും ഉണങ്ങിയതുമായ തുണി ഉപയോഗിച്ച് ക്ലോക്ക് വൃത്തിയാക്കുക. അബ്രസീവ് ക്ലീനറുകളോ ലായകങ്ങളോ ഉപയോഗിക്കരുത്.
- ക്ലോക്കിൽ നേരിട്ടുള്ള സൂര്യപ്രകാശമോ തീവ്രമായ താപനിലയോ ഏൽക്കുന്നത് ഒഴിവാക്കുക.
- If the clock will not be used for a long period, turn off the main power switch to preserve battery life.
8. പ്രശ്നപരിഹാരം
| പ്രശ്നം | പരിഹാരം |
|---|---|
| Display shows disordered code or incorrect information. | Use a pin to press the പുനഃസജ്ജമാക്കുക button on the back of the clock. This will restore the clock to its normal operating state. |
| Display turns off quickly when not connected to power. | This is normal behavior to conserve battery. The display is sound-activated or can be turned on by pressing any button. For a continuously lit display, keep the clock connected to a USB power source. |
| അലാറം മുഴങ്ങുന്നില്ല. | Ensure the corresponding alarm switch (അലാറം 1 ഓൺ/ഓഫ് or അലാറം 2 ഓൺ/ഓഫ്) is set to 'ON'. Check that the alarm time is correctly set. |
| Clock not charging or holding charge. | Verify that the USB cable is securely connected and that the power adapter is 5V/1A or 5V/2A. Ensure the main power switch is 'ON' for charging. |
9 സ്പെസിഫിക്കേഷനുകൾ
- ബ്രാൻഡ്: ചെറീക്കി
- മോഡൽ നമ്പർ: 8808
- നിറം: കറുപ്പ്
- ഡിസ്പ്ലേ തരം: ഡിജിറ്റൽ LED
- ഊർജ്ജ സ്രോതസ്സ്: Battery Powered (rechargeable Lithium-polymer) / USB 5V
- പ്രത്യേക സവിശേഷതകൾ: Temperature Display, Dual Alarms, Snooze, Adjustable Brightness, Sound Activated, 12/24 Hour Format, 10 Ringtones
- ഉൽപ്പന്ന അളവുകൾ: 14.5 സെ.മീ (L) x 6.5 സെ.മീ (H)
- ഇനത്തിൻ്റെ ഭാരം: 290 ഗ്രാം
- മെറ്റീരിയൽ: ABS (Acrylonitrile Butadiene Styrene) Plastic
- മൗണ്ടിംഗ് തരം: ടേബിൾടോപ്പ്
10. വാറണ്ടിയും പിന്തുണയും
This product comes with a lifetime warranty. For any questions, issues, or support needs, please contact CHEREEKI customer service. Please refer to your purchase documentation for specific contact details.