
1. ആമുഖം
This manual provides essential information for the safe and efficient operation, maintenance, and troubleshooting of your PARKSIDE PASD 4 A1 Cordless Screwdriver. Please read these instructions carefully before using the device for the first time and keep them for future reference. This tool is designed for general purpose screwing tasks.
1.1 സുരക്ഷാ വിവരങ്ങൾ
- സുരക്ഷാ ഗ്ലാസുകൾ പോലുള്ള ഉചിതമായ വ്യക്തിഗത സംരക്ഷണ ഉപകരണങ്ങൾ എല്ലായ്പ്പോഴും ധരിക്കുക.
- Ensure the workpiece is securely fastened before operation.
- മഴയിലോ നനഞ്ഞ അവസ്ഥയിലോ ഉപകരണം തുറന്നുകാട്ടരുത്.
- പവർ ടൂൾ പ്രവർത്തിപ്പിക്കുമ്പോൾ കുട്ടികളെയും കാഴ്ചക്കാരെയും അകറ്റി നിർത്തുക.
- ബാറ്ററിക്കായി നിർദ്ദിഷ്ട ചാർജർ മാത്രം ഉപയോഗിക്കുക.
- The included bits are insulated for up to 1000V. Always verify power is off before working on electrical components.
2. ഉൽപ്പന്നം കഴിഞ്ഞുview
The PARKSIDE PASD 4 A1 is a compact cordless screwdriver featuring a torque pre-selection function and an integrated lithium-ion battery. It comes with a set of insulated special bits and a USB Type-C quick charger.
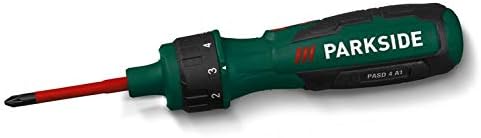
ചിത്രം 2.1: The PARKSIDE PASD 4 A1 Cordless Screwdriver. Note the ergonomic design, soft grip, and the torque selection dial located near the chuck.
2.1 Components and Included Accessories
- PARKSIDE PASD 4 A1 Cordless Screwdriver
- 6 Insulated Special Bits (max 1000 V)
- USB Type-C Quick Charger
- സ്റ്റോറേജ് കേസ്

ചിത്രം 2.2: The PARKSIDE PASD 4 A1 screwdriver kit, showing the screwdriver, insulated bits, and charger neatly organized within its durable storage case.
3. സജ്ജീകരണം
3.1 ബാറ്ററി ചാർജ് ചെയ്യുന്നു
- Connect the USB Type-C quick charger to the charging port on the screwdriver.
- അനുയോജ്യമായ പവർ ഔട്ട്ലെറ്റിലേക്ക് ചാർജർ പ്ലഗ് ചെയ്യുക.
- Allow approximately 60 minutes for a full charge. The charging indicator (if present) will show the charging status.
- ബാറ്ററി പൂർണ്ണമായി ചാർജ് ചെയ്തുകഴിഞ്ഞാൽ ചാർജർ വിച്ഛേദിക്കുക.
കുറിപ്പ്: The screwdriver is equipped with an integrated 4V / 1.5 Ah Lithium-Ion battery. It is recommended to fully charge the battery before first use.
3.2 Inserting and Removing Bits
- Ensure the screwdriver is switched off.
- Insert the desired insulated special bit firmly into the bit holder until it clicks into place.
- To remove a bit, pull it straight out from the bit holder.
4. പ്രവർത്തന നിർദ്ദേശങ്ങൾ
4.1 Torque Pre-selection
The screwdriver features 6 adjustable torque levels, allowing you to match the torque to the specific application and material. This prevents overtightening and damage to screws or workpieces.
- Locate the torque selection dial near the front of the screwdriver.
- Rotate the dial to select one of the 6 torque settings. A lower number indicates lower torque, suitable for delicate materials or small screws. A higher number provides more torque for larger screws or tougher materials.
4.2 ഫോർവേഡ്/റിവേഴ്സ് റൊട്ടേഷൻ
The screwdriver is equipped with a rocker switch for easy direction changes.
- Push the rocker switch to the left for forward (clockwise) rotation, used for tightening screws.
- Push the rocker switch to the right for reverse (counter-clockwise) rotation, used for loosening screws.
- When the switch is in the center position, the screwdriver is locked, preventing accidental activation.
4.3 LED വർക്ക് ലൈറ്റ്
The screwdriver includes two integrated LED lights to illuminate the work area, improving visibility in dimly lit conditions. The lights activate automatically when the screwdriver is in operation.
4.4 Manual Torque Override
For situations requiring higher torque than the battery-powered operation provides, the screwdriver can be used manually. The maximum manual torque is 8 Nm.
5. പരിപാലനം
5.1 വൃത്തിയാക്കൽ
- Always disconnect the charger and ensure the tool is off before cleaning.
- Wipe the tool's housing with a clean, damp തുണി. കഠിനമായ രാസവസ്തുക്കളോ ഉരച്ചിലുകളുള്ള ക്ലീനറുകളോ ഉപയോഗിക്കരുത്.
- Keep ventilation openings free from dust and debris.
5.2 സംഭരണം
When not in use, store the screwdriver and its accessories in the provided storage case in a dry, cool place, away from direct sunlight and out of reach of children.

ചിത്രം 5.1: The durable storage case for the PARKSIDE PASD 4 A1, designed for secure transport and protection of the tool and its accessories.
6. പ്രശ്നപരിഹാരം
| പ്രശ്നം | സാധ്യമായ കാരണം | പരിഹാരം |
|---|---|---|
| സ്ക്രൂഡ്രൈവർ ഓണാക്കുന്നില്ല. | ബാറ്ററി ഡിസ്ചാർജ് ചെയ്തു. | Charge the battery using the provided USB Type-C charger. |
| സ്ക്രൂഡ്രൈവറിന് പവർ ഇല്ല. | Battery is low or torque setting is too low. | Recharge the battery. Increase the torque setting on the dial. |
| Bit slips or strips screw head. | Incorrect bit size or torque setting too high/low. | Ensure the correct bit is used for the screw. Adjust the torque setting. |
| LED വർക്ക് ലൈറ്റ് പ്രവർത്തിക്കുന്നില്ല. | Tool not in operation. | The LED lights activate only when the screwdriver is actively driving or removing a screw. |
7 സാങ്കേതിക സവിശേഷതകൾ
- മോഡൽ: PASD 4 A1
- ബാറ്ററി: Integrated 4 V Lithium-Ion (1.5 Ah)
- നോ-ലോഡ് വേഗത: n0 215 മിനിറ്റ്-1
- ടോർക്ക് പ്രീ-സെലക്ഷൻ: 6 ലെവലുകൾ
- Max. Torque (Manual): 8 എൻഎം
- Max. Torque (Battery Operation): 0.4 എൻഎം
- ചാർജർ: 60 min USB Type-C Quick Charger
- ഭവന മെറ്റീരിയൽ: പോളിഅമൈഡ്, ഗ്ലാസ് ഫൈബർ (PA6 + GF30)
- അളവുകൾ (ഏകദേശം): 17 x 4.2 x 4 സെ.മീ
- Weight (approx., with battery): 218 ഗ്രാം
- Included Bits: 6 insulated special bits (max 1000 V)
8. വാറൻ്റിയും പിന്തുണയും
For warranty claims, technical support, or service inquiries, please refer to your purchase documentation or contact the retailer where the product was purchased. Keep your proof of purchase for any warranty-related matters. Do not attempt to repair the device yourself, as this may void the warranty and pose safety risks.