1. ആമുഖം
This manual provides detailed instructions for the proper use and maintenance of your ANCEL VD500 OBD II Diagnostic Scanner and ANCEL BST200 12V Car Battery Load Tester. The VD500 is designed for comprehensive diagnostics on VAG group vehicles (Volkswagen, Audi, Skoda, SEAT) and standard OBD II compliant vehicles. The BST200 is a dedicated tool for testing 12V lead-acid automotive batteries. Please read this manual thoroughly before operating the devices to ensure correct usage and to prevent damage.
2. ഉൽപ്പന്നം കഴിഞ്ഞുview

Image: The ANCEL VD500 OBD II Diagnostic Scanner (left) and the ANCEL BST200 12V Car Battery Load Tester (right) are shown together. Both devices feature a red and black casing with an LCD screen and control buttons.
2.1 ANCEL VD500 OBD II Diagnostic Scanner
The VD500 is a handheld diagnostic tool primarily for Volkswagen, Audi, Skoda, and SEAT vehicles, offering advanced system diagnostics and service resets. It also supports standard OBD II functions for most 1996 and newer 12V vehicles.

ചിത്രം: വിശദമായ ഒരു ചിത്രം view of the ANCEL VD500, highlighting its components: LCD Display, OBDII Connector, Scroll Up Button, Scroll Down Button, Enter Button, and Exit Button. The device has a compact, ergonomic design with anti-skid silicone grips.
2.2 ANCEL BST200 12V Car Battery Load Tester
The BST200 is a compact battery analyzer designed to quickly and accurately test 12V lead-acid batteries, including regular flooded, AGM flat plate, AGM spiral, and GEL types. It provides essential battery health information in seconds.
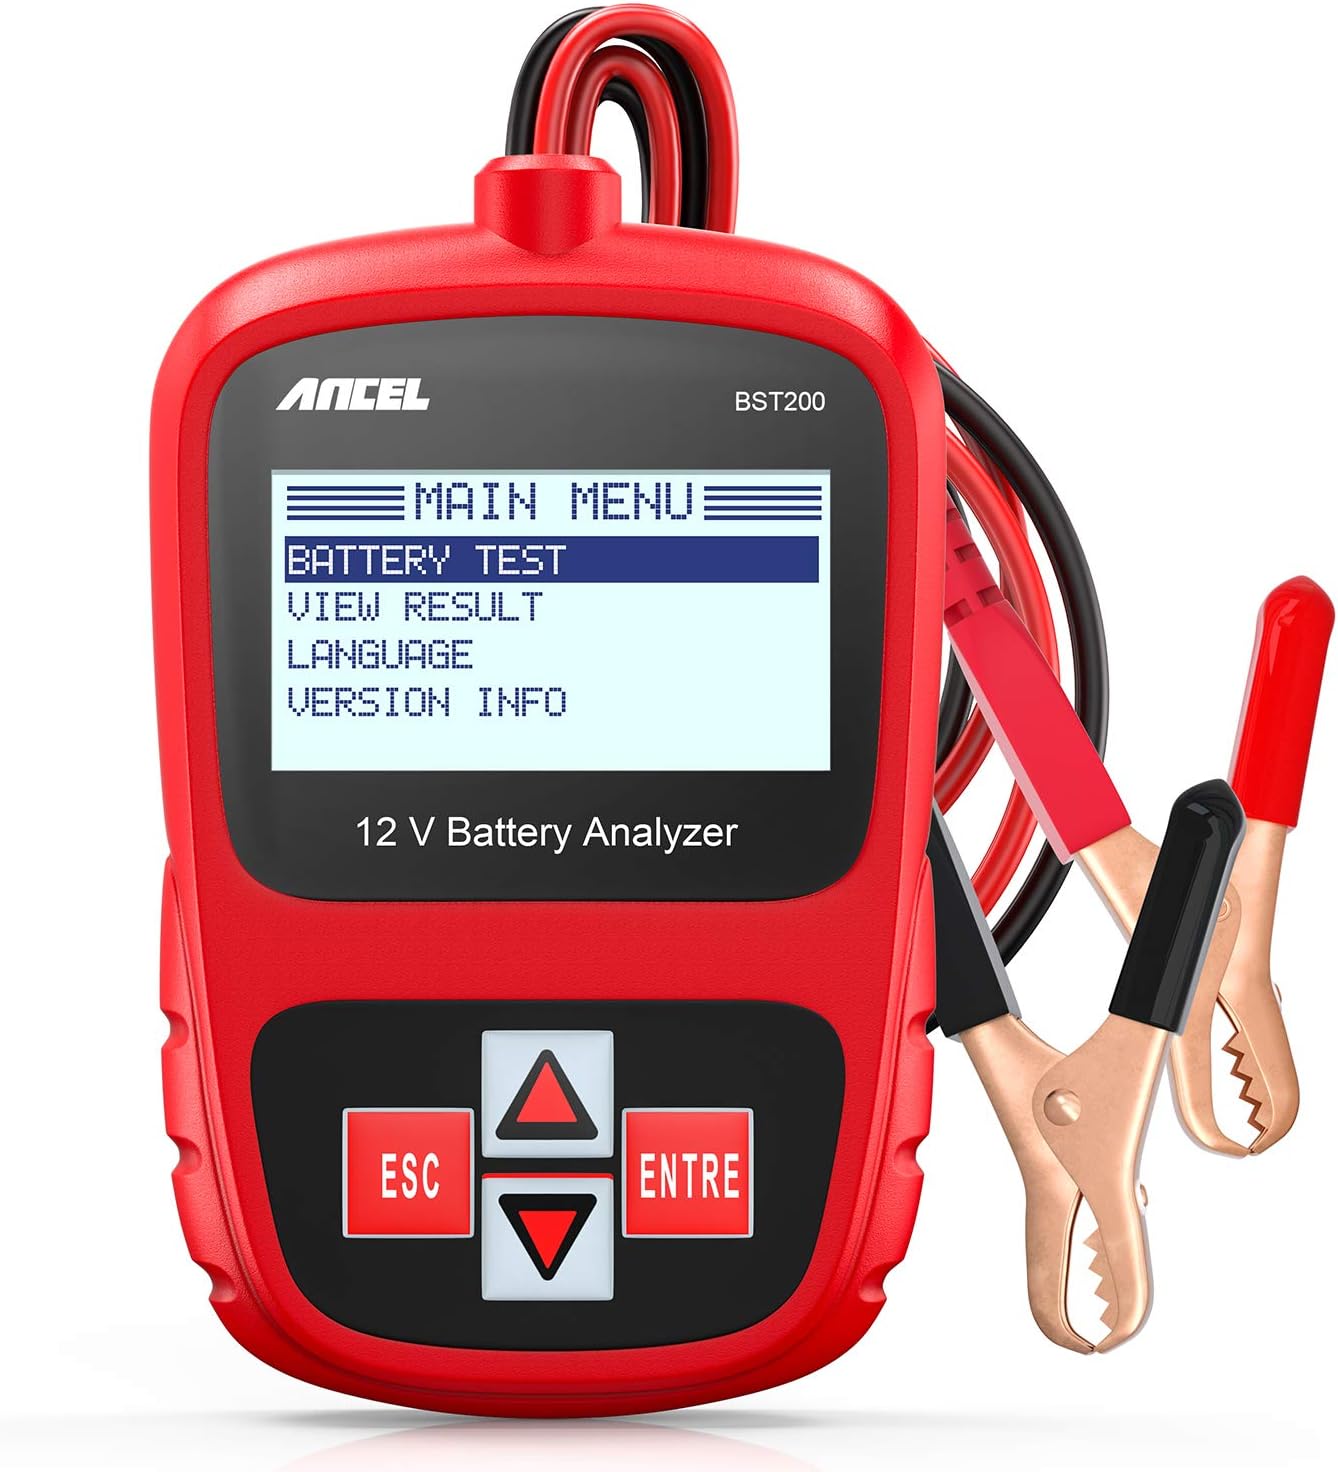
Image: The ANCEL BST200 battery tester is shown with its main menu on the screen, displaying options like 'BATTERY TEST', 'VIEW RESULT', 'LANGUAGE', and 'VERSION INFO'. The device has red and black alligator clips for connecting to a battery.
3. സജ്ജീകരണം
3.1 ANCEL VD500 Setup
- പവർ ഓൺ: The VD500 is powered directly from the vehicle's OBD II port. Connect the 16-pin OBD II connector to the vehicle's Data Link Connector (DLC), usually located under the dashboard on the driver's side.
- പ്രാരംഭ ബൂട്ട്: Once connected, the device will power on automatically and display the main menu.
- ഭാഷ തിരഞ്ഞെടുക്കൽ: Navigate to 'System Setup' using the scroll buttons and press 'ENTER' to select your preferred language.
3.2 ANCEL BST200 Setup
- ബാറ്ററിയുമായി ബന്ധിപ്പിക്കുക: വാഹനത്തിന്റെ ഇഗ്നിഷൻ ഓഫാണെന്ന് ഉറപ്പാക്കുക. ചുവന്ന പോസിറ്റീവ് (+) cl ബന്ധിപ്പിക്കുക.amp to the positive terminal of the 12V battery and the black negative (-) clamp നെഗറ്റീവ് ടെർമിനലിലേക്ക്.
- പവർ ഓൺ: The BST200 will power on automatically once correctly connected to the battery.
- പ്രധാന മെനു: The main menu will appear, ready for battery testing.
4. പ്രവർത്തന നിർദ്ദേശങ്ങൾ
4.1 ANCEL VD500 Operation
The VD500 offers two primary diagnostic modes: VAG Diagnosis and OBDII Diagnosis.
4.1.1 VAG Diagnosis (for Volkswagen, Audi, Skoda, SEAT)
This mode allows access to various control modules within VAG vehicles for in-depth diagnostics and special functions.

Image: The ANCEL VD500 screen displays 'V/A Diagnosis' as the selected option. Icons around the screen indicate various systems that can be diagnosed, including Engine System, SRS System, ABS System, TPMS System, HVAC, SAS System, ESP System, Transmission System, Windows, Battery System, Headlight, and Immobilizer System.
- Select 'V/A Diagnosis': From the main menu, use the scroll buttons to highlight 'V/A Diagnosis' and press 'ENTER'.
- സിസ്റ്റം തിരഞ്ഞെടുപ്പ്: The scanner will automatically identify the vehicle and present a list of available systems (e.g., Engine, ABS, Airbag, Transmission, EPB, SAS, TPMS, ESP). Select the desired system.
- കോഡുകൾ വായിക്കുക/മായ്ക്കുക: Within the selected system, you can choose to 'Read Fault Codes' to view Diagnostic Trouble Codes (DTCs) and their definitions, or 'Clear Fault Codes' to erase them after repairs.
- പ്രത്യേക പ്രവർത്തനങ്ങൾ: The VD500 supports specific service resets for VAG vehicles:
- ഓയിൽ സർവീസ് റീസെറ്റ്: Resets the oil change reminder.
- Brake Pad (EPB) Reset: For vehicles with electronic parking brakes, this function allows for safe replacement of brake pads.
- Throttle Position Adaption: വൃത്തിയാക്കിയതിനോ മാറ്റിസ്ഥാപിച്ചതിനോ ശേഷം ത്രോട്ടിൽ ബോഡി സ്ഥാനം വീണ്ടും പഠിക്കുന്നു.

Image: A collage illustrating the special functions of the ANCEL VD500. Top image shows an oil change with 'Oil Service Reset'. Middle image shows a car's gear selector with 'Brake Pad (EPB) Reset'. Bottom image shows a throttle body with 'Throttle Position Adaption'.
4.1.2 OBDII Diagnosis (for all OBD II Compliant Vehicles)
This mode provides standard OBD II functions for 12V cars and light trucks manufactured in 1996 or later that are OBD II-compliant (J1850 VPM, J1850PWM, ISO9141, KWP 2000, and CAN protocols).

Image: The ANCEL VD500 screen displays 'OBDII Diagnosis'. Surrounding images illustrate its functions: 'Read Fault code', 'Erase Fault code', 'Review DTC', 'Read VIN', and 'Turns off the MIL' (Malfunction Indicator Lamp).
- Select 'OBDII Diagnosis': From the main menu, use the scroll buttons to highlight 'OBDII Diagnosis' and press 'ENTER'.
- കോഡുകൾ വായിക്കുക: നിലവിലുള്ളതും, തീർപ്പുകൽപ്പിക്കാത്തതും, ചരിത്രപരവുമായ ഡയഗ്നോസ്റ്റിക് ട്രബിൾ കോഡുകൾ (DTC-കൾ) പ്രദർശിപ്പിക്കുന്നു.
- മായ്ക്കൽ കോഡുകൾ: വാഹനത്തിന്റെ കമ്പ്യൂട്ടറിൽ നിന്ന് ഡിടിസികൾ മായ്ക്കുകയും മാൽഫങ്ഷൻ ഇൻഡിക്കേറ്റർ എൽ ഓഫാക്കുകയും ചെയ്യുന്നു.amp (MIL).
- I/M സന്നദ്ധത: Checks the status of emission-related monitors.
- തത്സമയ ഡാറ്റ: Displays real-time sensor data from the vehicle.
- ഫ്രീസ് ഫ്രെയിം: ഒരു തകരാർ കോഡ് സജ്ജീകരിച്ച സമയത്തെ പ്രവർത്തന സാഹചര്യങ്ങളുടെ ഒരു സ്നാപ്പ്ഷോട്ട് കാണിക്കുന്നു.
- വാഹന വിവരം: വാഹന തിരിച്ചറിയൽ നമ്പർ (VIN), കാലിബ്രേഷൻ ഐഡി (CALID), കാലിബ്രേഷൻ വെരിഫിക്കേഷൻ നമ്പർ (CVN) എന്നിവ വീണ്ടെടുക്കുന്നു.
4.2 ANCEL BST200 Operation
The BST200 performs various tests to assess the health of a 12V battery.

Image: The ANCEL BST200 screen displays 'BAT. RESULT GOOD BATTERY'. Surrounding icons and text indicate the types of data provided: Voltage Test, Measured CCA, Rated CCA, State Of Charge, State Of Health, and Internal Resistance. The device provides results based on standards like CCA, CA, MCA, JIS, DIN, IEC, EN, and SAE.
- ബാറ്ററി ടെസ്റ്റ്: From the main menu, select 'Battery Test' and press 'ENTER'.
- ബാറ്ററി തരം തിരഞ്ഞെടുക്കൽ: Select the type of battery being tested (e.g., Regular Flooded, AGM Flat Plate, AGM Spiral, GEL).
- CCA Input: കോൾഡ് ക്രാങ്കിങ്ങിലേക്ക് പ്രവേശിക്കുക Amps (CCA) rating of the battery, usually found on the battery label.
- Test Execution: The BST200 will perform the test and display results within approximately 3 seconds.
- ഫല വ്യാഖ്യാനം: The results will include:
- CCA Value: Measured Cold Cranking Amps.
- വാല്യംtage: നിലവിലെ ബാറ്ററി വോള്യംtage.
- ആന്തരിക പ്രതിരോധം: Indicates the battery's internal health.
- State of Health (SOH): ശതമാനംtagശേഷിക്കുന്ന ബാറ്ററി ലൈഫിന്റെ ഇ.
- State of Charge (SOC): ശതമാനംtage of battery charge level.
- ബാറ്ററി നില: (e.g., Good Battery, Good & Recharge, Charge & Retest, Replace Battery, Bad Cell).

Image: The ANCEL BST200 is shown next to various battery types, with labels indicating 'AGM', 'GEL', and 'Regular flooded', demonstrating its compatibility with these battery chemistries.
5. പരിപാലനം
- വൃത്തിയാക്കൽ: ഒരു സോഫ്റ്റ് ഉപയോഗിക്കുക, ഡിamp ഉപകരണം വൃത്തിയാക്കാൻ തുണി casing. അബ്രാസീവ് ക്ലീനറുകളോ ലായകങ്ങളോ ഉപയോഗിക്കരുത്.
- സംഭരണം: Store the devices in a dry, cool environment, away from direct sunlight and extreme temperatures.
- കേബിൾ കെയർ: Avoid bending or crimping the cables excessively. Always grasp the connector when disconnecting, not the cable.
- സോഫ്റ്റ്വെയർ അപ്ഡേറ്റുകൾ: Periodically check the ANCEL official website for available software updates for the VD500 to ensure optimal performance and compatibility with newer vehicle models.
6. പ്രശ്നപരിഹാരം
| പ്രശ്നം | സാധ്യമായ കാരണം | പരിഹാരം |
|---|---|---|
| VD500: ഉപകരണം പവർ ഓണാക്കുന്നില്ല. | Loose connection to OBD II port; Vehicle's OBD II port fuse blown; Vehicle battery low. | Ensure secure connection. Check vehicle's OBD II fuse. Verify vehicle battery voltage. |
| VD500: വാഹനവുമായുള്ള ആശയവിനിമയ പിശക്. | Incorrect protocol selected (rare, usually auto-detects); Faulty vehicle DLC; Device software issue. | Verify vehicle compatibility. Try on another vehicle. Update device software. |
| BST200: No display after connecting to battery. | തെറ്റായ clamp connection (reversed polarity); Battery voltage too low; Faulty clamps/cable. | Ensure correct positive/negative connection. Check battery voltage (must be above 8V). Inspect clamps and cable for damage. |
| BST200: കൃത്യമല്ലാത്ത പരിശോധനാ ഫലങ്ങൾ. | Incorrect battery type or CCA input; Loose connection; Battery surface corrosion. | Verify battery type and CCA rating. Ensure clamps are clean and securely connected. Clean battery terminals. |
7 സ്പെസിഫിക്കേഷനുകൾ
7.1 ANCEL VD500
- ഡിസ്പ്ലേ: എൽസിഡി
- ഓപ്പറേറ്റിംഗ് വോളിയംtage: 9വി - 18വി ഡിസി
- പ്രവർത്തന താപനില: 0°C മുതൽ 50°C വരെ (32°F മുതൽ 122°F വരെ)
- സംഭരണ താപനില: -20°C മുതൽ 70°C വരെ (-4°F മുതൽ 158°F വരെ)
- പിന്തുണയ്ക്കുന്ന പ്രോട്ടോക്കോളുകൾ: J1850 VPM, J1850PWM, ISO9141, KWP 2000, CAN
- അളവുകൾ: ഏകദേശം 195mm x 80mm x 30mm
7.2 ANCEL BST200
- അപേക്ഷ: 12V lead-acid batteries (Flooded, AGM Flat Plate, AGM Spiral, GEL)
- CCA ശ്രേണി: 100 - 1100 സി.സി.എ.
- വാല്യംtagഇ ശ്രേണി: 8വി - 16വി ഡിസി
- ടെസ്റ്റ് മാനദണ്ഡങ്ങൾ: CCA, CA, MCA, JIS, DIN, IEC, EN, SAE
- പരീക്ഷണ സമയം: ഏകദേശം 3 സെക്കൻഡ്
- അളവുകൾ: ഏകദേശം 125mm x 70mm x 20mm
8. വാറൻ്റിയും പിന്തുണയും
ANCEL products typically come with a limited warranty covering manufacturing defects. For specific warranty terms and conditions, please refer to the warranty card included with your product or visit the official ANCEL website. For technical support, product inquiries, or service, please contact ANCEL customer support through their official channels. Keep your purchase receipt as proof of purchase for warranty claims.