
Technical Pro RX113BT
Technical Pro RX113BT Home Theater Amplifier Receiver and HC55 Ceiling Speakers User Manual
Model: RX113BT
ആമുഖം
This manual provides detailed instructions for the setup, operation, and maintenance of your Technical Pro RX113BT Home Theater Amplifier Receiver and Rockville HC55 5.25" In-Ceiling Speakers. Please read this manual thoroughly before use to ensure proper functionality and to maximize your audio experience.
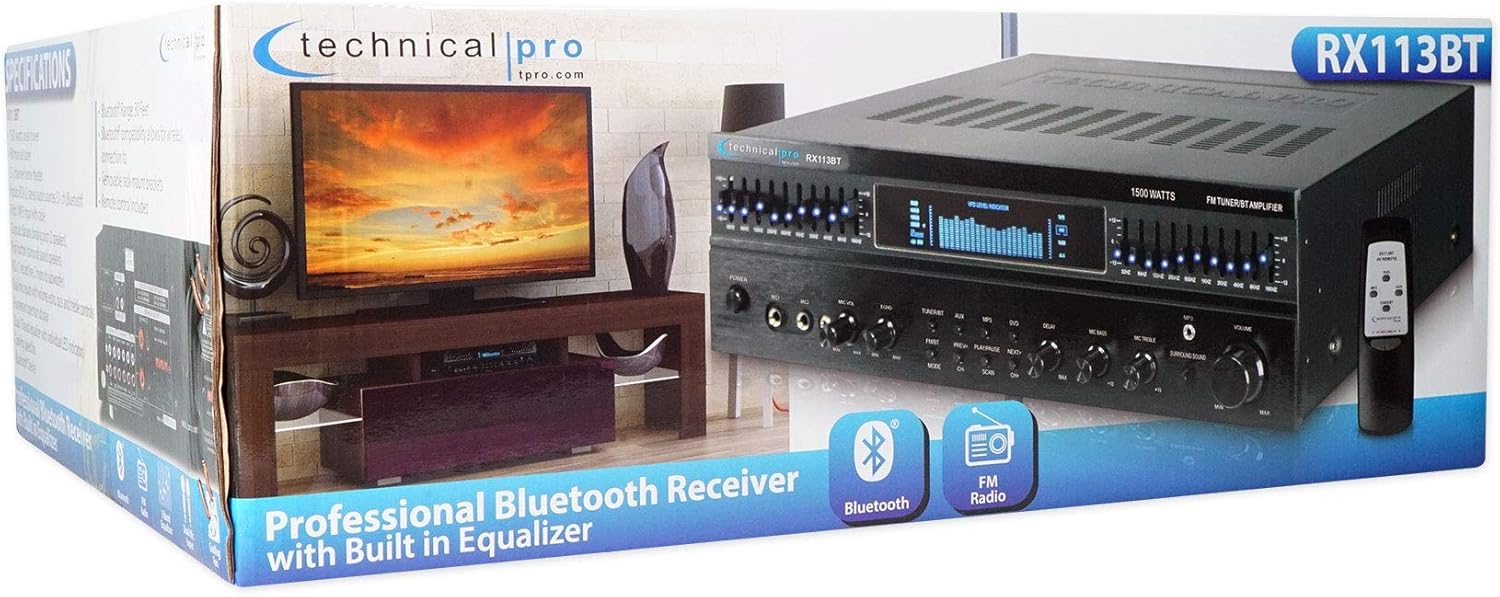
The RX113BT amplifier features 1500 watts peak power, Bluetooth connectivity, a 10-band equalizer, and multiple audio inputs. The HC55 speakers are designed for in-ceiling installation, offering clear audio reproduction for home theater environments.
പ്രധാനപ്പെട്ട സുരക്ഷാ നിർദ്ദേശങ്ങൾ
- ഈ നിർദ്ദേശങ്ങൾ വായിക്കുക.
- ഈ നിർദ്ദേശങ്ങൾ സൂക്ഷിക്കുക.
- എല്ലാ മുന്നറിയിപ്പുകളും ശ്രദ്ധിക്കുക.
- എല്ലാ നിർദ്ദേശങ്ങളും പാലിക്കുക.
- വെള്ളത്തിനടുത്ത് ഈ ഉപകരണം ഉപയോഗിക്കരുത്.
- ഉണങ്ങിയ തുണി ഉപയോഗിച്ച് മാത്രം വൃത്തിയാക്കുക.
- വെന്റിലേഷൻ തുറസ്സുകളൊന്നും തടയരുത്. നിർമ്മാതാവിന്റെ നിർദ്ദേശങ്ങൾക്കനുസൃതമായി ഇൻസ്റ്റാൾ ചെയ്യുക.
- റേഡിയറുകൾ, ഹീറ്റ് രജിസ്റ്ററുകൾ, സ്റ്റൗകൾ, അല്ലെങ്കിൽ മറ്റ് ഉപകരണങ്ങൾ (ഉൾപ്പെടെ) പോലെയുള്ള താപ സ്രോതസ്സുകൾക്ക് സമീപം ഇൻസ്റ്റാൾ ചെയ്യരുത്. ampലൈഫയറുകൾ) ചൂട് ഉത്പാദിപ്പിക്കുന്നത്.
- പോളറൈസ്ഡ് അല്ലെങ്കിൽ ഗ്രൗണ്ടിംഗ്-ടൈപ്പ് പ്ലഗിൻ്റെ സുരക്ഷാ ഉദ്ദേശ്യത്തെ പരാജയപ്പെടുത്തരുത്. ധ്രുവീകരിക്കപ്പെട്ട പ്ലഗിന് രണ്ട് ബ്ലേഡുകൾ ഉണ്ട്, ഒന്ന് മറ്റൊന്നിനേക്കാൾ വീതിയുള്ളതാണ്. ഒരു ഗ്രൗണ്ടിംഗ്-ടൈപ്പ് പ്ലഗിന് രണ്ട് ബ്ലേഡുകളും മൂന്നാമത്തെ ഗ്രൗണ്ടിംഗ് പ്രോംഗും ഉണ്ട്. നിങ്ങളുടെ സുരക്ഷയ്ക്കായി വിശാലമായ ബ്ലേഡ് അല്ലെങ്കിൽ മൂന്നാമത്തെ പ്രോംഗ് നൽകിയിരിക്കുന്നു. നൽകിയിരിക്കുന്ന പ്ലഗ് നിങ്ങളുടെ ഔട്ട്ലെറ്റിൽ ചേരുന്നില്ലെങ്കിൽ, കാലഹരണപ്പെട്ട ഔട്ട്ലെറ്റ് മാറ്റിസ്ഥാപിക്കുന്നതിന് ഒരു ഇലക്ട്രീഷ്യനെ സമീപിക്കുക.
- പ്രത്യേകിച്ച് പ്ലഗുകൾ, കൺവീനിയൻസ് റെസെപ്റ്റക്കിളുകൾ, ഉപകരണത്തിൽ നിന്ന് പുറത്തുകടക്കുന്ന ഇടം എന്നിവയിൽ നടക്കുകയോ നുള്ളുകയോ ചെയ്യുന്നതിൽ നിന്ന് പവർ കോർഡ് സംരക്ഷിക്കുക.
- നിർമ്മാതാവ് വ്യക്തമാക്കിയ അറ്റാച്ച്മെൻ്റുകൾ/ആക്സസറികൾ മാത്രം ഉപയോഗിക്കുക.
- നിർമ്മാതാവ് വ്യക്തമാക്കിയ കാർട്ട്, സ്റ്റാൻഡ്, ട്രൈപോഡ്, ബ്രാക്കറ്റ് അല്ലെങ്കിൽ ടേബിൾ എന്നിവയ്ക്കൊപ്പം മാത്രം ഉപയോഗിക്കുക, അല്ലെങ്കിൽ ഉപകരണം ഉപയോഗിച്ച് വിൽക്കുക. ഒരു കാർട്ട് ഉപയോഗിക്കുമ്പോൾ, ടിപ്പ്-ഓവറിൽ നിന്നുള്ള പരിക്ക് ഒഴിവാക്കാൻ വണ്ടി/ഉപകരണ കോമ്പിനേഷൻ നീക്കുമ്പോൾ ജാഗ്രത പാലിക്കുക.
- മിന്നൽ കൊടുങ്കാറ്റുകളുടെ സമയത്തോ ദീർഘനേരം ഉപയോഗിക്കാത്ത സമയത്തോ ഈ ഉപകരണം അൺപ്ലഗ് ചെയ്യുക.
- എല്ലാ സേവനങ്ങളും യോഗ്യതയുള്ള സേവന ഉദ്യോഗസ്ഥർക്ക് റഫർ ചെയ്യുക. പവർ സപ്ലൈ കോർഡ് അല്ലെങ്കിൽ പ്ലഗ് കേടാകുക, ദ്രാവകം ഒഴുകുകയോ ഉപകരണങ്ങൾ ഉപകരണത്തിലേക്ക് വീഴുകയോ ചെയ്യുക, ഉപകരണം മഴയോ ഈർപ്പമോ സമ്പർക്കം പുലർത്തുക, സാധാരണയായി പ്രവർത്തിക്കാത്തത് എന്നിങ്ങനെയുള്ള ഏതെങ്കിലും വിധത്തിൽ ഉപകരണത്തിന് കേടുപാടുകൾ സംഭവിക്കുമ്പോൾ സേവനം ആവശ്യമാണ്. , അല്ലെങ്കിൽ ഉപേക്ഷിച്ചു.
മുന്നറിയിപ്പ്: തീയോ വൈദ്യുതാഘാതമോ ഉണ്ടാകാനുള്ള സാധ്യത കുറയ്ക്കുന്നതിന്, ഈ ഉപകരണം മഴയ്ക്കോ ഈർപ്പത്തിനോ വിധേയമാക്കരുത്.
CAUTION: To prevent electric shock, do not use this (polarized) plug with an extension cord, receptacle or other outlet unless the blades can be fully inserted to prevent blade exposure.
പാക്കേജ് ഉള്ളടക്കം
നിങ്ങളുടെ പാക്കേജിൽ എല്ലാ ഇനങ്ങളും ഉണ്ടെന്ന് ഉറപ്പാക്കുക:
- Technical Pro RX113BT Ampജീവിത സ്വീകർത്താവ്
- (2) Rockville HC55 5.25" In-Ceiling Speakers
- Detachable Rack Ears
- വിദൂര ആന്റിന
- പവർ പ്ലഗ്
- റിമോട്ട് കൺട്രോൾ
- ഉപയോക്തൃ മാനുവൽ (ഈ പ്രമാണം)
- RCA ഓഡിയോ കേബിളിലേക്ക് 3.5mm
സജ്ജീകരണവും ഇൻസ്റ്റാളേഷനും
1. Ampലൈഫയർ പ്ലേസ്മെന്റ്
Place the RX113BT amplifier on a stable, flat surface or install it into a standard 19-inch equipment rack using the provided rack ears. Ensure adequate ventilation around the unit to prevent overheating. Do not block the cooling fan vents.

2. Speaker Installation (Rockville HC55)
The HC55 speakers are designed for in-ceiling installation. Follow these steps:
- ലൊക്കേഷൻ തിരഞ്ഞെടുക്കുക: Select a suitable location in your ceiling, avoiding joists or electrical wiring. Ensure there is enough clearance behind the ceiling panel for the speaker depth (2.6 inches).
- ദ്വാരം മുറിക്കുക: Using the provided template (if available, otherwise measure the cut-out diameter of 6.5 inches), carefully cut a circular hole in the ceiling.
- വയറുകൾ ബന്ധിപ്പിക്കുക: ഇതിൽ നിന്ന് സ്പീക്കർ വയർ പ്രവർത്തിപ്പിക്കുക amplifier to the speaker location. Connect the speaker wires to the spring-loaded push terminals on the back of the HC55 speaker, ensuring correct polarity (+ to + and - to -).
- മൗണ്ട് സ്പീക്കർ: Insert the speaker into the cut-out. The mounting clamps will secure the speaker to the ceiling. Tighten the screws on the front baffle to engage the clamps.
- ഗ്രിൽ അറ്റാച്ചുചെയ്യുക: Place the magnetic grille onto the speaker.


3. Connecting Speakers to Ampജീവപര്യന്തം
The RX113BT amplifier supports 5-channel surround sound. Connect your HC55 speakers to the "Speaker Output" terminals on the rear panel of the amplifier. Ensure correct polarity for all connections.
- ഫ്രണ്ട് സ്പീക്കറുകൾ: Use the Banana Binding Post terminals for the main front speakers.
- സറൗണ്ട് സ്പീക്കറുകൾ: Use the Push Button terminals for surround sound speakers.
- സബ്വൂഫർ: Connect an active subwoofer to the RCA Sub pre-amp ഔട്ട്പുട്ട്.

4. ഓഡിയോ ഉറവിടങ്ങൾ ബന്ധിപ്പിക്കുന്നു
The RX113BT offers various input options:
- RCA ഇൻപുട്ടുകൾ: Connect up to three audio sources (e.g., DVD player, CD player, TV) using RCA cables to the "AUDIO INPUT" section (AUX, MP3, Main).
- 1/8" (3.5mm) Input: Use the front panel 1/8" input for portable devices like smartphones or MP3 players.
- ബ്ലൂടൂത്ത്: Pair your Bluetooth-enabled device wirelessly (see "Operating Instructions" for details).
- മൈക്രോഫോണുകൾ: Connect up to two microphones to the front panel 1/4" MIC1 and MIC2 inputs.
5. പവർ കണക്ഷൻ
After all audio and speaker connections are made, connect the power cord to the amplifier and then to a suitable AC power outlet. Ensure the voltage selector switch on the rear panel matches your local power supply (110V/220V).
പ്രവർത്തന നിർദ്ദേശങ്ങൾ
1. പവർ ഓൺ/ഓഫ്
അമർത്തുക പവർ തിരിക്കാൻ മുൻ പാനലിലെ ബട്ടൺ amplifier on or off. The digital display will illuminate.
2. ഉറവിടം തിരഞ്ഞെടുക്കൽ
Use the input selector buttons on the front panel (TUNER, AUX, MP3, DVD) or the remote control to choose your desired audio source.
3. വോളിയം നിയന്ത്രണം
പ്രധാനം ക്രമീകരിക്കുക വോളിയം knob on the front panel or use the volume buttons on the remote control to set the overall listening level.
4. Equalizer Adjustment
The RX113BT features dual 10-band equalizers. Use the individual sliders on the front panel to adjust the frequency response for different audio ranges. Each band has an LED indicator for visual feedback.
5. ബ്ലൂടൂത്ത് പ്രവർത്തനം
- തിരഞ്ഞെടുക്കുക ബ്ലൂടൂത്ത് as the input source. The display will indicate "BT".
- നിങ്ങളുടെ മൊബൈൽ ഉപകരണത്തിൽ, ബ്ലൂടൂത്ത് പ്രവർത്തനക്ഷമമാക്കി ലഭ്യമായ ഉപകരണങ്ങൾക്കായി തിരയുക.
- Select "RX113BT" from the list to pair.
- ജോടിയാക്കിയുകഴിഞ്ഞാൽ, നിങ്ങളുടെ ഉപകരണത്തിൽ നിന്ന് ഓഡിയോ സ്ട്രീം ചെയ്യാൻ കഴിയും ampജീവൻ.
6. FM Tuner Operation
തിരഞ്ഞെടുക്കുക ട്യൂണർ as the input source. Use the tuning controls on the front panel or remote to scan for FM radio stations. The digital display will show the frequency.
7. Microphone Inputs (Karaoke/DJ)
Connect microphones to the MIC1 or MIC2 inputs. Use the എംഐസി വോൾ, ECHO, MIC BASS, ഒപ്പം MIC ട്രെബിൾ controls to adjust microphone levels and effects.
ദി MICROPHONE DELAY controls (50MS, 100MS, 150MS, 200MS) can be used to add a delay effect to the microphone audio.
8. സറൗണ്ട് സൗണ്ട്
ദി amplifier supports 5-channel surround sound. Ensure your speakers are connected correctly to the respective output terminals. Adjust the ചുറ്റുമുള്ള ശബ്ദം knob to control the effect level.
മെയിൻ്റനൻസ്
- വൃത്തിയാക്കൽ: Disconnect the power before cleaning. Use a soft, dry cloth to wipe the exterior surfaces of the amplifier and speakers. Do not use liquid cleaners or aerosols.
- വെൻ്റിലേഷൻ: വെന്റിലേഷൻ തുറസ്സുകൾ ഉറപ്പാക്കുക amplifier are not blocked. Proper airflow is crucial for preventing overheating.
- സംഭരണം: If storing the unit for an extended period, disconnect it from power and store in a cool, dry place away from direct sunlight and extreme temperatures.
- സ്പീക്കർ ഗ്രിൽസ്: The magnetic grilles on the HC55 speakers can be removed for cleaning if necessary. Use a soft brush or cloth to remove dust.
ട്രബിൾഷൂട്ടിംഗ്
| പ്രശ്നം | സാധ്യമായ കാരണം | പരിഹാരം |
|---|---|---|
| ശക്തിയില്ല | പവർ കോർഡ് ബന്ധിപ്പിച്ചിട്ടില്ല; പവർ ഔട്ട്ലെറ്റ് തകരാറിലായി; വോളിയംtage selector incorrect; Fuse blown. | പവർ കോർഡ് സുരക്ഷിതമായി ബന്ധിപ്പിച്ചിട്ടുണ്ടെന്ന് ഉറപ്പാക്കുക. മറ്റൊരു ഉപകരണം ഉപയോഗിച്ച് ഔട്ട്ലെറ്റ് പരിശോധിക്കുക. വോളിയം പരിശോധിക്കുകtage selector (110V/220V) matches local supply. Check and replace fuse if necessary (refer to rear panel for fuse specifications). |
| സ്പീക്കറുകളിൽ നിന്ന് ശബ്ദമില്ല | Incorrect input source selected; Speaker wires disconnected or incorrect polarity; Volume too low; Mute function active; Faulty audio source. | Select the correct input source. Check all speaker wire connections for secure fit and correct polarity. Increase volume. Ensure mute is off. Test with a different audio source. |
| ബ്ലൂടൂത്ത് കണക്റ്റ് ചെയ്യുന്നില്ല | Bluetooth not enabled on device; Device too far from ampലൈഫയർ; Amplifier not in pairing mode; Interference. | Ensure Bluetooth is enabled on your device. Move device closer to the amplifier. Select Bluetooth input on amplifier to enter pairing mode. Reduce interference from other wireless devices. |
| വികലമായ ശബ്ദം | Volume too high; Incorrect equalizer settings; Poor audio source quality; Speaker impedance mismatch. | Reduce volume. Adjust equalizer settings. Use a high-quality audio source. Ensure speakers are 4-16 Ohms as specified. |
| മൈക്രോഫോൺ പ്രവർത്തിക്കുന്നില്ല | Microphone not connected; MIC VOL too low; ECHO/BASS/TREBLE settings incorrect. | Ensure microphone is securely connected. Increase MIC VOL. Adjust ECHO, MIC BASS, and MIC TREBLE controls. |
സ്പെസിഫിക്കേഷനുകൾ
Technical Pro RX113BT Ampജീവിത സ്വീകർത്താവ്
- പീക്ക് പവർ: 1500 വാട്ട്സ്
- ചാനലുകൾ: 5 ചാനൽ സറൗണ്ട് സൗണ്ട്
- ഇൻപുട്ടുകൾ: RCA (3 audio sources), 1/8" (MP3), Microphone (Dual)
- ഔട്ട്പുട്ടുകൾ: Banana Binding Post (2 Speakers), Push Button (Surround Sound Speakers), RCA (1 Record Line, 2 Mono to Subwoofer)
- കണക്റ്റിവിറ്റി: Bluetooth, Auxiliary, RCA
- സമനില: Dual 10-band with individual LED indicators
- ട്യൂണർ: FM Manual Tuner
- മൈക്രോഫോൺ സവിശേഷതകൾ: Dual inputs with volume, echo, bass, treble controls, and delay (50ms, 100ms, 150ms, 200ms)
- ഡിസ്പ്ലേ: ഡിജിറ്റൽ ഫ്ലൂറസെന്റ് put ട്ട്പുട്ട് ഡിസ്പ്ലേ മീറ്റർ
- തണുപ്പിക്കൽ: സ്പീഡ് ഫാൻ
- റാക്ക് മൗണ്ടബിൾ: Yes (removable brackets)
- വാല്യംtage: 110-220 വി സ്വിച്ചുചെയ്യാവുന്ന
- അളവുകൾ: 17"w (19" w/ brackets) x 5"h x 12.25"d
- ഭാരം: 15 പൗണ്ട്
Rockville HC55 5.25" In-Ceiling Speakers
- സ്പീക്കർ തരം: 2-Way In-Ceiling
- വൂഫർ: 5.25" Polypropylene Cone with Rubber Surround, 1" Aluminum Voice Coil, 8 oz. Ferrite Magnet
- ട്വീറ്റർ: Mylar Dome, Aim-able Swivel
- പീക്ക് പവർ കൈകാര്യം ചെയ്യൽ: 150 വാട്ട്സ് (ഓരോ സ്പീക്കറിനും) / 300 വാട്ട്സ് (ഓരോ ജോഡിക്കും)
- RMS പവർ കൈകാര്യം ചെയ്യൽ: 60 വാട്ട്സ് (ഓരോ സ്പീക്കറിനും) / 120 വാട്ട്സ് (ഓരോ ജോഡിക്കും)
- ഫ്രീക്വൻസി പ്രതികരണം: 80Hz - 20KHz
- സംവേദനക്ഷമത: 88dB
- പ്രതിരോധം: 8 ഓം
- മൗണ്ടിംഗ് ഡെപ്ത്: 2.6"
- കട്ട് out ട്ട് വ്യാസം: 6.5"
- നിറം: കറുപ്പ്
വാറൻ്റിയും പിന്തുണയും
For warranty information and technical support, please contact Technical Pro customer service. Retain your proof of purchase for warranty claims.
For further assistance, visit the official Technical Pro webസൈറ്റ് അല്ലെങ്കിൽ അവരുടെ പിന്തുണാ ചാനലുകളുമായി ബന്ധപ്പെടുക.
Ask a question about this manual
Ask about setup, troubleshooting, compatibility, parts, safety, or missing instructions. Manuals+ will review the question and use this page’s manual context to help answer it.