
SH-12
SH-12 Wireless Headphones User Manual
മോഡൽ: SH-12
1. ആമുഖം
വാങ്ങിയതിന് നന്ദി.asing the SH-12 Wireless Headphones. This manual provides essential information for setting up, operating, maintaining, and troubleshooting your new headphones. Please read this manual thoroughly before use to ensure optimal performance and longevity of your device.
2 സുരക്ഷാ വിവരങ്ങൾ
- ഹെഡ്ഫോണുകൾ തീവ്രമായ താപനില, ഈർപ്പം, അല്ലെങ്കിൽ നശിപ്പിക്കുന്ന വസ്തുക്കൾ എന്നിവയ്ക്ക് വിധേയമാക്കരുത്.
- ഹെഡ്ഫോണുകൾ താഴെയിടുകയോ ശക്തമായ ആഘാതങ്ങൾക്ക് വിധേയമാക്കുകയോ ചെയ്യുന്നത് ഒഴിവാക്കുക.
- ഹെഡ്ഫോണുകൾ വേർപെടുത്തുകയോ പരിഷ്ക്കരിക്കുകയോ ചെയ്യരുത്. ഇത് വാറന്റി അസാധുവാക്കുകയും സുരക്ഷാ അപകടമുണ്ടാക്കുകയും ചെയ്തേക്കാം.
- Listen at moderate volume levels to prevent hearing damage. Prolonged exposure to loud sounds can cause irreversible hearing loss.
- Keep the headphones away from medical devices, as they contain magnets that may interfere with pacemakers or other medical equipment.
- ചാർജ് ചെയ്യുന്നതിന് നൽകിയിരിക്കുന്ന ചാർജിംഗ് കേബിളോ സാക്ഷ്യപ്പെടുത്തിയ തത്തുല്യമായതോ മാത്രം ഉപയോഗിക്കുക.
3. പാക്കേജ് ഉള്ളടക്കം
പാക്കേജിൽ ഇനിപ്പറയുന്ന ഇനങ്ങൾ ഉണ്ടോ എന്ന് പരിശോധിക്കുക:
- 1 x SH-12 Wireless Headphones
- 1 x Small USB Charging Cable
- 1 x 3.5mm Audio Cable (if included with your model)
- 1 x ഉപയോക്തൃ മാനുവൽ
4. ഉൽപ്പന്നം കഴിഞ്ഞുview
Familiarize yourself with the components and controls of your SH-12 Wireless Headphones.

ചിത്രം 4.1: മുൻഭാഗം view of the SH-12 Wireless Headphones. These over-ear headphones feature a black and grey design with cushioned earcups and an adjustable headband.

ചിത്രം 4.2: വശം view of the SH-12 Wireless Headphones, highlighting the 'Bluetooth STEREO DYNAMIC HEADPHONES SH-12' branding on the earcup.
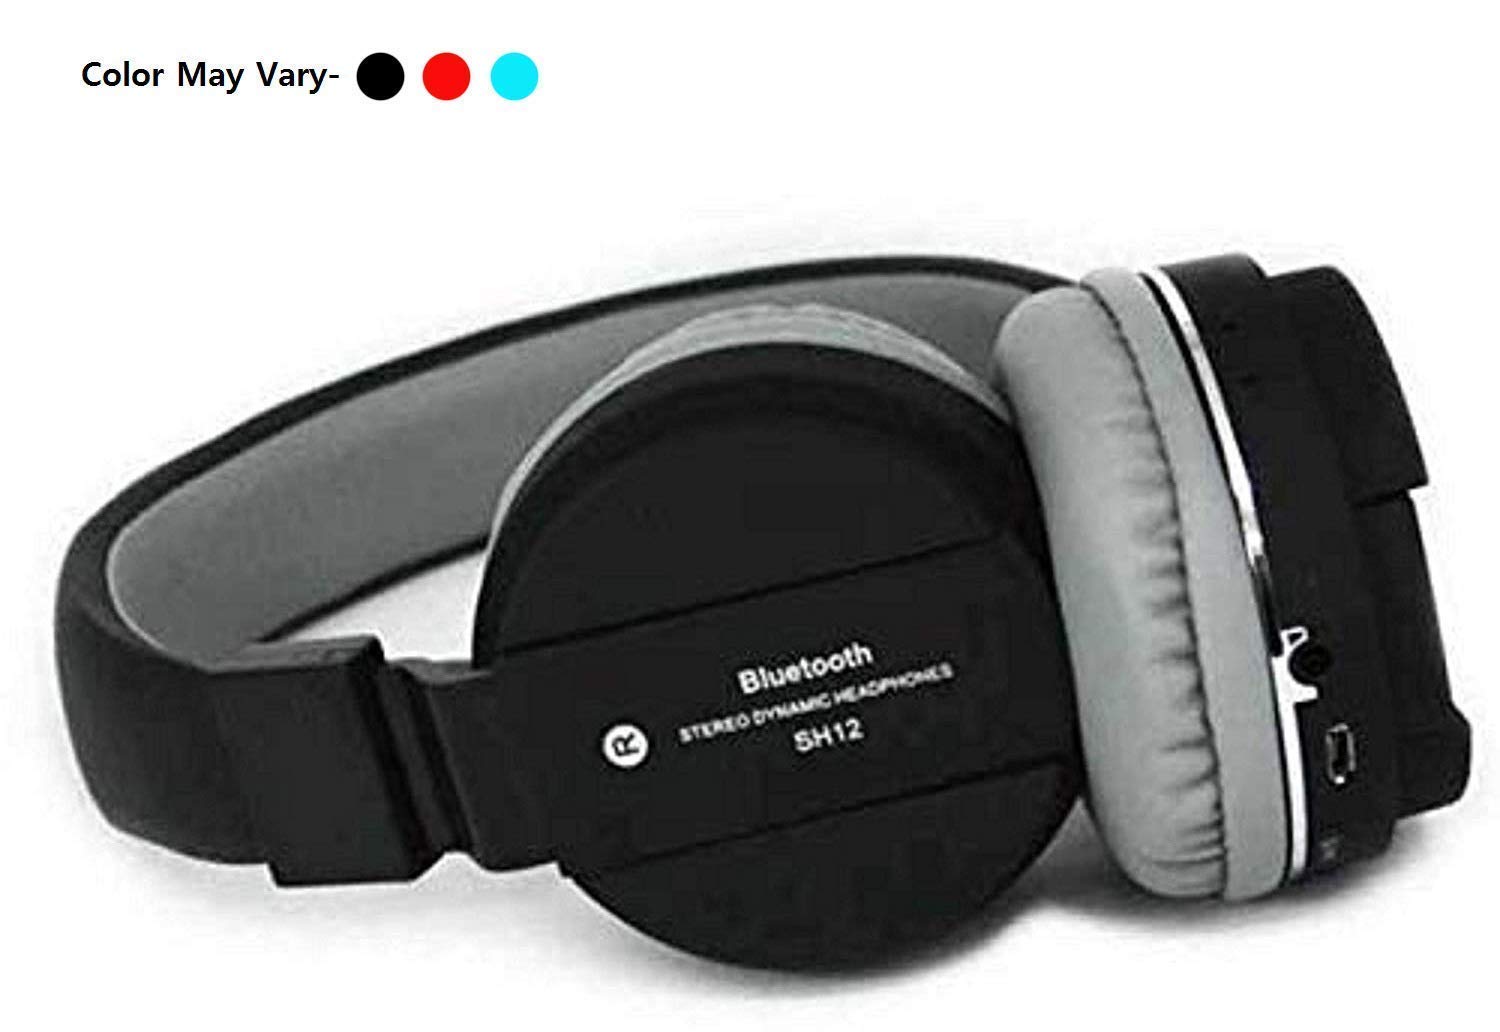
Figure 4.3: Folded view of the SH-12 Wireless Headphones, showing the charging port (likely Micro USB), 3.5mm audio jack, and possibly an SD card slot and control buttons on the earcup.
നിയന്ത്രണ ബട്ടണുകളും പോർട്ടുകളും:
- പവർ ബട്ടൺ: ഹെഡ്ഫോണുകൾ ഓൺ/ഓഫ് ചെയ്യുന്നതിനും ബ്ലൂടൂത്ത് ജോടിയാക്കുന്നതിനും ഉപയോഗിക്കുന്നു.
- വോളിയം കൂട്ടുക/അടുത്ത ട്രാക്ക്: വോളിയം കൂട്ടാൻ ഷോർട്ട് പ്രസ്സ് ചെയ്യുക, അടുത്ത ട്രാക്കിനായി ദീർഘനേരം പ്രസ്സ് ചെയ്യുക.
- വോളിയം ഡൗൺ/മുൻ ട്രാക്ക്: വോളിയം കുറയ്ക്കാൻ ഷോർട്ട് പ്രസ്സ് ചെയ്യുക, മുമ്പത്തെ ട്രാക്കിനായി ദീർഘനേരം അമർത്തുക.
- മൾട്ടി-ഫംഗ്ഷൻ ബട്ടൺ (MFB): Play/Pause, Answer/End Call.
- മൈക്രോ യുഎസ്ബി ചാർജിംഗ് പോർട്ട്: ഹെഡ്ഫോണുകൾ ചാർജ് ചെയ്യുന്നതിനായി.
- 3.5mm ഓഡിയോ ജാക്ക്: ഓഡിയോ ഉപകരണങ്ങളിലേക്കുള്ള വയർ കണക്ഷന്.
- മൈക്രോ എസ്ഡി കാർഡ് സ്ലോട്ട്: മെമ്മറി കാർഡിൽ നിന്ന് നേരിട്ട് സംഗീതം പ്ലേ ചെയ്യുന്നതിന്.
- ബിൽറ്റ്-ഇൻ മൈക്രോഫോൺ: ഹാൻഡ്സ് ഫ്രീ കോളിംഗിനായി.
കുറിപ്പ്: ഈ മാനുവലിൽ ഉൾച്ചേർക്കുന്നതിനായി ഔദ്യോഗിക വിൽപ്പനക്കാരന്റെ വീഡിയോകളൊന്നും ലഭ്യമായിരുന്നില്ല.
5. സജ്ജീകരണം
5.1 പ്രാരംഭ ചാർജിംഗ്
- Connect the small end of the USB charging cable to the Micro USB port on the headphones.
- USB ചാർജിംഗ് കേബിളിന്റെ വലിയ അറ്റം ഒരു USB പവർ അഡാപ്റ്ററുമായി (ഉൾപ്പെടുത്തിയിട്ടില്ല) അല്ലെങ്കിൽ ഒരു കമ്പ്യൂട്ടറിന്റെ USB പോർട്ടുമായി ബന്ധിപ്പിക്കുക.
- The LED indicator will illuminate (typically red) during charging.
- Once fully charged (approximately 1.5 hours), the LED indicator will change color (typically blue) or turn off.
കുറിപ്പ്: ആദ്യ ഉപയോഗത്തിന് മുമ്പ് ഹെഡ്ഫോണുകൾ പൂർണ്ണമായും ചാർജ് ചെയ്യുക.
5.2 പവർ ഓൺ/ഓഫ്
- പവർ ഓണാക്കാൻ: Press and hold the Power button for approximately 3-5 seconds until the LED indicator flashes (typically blue).
- പവർ ഓഫ് ചെയ്യാൻ: LED ഇൻഡിക്കേറ്റർ ഓഫാകുന്നതുവരെ ഏകദേശം 3-5 സെക്കൻഡ് നേരത്തേക്ക് പവർ ബട്ടൺ അമർത്തിപ്പിടിക്കുക.
6. പ്രവർത്തന നിർദ്ദേശങ്ങൾ
6.1 ബ്ലൂടൂത്ത് ജോടിയാക്കൽ
- ഹെഡ്ഫോണുകൾ ഓഫാണെന്ന് ഉറപ്പാക്കുക.
- Press and hold the Power button for approximately 5-7 seconds until the LED indicator flashes rapidly (alternating blue and red), indicating pairing mode.
- നിങ്ങളുടെ ഉപകരണത്തിൽ (സ്മാർട്ട്ഫോൺ, ടാബ്ലെറ്റ്, പിസി), ബ്ലൂടൂത്ത് പ്രവർത്തനക്ഷമമാക്കി ലഭ്യമായ ഉപകരണങ്ങൾക്കായി തിരയുക.
- Select "SH-12" from the list of found devices.
- Once paired, the LED indicator on the headphones will flash slowly (typically blue) or remain solid blue. A voice prompt may confirm the connection.
- പാസ്വേഡ് ആവശ്യപ്പെടുകയാണെങ്കിൽ, "0000" എന്ന് നൽകുക.
6.2 സംഗീത പ്ലേബാക്ക് (ബ്ലൂടൂത്ത്)
- പ്ലേ/താൽക്കാലികമായി നിർത്തുക: MFB ഒരിക്കൽ അമർത്തുക.
- അടുത്ത ട്രാക്ക്: വോളിയം അപ്പ് ബട്ടൺ ദീർഘനേരം അമർത്തുക.
- മുമ്പത്തെ ട്രാക്ക്: വോളിയം ഡൗൺ ബട്ടൺ ദീർഘനേരം അമർത്തുക.
- വോളിയം കൂട്ടുക: വോളിയം അപ്പ് ബട്ടൺ ചുരുക്കി അമർത്തുക.
- വോളിയം താഴേക്ക്: വോളിയം ഡൗൺ ബട്ടൺ ചുരുക്കി അമർത്തുക.
6.3 SD കാർഡ് പ്ലേബാക്ക്
- Insert a Micro SD card (TF card) with MP3 audio files into the designated slot on the headphones.
- The headphones will automatically switch to SD card playback mode.
- Use the same control buttons (MFB, Volume Up/Down) for play/pause, track navigation, and volume control as in Bluetooth mode.
6.4 കോൾ പ്രവർത്തനങ്ങൾ
- മറുപടി കോൾ: Press the MFB once when an incoming call rings.
- കോൾ അവസാനിപ്പിക്കുക: Press the MFB once during a call.
- കോൾ നിരസിക്കുക: Press and hold the MFB for approximately 2 seconds when an incoming call rings.
- അവസാന നമ്പർ വീണ്ടും ഡയൽ ചെയ്യുക: MFB രണ്ടുതവണ അമർത്തുക.
6.5 വയേർഡ് മോഡ് (AUX)
- Insert one end of the 3.5mm audio cable into the headphone's 3.5mm audio jack.
- Insert the other end into the audio output jack of your device.
- The headphones will automatically switch to wired mode. In this mode, the headphone's battery is not used, and control buttons on the headphones may not function. Control playback and volume directly from your connected device.
7. പരിപാലനം
7.1 വൃത്തിയാക്കൽ
- മൃദുവായതും ഉണങ്ങിയതും ലിന്റ് രഹിതവുമായ തുണി ഉപയോഗിച്ച് ഹെഡ്ഫോണുകൾ തുടയ്ക്കുക.
- അബ്രാസീവ് ക്ലീനറുകൾ, ആൽക്കഹോൾ, കെമിക്കൽ ലായകങ്ങൾ എന്നിവ ഉപയോഗിക്കരുത്.
- ഏതെങ്കിലും ദ്വാരങ്ങളിൽ ഈർപ്പം കയറുന്നത് ഒഴിവാക്കുക.
7.2 സംഭരണം
- ഹെഡ്ഫോണുകൾ തണുത്തതും വരണ്ടതുമായ സ്ഥലത്ത് സൂക്ഷിക്കുക, നേരിട്ടുള്ള സൂര്യപ്രകാശത്തിൽ നിന്നും കടുത്ത താപനിലയിൽ നിന്നും അകറ്റി നിർത്തുക.
- If storing for an extended period, charge the headphones every few months to maintain battery health.
8. പ്രശ്നപരിഹാരം
| പ്രശ്നം | സാധ്യമായ കാരണം | പരിഹാരം |
|---|---|---|
| ഹെഡ്ഫോണുകൾ പവർ ഓൺ ചെയ്യുന്നില്ല. | കുറഞ്ഞ ബാറ്ററി. | ഹെഡ്ഫോണുകൾ പൂർണ്ണമായും ചാർജ് ചെയ്യുക. |
| ഉപകരണവുമായി ജോടിയാക്കാൻ കഴിയില്ല. | ഹെഡ്ഫോണുകൾ ജോടിയാക്കൽ മോഡിൽ ഇല്ല; ഉപകരണത്തിൽ ബ്ലൂടൂത്ത് ഓഫാണ്; ഉപകരണം വളരെ അകലെയാണ്. | Ensure headphones are in pairing mode (rapid flashing LED). Turn on Bluetooth on your device. Move headphones closer to the device (within 10 meters). Restart both devices. |
| ശബ്ദമില്ല. | Volume too low; incorrect source; headphones not connected. | Increase volume on both headphones and connected device. Ensure correct input mode (Bluetooth, SD, AUX). Reconnect headphones. |
| മോശം ഓഡിയോ നിലവാരം. | Interference; device too far; low quality audio file. | Move away from sources of interference (Wi-Fi routers, other Bluetooth devices). Move closer to the connected device. Try a different audio file. |
| മൈക്രോഫോൺ പ്രവർത്തിക്കുന്നില്ല. | Device settings; poor connection. | Check microphone settings on your connected device. Ensure headphones are properly connected via Bluetooth. |
9 സ്പെസിഫിക്കേഷനുകൾ
| ഫീച്ചർ | വിശദാംശങ്ങൾ |
|---|---|
| മോഡലിൻ്റെ പേര് | SH-12 |
| കണക്റ്റിവിറ്റി ടെക്നോളജി | വയർലെസ്സ് (ബ്ലൂടൂത്ത്, ആർഎഫ്) |
| ഹെഡ്ഫോണുകൾ ജാക്ക് | 3.5 mm ജാക്ക് |
| ഓഡിയോ ഡ്രൈവർ തരം | Dynamic Driver (40mm Drivers) |
| ഇയർപീസ് ആകൃതി | ഓവർ-ചെവി |
| മൈക്രോഫോൺ ഫോർമാറ്റ് | ബിൽറ്റ്-ഇൻ |
| ശബ്ദ നിയന്ത്രണം | സജീവ നോയ്സ് റദ്ദാക്കൽ |
| ഫ്രീക്വൻസി പ്രതികരണം | 2000 GHz |
| പ്രതിരോധം | 120 ഓം |
| ബാറ്ററി തരം | ലിഥിയം പോളിമർ (1 ഉൾപ്പെടുത്തിയിരിക്കുന്നു) |
| മെറ്റീരിയൽ | പ്ലാസ്റ്റിക് |
| ഇനത്തിൻ്റെ ഭാരം | 200 ഗ്രാം |
| ഉൽപ്പന്ന അളവുകൾ | 17 x 10 x 8 സെ.മീ |
| അനുയോജ്യമായ ഉപകരണങ്ങൾ | Laptops, Mobile Phones, Tablets, PC, Smart TVs, All Bluetooth Devices, iOS, Android |
| പ്രത്യേക സവിശേഷതകൾ | Noise Cancellation, Volume-Control, Microphone Feature, 40mm Drivers, Bluetooth Wireless Connectivity, Call Control, Media Control |
10. വാറൻ്റിയും പിന്തുണയും
10.1 വാറൻ്റി വിവരങ്ങൾ
This product typically comes with a 30-day warranty from the date of purchase, covering manufacturing defects. Please retain your purchase receipt as proof of purchase for warranty claims.
The warranty does not cover damage caused by misuse, accident, unauthorized modification, or normal wear and tear.
10.2 ഉപഭോക്തൃ പിന്തുണ
For any questions, technical assistance, or warranty claims, please contact the retailer or manufacturer's customer support. Refer to your purchase documentation for specific contact details.
Ask a question about this manual
Ask about setup, troubleshooting, compatibility, parts, safety, or missing instructions. Manuals+ will review the question and use this page’s manual context to help answer it.