
HASWING Protruar G 3.0
HASWING Protruar G 3.0 Electric Trolling Motor Instruction Manual
Model: Protruar G 3.0 | Brand: HASWING
1. ആമുഖം
This manual provides essential information for the safe and efficient operation, installation, and maintenance of your HASWING Protruar G 3.0 Electric Trolling Motor. Please read this manual thoroughly before using the product to ensure proper function and longevity.

ചിത്രം 1: ഓവർview of the HASWING Protruar G 3.0 Electric Trolling Motor.
2 സുരക്ഷാ വിവരങ്ങൾ
Always prioritize safety when operating any marine equipment. Failure to follow these instructions may result in injury or damage to the product or vessel.
- എല്ലാ നിർദ്ദേശങ്ങളും വായിക്കുക: Familiarize yourself with all features and operating procedures before use.
- ബാറ്ററി സുരക്ഷ: Always connect the motor to a compatible 24V deep cycle battery system. Ensure proper polarity (+ to + and - to -). Disconnect battery power when the motor is not in use or during maintenance.
- പ്രൊപ്പല്ലർ സുരക്ഷ: Keep hands, feet, and clothing clear of the propeller at all times, especially when the motor is connected to power.
- കിൽ സ്വിച്ച്: Always use the provided kill switch lanyard. Attach it to yourself or the boat to ensure immediate power cut-off in an emergency.
- ജലത്തിന്റെ അവസ്ഥ: Operate the motor cautiously in shallow water or areas with submerged obstacles to prevent propeller damage.
- വെൻ്റിലേഷൻ: Ensure adequate ventilation around batteries to prevent accumulation of explosive gases.
- കുട്ടികൾ: Keep children away from the motor and controls.
3. പാക്കേജ് ഉള്ളടക്കം
പാക്കേജിൽ എല്ലാ ഇനങ്ങളും ഉണ്ടെന്ന് ഉറപ്പാക്കുക:
- HASWING Protruar G 3.0 Trolling Motor with 35.4-inch shaft
- Extendable Tiller Handle
- Transom Mount Bracket
- 3-Blade Propeller (11.8-inch diameter)
- Kill Switch Lanyard
- മൗണ്ടിംഗ് ഹാർഡ്വെയർ (സ്ക്രൂകൾ, വാഷറുകൾ, നട്ടുകൾ)
- ഇൻസ്ട്രക്ഷൻ മാനുവൽ

Figure 2: Key components of the trolling motor, including the kill switch, battery meter, stepless speed control, foldable handle, bracket, durable motor, and anti-impact propeller.
4 സ്പെസിഫിക്കേഷനുകൾ
| ഫീച്ചർ | സ്പെസിഫിക്കേഷൻ |
|---|---|
| മോഡൽ | Protruar G 3.0 |
| ഷാഫ്റ്റ് പവർ | 3എച്ച്പി |
| പീക്ക് ത്രസ്റ്റ് | 110 എൽബിഎസ് |
| മാക്സ് വോളിയംtage | DC 24V |
| പരമാവധി പവർ | 1200W |
| പരമാവധി Amp | 50എ |
| ആഴത്തിലുള്ള ക്രമീകരണം | ഡെപ്ത് കോളർ |
| Prop Type/Size | 3 Blade Prop/11.8 In. Diam |
| Pro Speed at Full Power | Max. 630rpm underwater |
| ബാറ്ററി തരം | 2 x 10⁵ AH Deep Cycle (recommended) |
| സ്റ്റിയറിംഗ് അനുപാതം | 360 Degree Control |
| Decibel Level (db) | 65db |
| ഭാരം | 8.0kg/17.6lb |
| ഷാഫ്റ്റ് നീളം | 900mm/35.4 Inch |
| Max Boat Length & Load | 7മീ/22.9 അടി |
| മൗണ്ടിംഗ് തരം | ട്രാൻസോം മൗണ്ട് |
5. സജ്ജീകരണം
5.1 മോട്ടോർ മൌണ്ട് ചെയ്യുന്നു
The Protruar G 3.0 is designed for transom mounting. Follow these steps to securely attach the motor to your boat:
- Position the transom mount bracket on the stern of your boat.
- cl മുറുക്കുകamp screws on the bracket firmly to secure it to the transom. Ensure the motor is centered and stable.
- Adjust the motor's shaft depth using the depth collar to ensure the propeller is submerged at the desired level, avoiding contact with the bottom or excessive splashing.
- The motor offers 7 levels of tilting positions. Adjust the tilt to optimize performance and propeller depth.
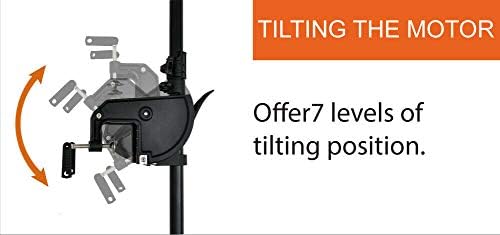
Figure 3: Adjusting the motor's tilt for optimal operation.
5.2 ബാറ്ററി കണക്ഷൻ
The Protruar G 3.0 requires a 24V power supply. This typically involves two 12V deep cycle batteries connected in series. The motor includes a 60A resettable inline fuse for protection.
- Ensure the motor is OFF and the kill switch is disengaged before connecting batteries.
- Connect the positive (+) terminal of the first 12V battery to the negative (-) terminal of the second 12V battery using a short jumper cable.
- Connect the motor's positive (+) cable (red) to the remaining positive (+) terminal of the battery series.
- Connect the motor's negative (-) cable (black) to the remaining negative (-) terminal of the battery series.
- എല്ലാ കണക്ഷനുകളും കർശനമായി സുരക്ഷിതമാക്കുക.
WARNING: Incorrect battery connection can cause severe damage to the motor and pose a safety hazard.
5.3 അസംബ്ലി കൈകാര്യം ചെയ്യുക
The tiller handle is extendable and foldable for convenience.
- To extend the handle, pull it outwards until it locks into position.
- To fold the handle, release the locking mechanism and fold it down. The handle can fold at angles of 0-100 degrees.
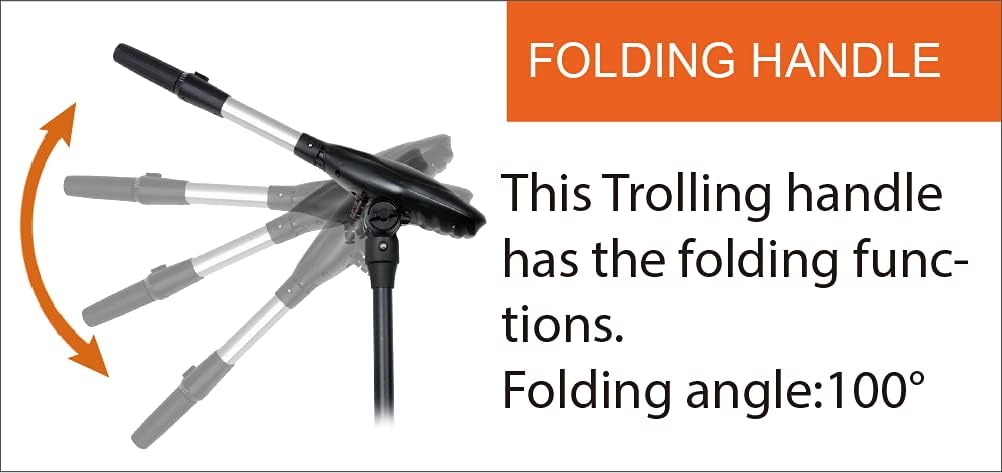
Figure 4: The tiller handle can be folded for storage or adjusted for comfortable operation.
6. ഓപ്പറേഷൻ
6.1 പവർ ഓൺ/ഓഫ്, വേഗത നിയന്ത്രണം
The motor features digital stepless forward and reverse speed control directly from the tiller handle.
- Attach the kill switch lanyard to the motor and yourself or the boat.
- To engage forward motion, rotate the tiller handle clockwise. The further you rotate, the higher the speed.
- To engage reverse motion, rotate the tiller handle counter-clockwise. The further you rotate, the higher the reverse speed.
- To stop the motor, return the tiller handle to the neutral (OFF) position.

Figure 5: Digital stepless speed control for precise adjustments.
6.2 ബാറ്ററി ഇൻഡിക്കേറ്റർ
The motor head features a 5-level power display to indicate the battery's charge status.
- Monitor the display regularly to avoid unexpected power loss.
- Recharge batteries when the indicator shows low power.
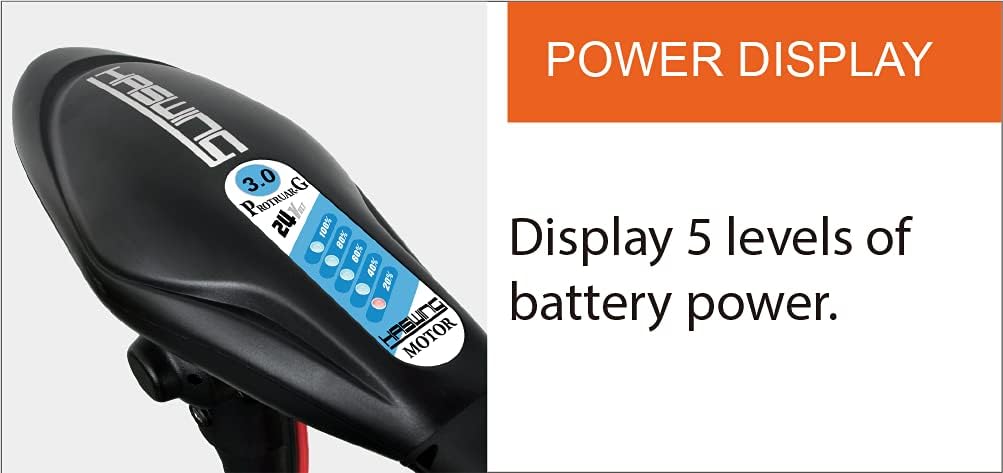
Figure 6: The 5-level battery meter on the motor head.
6.3 എമർജൻസി സ്റ്റോപ്പ്
The kill switch provides an immediate power cut-off for safety.
- In an emergency, pull the kill switch lanyard to instantly stop the motor.
- Always ensure the kill switch is properly engaged before starting the motor.
7. പരിപാലനം
7.1 പ്രൊപ്പല്ലർ കെയർ
The anti-impact propeller features a prop-clutch ability to prevent damage if it strikes an object.
- Regularly inspect the propeller for weeds, fishing line, or damage. Clear any obstructions.
- If the propeller is damaged, replace it with an authentic HASWING replacement propeller.
- Do not overtighten the propeller nut, as this can damage the motor if the prop strikes an object.

Figure 7: The prop-clutch mechanism helps prevent damage to the propeller and motor.
7.2 വൃത്തിയാക്കലും സംഭരണവും
- After each use, especially in saltwater, rinse the motor thoroughly with fresh water.
- Wipe down all surfaces to remove salt, dirt, and debris.
- Store the motor in a dry, well-ventilated area, away from direct sunlight and extreme temperatures.
- Disconnect batteries during long-term storage.
8. പ്രശ്നപരിഹാരം
| പ്രശ്നം | സാധ്യമായ കാരണം | പരിഹാരം |
|---|---|---|
| മോട്ടോർ ആരംഭിക്കുന്നില്ല |
|
|
| കുറഞ്ഞ പവർ അല്ലെങ്കിൽ വേഗത |
|
|
| അമിതമായ വൈബ്രേഷൻ അല്ലെങ്കിൽ ശബ്ദം |
|
|
9. വാറൻ്റിയും പിന്തുണയും
For warranty information, technical support, or replacement parts, please refer to the official HASWING webസൈറ്റിൽ ബന്ധപ്പെടുക അല്ലെങ്കിൽ നിങ്ങളുടെ അംഗീകൃത ഡീലറെ ബന്ധപ്പെടുക. വാങ്ങിയതിന്റെ തെളിവായി നിങ്ങളുടെ വാങ്ങൽ രസീത് സൂക്ഷിക്കുക.
Ask a question about this manual
Ask about setup, troubleshooting, compatibility, parts, safety, or missing instructions. Manuals+ will review the question and use this page’s manual context to help answer it.