ആമുഖം
This manual provides detailed instructions for the safe and efficient operation of your SINGER M1005 Electric Sewing Machine. The M1005 is designed for various sewing projects, offering 4 built-in stitches with 11 options, adjustable thread tension, and a reverse lever for securing seams. Please read this manual thoroughly before using the machine to ensure proper setup and function.
പ്രധാനപ്പെട്ട സുരക്ഷാ നിർദ്ദേശങ്ങൾ
ഒരു ഇലക്ട്രിക്കൽ ഉപകരണം ഉപയോഗിക്കുമ്പോൾ, ഇനിപ്പറയുന്നവ ഉൾപ്പെടെ അടിസ്ഥാന സുരക്ഷാ മുൻകരുതലുകൾ എല്ലായ്പ്പോഴും പാലിക്കണം:
- ഈ തയ്യൽ മെഷീൻ ഉപയോഗിക്കുന്നതിന് മുമ്പ് എല്ലാ നിർദ്ദേശങ്ങളും വായിക്കുക.
- Keep these instructions in a convenient place near your machine.
- Always unplug the machine from the electrical outlet immediately after using and before cleaning, removing covers, lubricating, or making any other user servicing adjustments mentioned in the instruction manual.
- കളിപ്പാട്ടമായി ഉപയോഗിക്കാൻ അനുവദിക്കരുത്. കുട്ടികളോ സമീപത്തോ ഈ ഉപകരണം ഉപയോഗിക്കുമ്പോൾ വളരെ ശ്രദ്ധ ആവശ്യമാണ്.
- ഈ മാനുവലിൽ വിവരിച്ചിരിക്കുന്നതുപോലെ ഉദ്ദേശിച്ച ഉപയോഗത്തിന് മാത്രം ഈ ഉൽപ്പന്നം ഉപയോഗിക്കുക.
- Never operate this sewing machine if it has a damaged cord or plug, if it is not working properly, or if it has been dropped or damaged.
- ചലിക്കുന്ന എല്ലാ ഭാഗങ്ങളിൽ നിന്നും വിരലുകൾ അകറ്റി നിർത്തുക. തയ്യൽ മെഷീൻ സൂചിക്ക് ചുറ്റും പ്രത്യേക ശ്രദ്ധ ആവശ്യമാണ്.
- എല്ലായ്പ്പോഴും ശരിയായ സൂചി പ്ലേറ്റ് ഉപയോഗിക്കുക. തെറ്റായ പ്ലേറ്റ് സൂചി തകരാൻ കാരണമാകും.
- തുന്നുമ്പോൾ തുണി വലിക്കുകയോ തള്ളുകയോ ചെയ്യരുത്. ഇത് സൂചി വഴിതിരിച്ചുവിട്ട് പൊട്ടാൻ ഇടയാക്കും.
- സൂചിയിൽ ത്രെഡ് ഇടുക, സൂചി മാറ്റുക, ബോബിൻ ത്രെഡ് ഇടുക, അല്ലെങ്കിൽ പ്രഷർ ഫൂട്ട് മാറ്റുക തുടങ്ങിയ സൂചി ഭാഗത്ത് എന്തെങ്കിലും ക്രമീകരണങ്ങൾ വരുത്തുമ്പോൾ തയ്യൽ മെഷീൻ ഓഫ് ചെയ്യുക.
ഉൽപ്പന്നം കഴിഞ്ഞുview
The SINGER M1005 is a compact and user-friendly electric sewing machine designed for ease of use and portability.
പ്രധാന സവിശേഷതകൾ:
- 4 Stitches in 11 Options: Select from various straight stitches, zigzag stitches, blind hem stitch, and multi-stitch zigzag using the Stitch Selector Dial.
- Adjustable Thread Tension: Allows for fine-tuning stitch quality for different fabrics and threads.
- ടോപ്പ് ഡ്രോപ്പ്-ഇൻ ബോബിൻ: Features a transparent bobbin cover for easy monitoring of thread supply and simple bobbin insertion.
- Free-Arm Design: Facilitates sewing of cylindrical items like trouser hems and sleeve cuffs.
- റിവേഴ്സ് ലിവർ: Conveniently located for securing the beginning and end of seams with reverse stitches.
- Extra High-Presser Foot Lifter: Provides additional clearance for sewing multiple layers or thicker fabrics.
- പോർട്ടബിൾ ഡിസൈൻ: Lightweight for easy transport and storage.
ഉൾപ്പെടുത്തിയ ഘടകങ്ങൾ:
Your SINGER M1005 sewing machine package includes the following items:
- 1 തയ്യൽ മെഷീൻ
- All-purpose Foot
- അധിക സൂചി
- Finger Guard (pre-installed, removable)
- Bobbins: Class 15 (Transparent)
- മാനുവൽ നീഡിൽ ത്രെഡർ
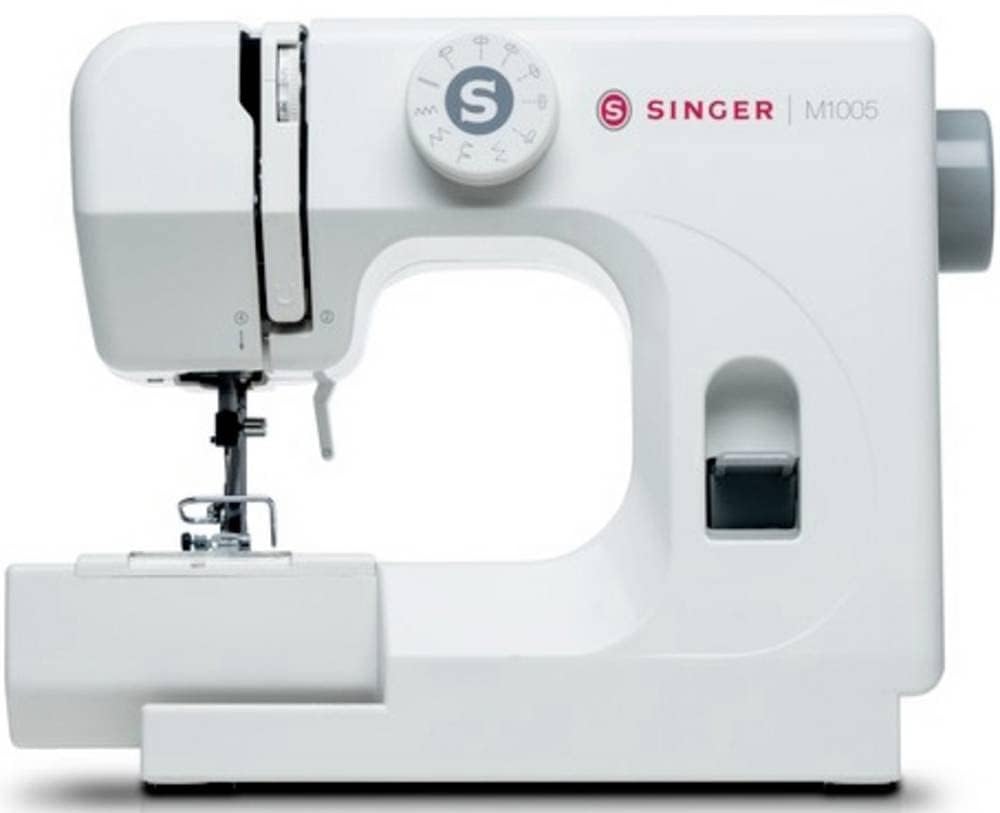
ചിത്രം 1: The SINGER M1005 Electric Sewing Machine, showcasing its compact design and ready-to-use setup.
സജ്ജമാക്കുക
1. പവർ കണക്ഷൻ
- സുസ്ഥിരവും പരന്നതുമായ പ്രതലത്തിൽ യന്ത്രം സ്ഥാപിക്കുക.
- പവർ സ്വിച്ച് "ഓഫ്" സ്ഥാനത്താണെന്ന് ഉറപ്പാക്കുക.
- പവർ കോർഡ് മെഷീനിന്റെ പവർ ഇൻപുട്ടിലേക്കും തുടർന്ന് അനുയോജ്യമായ ഒരു ഇലക്ട്രിക്കൽ ഔട്ട്ലെറ്റിലേക്കും ബന്ധിപ്പിക്കുക.
2. ബോബിൻ വൈൻഡിംഗ്
ശരിയായ ബോബിൻ വൈൻഡിംഗ് സുഗമമായ തുന്നൽ ഉറപ്പാക്കുന്നു.
- സ്പൂൾ പിന്നിൽ ഒരു സ്പൂൾ ത്രെഡ് വയ്ക്കുക.
- മുകളിലെ ത്രെഡ് ഗൈഡിലൂടെയും ബോബിൻ വൈൻഡിംഗ് ടെൻഷൻ ഡിസ്കിന് ചുറ്റും ത്രെഡ് ഗൈഡ് ചെയ്യുക.
- ബോബിനിലെ ചെറിയ ദ്വാരത്തിലൂടെ നൂൽ അകത്തു നിന്ന് പുറത്തേക്ക് കടത്തുക.
- Place the bobbin onto the bobbin winder spindle.
- ബോബിൻ വിൻഡർ സ്പിൻഡിൽ വലതുവശത്തേക്ക് തള്ളുക.
- Turn on the machine and gently press the foot controller (if applicable) or press the start button to begin winding.
- Once the bobbin is full, push the spindle back to the left and cut the thread.
3. Inserting the Top Drop-in Bobbin
The transparent bobbin cover allows for easy monitoring.
- Ensure the needle is in its highest position.
- Open the transparent bobbin cover plate.
- Place the wound bobbin into the bobbin case with the thread unwinding counter-clockwise.
- Guide the thread into the tension spring and then into the thread guide slot.
- Pull out approximately 10-15 cm (4-6 inches) of thread.
- ബോബിൻ കവർ പ്ലേറ്റ് മാറ്റിസ്ഥാപിക്കുക.
4. മുകളിലെ ത്രെഡ് ത്രെഡ് ചെയ്യൽ
Correct upper threading is crucial for proper stitch formation.
- പ്രസ്സർ ഫുട്ട് ലിഫ്റ്റർ ഉയർത്തുക.
- സ്പൂൾ പിന്നിൽ ഒരു സ്പൂൾ ത്രെഡ് വയ്ക്കുക.
- മുകളിലെ ത്രെഡ് ഗൈഡിലൂടെ ത്രെഡ് ഗൈഡ് ചെയ്യുക.
- Follow the numbered threading path down the right channel, up the left channel, and through the take-up lever from right to left.
- സൂചി ബാർ ത്രെഡ് ഗൈഡിലേക്ക് ത്രെഡ് താഴേക്ക് നയിക്കുന്നത് തുടരുക.
- സൂചി മുന്നിൽ നിന്ന് പിന്നിലേക്ക് ത്രെഡ് ചെയ്യുക.
- Pull approximately 15-20 cm (6-8 inches) of thread through the needle eye.
ചിത്രം 2: ഫ്രണ്ട് view of the SINGER M1005, highlighting the stitch selector dial and general threading area.
പ്രവർത്തന നിർദ്ദേശങ്ങൾ
1. ഒരു തുന്നൽ തിരഞ്ഞെടുക്കൽ
The SINGER M1005 offers 4 core stitch types with 11 different options.
- തിരിയുക സ്റ്റിച്ച് സെലക്ടർ ഡയൽ to choose your desired stitch pattern.
- Available stitches include various straight stitches (different lengths/positions), three types of zigzag stitches (different lengths/widths), one blind hem stitch, and one multi-stitch zigzag.
- The optimum stitch width for this machine is 4 mm.
2. Adjusting Thread Tension
Adjust the needle thread tension to achieve balanced stitches.
- The tension dial is usually located on the front of the machine.
- Turn the dial to a higher number for tighter tension, and a lower number for looser tension.
- Test on a scrap piece of fabric to find the ideal setting for your fabric and thread combination.
3. Using the Reverse Lever
The reverse lever is used to secure the beginning and end of seams.
- To sew in reverse, press and hold the റിവേഴ്സ് ലിവർ located on the front of the machine.
- Release the lever to resume forward stitching.
4. Free-Arm Sewing
To utilize the free-arm feature for sewing cuffs, pant hems, or other small circular items:
- Remove the accessory storage compartment (if present) by sliding it off to the left.
- The narrow free arm is now exposed, allowing you to slide fabric around it.
5. Extra High-Presser Foot Lifter
For thicker fabrics or multiple layers, the presser foot can be raised higher than its standard position.
- Lift the presser foot lifter to its highest position.
- For extra clearance, push the lifter up further to engage the extra high position.
മെയിൻ്റനൻസ്
Regular maintenance ensures the longevity and optimal performance of your sewing machine. Always unplug the machine before performing any maintenance.
1 മെഷീൻ വൃത്തിയാക്കൽ
- ലിന്റ് നീക്കം ചെയ്യൽ: Use a small brush to remove lint and dust from the bobbin area and feed dogs.
- ബാഹ്യ ശുചീകരണം: ഒരു മൃദുവായ, ഡി ഉപയോഗിച്ച് ബാഹ്യ പ്രതലങ്ങൾ തുടയ്ക്കുകamp തുണി. കഠിനമായ രാസവസ്തുക്കൾ ഉപയോഗിക്കരുത്.
2 സൂചി മാറ്റിസ്ഥാപിക്കൽ
Replace the needle regularly (after 8-10 hours of sewing) or if it becomes bent, dull, or broken.
- മെഷീൻ ഓഫാക്കി അത് അൺപ്ലഗ് ചെയ്യുക.
- സൂചി cl അഴിക്കുകamp സ്ക്രൂ.
- പഴയ സൂചി നീക്കം ചെയ്യുക.
- മെഷീനിന്റെ പിൻഭാഗത്തേക്ക് അഭിമുഖമായി പരന്ന വശം വരുന്ന തരത്തിൽ ഒരു പുതിയ സൂചി തിരുകുക, അത് കഴിയുന്നിടത്തോളം മുകളിലേക്ക് തള്ളുക.
- സൂചി മുറുക്കുക clamp സുരക്ഷിതമായി സ്ക്രൂ ചെയ്യുക.
ട്രബിൾഷൂട്ടിംഗ്
നിങ്ങൾ നേരിട്ടേക്കാവുന്ന പൊതുവായ പ്രശ്നങ്ങൾക്കുള്ള പരിഹാരങ്ങൾക്കായി ഈ വിഭാഗം കാണുക.
| പ്രശ്നം | സാധ്യമായ കാരണം | പരിഹാരം |
|---|---|---|
| ഒഴിവാക്കിയ തുന്നലുകൾ | തെറ്റായ സൂചി, വളഞ്ഞ സൂചി, തെറ്റായ നൂൽ നൂൽ. | സൂചി ശരിയായ തരം/വലുപ്പം ഉപയോഗിച്ച് മാറ്റിസ്ഥാപിക്കുക, മെഷീൻ ശരിയായി വീണ്ടും ത്രെഡ് ചെയ്യുക. |
| ത്രെഡ് ബ്രേക്കിംഗ് | തെറ്റായ ത്രെഡിംഗ്, വളരെ ഇറുകിയ ടെൻഷൻ, കേടായ സൂചി, മോശം ഗുണനിലവാരമുള്ള നൂൽ. | മെഷീൻ വീണ്ടും ത്രെഡ് ചെയ്യുക, ടെൻഷൻ ക്രമീകരിക്കുക, സൂചി മാറ്റിസ്ഥാപിക്കുക, നല്ല നിലവാരമുള്ള നൂൽ ഉപയോഗിക്കുക. |
| തുണി പക്കറിംഗ് | വളരെ ഇറുകിയ പിരിമുറുക്കം, തെറ്റായ തുന്നൽ നീളം, തുണിയിൽ തെറ്റായ സൂചി. | Loosen tension, adjust stitch length, use appropriate needle. |
| മെഷീൻ ജാമിംഗ് | ബോബിൻ ഭാഗത്ത് നൂൽ കുടുങ്ങി, ലിന്റ് അടിഞ്ഞുകൂടൽ, തെറ്റായ ബോബിൻ ഇൻസേർട്ടിംഗ്. | Remove bobbin and clean bobbin case, re-insert bobbin correctly. |
| അസമമായ തുന്നലുകൾ | Incorrect thread tension, improper threading, worn needle. | Adjust tension, re-thread machine, replace needle. |
സ്പെസിഫിക്കേഷനുകൾ
Technical specifications for the SINGER M1005 Electric Sewing Machine.
- ബ്രാൻഡ്: സിംഗർ
- മോഡൽ നമ്പർ: M1005 (Part Number: 230246102)
- നിറം: വെള്ള
- മെറ്റീരിയൽ: പ്ലാസ്റ്റിക്
- ഇനത്തിൻ്റെ ഭാരം: 3 കിലോഗ്രാം
- ഊർജ്ജ സ്രോതസ്സ്: കോർഡഡ് ഇലക്ട്രിക്
- തുന്നൽ ഓപ്ഷനുകൾ: 4 built-in stitches with 11 options
- Max Stitch Width: 4 മി.മീ
- ബോബിൻ തരം: Class 15 (Transparent, Top Drop-in)
- പ്രത്യേക സവിശേഷതകൾ: Adjustable Thread Tension, Free-Arm Design, Reverse Lever, Extra High-Presser Foot Lifter
വാറൻ്റിയും പിന്തുണയും
For warranty information, service, or technical support, please refer to the warranty card included with your product or contact SINGER customer service directly. Keep your purchase receipt as proof of purchase.
You can typically find contact information for SINGER support on their official webഉൽപ്പന്ന പാക്കേജിംഗിനുള്ളിൽ.