
1. ആമുഖം
This manual provides detailed instructions for the setup, operation, and maintenance of your WISE TIGER LED Digital Alarm Clock (Model CK-LED1302). Please read this manual thoroughly before use to ensure proper functionality and to maximize your product experience.

Image 1.1: WISE TIGER LED Digital Alarm Clock and its remote control.
2. പാക്കേജ് ഉള്ളടക്കം
നിങ്ങളുടെ പാക്കേജിൽ എല്ലാ ഇനങ്ങളും ഉണ്ടെന്ന് ദയവായി പരിശോധിക്കുക:
- WISE TIGER LED Digital Alarm Clock (Model CK-LED1302)
- റിമോട്ട് കൺട്രോൾ
- യുഎസ്ബി പവർ കേബിൾ
- ഉപയോക്തൃ മാനുവൽ (ഈ പ്രമാണം)
- Fixed Bracket (for desk placement)
3. ഉൽപ്പന്നം കഴിഞ്ഞുview
The WISE TIGER LED Digital Alarm Clock features a modern 3D design, offering clear time display and multiple functions for various environments.
3.1 പ്രധാന സവിശേഷതകൾ
- സമയ പ്രദർശനം: 12-hour or 24-hour format.
- കലണ്ടർ ഡിസ്പ്ലേ: Shows date.
- അലാറം ക്ലോക്ക്: With snooze function.
- താപനില പ്രദർശനം: ആംബിയന്റ് താപനില കാണിക്കുന്നു.
- ക്രമീകരിക്കാവുന്ന തെളിച്ചം: Automatic brightness sensor and manual adjustment via remote control.
- രാത്രി വെളിച്ച പ്രവർത്തനം: Provides soft illumination.
- മെമ്മറി പ്രവർത്തനം: Built-in battery retains time settings for 4-8 hours during power disconnection.
- ബഹുമുഖ പ്ലെയ്സ്മെന്റ്: Suitable for desk or wall mounting.

Image 3.1: Visual representation of the clock's main functions.
3.2 ഘടകങ്ങൾ
ഒരു ഓവറിനായി താഴെയുള്ള ഡയഗ്രം കാണുക.view of the clock's components and connection points.
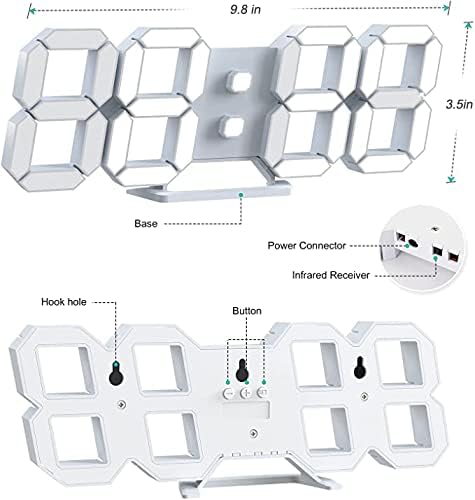
ചിത്രം 3.2: പിന്നിലേക്ക് view and dimensions of the clock, highlighting the power connector, infrared receiver, and mounting options.
- ഡിസ്പ്ലേ: Large 3D LED digits for time, date, and temperature.
- അടിസ്ഥാനം: Removable stand for desk placement.
- പവർ കണക്റ്റർ: USB port for power input.
- ഇൻഫ്രാറെഡ് റിസീവർ: റിമോട്ട് കൺട്രോൾ സിഗ്നലുകൾക്കായി.
- Hook Holes: മതിൽ കയറുന്നതിന്.
- നിയന്ത്രണ ബട്ടണുകൾ: Located on the back for basic settings (Power, Up, Down, Set).
4. സജ്ജീകരണം
4.1 പവർ കണക്ഷൻ
- Connect the provided USB power cable to the power connector on the back of the clock.
- USB കേബിളിന്റെ മറ്റേ അറ്റം ഒരു സാധാരണ USB പവർ അഡാപ്റ്ററിലേക്ക് (ഉൾപ്പെടുത്തിയിട്ടില്ല) അല്ലെങ്കിൽ ഒരു കമ്പ്യൂട്ടർ USB പോർട്ടിലേക്ക് പ്ലഗ് ചെയ്യുക.
- The clock will power on and display the time.
The clock is powered by the USB cable only. A built-in battery serves to record time settings when power is disconnected, ensuring settings are retained for 4-8 hours.

Image 4.1: Explanation of the clock's power and memory function.
4.2 പ്ലേസ്മെന്റ് ഓപ്ഷനുകൾ
The clock can be used as a desk clock or a wall clock.
- ഡെസ്ക് പ്ലേസ്മെന്റ്: Attach the fixed bracket to the bottom of the clock. The angle of the bracket can be adjusted for optimal viewing.
- മതിൽ മൗണ്ടിംഗ്: Remove the fixed bracket if attached. Use the installation slots (hook holes) on the back of the clock to hang it securely on a wall using appropriate fasteners (not included).

Image 4.2: The clock configured for wall mounting and desk placement.
5. പ്രവർത്തന നിർദ്ദേശങ്ങൾ
The clock's functions are primarily controlled using the included remote control. Basic settings can also be adjusted via the buttons on the back of the clock.
5.1 സമയവും തീയതിയും ക്രമീകരിക്കുക
- അമർത്തുക സമയം button on the remote control to enter time setting mode.
- ഉപയോഗിക്കുക UP ഒപ്പം താഴേക്ക് മണിക്കൂർ ക്രമീകരിക്കാനുള്ള അമ്പടയാളങ്ങൾ.
- അമർത്തുക സമയം again to move to minute setting, then use UP ഒപ്പം താഴേക്ക് ക്രമീകരിക്കാൻ.
- അമർത്തുന്നത് തുടരുക സമയം വർഷം, മാസം, ദിവസം എന്നീ ക്രമീകരണങ്ങളിലൂടെ സൈക്കിൾ ചെയ്യാൻ, ഓരോന്നും ഉപയോഗിച്ച് ക്രമീകരിക്കുക UP ഒപ്പം താഴേക്ക്.
- അമർത്തുക സമയം one last time or wait a few seconds for the settings to save automatically.
5.2 12/24 മണിക്കൂർ ഫോർമാറ്റ്
12 മണിക്കൂർ മുതൽ 24 മണിക്കൂർ വരെയുള്ള സമയ ഫോർമാറ്റുകൾക്കിടയിൽ മാറാൻ, അമർത്തുക 12/24എച്ച് റിമോട്ട് കൺട്രോളിലെ ബട്ടൺ.

ചിത്രം 5.1: ഉദാample of 12-hour and 24-hour time display.
5.3 അലാറം സജ്ജമാക്കുന്നു
- അമർത്തുക അലാറം button on the remote control to enter alarm setting mode.
- ഉപയോഗിക്കുക UP ഒപ്പം താഴേക്ക് arrows to set the desired alarm hour.
- അമർത്തുക അലാറം again to move to minute setting, then use UP ഒപ്പം താഴേക്ക് ക്രമീകരിക്കാൻ.
- അമർത്തുക അലാറം one last time or wait for the settings to save.
- അലാറം സജീവമാക്കുന്നതിനും നിർജ്ജീവമാക്കുന്നതിനും, അമർത്തുക അലാറം button briefly outside of setting mode. An alarm icon will appear/disappear on the display.
5.4 സ്നൂസ് ഫംഗ്ഷൻ
അലാറം മുഴങ്ങുമ്പോൾ, അമർത്തുക സ്നൂസ് ചെയ്യുക button on the remote control to temporarily silence the alarm. The alarm will sound again after a set interval (typically 5-10 minutes).

Image 5.2: The snooze alarm function in use.
5.5 തെളിച്ചം ക്രമീകരിക്കൽ
ക്ലോക്കിൽ ഓട്ടോമാറ്റിക്, മാനുവൽ ബ്രൈറ്റ്നെസ് കൺട്രോൾ എന്നിവയുണ്ട്.
- യാന്ത്രിക തെളിച്ചം: The built-in sensor automatically adjusts the display brightness based on ambient light conditions.
- Manual Brightness: അമർത്തുക തിളക്കമുള്ളത് button on the remote control to cycle through different brightness levels (e.g., high, medium, low).

Image 5.3: Automatic brightness adjustment based on ambient light.

Image 5.4: Manual adjustment through three brightness levels.
5.6 താപനില ഡിസ്പ്ലേ
The clock automatically displays the ambient temperature. No manual adjustment is typically required for this function.
6. പരിപാലനം
To ensure the longevity and optimal performance of your WISE TIGER LED Digital Alarm Clock, follow these maintenance guidelines:
- വൃത്തിയാക്കൽ: Use a soft, dry cloth to wipe the display and casing. Avoid abrasive cleaners, solvents, or spray cleaners directly on the clock.
- ശക്തി: Always use the provided USB cable for power. Ensure the power source is stable.
- പരിസ്ഥിതി: Keep the clock away from extreme temperatures, direct sunlight, and high humidity.
- റിമോട്ട് കൺട്രോൾ: Store the remote control in a safe place to prevent loss or damage. Ensure batteries are replaced when needed (typically 2 Lithium Ion batteries, included).
7. പ്രശ്നപരിഹാരം
നിങ്ങളുടെ ക്ലോക്കിൽ പ്രശ്നങ്ങൾ നേരിടുകയാണെങ്കിൽ, ഇനിപ്പറയുന്ന പൊതുവായ പ്രശ്നങ്ങളും പരിഹാരങ്ങളും പരിശോധിക്കുക:
| പ്രശ്നം | സാധ്യമായ കാരണം | പരിഹാരം |
|---|---|---|
| ക്ലോക്ക് ഓണാക്കുന്നില്ല | വൈദ്യുതിയോ അയഞ്ഞ കണക്ഷനോ ഇല്ല | Ensure USB cable is securely connected and power source is active. Try a different USB port or adapter. |
| റിമോട്ട് കൺട്രോൾ പ്രവർത്തിക്കുന്നില്ല | Remote batteries are dead or remote is out of range/blocked | Replace remote control batteries. Ensure remote is pointed at the clock's infrared receiver (refer to Image 3.2) and within 8 meters. Remove any obstructions. |
| സമയം കൃത്യമല്ല | Time was not set precisely | Reset the time carefully, ensuring you set it at the exact second of the desired time. |
| Display is too dim or too bright | Brightness setting needs adjustment | അമർത്തുക തിളക്കമുള്ളത് button on the remote to cycle through manual brightness levels. Check if automatic brightness is functioning correctly in different light conditions. |
| അലാറം മുഴങ്ങുന്നില്ല | Alarm is not activated or set incorrectly | Ensure the alarm is set and activated (alarm icon visible). Verify the alarm time is correct. |
8 സ്പെസിഫിക്കേഷനുകൾ
| ഫീച്ചർ | വിശദാംശങ്ങൾ |
|---|---|
| ബ്രാൻഡ് | ബുദ്ധിയുള്ള കടുവ |
| മോഡൽ നമ്പർ | CK-LED1302 |
| ഡിസ്പ്ലേ തരം | ഡിജിറ്റൽ |
| നിറം | വെള്ള |
| ഉൽപ്പന്ന അളവുകൾ | 9.7"ആംശം x 3.5"ആംശം |
| പവർ ഉറവിടം | കോർഡഡ് ഇലക്ട്രിക് (USB) |
| മെമ്മറി ബാറ്ററി | 2 Lithium Ion batteries (included), retains settings for 4-8 hours |
| മൗണ്ടിംഗ് തരം | Wall Mount, Desk Mount |
| പ്രത്യേക സവിശേഷതകൾ | Adjustable Brightness, Alarm Clock, Temperature Display, Date Display, 12/24 Hour Format |
| മെറ്റീരിയൽ | അക്രിലോണിട്രൈൽ ബ്യൂട്ടാഡൈൻ സ്റ്റൈറൈൻ |
| ഇനത്തിൻ്റെ ഭാരം | 0.317 ഔൺസ് (ഏകദേശം 9 ഗ്രാം) |
| യു.പി.സി | 728990655931 |
9. വാറൻ്റിയും പിന്തുണയും
For warranty information or technical support, please refer to the product packaging or contact the retailer where the product was purchased. Keep your purchase receipt as proof of purchase.