
1. ആമുഖം
Thank you for choosing the DEXTER 1500W SDS Plus Hammer Drill. This manual provides essential information for the safe and effective operation, maintenance, and troubleshooting of your new tool. Please read this manual thoroughly before first use and keep it for future reference.

Figure 1: The DEXTER 1500W SDS Plus Hammer Drill, showcasing its robust design and ergonomic features.
2. സുരക്ഷാ നിർദ്ദേശങ്ങൾ
തീ, വൈദ്യുതാഘാതം, വ്യക്തിപരമായ പരിക്കുകൾ എന്നിവ കുറയ്ക്കുന്നതിന് വൈദ്യുത ഉപകരണങ്ങൾ ഉപയോഗിക്കുമ്പോൾ എല്ലായ്പ്പോഴും അടിസ്ഥാന സുരക്ഷാ മുൻകരുതലുകൾ പാലിക്കുക.
- വർക്ക് ഏരിയ സുരക്ഷ: നിങ്ങളുടെ ജോലിസ്ഥലം വൃത്തിയുള്ളതും നല്ല വെളിച്ചമുള്ളതുമായി സൂക്ഷിക്കുക. കത്തുന്ന ദ്രാവകങ്ങൾ, വാതകങ്ങൾ അല്ലെങ്കിൽ പൊടി എന്നിവയുടെ സാന്നിധ്യം പോലുള്ള സ്ഫോടനാത്മകമായ അന്തരീക്ഷത്തിൽ പവർ ഉപകരണങ്ങൾ പ്രവർത്തിപ്പിക്കരുത്.
- ഇലക്ട്രിക്കൽ സുരക്ഷ: പവർ ടൂൾ പ്ലഗുകൾ ഔട്ട്ലെറ്റുമായി പൊരുത്തപ്പെടണം. പ്ലഗിൽ ഒരിക്കലും ഒരു തരത്തിലും മാറ്റം വരുത്തരുത്. മണ്ണിട്ടതോ നിലംപരിശായതോ ആയ പ്രതലങ്ങളുമായുള്ള ശരീര സമ്പർക്കം ഒഴിവാക്കുക.
- വ്യക്തിഗത സുരക്ഷ: Always wear eye protection, hearing protection, and suitable work gloves. Dress properly; do not wear loose clothing or jewelry.
- ഉപകരണ ഉപയോഗവും പരിചരണവും: പവർ ടൂൾ നിർബന്ധിച്ച് ഉപയോഗിക്കരുത്. നിങ്ങളുടെ ആപ്ലിക്കേഷന് അനുയോജ്യമായ പവർ ടൂൾ ഉപയോഗിക്കുക. എന്തെങ്കിലും ക്രമീകരണങ്ങൾ നടത്തുന്നതിനോ, ആക്സസറികൾ മാറ്റുന്നതിനോ, പവർ ടൂളുകൾ സൂക്ഷിക്കുന്നതിനോ മുമ്പ് പവർ സ്രോതസ്സിൽ നിന്ന് പ്ലഗ് വിച്ഛേദിക്കുക.
3. ഉൽപ്പന്നം കഴിഞ്ഞുview ഘടകങ്ങളും
Familiarize yourself with the various parts of your DEXTER Hammer Drill and its included accessories.
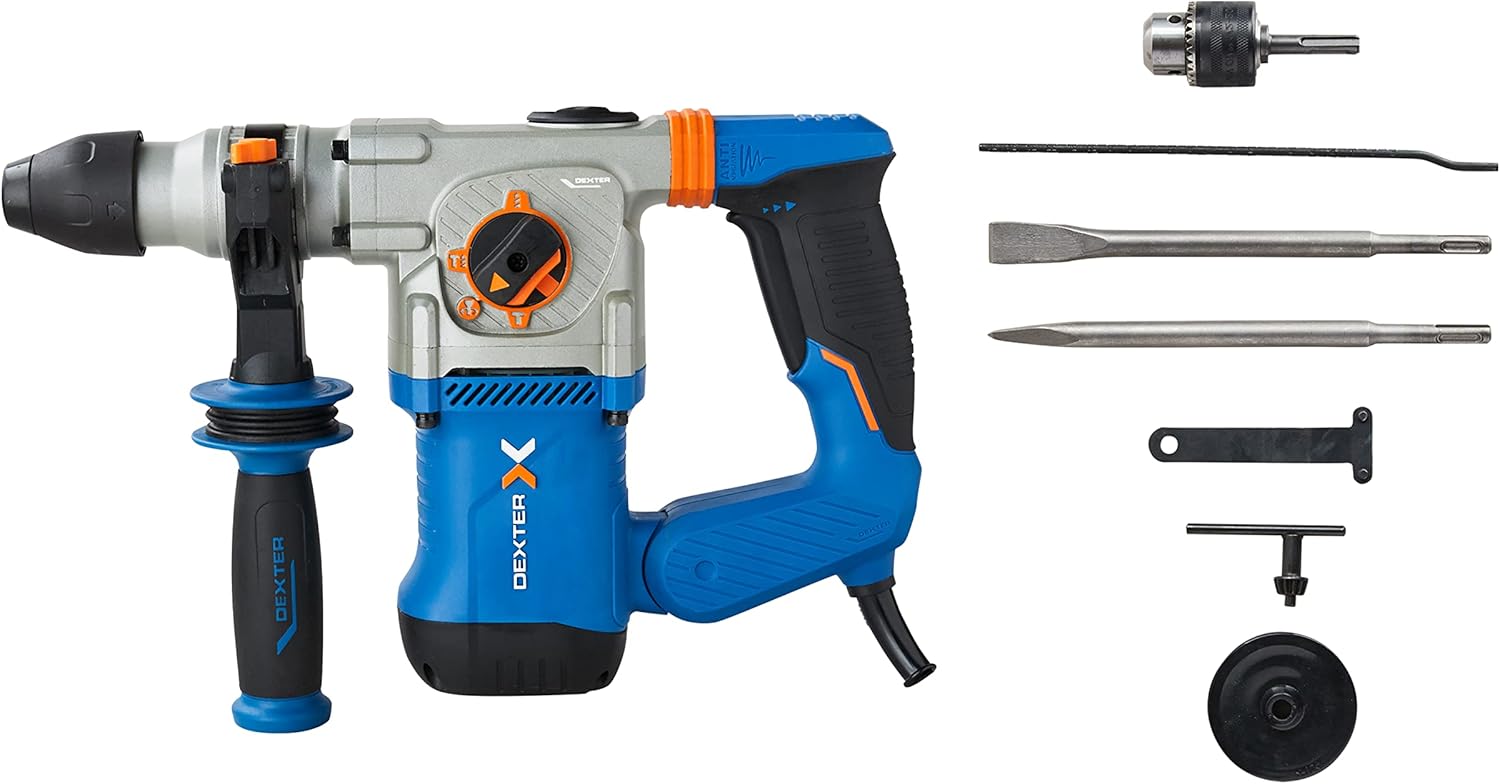
Figure 2: The hammer drill along with its standard accessories, including the SDS Plus chuck, pointed chisel, flat chisel, side handle, key, and depth gauge.
പ്രധാന ഘടകങ്ങൾ:
- എസ്ഡിഎസ് പ്ലസ് ചക്ക്: വേഗത്തിലുള്ളതും സുരക്ഷിതവുമായ ബിറ്റ് മാറ്റങ്ങൾക്ക്.
- മോഡ് സെലക്ടർ സ്വിച്ച്: Allows selection between drilling, hammer drilling, chiseling, and chiseling with free accessory adjustment.
- വേരിയബിൾ സ്പീഡ് ട്രിഗർ: For precise control over drilling and chiseling speed.
- Anti-Vibration Handles: Designed to absorb shocks and reduce user fatigue.
- സൈഡ് ഹാൻഡിൽ: പ്രവർത്തന സമയത്ത് അധിക പിടുത്തവും നിയന്ത്രണവും നൽകുന്നു.
- ഡെപ്ത് ഗേജ്: For setting precise drilling depths.
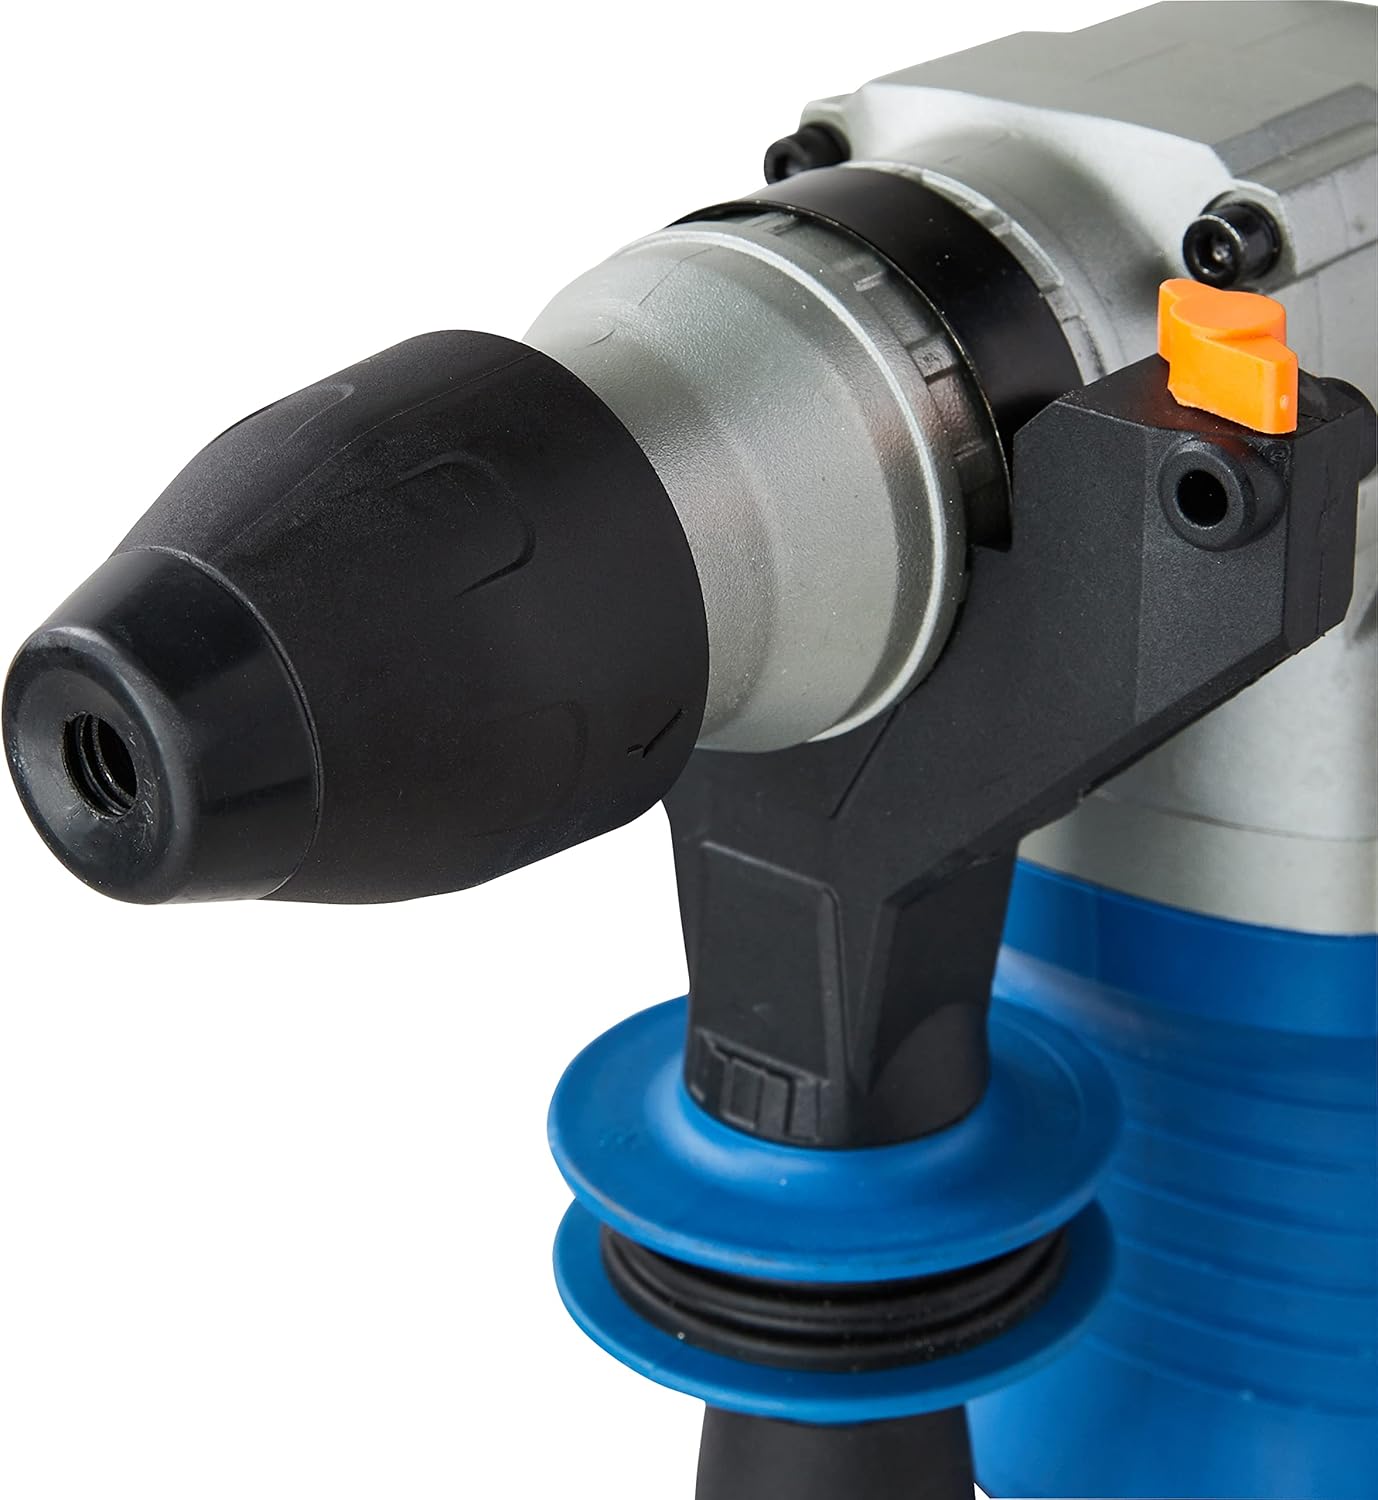
ചിത്രം 3: വിശദമായി view of the SDS Plus chuck, designed for quick and secure bit insertion.

Figure 4: Close-up of the mode selector switch, indicating the different operational modes of the hammer drill.

ചിത്രം 5: View of the anti-vibration handle, highlighting its design for improved user comfort and reduced fatigue.
4. സജ്ജീകരണം
4.1 സൈഡ് ഹാൻഡിൽ ഘടിപ്പിക്കൽ
- എതിർ ഘടികാരദിശയിൽ തിരിക്കുന്നതിലൂടെ സൈഡ് ഹാൻഡിൽ അഴിക്കുക.
- Slide the handle onto the front of the tool until it is in the desired position.
- Rotate the handle clockwise to tighten and secure it.
4.2 Inserting and Removing SDS Plus Bits
- എസ്ഡിഎസ് പ്ലസ് ബിറ്റിന്റെ ഷാങ്ക് വൃത്തിയാക്കുക.
- Insert the bit into the chuck until it clicks into place. Pull on the bit to ensure it is securely locked.
- നീക്കം ചെയ്യാൻ, ചക്ക് കോളർ പിന്നിലേക്ക് വലിച്ച് ബിറ്റ് പുറത്തെടുക്കുക.
4.3 Attaching the Key Chuck (for standard drill bits)
For drilling with standard, non-SDS bits (e.g., for wood or metal), attach the included key chuck adapter to the SDS Plus chuck.
- Insert the key chuck adapter into the SDS Plus chuck as described in 4.2.
- Insert the desired standard drill bit into the key chuck.
- Tighten the key chuck using the provided chuck key to secure the bit.
4.4 ഡെപ്ത് ഗേജ് സജ്ജീകരിക്കൽ
- സൈഡ് ഹാൻഡിലിലെ ദ്വാരത്തിലേക്ക് ഡെപ്ത് ഗേജ് തിരുകുക.
- Adjust the gauge to the desired drilling depth.
- Tighten the side handle to secure the depth gauge in place.
5. പ്രവർത്തിക്കുന്നു
Your DEXTER Hammer Drill offers four primary functions for various applications.
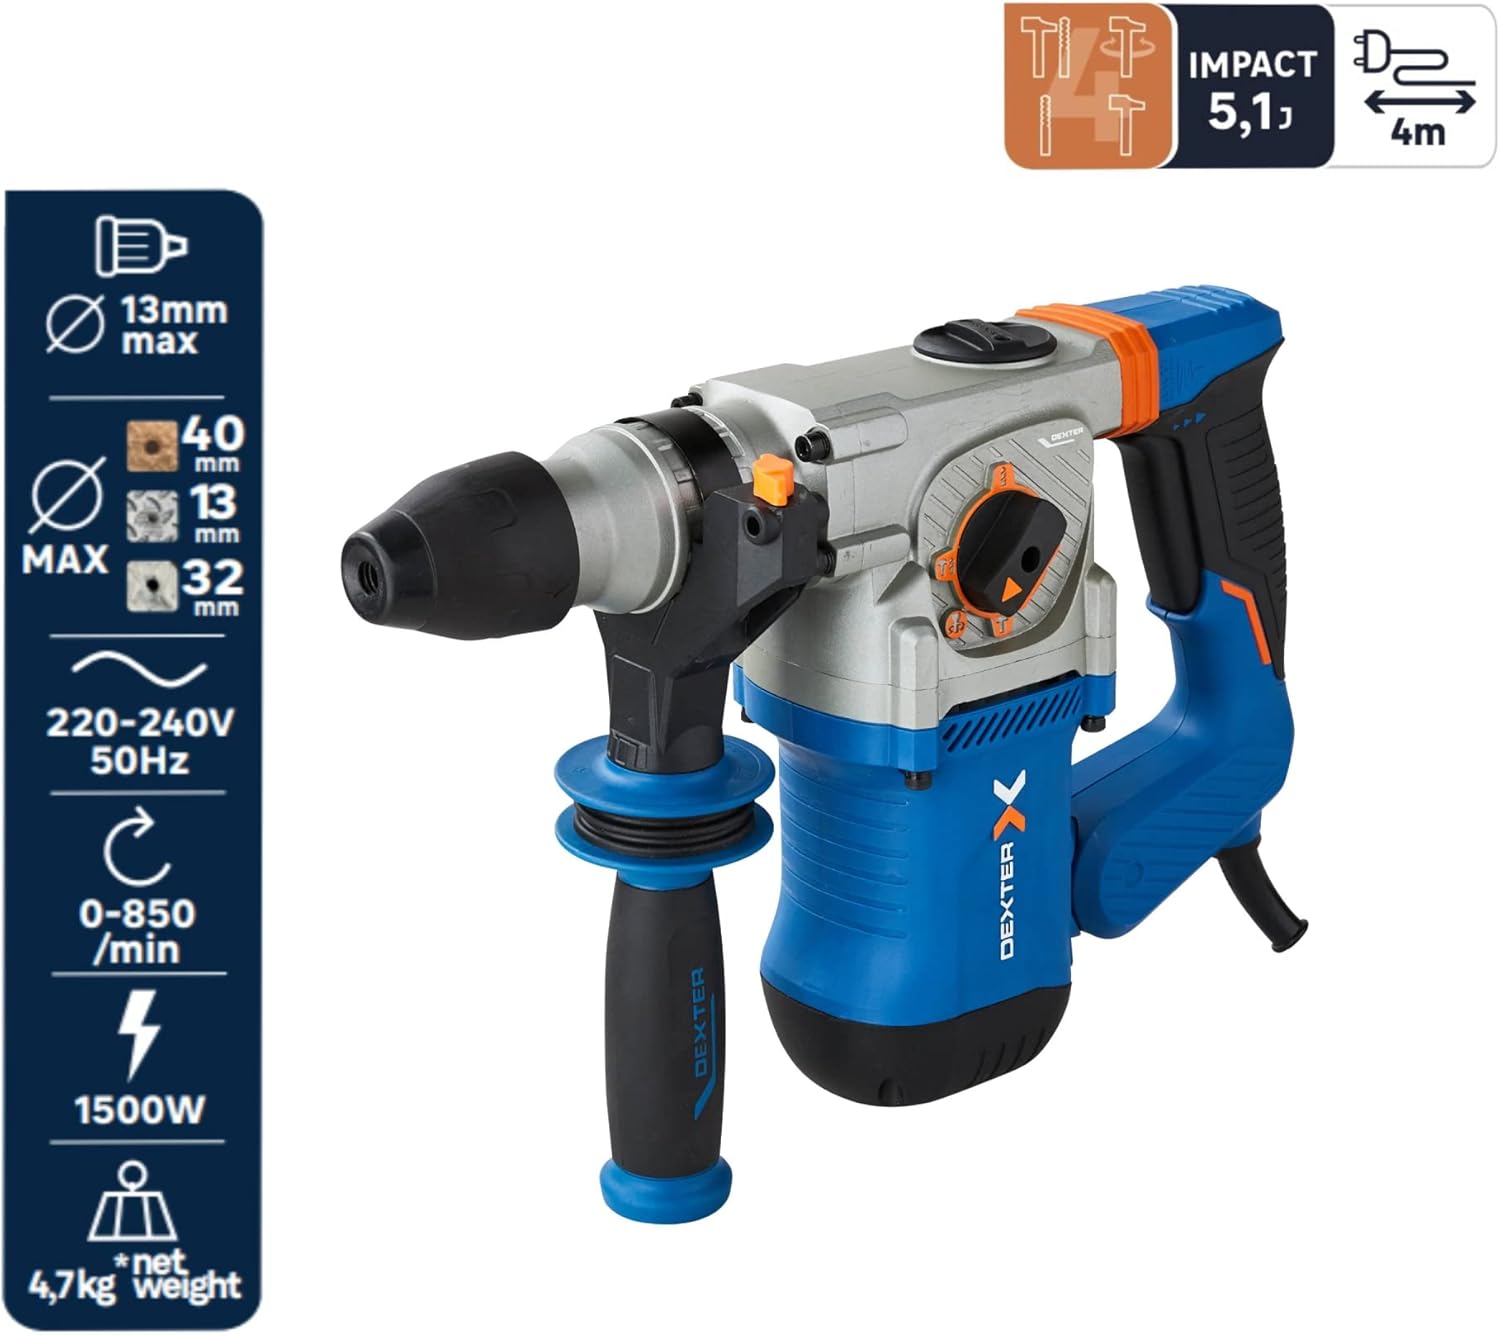
ചിത്രം 6: ഓവർview of the hammer drill's capabilities, including maximum drilling diameters and power specifications.
5.1 ഓപ്പറേറ്റിംഗ് മോഡ് തിരഞ്ഞെടുക്കൽ
Rotate the mode selector switch to choose the appropriate function:
- Drilling Mode (Drill Bit Symbol): For drilling in wood (up to 40mm) and metal (up to 13mm). Use with the key chuck and standard drill bits.
- Hammer Drilling Mode (Drill Bit + Hammer Symbol): For drilling in concrete or brick (up to 26mm). Use with SDS Plus drill bits.
- Chiseling Mode (Hammer Symbol): For chiseling applications, such as breaking concrete or removing tiles. The accessory is fixed in position.
- Chiseling with Free Accessory Adjustment (Hammer + Rotating Arrow Symbol): Allows the chisel to rotate freely, useful for adjusting the angle when removing tiles or similar tasks.
5.2 വേരിയബിൾ സ്പീഡ് കൺട്രോൾ
The trigger features variable speed control. Press the trigger lightly for lower speeds and press harder for higher speeds. This allows for precise control depending on the material and application.
5.3 തുടർച്ചയായ പ്രവർത്തനം
For extended use, the tool can be set to continuous operation. Press the trigger and then engage the lock-on button (if present, typically on the handle). To disengage, press the trigger again.
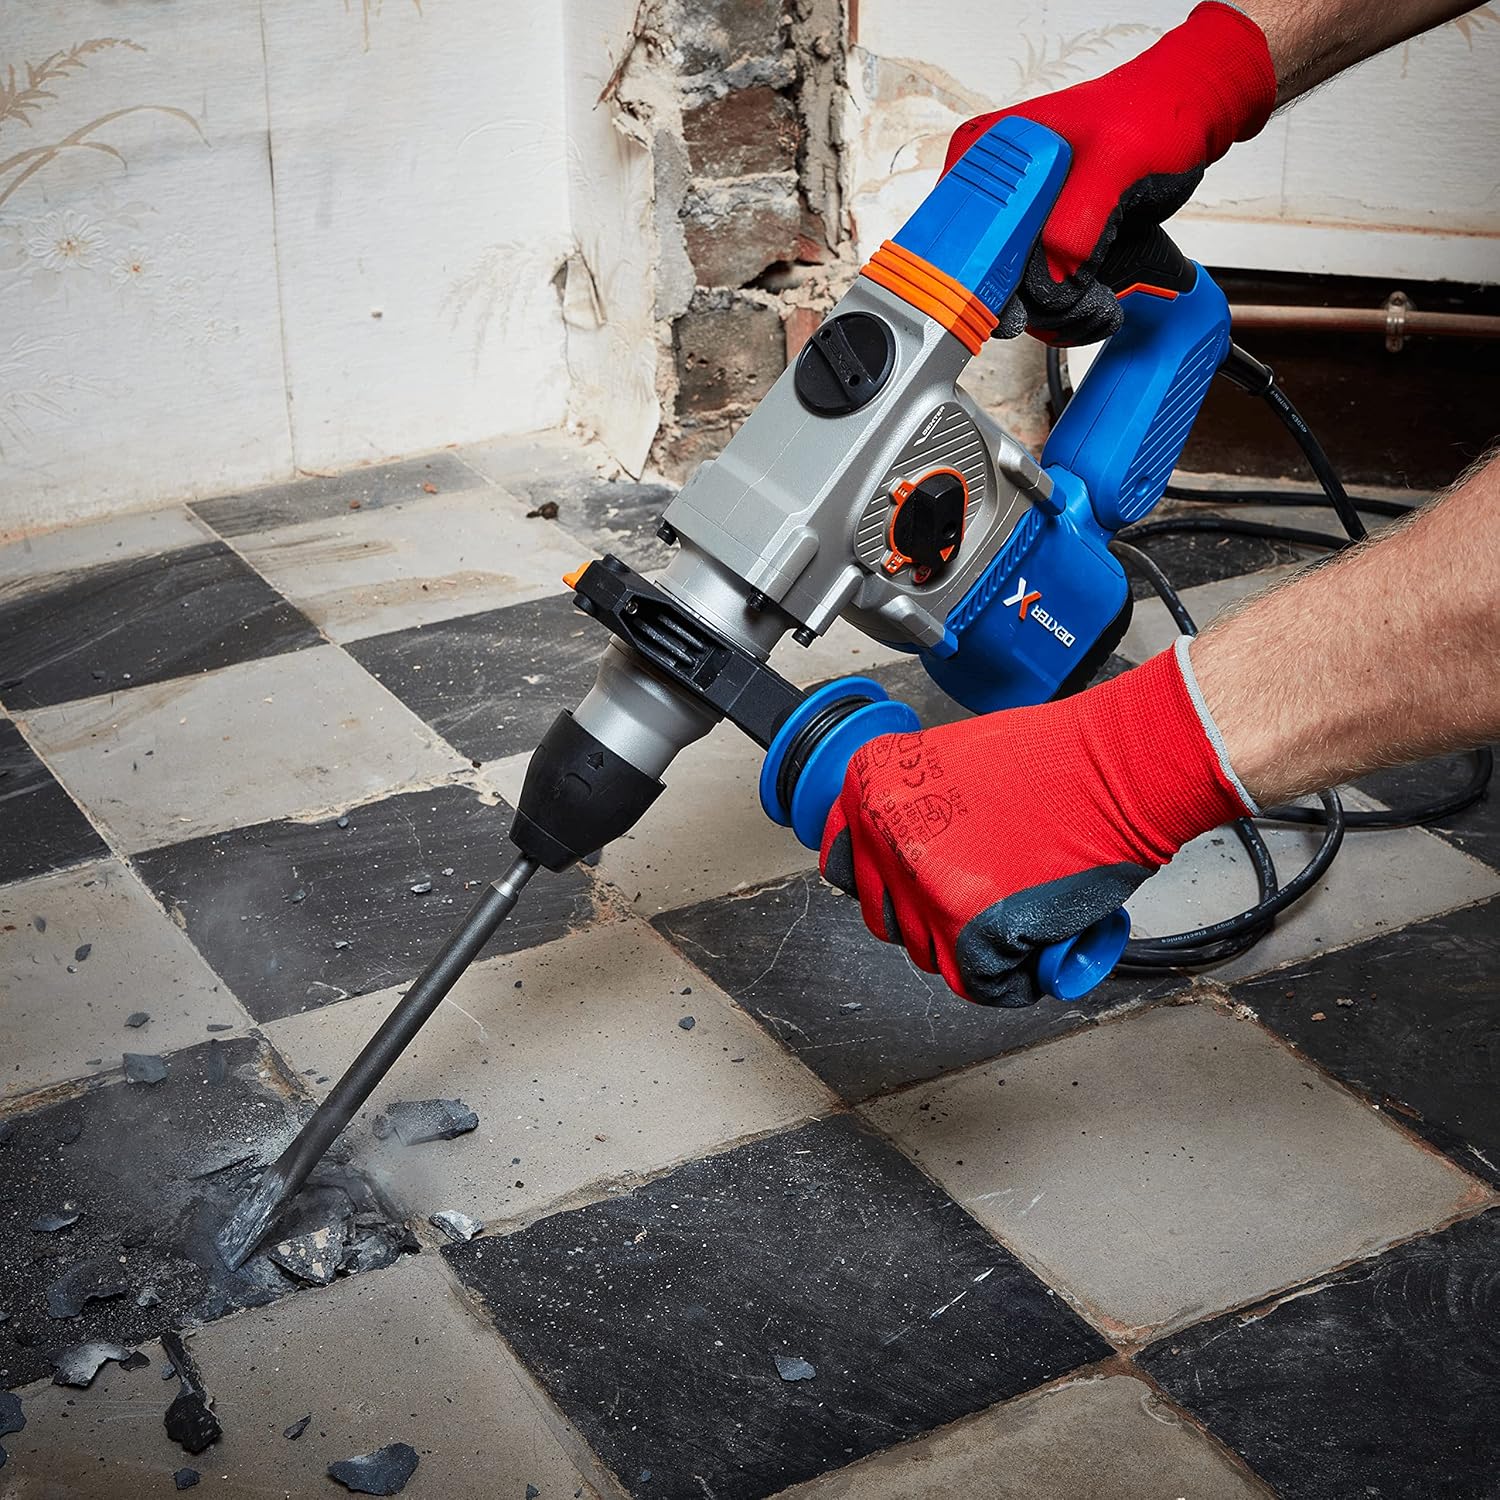
Figure 7: The hammer drill being used to chisel and break up a concrete floor, demonstrating its power in demolition tasks.

Figure 8: An operator using the hammer drill to efficiently remove floor tiles, utilizing the chiseling function.

Figure 9: The hammer drill in action, drilling into a brick wall, showcasing its capability for masonry work.
6. പരിപാലനം
പതിവ് അറ്റകുറ്റപ്പണികൾ നിങ്ങളുടെ ഉപകരണത്തിന്റെ ദീർഘായുസ്സും മികച്ച പ്രകടനവും ഉറപ്പാക്കുന്നു.
- വൃത്തിയാക്കൽ: ഓരോ ഉപയോഗത്തിനു ശേഷവും, ഉപകരണം മൃദുവായ, ഡി-ടച്ച് ഉപയോഗിച്ച് വൃത്തിയാക്കുക.amp തുണി. കഠിനമായ രാസവസ്തുക്കളോ അബ്രസീവ് ക്ലീനറുകളോ ഉപയോഗിക്കരുത്. വായുസഞ്ചാര ദ്വാരങ്ങൾ പൊടിയും അവശിഷ്ടങ്ങളും ഇല്ലാതെ വൃത്തിയായി സൂക്ഷിക്കുക.
- ചക്ക് മെയിന്റനൻസ്: Periodically clean and lightly lubricate the SDS Plus chuck to ensure smooth bit insertion and removal.
- കാർബൺ ബ്രഷുകൾ: If the tool experiences reduced power or excessive sparking, the carbon brushes may need inspection or replacement. This should ideally be done by a qualified service technician.
- സംഭരണം: കുട്ടികൾക്ക് ലഭ്യമാകാതെ, ഉണങ്ങിയതും സുരക്ഷിതവുമായ സ്ഥലത്ത് ഉപകരണം സൂക്ഷിക്കുക.
7. പ്രശ്നപരിഹാരം
താഴെ പറയുന്നവയാണ് സാധാരണ പ്രശ്നങ്ങളും അവയുടെ സാധ്യമായ പരിഹാരങ്ങളും.
| പ്രശ്നം | സാധ്യമായ കാരണം | പരിഹാരം |
|---|---|---|
| ഉപകരണം ആരംഭിക്കുന്നില്ല | No power supply; Faulty power cord/plug | Check power outlet and connections; Inspect power cord for damage. |
| കുറഞ്ഞ പവർ/പ്രകടനം | Worn carbon brushes; Overload; Incorrect mode selection | Have carbon brushes checked/replaced; Reduce load; Ensure correct mode is selected. |
| ചക്കിൽ ബിറ്റ് പൂട്ടുന്നില്ല. | Chuck dirty; Bit shank damaged | Clean chuck and bit shank; Use a new bit if damaged. |
| അമിതമായ വൈബ്രേഷൻ | Damaged bit; Internal issue | Replace bit; If problem persists, seek professional service. |
8 സ്പെസിഫിക്കേഷനുകൾ
| ഫീച്ചർ | സ്പെസിഫിക്കേഷൻ |
|---|---|
| മോഡൽ നമ്പർ | 3276007131802 |
| പവർ ഇൻപുട്ട് | 1500 W |
| ഇംപാക്റ്റ് എനർജി | 5.1 ജൂൾസ് |
| പരമാവധി ഇംപാക്ട് നിരക്ക് | 4500 ബിപിഎം |
| നോ-ലോഡ് സ്പീഡ് | 0-850 ആർപിഎം |
| ചക്ക് തരം | എസ്ഡിഎസ് പ്ലസ് |
| ഡ്രില്ലിംഗ് ശേഷി (മരം) | 40 മി.മീ |
| ഡ്രില്ലിംഗ് ശേഷി (ലോഹം) | 13 മി.മീ |
| Drilling Capacity (Concrete/Brick) | 26 മി.മീ |
| വാല്യംtage | 230 വി |
| ഉൽപ്പന്ന അളവുകൾ | 12 x 12 x 32 സെ.മീ |
| ഇനത്തിൻ്റെ ഭാരം | 8.2 കി.ഗ്രാം |
| കേബിൾ നീളം | 4 മീ |
9. വാറൻ്റിയും പിന്തുണയും
DEXTER products are manufactured to high-quality standards. For warranty information, please refer to the warranty card included with your purchase or contact DEXTER customer support. Keep your proof of purchase for any warranty claims.
For technical assistance, spare parts, or service, please contact your local DEXTER authorized service center or visit the official DEXTER webബന്ധപ്പെടാനുള്ള വിശദാംശങ്ങൾക്കുള്ള സൈറ്റ്.