
1. ആമുഖം
Thank you for choosing the Conentool 21V Cordless Drill Driver Set. This manual provides essential information for the safe and effective use of your new tool. Please read all instructions carefully before operation to ensure proper handling, maximize performance, and prevent injury. Keep this manual for future reference.
2. സുരക്ഷാ നിർദ്ദേശങ്ങൾ
തീ, വൈദ്യുതാഘാതം, വ്യക്തിപരമായ പരിക്കുകൾ എന്നിവ കുറയ്ക്കുന്നതിന് വൈദ്യുത ഉപകരണങ്ങൾ ഉപയോഗിക്കുമ്പോൾ എല്ലായ്പ്പോഴും അടിസ്ഥാന സുരക്ഷാ മുൻകരുതലുകൾ പാലിക്കുക.
പൊതു പവർ ടൂൾ സുരക്ഷാ മുന്നറിയിപ്പുകൾ
- വർക്ക് ഏരിയ സുരക്ഷ: നിങ്ങളുടെ ജോലിസ്ഥലം വൃത്തിയുള്ളതും നല്ല വെളിച്ചമുള്ളതുമായി സൂക്ഷിക്കുക. അലങ്കോലമായതോ ഇരുണ്ടതോ ആയ സ്ഥലങ്ങൾ അപകടങ്ങൾ ക്ഷണിച്ചുവരുത്തുന്നു. കത്തുന്ന ദ്രാവകങ്ങൾ, വാതകങ്ങൾ അല്ലെങ്കിൽ പൊടി എന്നിവയുടെ സാന്നിധ്യം പോലുള്ള സ്ഫോടനാത്മകമായ അന്തരീക്ഷത്തിൽ വൈദ്യുതി ഉപകരണങ്ങൾ പ്രവർത്തിപ്പിക്കരുത്.
- ഇലക്ട്രിക്കൽ സുരക്ഷ: പൈപ്പുകൾ, റേഡിയേറ്ററുകൾ, റേഞ്ചുകൾ, റഫ്രിജറേറ്ററുകൾ തുടങ്ങിയ മണ്ണ് പുരണ്ടതോ നിലം പതിച്ചതോ ആയ പ്രതലങ്ങളുമായി ശരീര സമ്പർക്കം ഒഴിവാക്കുക. മഴയിലോ നനഞ്ഞ കാലാവസ്ഥയിലോ വൈദ്യുതി ഉപകരണങ്ങൾക്ക് വിധേയമാക്കരുത്.
- വ്യക്തിഗത സുരക്ഷ: Always wear eye protection. Use appropriate safety equipment such as dust masks, non-skid safety shoes, hard hats, or hearing protection when necessary. Dress properly; avoid loose clothing or jewelry.
- ഉപകരണ ഉപയോഗവും പരിചരണവും: പവർ ടൂളിനെ നിർബന്ധിച്ച് ഉപയോഗിക്കരുത്. നിങ്ങളുടെ ആപ്ലിക്കേഷന് അനുയോജ്യമായ പവർ ടൂൾ ഉപയോഗിക്കുക. എന്തെങ്കിലും ക്രമീകരണങ്ങൾ നടത്തുന്നതിനോ, ആക്സസറികൾ മാറ്റുന്നതിനോ, പവർ ടൂളുകൾ സൂക്ഷിക്കുന്നതിനോ മുമ്പ് പവർ സ്രോതസ്സിൽ നിന്ന് പ്ലഗ് വിച്ഛേദിക്കുക കൂടാതെ/അല്ലെങ്കിൽ ബാറ്ററി പായ്ക്ക് നീക്കം ചെയ്യുക.
- ബാറ്ററി പായ്ക്ക് ഉപയോഗവും പരിചരണവും: നിർമ്മാതാവ് വ്യക്തമാക്കിയ ചാർജർ ഉപയോഗിച്ച് മാത്രം റീചാർജ് ചെയ്യുക. മറ്റ് പവർ ടൂളുകൾക്കൊപ്പം ബാറ്ററി പായ്ക്കുകൾ ഉപയോഗിക്കരുത്.
3. പാക്കേജ് ഉള്ളടക്കം
Your Conentool 21V Cordless Drill Driver Set includes the following items:
- 1x Cordless Drill
- 1x ക്യാരി കേസ്
- 2x 1500mAh ലിഥിയം-അയൺ ബാറ്ററികൾ
- 1x ചാർജർ
- 9x Socket Wrenches ( 4-12mm)
- 12x Screwdriver Bits
- Conventional Drill Bits
- Tile Drill Bit
- Long Screwdriver Bit
- 1x Flexible Drill Shaft

Image: Complete Conentool 21V Cordless Drill Driver Set with all accessories laid out.
ചിത്രം: ക്ലോസ്-അപ്പ് view of the various accessories included in the set, such as the drill, batteries, charger, and different types of bits and wrenches.
4. ഉൽപ്പന്നം കഴിഞ്ഞുview
The Conentool 21V Cordless Drill Driver is a versatile and powerful tool designed for various drilling and screwing tasks. It features a robust motor, ergonomic design, and multiple adjustable settings for optimal performance.
പ്രധാന സവിശേഷതകൾ:
- 45N.m Max Torque: നൽകുന്നു ampഅപേക്ഷകൾ ആവശ്യപ്പെടുന്നതിനുള്ള അധികാരം.
- 18+1 Torque Adjustment: Allows precise control for different materials and tasks, from delicate screwing to heavy-duty drilling.
- Two-Speed Setting: Offers flexibility with a low speed (0-400rpm) for high torque applications and a high speed (0-1500rpm) for faster drilling.
- ഡ്യുവൽ 1500mAh ബാറ്ററികൾ: Ensures extended operation time with quick charging.
- ഒതുക്കമുള്ളതും ഭാരം കുറഞ്ഞതുമായ ഡിസൈൻ: Minimizes user fatigue during prolonged use.
- ബിൽറ്റ്-ഇൻ LED ലൈറ്റ്: കുറഞ്ഞ വെളിച്ചത്തിൽ മെച്ചപ്പെട്ട ദൃശ്യപരതയ്ക്കായി ജോലിസ്ഥലം പ്രകാശിപ്പിക്കുന്നു.
- 3/8" (10mm) Self-Locking Chuck: Enables quick and easy bit changes.
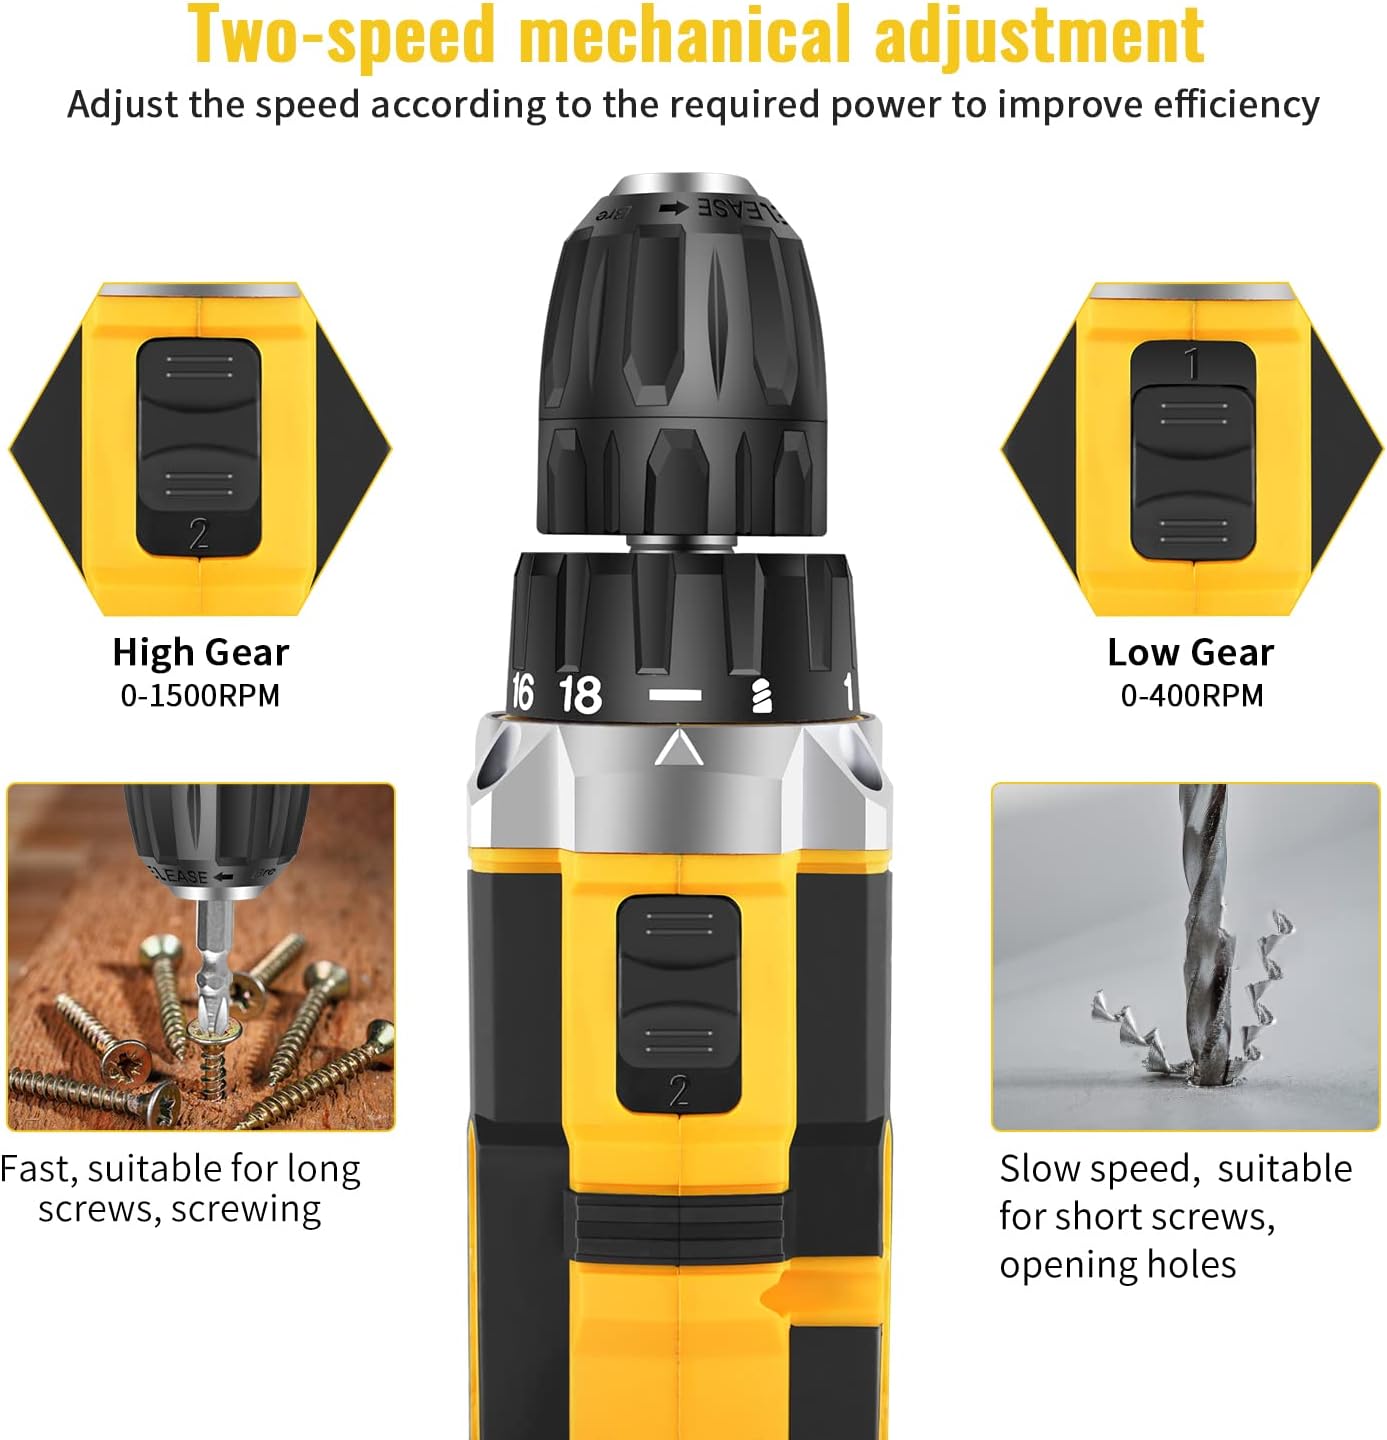
Image: Detailed diagram pointing out various features of the drill, including torque settings, speed selector, ventilation, LED light, and grip.

Image: Visual representation of the drill's internal motor, highlighting its 45N.m maximum torque and efficient heat dissipation.

Image: The drill depicted as lightweight and compact, designed to reduce user fatigue.

Image: Illustration of the drill's motor cooling system, demonstrating effective heat dissipation.

Image: Close-up of the integrated LED light, designed to illuminate the work area.
5. സജ്ജീകരണം
5.1 ബാറ്ററി ചാർജ് ചെയ്യുന്നു
The drill comes with two 1500mAh lithium-ion batteries. Before first use, fully charge both batteries. A fast charger is included, and a full charge typically takes about 1 hour.
- ചാർജർ ഒരു സാധാരണ പവർ ഔട്ട്ലെറ്റിലേക്ക് ബന്ധിപ്പിക്കുക.
- ബാറ്ററി പായ്ക്ക് ചാർജറിൽ ക്ലിക്ക് ചെയ്യുന്നത് വരെ സ്ലൈഡ് ചെയ്യുക.
- The charger indicator light will show the charging status (refer to charger manual for specific light indications).
- പൂർണ്ണമായി ചാർജ് ചെയ്തുകഴിഞ്ഞാൽ, ചാർജറിൽ നിന്ന് ബാറ്ററി നീക്കം ചെയ്യുക.
5.2 ബാറ്ററി ഇൻസ്റ്റാൾ ചെയ്യൽ/നീക്കം ചെയ്യൽ
- ഇൻസ്റ്റാൾ ചെയ്യാൻ: ഡ്രിൽ ഹാൻഡിലിന്റെ അടിഭാഗവുമായി ബാറ്ററി പായ്ക്ക് വിന്യസിക്കുക, അത് സുരക്ഷിതമായി സ്ഥലത്ത് ക്ലിക്ക് ചെയ്യുന്നത് വരെ അത് അകത്തേക്ക് സ്ലൈഡ് ചെയ്യുക.
- നീക്കം ചെയ്യാൻ: Press the battery release button located on the front of the battery pack and slide the battery out of the drill handle.

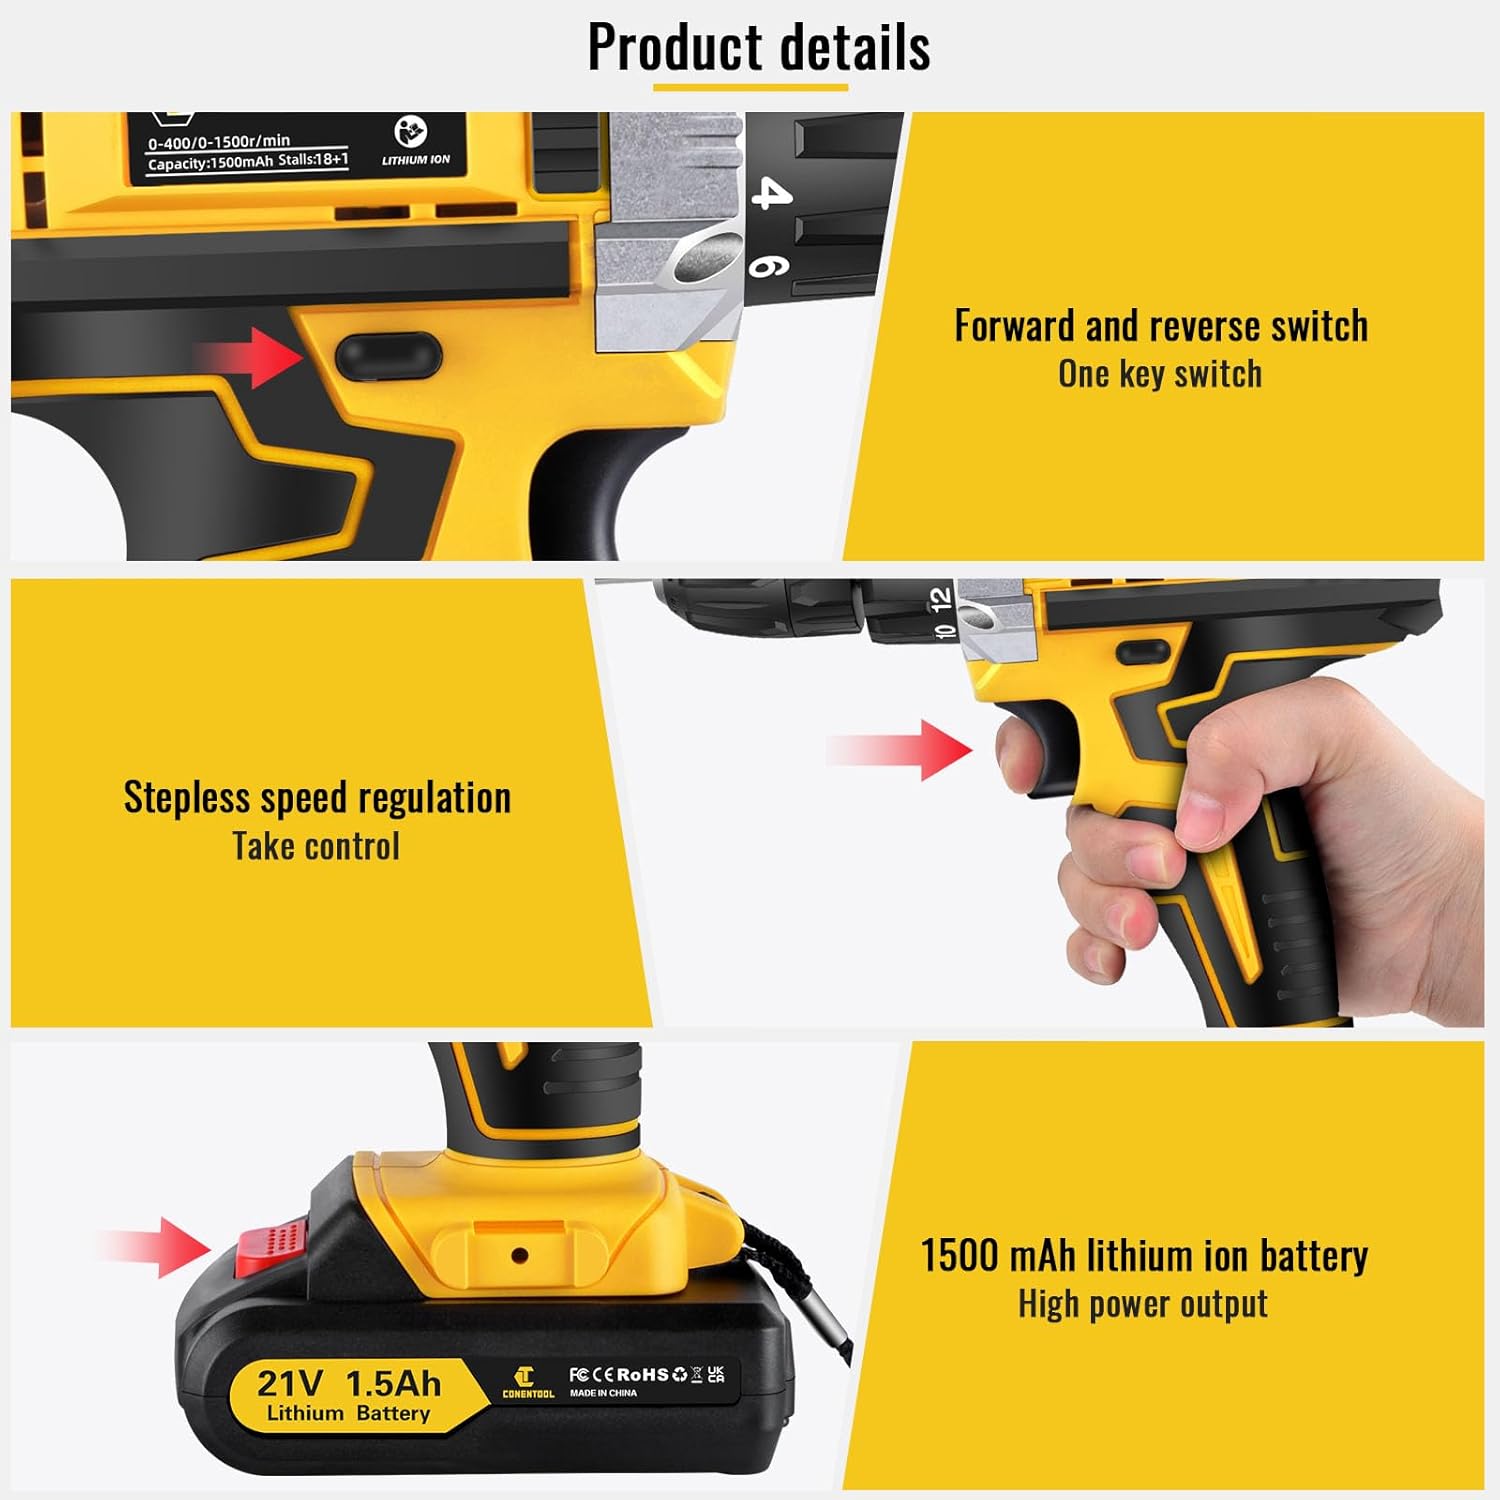
Image: Details on battery installation and removal, along with trigger and switch controls.
5.3 Installing Drill Bits/Screwdriver Bits
The drill features a 3/8" (10mm) self-locking chuck for quick and easy bit changes.
- താടിയെല്ലുകൾ തുറക്കാൻ ചക്ക് എതിർ ഘടികാരദിശയിൽ തിരിക്കുക.
- Insert the desired drill bit or screwdriver bit into the chuck, ensuring it is seated firmly.
- Rotate the chuck clockwise to tighten the jaws securely around the bit. Ensure the bit is centered and tight before operation.

Image: Close-up of the drill chuck, showing how to insert and secure bits.
6. പ്രവർത്തന നിർദ്ദേശങ്ങൾ
6.1 പവറിംഗ് ഓൺ/ഓഫ്, വേരിയബിൾ സ്പീഡ് ട്രിഗർ
The drill is activated by pressing the variable speed trigger. The speed of rotation increases as you press the trigger further.
- To start the drill, press the trigger.
- To increase speed, press the trigger further.
- ഡ്രിൽ നിർത്താൻ, ട്രിഗർ വിടുക.

Image: Illustration of the variable speed trigger and the forward/reverse button.
6.2 Two-Speed Mechanical Adjustment
The drill has two mechanical speed settings, selected via a switch on top of the drill housing.
- Gear 1 (Low Speed: 0-400rpm): Provides higher torque, ideal for driving screws or drilling into harder materials.
- Gear 2 (High Speed: 0-1500rpm): Provides lower torque but faster rotation, suitable for drilling into softer materials or for quick tasks.

Image: Diagram showing the two-speed selector switch and its corresponding RPM ranges.
6.3 Torque Adjustment (18+1 Settings)
The torque collar allows you to adjust the amount of rotational force the drill applies. This prevents over-tightening screws or damaging materials.
- Rotate the torque collar to select the desired setting from 1 to 18. Lower numbers are for smaller screws and softer materials, higher numbers for larger screws and harder materials.
- The drill icon setting is for drilling applications, providing maximum torque.

Image: The torque adjustment ring with settings for different materials.
6.4 ഫോർവേഡ്/റിവേഴ്സ് സ്വിച്ച്
The forward/reverse switch is located above the trigger and controls the direction of rotation.
- മുന്നോട്ട് തിരിക്കുന്നതിന് (സ്ക്രൂകൾ തുരക്കുന്നതിനും മുറുക്കുന്നതിനും) സ്വിച്ച് ഇടതുവശത്തേക്ക് അമർത്തുക.
- Push the switch to the right for reverse rotation (for loosening screws or removing bits).
- When the switch is in the center position, the trigger is locked, preventing accidental startup.
6.5 LED ലൈറ്റ് ഉപയോഗിക്കുന്നു
ട്രിഗർ അമർത്തുമ്പോൾ ഇന്റഗ്രേറ്റഡ് എൽഇഡി ലൈറ്റ് യാന്ത്രികമായി പ്രകാശിക്കുന്നു, മങ്ങിയ വെളിച്ചമുള്ള ജോലിസ്ഥലങ്ങളിൽ ദൃശ്യപരത നൽകുന്നു.

Image: The LED light in action, illuminating the work surface, and the onboard bit holder.
7. പരിപാലനം
പതിവ് അറ്റകുറ്റപ്പണികൾ നിങ്ങളുടെ ഡ്രില്ലിന്റെ ദീർഘായുസ്സും മികച്ച പ്രകടനവും ഉറപ്പാക്കുന്നു.
- വൃത്തിയാക്കൽ: Keep the ventilation openings clear and clean. Use a soft, damp ഉപകരണം തുടയ്ക്കാൻ തുണി ഉപയോഗിക്കുക. കഠിനമായ രാസവസ്തുക്കളോ ഉരച്ചിലുകളുള്ള ക്ലീനറുകളോ ഉപയോഗിക്കരുത്.
- ബാറ്ററി കെയർ: Store batteries in a cool, dry place away from direct sunlight. Do not store fully discharged batteries for extended periods. Recharge them periodically if not in use.
- സംഭരണം: Store the drill and all accessories in the provided carry case in a dry, secure location, out of reach of children.
8. പ്രശ്നപരിഹാരം
If you encounter issues with your Conentool drill, refer to the following common problems and solutions:
| പ്രശ്നം | സാധ്യമായ കാരണം | പരിഹാരം |
|---|---|---|
| ഡ്രിൽ ആരംഭിക്കുന്നില്ല | Battery not charged; Battery not properly inserted; Forward/Reverse switch in center (locked) position. | Charge battery; Re-insert battery securely; Move switch to forward or reverse position. |
| പ്രവർത്തന സമയത്ത് ശക്തി നഷ്ടപ്പെടുന്നു | Battery low; Overload. | Recharge battery; Reduce pressure on the drill or use a lower speed/higher torque setting. |
| Bit wobbles or falls out | Chuck not tightened sufficiently; Bit shank damaged. | Re-tighten chuck firmly; Replace damaged bit. |
| അമിത ചൂടാക്കൽ | Prolonged heavy use; Blocked ventilation. | Allow tool to cool down; Clear ventilation openings. |
If the problem persists after attempting these solutions, please contact Conentool customer support.
9 സ്പെസിഫിക്കേഷനുകൾ
| ഫീച്ചർ | സ്പെസിഫിക്കേഷൻ |
|---|---|
| മോഡൽ നമ്പർ | P000125 |
| വാല്യംtage | 21V |
| ബാറ്ററി തരം | ലിഥിയം അയോൺ |
| ബാറ്ററി ശേഷി | 1500എംഎഎച്ച് (1.5ആഹ്) |
| മാക്സ് ടോർക് | 45 എൻഎം |
| ടോർക്ക് ക്രമീകരണങ്ങൾ | 18+1 |
| ലോഡ് ചെയ്യാത്ത വേഗത (കുറവ്) | 0-400 ആർപിഎം |
| ലോഡ്-രഹിത വേഗത (ഉയർന്നത്) | 0-1500 ആർപിഎം |
| ചക്ക് വലുപ്പം | 3/8" (10 മിമി) |
| പവർ ഉറവിടം | ബാറ്ററി പവർ |
| മെറ്റീരിയൽ | ലോഹം |
| ഇനത്തിൻ്റെ ഭാരം | 2.5 കി.ഗ്രാം |
| ഉൽപ്പന്ന അളവുകൾ | 30.5 x 27 x 10.5 സെ.മീ |
10. വാറൻ്റിയും പിന്തുണയും
Conentool is committed to providing high-quality tools. For any product-related inquiries, technical assistance, or warranty claims, please contact Conentool customer support. Refer to your purchase documentation for specific warranty terms and contact information.
You can also visit the official Conentool store on Amazon for more information and support: Conentool Store