
1. ആമുഖം
This manual provides essential information for the safe and efficient operation of your TechniSat DIGITRADIO 370 IR. Please read these instructions carefully before using the device and retain them for future reference.
2. സുരക്ഷാ നിർദ്ദേശങ്ങൾ
- തീയോ വൈദ്യുതാഘാതമോ തടയാൻ ഉപകരണം മഴയിലോ ഈർപ്പത്തിലോ തുറന്നുകാട്ടരുത്.
- Do not block ventilation openings. Ensure adequate space around the device for proper airflow.
- ഉപകരണത്തിനൊപ്പം നൽകിയിട്ടുള്ള പവർ അഡാപ്റ്റർ മാത്രം ഉപയോഗിക്കുക.
- റേഡിയേറ്ററുകൾ, ഹീറ്റ് രജിസ്റ്ററുകൾ, സ്റ്റൗകൾ അല്ലെങ്കിൽ മറ്റ് ഉപകരണങ്ങൾ (ഉൾപ്പെടെ) പോലുള്ള താപ സ്രോതസ്സുകൾക്ക് സമീപം ഉപകരണം വയ്ക്കുന്നത് ഒഴിവാക്കുക. ampലൈഫയറുകൾ) ചൂട് ഉത്പാദിപ്പിക്കുന്നത്.
- പ്രത്യേകിച്ച് പ്ലഗുകൾ, കൺവീനിയൻസ് റെസെപ്റ്റക്കിളുകൾ, ഉപകരണത്തിൽ നിന്ന് പുറത്തുകടക്കുന്ന ഇടം എന്നിവയിൽ നടക്കുകയോ നുള്ളുകയോ ചെയ്യുന്നതിൽ നിന്ന് പവർ കോർഡ് സംരക്ഷിക്കുക.
- മിന്നൽ കൊടുങ്കാറ്റുകളുടെ സമയത്തോ ദീർഘനേരം ഉപയോഗിക്കാത്ത സമയത്തോ ഈ ഉപകരണം അൺപ്ലഗ് ചെയ്യുക.
- എല്ലാ സേവനങ്ങളും യോഗ്യതയുള്ള സേവന ഉദ്യോഗസ്ഥർക്ക് റഫർ ചെയ്യുക. പവർ സപ്ലൈ കോർഡ് അല്ലെങ്കിൽ പ്ലഗ് കേടാകുക, ദ്രാവകം ഒഴുകുകയോ ഉപകരണങ്ങൾ ഉപകരണത്തിലേക്ക് വീഴുകയോ ചെയ്യുക, ഉപകരണം മഴയോ ഈർപ്പമോ സമ്പർക്കം പുലർത്തുക, സാധാരണയായി പ്രവർത്തിക്കാത്തത് എന്നിങ്ങനെയുള്ള ഏതെങ്കിലും വിധത്തിൽ ഉപകരണത്തിന് കേടുപാടുകൾ സംഭവിക്കുമ്പോൾ സേവനം ആവശ്യമാണ്. , അല്ലെങ്കിൽ ഉപേക്ഷിച്ചു.
3. പാക്കേജ് ഉള്ളടക്കം
പാക്കേജിൽ എല്ലാ ഇനങ്ങളും ഉണ്ടെന്ന് ഉറപ്പാക്കുക:
- TechniSat DIGITRADIO 370 IR (Black)
- റിമോട്ട് കൺട്രോൾ
- പവർ അഡാപ്റ്റർ
- ഉപയോക്തൃ മാനുവൽ (ഈ പ്രമാണം)
4. നിയന്ത്രണങ്ങളും കണക്ഷനുകളും

ചിത്രം 4.1: മുൻവശത്തെ പാനൽ മുകളിൽview
The image above displays the front panel of the DIGITRADIO 370 IR, featuring the central display, volume and tuning/OK rotary knobs, and various control buttons such as Power, Mode, Preset, Scan, and Back.
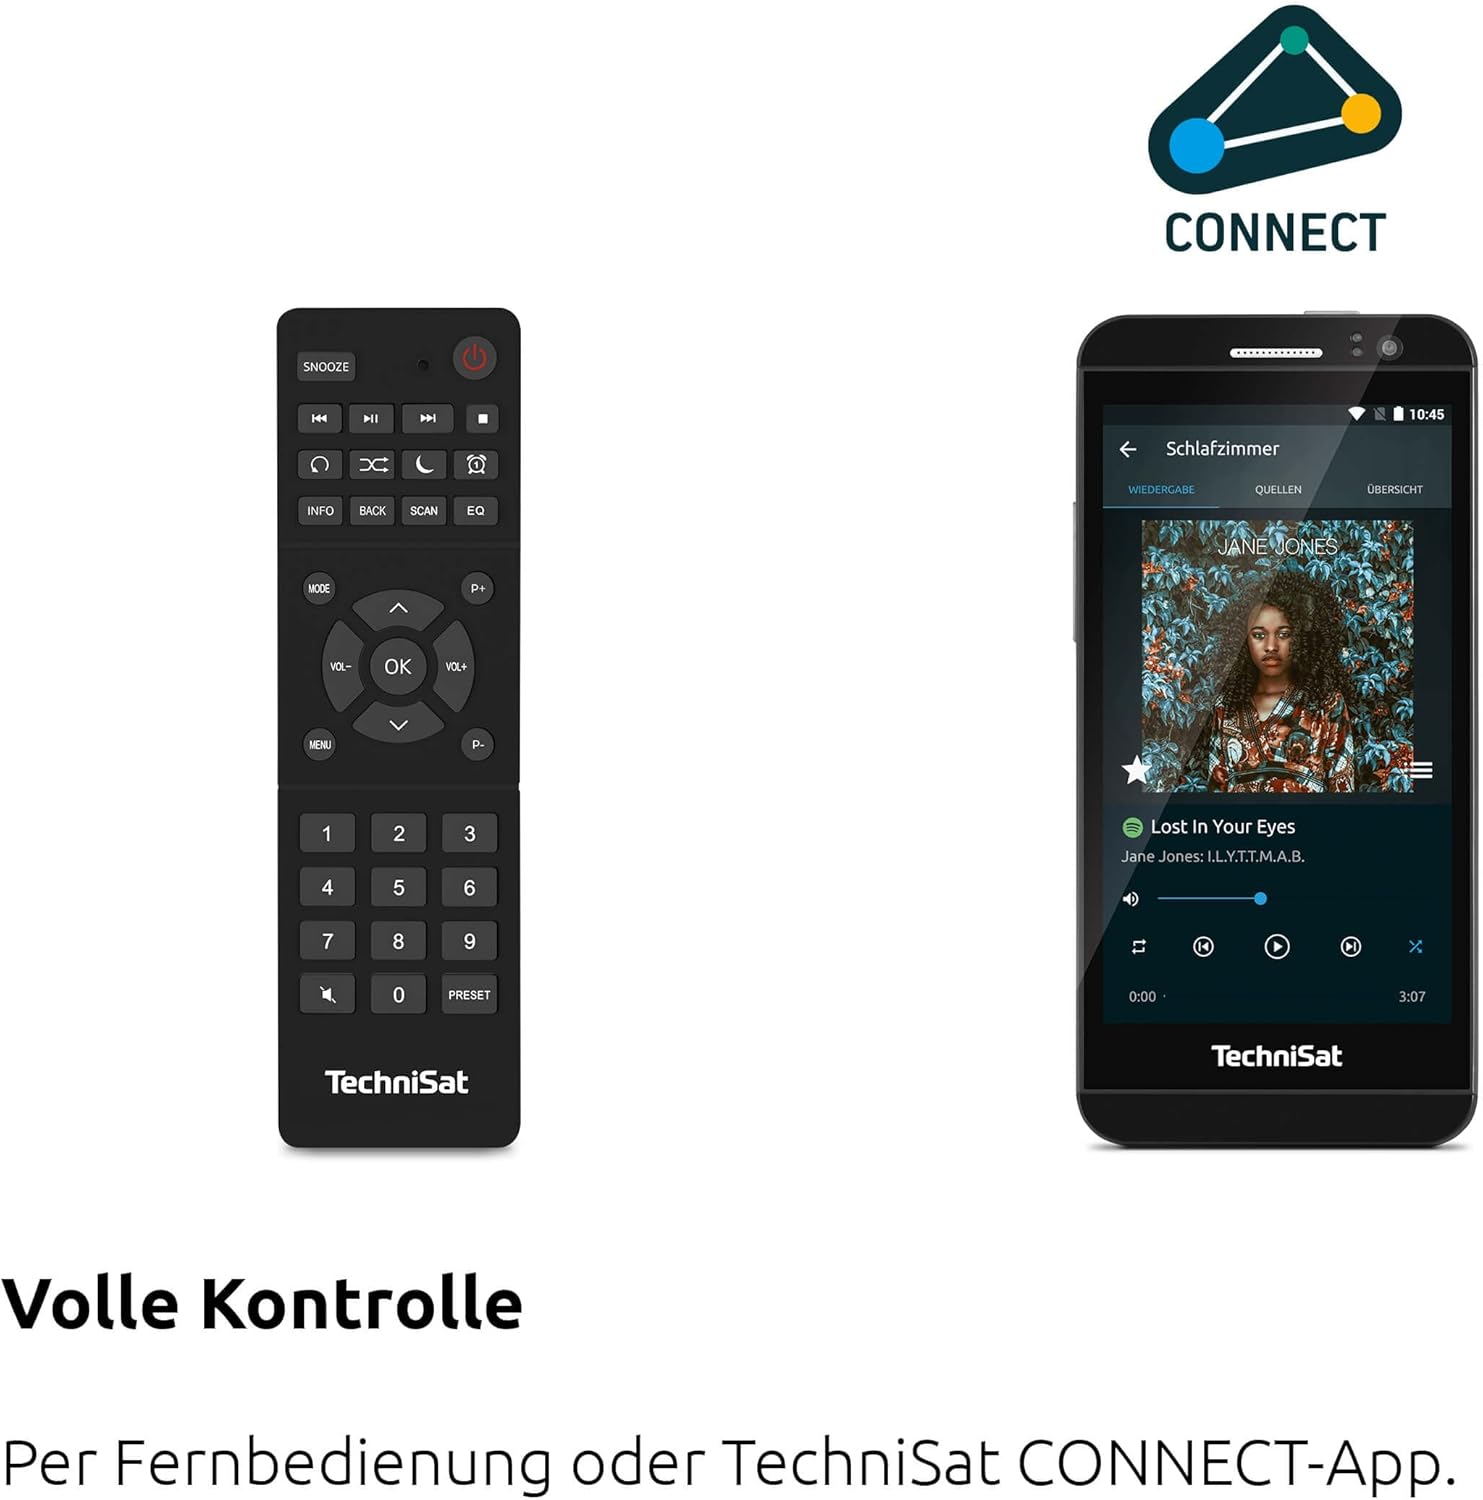
Figure 4.2: Remote Control and App Interface
This image shows the included remote control with buttons for power, snooze, mode, info, scan, EQ, preset numbers, volume, and navigation. It also illustrates the TechniSat CONNECT app interface on a smartphone, providing an alternative control method.
ഫ്രണ്ട് പാനൽ നിയന്ത്രണങ്ങൾ:
- പവർ ബട്ടൺ: ഉപകരണം ഓൺ/ഓഫ് ചെയ്യുന്നു.
- മോഡ് ബട്ടൺ: Switches between DAB+, FM, Internet Radio, Bluetooth, AUX, and USB modes.
- പ്രീസെറ്റ് ബട്ടൺ: Accesses stored radio station presets.
- വോളിയം നോബ്: ഓഡിയോ ഔട്ട്പുട്ട് ലെവൽ ക്രമീകരിക്കുന്നു.
- Tuning/OK Knob: മെനുകളിലൂടെ നാവിഗേറ്റ് ചെയ്ത് തിരഞ്ഞെടുപ്പുകൾ സ്ഥിരീകരിക്കുന്നു.
- സ്കാൻ ബട്ടൺ: Initiates station scanning in radio modes.
- ബാക്ക് ബട്ടൺ: മുമ്പത്തെ മെനുവിലേക്കോ സ്ക്രീനിലേക്കോ മടങ്ങുന്നു.
- ഡിസ്പ്ലേ: 2.4-inch TFT color display for information and menu navigation.
പിൻ പാനൽ കണക്ഷനുകൾ:
- പവർ ഇൻപുട്ട്: വിതരണം ചെയ്ത പവർ അഡാപ്റ്റർ ബന്ധിപ്പിക്കുക.
- ഓക്സ്-ഇൻ: ബാഹ്യ ഓഡിയോ ഉപകരണങ്ങൾ ബന്ധിപ്പിക്കുന്നതിനുള്ള 3.5mm ജാക്ക്.
- ഹെഡ്ഫോൺ ജാക്ക്: സ്വകാര്യ ശ്രവണത്തിനായി 3.5mm ജാക്ക്.
- USB പോർട്ട്: For MP3 playback from USB drives and charging external devices.
5. സജ്ജീകരണം
5.1 പ്രാരംഭ പവർ-അപ്പ്
- Place the DIGITRADIO 370 IR on a stable, flat surface.
- Extend the telescopic antenna for optimal DAB+ and FM reception.
- Connect the power adapter to the DC IN port on the rear of the radio and then to a wall outlet.
- Press the Power button on the front panel or remote control to turn on the device.
- Follow the on-screen prompts for initial setup, including language selection and network configuration.
5.2 Network Configuration (WLAN)
To access Internet Radio and app control, the device must be connected to a Wi-Fi network.
- Navigate to the 'Settings' menu using the Tuning/OK knob.
- Select 'Network' and then 'Wi-Fi Setup'.
- The radio will scan for available networks. Select your desired network from the list.
- Enter the Wi-Fi password using the on-screen keyboard and the Tuning/OK knob.
- Confirm the connection. Once connected, the Wi-Fi icon will appear on the display.
6. പ്രവർത്തന നിർദ്ദേശങ്ങൾ

Figure 6.1: Radio Diversity
This image highlights the multiple radio reception options available: DAB+ Digital Radio, Internet Radio via WLAN, and UKW/FM analog radio.
6.1 DAB+ റേഡിയോ
- Press the 'Mode' button until 'DAB+' is selected.
- The radio will automatically scan for available DAB+ stations during the first use. To initiate a scan manually, press the 'Scan' button.
- Use the Tuning/OK knob to scroll through the list of available stations. Press the knob to select a station.
- To save a station as a preset, press and hold the 'Preset' button, then select a preset number and confirm.
6.2 എഫ്എം റേഡിയോ
- Press the 'Mode' button until 'FM' is selected.
- Press the 'Scan' button to automatically search for and store FM stations.
- Alternatively, use the Tuning/OK knob to manually tune to a frequency.
- To save a station as a preset, press and hold the 'Preset' button, then select a preset number and confirm.
6.3 ഇൻ്റർനെറ്റ് റേഡിയോ
Ensure the radio is connected to a Wi-Fi network (see Section 5.2).
- Press the 'Mode' button until 'Internet Radio' is selected.
- You can browse stations by location, genre, or search for specific stations.
- Use the Tuning/OK knob to navigate and select stations.
- To save a station as a preset, press and hold the 'Preset' button, then select a preset number and confirm.
6.4 ബ്ലൂടൂത്ത് ഓഡിയോ സ്ട്രീമിംഗ്

Figure 6.2: Bluetooth Audio Streaming
This image demonstrates a smartphone wirelessly streaming music to the radio via Bluetooth, indicating the device's capability for wireless music enjoyment.
- Press the 'Mode' button until 'Bluetooth' is selected. The radio will enter pairing mode.
- നിങ്ങളുടെ സ്മാർട്ട്ഫോണിലോ മറ്റ് ബ്ലൂടൂത്ത് ഉപകരണത്തിലോ, ബ്ലൂടൂത്ത് പ്രവർത്തനക്ഷമമാക്കി ലഭ്യമായ ഉപകരണങ്ങൾക്കായി തിരയുക.
- Select 'DIGITRADIO 370 IR' from the list to pair.
- ജോടിയാക്കിയാൽ, നിങ്ങളുടെ ഉപകരണത്തിൽ നിന്ന് റേഡിയോ വഴി ഓഡിയോ പ്ലേ ചെയ്യാൻ കഴിയും.
6.5 യുഎസ്ബി പ്ലേബാക്കും ചാർജിംഗും

Figure 6.3: USB Playback and Charging Function
This image illustrates the dual functionality of the USB port: connecting USB storage devices for MP3 playback and using the port to charge compatible devices like smartphones.
- MP3 അടങ്ങിയ യുഎസ്ബി ഫ്ലാഷ് ഡ്രൈവ് ചേർക്കുക fileറേഡിയോയുടെ പിൻഭാഗത്തുള്ള USB പോർട്ടിലേക്ക് s.
- Press the 'Mode' button until 'USB' is selected.
- Use the Tuning/OK knob to navigate through folders and select tracks for playback.
- The USB port can also be used to charge compatible smartphones and other devices. Connect your device's charging cable to the USB port.
6.6 വയർലെസ് ചാർജിംഗ്

Figure 6.4: Wireless Charging Function
This image shows a hand placing a smartphone on the top surface of the radio, demonstrating the wireless charging capability for compatible smartphones.
The DIGITRADIO 370 IR features a wireless charging surface on its top panel.
- Ensure your smartphone or device supports Qi wireless charging.
- Place your compatible device centrally on the designated wireless charging area on top of the radio.
- The device should indicate that charging has begun.
6.7 Alarm Clock, Sleep Timer, and Snooze
The radio includes an alarm clock, sleep timer, and snooze function.
- അലാറം ക്ലോക്ക്: Set up to two independent alarms with customizable sources (buzzer, DAB+, FM, Internet Radio) and volume. Access via the 'Settings' menu.
- സ്ലീപ്പ് ടൈമർ: Allows the radio to turn off automatically after a set period (e.g., 15, 30, 60 minutes). Access via the 'Settings' menu.
- സ്നൂസ്: When an alarm sounds, press the 'Snooze' button on the remote control to temporarily pause the alarm.
6.8 App Control (UNDOK App)
The DIGITRADIO 370 IR can be controlled via the UNDOK app on your smartphone or tablet.
- Download the 'UNDOK' app from your device's app store.
- Ensure your smartphone/tablet and the radio are connected to the same Wi-Fi network.
- Open the UNDOK app; it should automatically detect your DIGITRADIO 370 IR.
- You can now control all major functions of the radio, including mode selection, station tuning, volume, and presets, directly from the app.
7. പരിപാലനം
7.1 വൃത്തിയാക്കൽ
- വൃത്തിയാക്കുന്നതിന് മുമ്പ് എല്ലായ്പ്പോഴും പവർ ഔട്ട്ലെറ്റിൽ നിന്ന് ഉപകരണം അൺപ്ലഗ് ചെയ്യുക.
- പുറംഭാഗങ്ങൾ തുടയ്ക്കാൻ മൃദുവായതും ഉണങ്ങിയതുമായ തുണി ഉപയോഗിക്കുക.
- Do not use liquid cleaners, aerosol cleaners, or strong chemical solvents, as these may damage the finish.
7.2 സംഭരണം
If storing the device for an extended period, unplug it from the power source and store it in a cool, dry place, away from direct sunlight and extreme temperatures.
8. പ്രശ്നപരിഹാരം
| പ്രശ്നം | സാധ്യമായ കാരണം | പരിഹാരം |
|---|---|---|
| ശക്തിയില്ല | പവർ കേബിൾ ബന്ധിപ്പിച്ചിട്ടില്ല; പവർ ഔട്ട്ലെറ്റ് തകരാറിലാണ് | പവർ കേബിൾ കണക്ഷൻ പരിശോധിക്കുക; മറ്റൊരു പവർ ഔട്ട്ലെറ്റ് പരീക്ഷിക്കുക. |
| ശബ്ദമില്ല | ശബ്ദം വളരെ കുറവാണ്; മ്യൂട്ട് സജീവമാക്കി; തെറ്റായ ഉറവിടം തിരഞ്ഞെടുത്തു. | Increase volume; Check if mute is active; Select the correct input source (DAB+, FM, Internet, Bluetooth, USB, AUX). |
| മോശം റേഡിയോ റിസപ്ഷൻ (DAB+/FM) | Antenna not extended; Weak signal; Interference | Fully extend the telescopic antenna; Reposition the radio; Avoid placing near other electronic devices. |
| Internet Radio not working | No Wi-Fi connection; Incorrect Wi-Fi password; Router issue | Check Wi-Fi connection in settings; Re-enter Wi-Fi password; Restart your Wi-Fi router. |
| ബ്ലൂടൂത്ത് ജോടിയാക്കൽ പരാജയപ്പെട്ടു | Radio not in pairing mode; Device too far; Bluetooth off on source device | Ensure radio is in Bluetooth mode; Move devices closer; Enable Bluetooth on your source device. |
| വയർലെസ് ചാർജിംഗ് പ്രവർത്തിക്കുന്നില്ല | Device not Qi-compatible; Device not placed correctly; Phone case too thick | Verify device supports Qi charging; Adjust device position on charging pad; Remove thick phone cases. |
9 സ്പെസിഫിക്കേഷനുകൾ
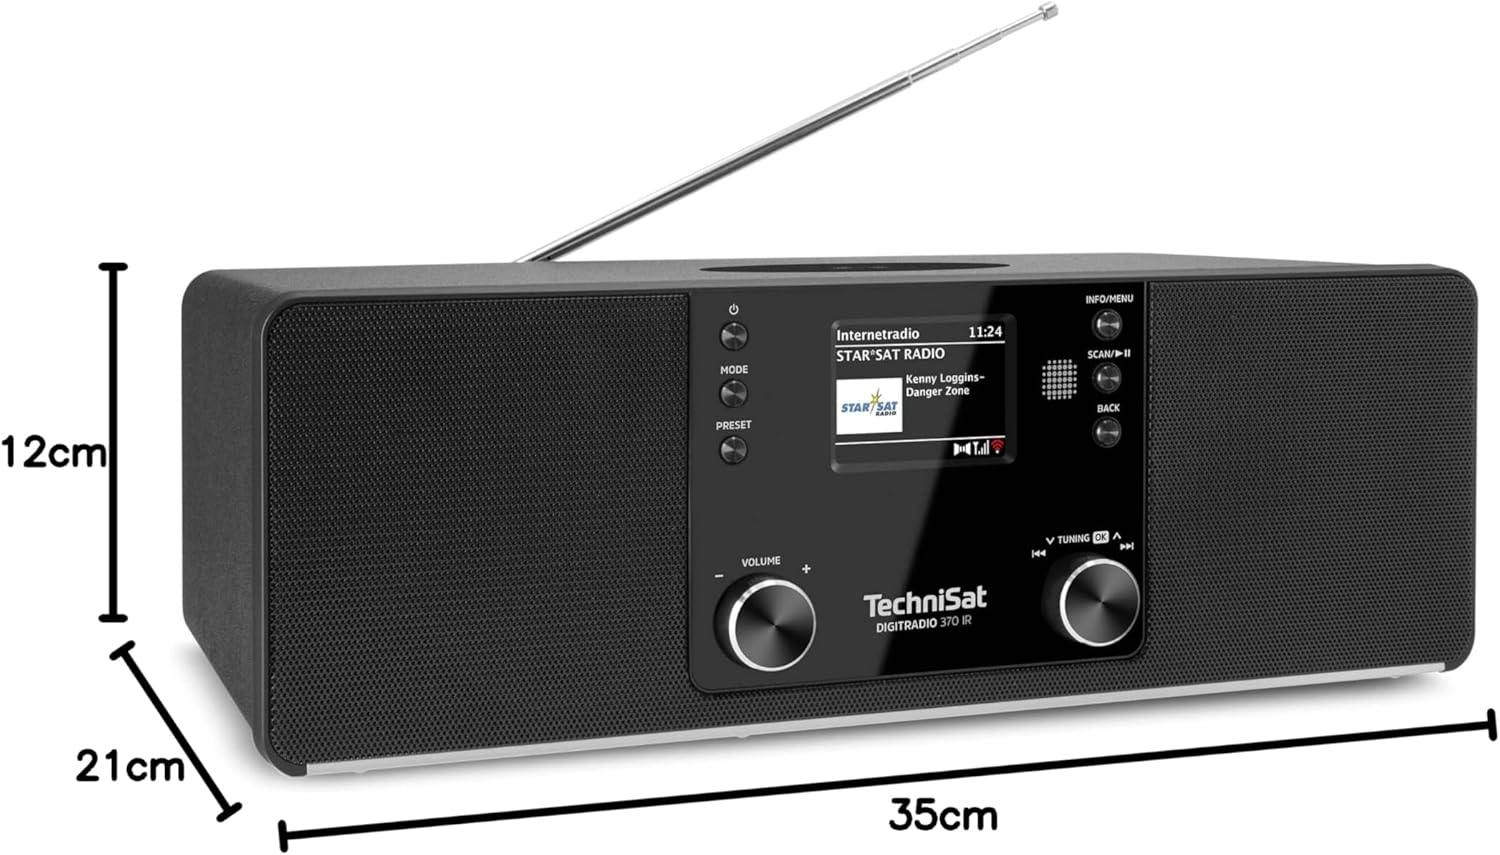
ചിത്രം 9.1: ഉൽപ്പന്ന അളവുകൾ
This image provides a visual representation of the radio's dimensions: 35 cm (length), 12 cm (height), and 21 cm (depth).
| ഫീച്ചർ | വിശദാംശങ്ങൾ |
|---|---|
| മോഡൽ നമ്പർ | 0000/3971 |
| ബ്രാൻഡ് | ടെക്നിസാറ്റ് |
| റേഡിയോ ബാൻഡുകൾ പിന്തുണയ്ക്കുന്നു | DAB+, FM, ഇന്റർനെറ്റ് റേഡിയോ |
| കണക്റ്റിവിറ്റി ടെക്നോളജി | Bluetooth, USB, Wireless-Charging, WLAN (2.4 GHz & 5 GHz) |
| പ്രത്യേക സവിശേഷതകൾ | Wireless Charging, Bluetooth Audio Streaming, USB Playback & Charging, Alarm Clock, Sleep Timer, Snooze, App Control (UNDOK) |
| ഓഡിയോ put ട്ട്പുട്ട് മോഡ് | സ്റ്റീരിയോ |
| സ്പീക്കർ ഔട്ട്പുട്ട് പവർ | 2 x 5 Watts RMS (10 Watts total) |
| ഡിസ്പ്ലേ തരം | 2.4-ഇഞ്ച് TFT കളർ എൽസിഡി |
| പവർ ഉറവിടം | Electric Cord (230 Volts, 60 Hz) |
| അളവുകൾ (L x W x H) | 35 x 21 x 12 സെ.മീ |
| ഭാരം | 2.7 കിലോഗ്രാം |
| ഹൗസിംഗ് മെറ്റീരിയൽ | മരം |
| അനുയോജ്യമായ ഉപകരണങ്ങൾ | Smartphone, MP3 player, tablet, laptop, headphones |
| ഇൻ്റർഫേസുകൾ | 3.5 mm Audio (AUX-IN), USB 2.0, 3.5 mm Headphone |
10. വാറൻ്റിയും പിന്തുണയും
10.1 വാറൻ്റി വിവരങ്ങൾ
This product comes with a 2-year warranty (Gewährleistung) from the date of purchase. Please retain your proof of purchase for any warranty claims. The warranty covers manufacturing defects and malfunctions under normal use. It does not cover damage caused by misuse, accidents, unauthorized modifications, or normal wear and tear.
10.2 ഉപഭോക്തൃ പിന്തുണ
For technical assistance, troubleshooting beyond this manual, or warranty inquiries, please contact TechniSat customer support. Refer to the TechniSat official webനിങ്ങളുടെ പ്രദേശത്തെ പ്രത്യേക കോൺടാക്റ്റ് വിശദാംശങ്ങൾക്കുള്ള സൈറ്റ്.
ഓൺലൈൻ ഉറവിടങ്ങൾ: Visit the official TechniSat website for updated manuals, FAQs, and support information.