
ആമുഖം
This manual provides detailed instructions for the operation and maintenance of your Raynic CR1019 8.7-inch Digital Alarm Clock. Please read this manual thoroughly before use to ensure proper functionality and to maximize your product experience. This device features a large LED display, dual alarms, USB and Type-C charging ports, temperature and humidity display, and adjustable brightness and volume.
പാക്കേജ് ഉള്ളടക്കം
- Raynic CR1019 Digital Alarm Clock
- പവർ അഡാപ്റ്റർ (കോർഡഡ് ഇലക്ട്രിക്)
- ഉപയോക്തൃ മാനുവൽ
ഉൽപ്പന്നം കഴിഞ്ഞുview
The Raynic CR1019 Digital Alarm Clock is designed for ease of use and includes multiple features for convenience. The front panel displays time, date, day of the week, temperature, and humidity. The top panel features control buttons for various settings.

ചിത്രം 1: ഫ്രണ്ട് view of the Raynic CR1019 Digital Alarm Clock displaying time, date, temperature, and humidity, with a smartphone connected for charging.

ചിത്രം 2: കഴിഞ്ഞുview of the Raynic Digital Alarm Clock highlighting its large LED display, dual alarms, USB/Type-C charging, snooze, 12/24H/DST, temperature/humidity, adjustable brightness, and volume.
സജ്ജമാക്കുക
1. പവർ കണക്ഷൻ
- നൽകിയിരിക്കുന്ന പവർ അഡാപ്റ്റർ അലാറം ക്ലോക്കിന്റെ പിൻഭാഗത്തുള്ള DC IN പോർട്ടുമായി ബന്ധിപ്പിക്കുക.
- Plug the adapter into a standard electrical outlet. The display will illuminate.
2. ബാറ്ററി ബാക്കപ്പ് ഇൻസ്റ്റാളേഷൻ (ഓപ്ഷണൽ)
The clock requires 2 AAA batteries (not included) for battery backup. These batteries are only used to remember time and alarm settings during a power outage and do not power the display.

ചിത്രം 3: പിൻഭാഗം view of the alarm clock with the battery compartment open, showing where to insert two AAA batteries for backup.
- ക്ലോക്കിന്റെ പിൻഭാഗത്ത് ബാറ്ററി കമ്പാർട്ട്മെന്റ് കണ്ടെത്തുക.
- ബാറ്ററി കമ്പാർട്ട്മെൻ്റ് കവർ തുറക്കുക.
- ശരിയായ പോളാരിറ്റി (+/-) ഉറപ്പാക്കിക്കൊണ്ട് 2 AAA ബാറ്ററികൾ ഇടുക.
- ബാറ്ററി കമ്പാർട്ട്മെൻ്റ് കവർ അടയ്ക്കുക.
പ്രവർത്തന നിർദ്ദേശങ്ങൾ
1. സമയവും തീയതിയും ക്രമീകരിക്കുന്നു
Refer to the specific buttons on the top of the clock for time and date adjustments. Typically, a 'SET' or 'TIME SET' button is used to enter setting mode, and '+' / '-' buttons adjust values.
2. Dual Alarm Settings
The clock supports two independent alarms with four mode options: Weekdays (Mon-Fri), Weekends (Sat-Sun), Everyday (Mon-Sun), and One Time.

ചിത്രം 4: Illustration of dual alarm functionality, allowing two separate wake-up times for different users or purposes.
- Press the 'ALARM 1' or 'ALARM 2' button to select the desired alarm.
- Use the adjustment buttons to set the alarm time.
- Select the alarm mode (Weekdays, Weekends, Everyday, One Time) using the mode selection button.
- അലാറം സജീവമാക്കുന്നതിന് ക്രമീകരണങ്ങൾ സ്ഥിരീകരിക്കുക.
3. തെളിച്ച ക്രമീകരണം
The display brightness can be adjusted to 5 levels (L1 to L5) to suit your preference, especially for light-sensitive individuals.
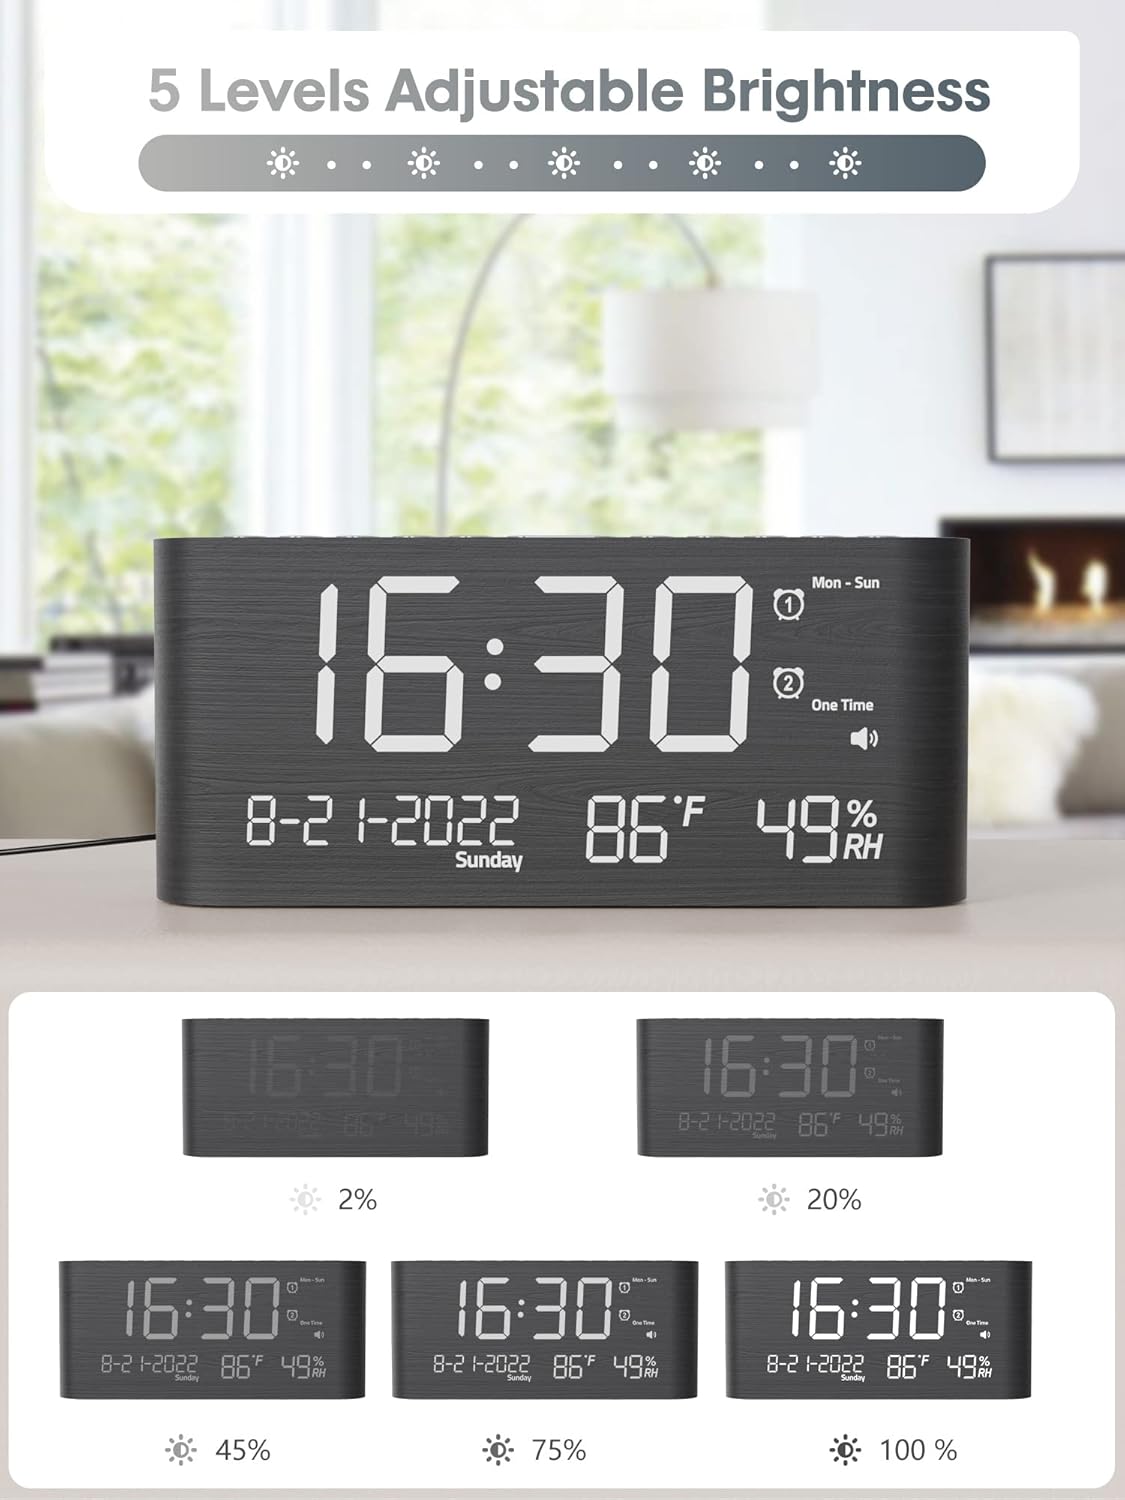
ചിത്രം 5: Visual representation of the 5 adjustable brightness levels of the clock display.
- Press the 'DIMMER' or 'BRIGHTNESS' button repeatedly to cycle through the 5 brightness levels.
- ആവശ്യമുള്ള തെളിച്ചം തിരഞ്ഞെടുക്കുക.
4. വോളിയം അഡ്ജസ്റ്റ്മെൻ്റ്
The alarm volume can be set to 5 levels, ranging from 0dB to 120dB, with a gradual ascending tone.

ചിത്രം 6: Depiction of the 5 adjustable volume levels for the alarm, suitable for various sleeping preferences.
- During alarm setting or when the alarm is sounding, use the 'VOLUME' or adjustment buttons to change the volume level.
5. 12H/24H/DST Switchable
You can switch between 12-hour and 24-hour time formats, and activate Daylight Saving Time (DST).

ചിത്രം 7: Illustration of switching between 12-hour, 24-hour, and Daylight Saving Time (DST) display modes.
- Press the '12/24H' button to toggle between 12-hour and 24-hour formats.
- Press the 'DST' button to activate or deactivate Daylight Saving Time.
6. സ്നൂസ് ഫംഗ്ഷൻ
When the alarm sounds, press the 'SNOOZE' button to temporarily silence the alarm for 9 minutes.

ചിത്രം 8: Demonstrating the 9-minute snooze function by pressing the snooze button on the clock.
7. യുഎസ്ബി, ടൈപ്പ്-സി ചാർജിംഗ് പോർട്ടുകൾ
The clock includes both USB and Type-C charging ports for convenient charging of external devices.

ചിത്രം 9: The back of the alarm clock with a smartphone and smartwatch charging simultaneously via the integrated USB and Type-C ports.
- Connect your device's charging cable to either the USB-A or Type-C port on the back of the clock.
- നിങ്ങളുടെ ഉപകരണം ചാർജ് ചെയ്യാൻ തുടങ്ങുന്നുവെന്ന് ഉറപ്പാക്കുക.
8. താപനിലയും ഈർപ്പവും പ്രദർശിപ്പിക്കുന്നു
The clock displays accurate indoor temperature and humidity readings.

ചിത്രം 10: The clock displaying current temperature and humidity, indicating its function for health care monitoring.
- The temperature and humidity are displayed automatically on the screen.
- To switch between Celsius and Fahrenheit, refer to the specific button (often combined with time/date settings).
മെയിൻ്റനൻസ്
- വൃത്തിയാക്കൽ: മൃദുവായതും ഉണങ്ങിയതുമായ തുണി ഉപയോഗിച്ച് ക്ലോക്ക് തുടയ്ക്കുക. അബ്രസീവ് ക്ലീനറുകളോ ലായകങ്ങളോ ഉപയോഗിക്കരുത്.
- പ്ലേസ്മെൻ്റ്: Place the clock on a stable, flat surface. Avoid direct sunlight, extreme temperatures, and high humidity.
- ശക്തി: നൽകിയിരിക്കുന്ന പവർ അഡാപ്റ്റർ എപ്പോഴും ഉപയോഗിക്കുക.
ട്രബിൾഷൂട്ടിംഗ്
- പ്രദർശനം ശൂന്യമാണ്:
Ensure the power adapter is securely connected to both the clock and a working electrical outlet. If using battery backup, remember it only saves settings, it does not power the display. - അലാറം മുഴങ്ങുന്നില്ല:
Check if the alarm is activated and set to the correct time and mode. Verify the alarm volume is not set to 0dB. - സമയം തെറ്റാണ്:
Re-enter the time and date settings. Ensure 12H/24H format and DST settings are correct for your region. - Devices not charging via USB/Type-C:
Ensure the clock is powered on. Check the charging cables and the devices themselves. Try a different port or cable.
സ്പെസിഫിക്കേഷനുകൾ
| ഫീച്ചർ | വിശദാംശങ്ങൾ |
|---|---|
| ബ്രാൻഡ് | റെയ്നിക് |
| മോഡൽ നമ്പർ | CR1019 |
| ഡിസ്പ്ലേ തരം | ഡിജിറ്റൽ LED |
| ഉൽപ്പന്ന അളവുകൾ | 1.7"W x 3.6"H (Note: Full dimensions are 8.7"L x 1.7"W x 3.6"H) |
| ഇനത്തിൻ്റെ ഭാരം | 7.7 ഔൺസ് (0.48 പൗണ്ട്) |
| പവർ ഉറവിടം | കോർഡഡ് ഇലക്ട്രിക് |
| ബാറ്ററി ബാക്കപ്പ് | 2 AAA batteries required (not included) for memory only |
| പ്രത്യേക സവിശേഷതകൾ | Dual Alarms, USB & Type-C Charging, Temperature, Humidity, Date, 5-level Brightness, 5-level Volume, 9-min Snooze, 12H/24H/DST |
| മെറ്റീരിയൽ | മരം |
വാറൻ്റിയും പിന്തുണയും
Raynic products are designed for reliability and performance. For warranty information or technical support, please refer to the contact details provided with your purchase documentation or visit the official Raynic webസൈറ്റ്. വാറൻ്റി ക്ലെയിമുകൾക്കായി നിങ്ങളുടെ വാങ്ങൽ രസീത് സൂക്ഷിക്കുക.