
1. ആമുഖം
The HYUNDAI WS 1070 B is a compact weather station designed to provide accurate indoor and outdoor temperature readings, along with humidity information. It also features an integrated clock with an alarm function, making it a versatile device for your home or office. The large LCD ensures clear digital display of all values and functions.
ഒപ്റ്റിമൽ പ്രകടനം ഉറപ്പാക്കുന്നതിന് നിങ്ങളുടെ കാലാവസ്ഥാ സ്റ്റേഷൻ സജ്ജീകരിക്കുന്നതിനും പ്രവർത്തിപ്പിക്കുന്നതിനും പരിപാലിക്കുന്നതിനുമുള്ള വിശദമായ നിർദ്ദേശങ്ങൾ ഈ മാനുവലിൽ നൽകുന്നു.
2. പാക്കേജ് ഉള്ളടക്കം
- HYUNDAI WS 1070 B Main Unit
- വയർലെസ് Outട്ട്ഡോർ സെൻസർ
- ഉപയോക്തൃ മാനുവൽ (ഈ പ്രമാണം)
കുറിപ്പ്: ബാറ്ററികൾ ഉൾപ്പെടുത്തിയിട്ടില്ല, പ്രത്യേകം വാങ്ങണം.
3. ഉൽപ്പന്നം കഴിഞ്ഞുview
3.1 പ്രധാന യൂണിറ്റ്
The main unit features a large LCD display showing indoor and outdoor temperatures, time, and alarm status. Control buttons are located below the display.
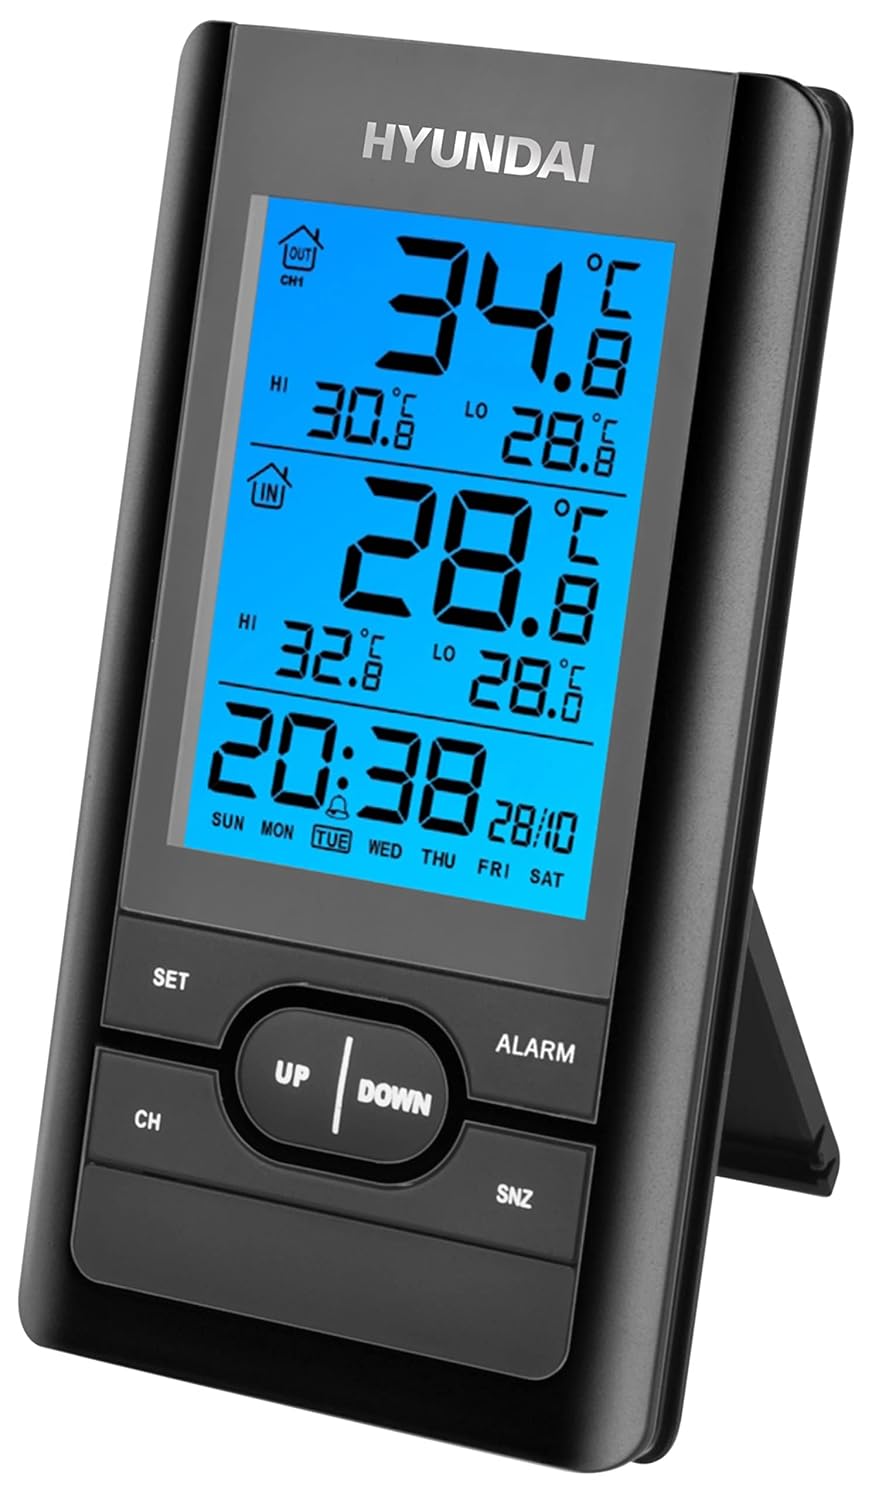
ചിത്രം 1: മുൻഭാഗം view of the HYUNDAI WS 1070 B main unit, displaying indoor and outdoor temperatures, time, and day of the week. Buttons for 'SET', 'CH', 'UP', 'DOWN', 'ALARM', and 'SNZ' are visible below the screen.
- LCD ഡിസ്പ്ലേ: Shows time, date, indoor/outdoor temperature, humidity, and alarm status.
- SET ബട്ടൺ: Enters setting mode for time, date, and other parameters.
- സിഎച്ച് ബട്ടൺ: Selects display channel for multiple outdoor sensors (if additional sensors are connected).
- മുകളിലേക്കും താഴേക്കും ബട്ടണുകൾ: Adjusts values during setting mode or cycles through display options.
- അലാറം ബട്ടൺ: Enters alarm setting mode or activates/deactivates the alarm.
- SNZ (സ്നൂസ്) ബട്ടൺ: അലാറം മുഴങ്ങുമ്പോൾ സ്നൂസ് ഫംഗ്ഷൻ സജീവമാക്കുന്നു.
3.2 വയർലെസ് ഔട്ട്ഡോർ സെൻസർ
The wireless sensor transmits outdoor temperature data to the main unit. It features a small display for local temperature readings and a channel selector.

ചിത്രം 2: വശം view of the HYUNDAI WS 1070 B wireless outdoor sensor, showing its compact black casing and a small display indicating 'CH1' and the current temperature. A 433MHz signal icon is also visible.
- താപനില പ്രദർശനം: Shows the current temperature measured by the sensor.
- ചാനൽ സെലക്ടർ: Allows selection of the transmission channel (1, 2, or 3) to avoid interference with other sensors.
- ബാറ്ററി കമ്പാർട്ട്മെൻ്റ്: ബാറ്ററി ഇൻസ്റ്റാളേഷനായി പിന്നിൽ സ്ഥിതിചെയ്യുന്നു.
4. സജ്ജീകരണം
4.1 ബാറ്ററി ഇൻസ്റ്റാളേഷൻ
- പ്രധാന യൂണിറ്റ്: Open the battery compartment on the back of the main unit. Insert 2 x 1.5V AAA batteries, observing the correct polarity (+/-). Close the compartment.
- വയർലെസ് Outട്ട്ഡോർ സെൻസർ: Open the battery compartment on the back of the sensor. Insert 2 x 1.5V AAA batteries, observing the correct polarity (+/-). Close the compartment.
4.2 Initial Setup and Synchronization
- After installing batteries in both the main unit and the outdoor sensor, the main unit will automatically begin searching for the sensor signal. This process may take a few minutes.
- Ensure the outdoor sensor is within effective transmission range (typically up to 30 meters in open air) and not obstructed by thick walls or large metal objects.
- Once synchronized, the outdoor temperature will appear on the main unit's display. If synchronization fails, remove and reinsert batteries in both units, then try again.
4.3 സെൻസർ പ്ലേസ്മെന്റ്
For accurate outdoor temperature readings, place the wireless sensor in a sheltered location away from direct sunlight and rain. Avoid placing it near heat sources (e.g., vents, windows) or reflective surfaces that could affect temperature measurements. Ensure it is mounted vertically for proper drainage.
5. പ്രവർത്തന നിർദ്ദേശങ്ങൾ
5.1 സമയവും തീയതിയും ക്രമീകരിക്കുക
- അമർത്തിപ്പിടിക്കുക സെറ്റ് button for approximately 3 seconds to enter time setting mode. The hour digit will start flashing.
- ഉപയോഗിക്കുക UP or താഴേക്ക് മണിക്കൂർ ക്രമീകരിക്കാനുള്ള ബട്ടണുകൾ.
- അമർത്തുക സെറ്റ് again to confirm the hour and move to setting the minutes.
- Repeat the process using UP/താഴേക്ക് for minutes, then സെറ്റ് to cycle through year, month, and day settings.
- അമർത്തുക സെറ്റ് ക്രമീകരണ മോഡിൽ നിന്ന് പുറത്തുകടക്കാൻ അവസാനമായി ഒരിക്കൽ കൂടി.
5.2 അലാറം സജ്ജമാക്കുന്നു
- അമർത്തുക അലാറം നിലവിലെ അലാറം സമയം പ്രദർശിപ്പിക്കാൻ ഒരിക്കൽ ബട്ടൺ അമർത്തുക.
- അമർത്തിപ്പിടിക്കുക അലാറം button for approximately 3 seconds to enter alarm setting mode. The alarm hour digit will flash.
- ഉപയോഗിക്കുക UP or താഴേക്ക് അലാറം സമയം ക്രമീകരിക്കാനുള്ള ബട്ടണുകൾ.
- അമർത്തുക അലാറം again to confirm the hour and move to setting the alarm minutes.
- ഉപയോഗിക്കുക UP or താഴേക്ക് അലാറം മിനിറ്റ് ക്രമീകരിക്കാനുള്ള ബട്ടണുകൾ.
- അമർത്തുക അലാറം one last time to confirm and exit alarm setting mode.
- അലാറം സജീവമാക്കാനോ നിർജ്ജീവമാക്കാനോ, അമർത്തുക അലാറം button briefly when the alarm time is displayed. An alarm icon will appear/disappear on the LCD.
5.3 സ്നൂസ് ഫംഗ്ഷൻ
അലാറം മുഴങ്ങുമ്പോൾ, അമർത്തുക എസ്എൻസെ button to activate the snooze function. The alarm will temporarily stop and sound again after a few minutes (typically 5-10 minutes, depending on the model's default setting). To turn off the alarm completely, press any other button (e.g., ALARM, SET, UP, DOWN).
5.4 താപനില യൂണിറ്റ് തിരഞ്ഞെടുക്കൽ
The weather station displays temperature in Celsius (°C). There is no explicit mention of Fahrenheit (°F) conversion in the product description. If available, this option is usually found within the SET menu or by a dedicated button on the back of the unit.
5.5 Channel Selection (for multiple sensors)
If you have purchased additional outdoor sensors (up to three are supported), press the CH button repeatedly to cycle through the channels (CH1, CH2, CH3) and view the temperature from each connected sensor. The main unit will automatically scan and display data from active channels.
6. പരിപാലനം
- വൃത്തിയാക്കൽ: Wipe the main unit and sensor with a soft, slightly damp തുണി. അബ്രാസീവ് ക്ലീനറുകളോ ലായകങ്ങളോ ഉപയോഗിക്കരുത്, കാരണം ഇവ ഡിസ്പ്ലേയ്ക്കോ സി.asing.
- ബാറ്ററി മാറ്റിസ്ഥാപിക്കൽ: Replace batteries in both the main unit and the outdoor sensor when the display becomes dim or readings become erratic. Always replace all batteries at the same time with new ones of the same type.
- സംഭരണം: If the device will not be used for an extended period, remove the batteries to prevent leakage and corrosion.
7. പ്രശ്നപരിഹാരം
| പ്രശ്നം | സാധ്യമായ കാരണം | പരിഹാരം |
|---|---|---|
| No outdoor temperature reading or '---' displayed. |
|
|
| തെറ്റായ സമയമോ തീയതിയോ. |
|
|
| ഡിസ്പ്ലേ മങ്ങിയതോ ശൂന്യമോ ആണ്. |
|
|
8 സ്പെസിഫിക്കേഷനുകൾ
| ഫീച്ചർ | വിശദാംശങ്ങൾ |
|---|---|
| മോഡൽ നമ്പർ | HYUWS1070B |
| അളവുകൾ (L x W x H) | 14 x 3.81 x 12 സെ.മീ |
| ഇൻഡോർ താപനില ശ്രേണി | 0 °C മുതൽ +50 °C വരെ |
| Do ട്ട്ഡോർ താപനില ശ്രേണി | -20 °C മുതൽ +50 °C വരെ |
| ഡിസ്പ്ലേ തരം | എൽസിഡി |
| പവർ സപ്ലൈ (മെയിൻ യൂണിറ്റ്) | 2 x 1.5V AAA ബാറ്ററികൾ |
| Power Supply (Sensor Unit) | 2 x 1.5V AAA ബാറ്ററികൾ |
| പ്രത്യേക സവിശേഷതകൾ | Outdoor, Indoor, Digital, Alarm, Snooze |
| മെറ്റീരിയൽ | പ്ലാസ്റ്റിക് |
| നിറം | കറുപ്പ് |
9. വാറൻ്റിയും പിന്തുണയും
For warranty information or technical support, please refer to the documentation provided at the time of purchase or contact your retailer. You may also visit the official HYUNDAI Electronics webഉപഭോക്തൃ സേവന കോൺടാക്റ്റ് വിശദാംശങ്ങൾക്കായുള്ള സൈറ്റ്.