
MSZ-FH09NA, MSZ-FH12NA, MSZ-FH15NA, MSZ-FE09NA, MSZ-FE12NA, MSZ-FE18NA
User Manual for Mitsubishi Air Conditioning Remote Control
Compatible Models: MSZ-FH09NA, MSZ-FH12NA, MSZ-FH15NA, MSZ-FE09NA, MSZ-FE12NA, MSZ-FE18NA
1. ആമുഖം
This manual provides comprehensive instructions for the operation and maintenance of your new replacement remote control for Mitsubishi Air Conditioning units. Please read this manual thoroughly before use to ensure proper functionality and to maximize the lifespan of your remote control.
2. ഉൽപ്പന്നം കഴിഞ്ഞുview
This remote control is designed as a direct replacement for various Mitsubishi Air Conditioning models, offering seamless compatibility and full functionality. It utilizes infrared (IR) communication for reliable control of your air conditioning unit.

ചിത്രം 2.1: കോണാകൃതിയിലുള്ളത് view of the remote control, highlighting the display and button layout.
Compatible Air Conditioning Models:
- MSZ-FH09NA
- MSZ-FH12NA
- MSZ-FH15NA
- MSZ-FE09NA
- MSZ-FE12NA
- MSZ-FE18NA
3. സജ്ജീകരണം
Before using the remote control, you must install batteries.
- ബാറ്ററി കമ്പാർട്ട്മെന്റ് തുറക്കുക: റിമോട്ട് കൺട്രോളിന്റെ പിൻഭാഗത്ത് ബാറ്ററി കവർ കണ്ടെത്തുക. കവർ താഴേക്ക് സ്ലൈഡ് ചെയ്യുകയോ ലാച്ച് അമർത്തി ലിഫ്റ്റ് ചെയ്ത് തുറക്കുകയോ ചെയ്യുക.
- ബാറ്ററികൾ ചേർക്കുക: Insert two new AAA batteries (not included) into the compartment. Ensure the positive (+) and negative (-) terminals align correctly with the markings inside the compartment.
- ബാറ്ററി കമ്പാർട്ട്മെന്റ് അടയ്ക്കുക: സുരക്ഷിതമായി ക്ലിക്കുചെയ്യുന്നത് വരെ ബാറ്ററി കവർ തിരികെ സ്ഥലത്തേക്ക് സ്ലൈഡ് ചെയ്യുക.
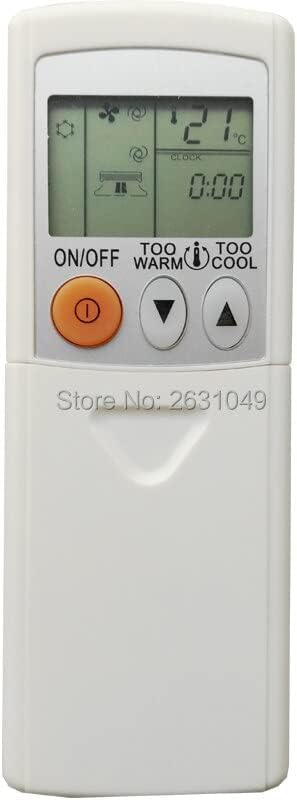
Figure 3.1: Top section of the remote control, displaying the screen and primary controls.
കുറിപ്പ്: If the remote control does not respond after battery installation, check the battery orientation or replace with fresh batteries.
4. പ്രവർത്തന നിർദ്ദേശങ്ങൾ
Familiarize yourself with the buttons and their functions to effectively control your air conditioning unit.

ചിത്രം 4.1: പൂർണ്ണം view of the remote control, detailing all available buttons.
| ബട്ടൺ | ഫംഗ്ഷൻ |
|---|---|
| ഓൺ/ഓഫ് | Turns the air conditioning unit on or off. |
| TOO WARM / TOO COOL (Temperature ▲/▼) | Adjusts the desired temperature setting. Press 'TOO WARM' to increase temperature, 'TOO COOL' to decrease. |
| മോഡ് | Cycles through operating modes: Auto, Cool, Dry, Fan, Heat (availability depends on AC unit). |
| ഫാൻ | ഫാൻ വേഗത ക്രമീകരിക്കുന്നു (ഉദാ. ഓട്ടോ, ലോ, മീഡിയം, ഹൈ). |
| VANE / WIDE VANE | Controls the vertical and horizontal airflow direction of the air conditioner louvers. |
| ഇക്കോനോ കൂൾ | Activates energy-saving cooling operation. |
| ഉറങ്ങുക | സുഖകരമായ ഉറക്കത്തിനും ഊർജ്ജ ലാഭത്തിനുമായി താപനില ക്രമേണ ക്രമീകരിക്കുന്ന സ്ലീപ്പ് മോഡ് സജീവമാക്കുന്നു. |
| POWERFUL COOL | Initiates rapid cooling for a short period. |
| STOP / START (Timer) | Used to set or cancel the ON/OFF timer function. |
| TIME (▲/▼) | Adjusts the time for timer settings. |
| ക്ലോക്ക് പുനഃസജ്ജമാക്കുക | Resets the internal clock of the remote control. |
5. പരിപാലനം
ശരിയായ അറ്റകുറ്റപ്പണി നിങ്ങളുടെ റിമോട്ട് കൺട്രോളിന്റെ ദീർഘായുസ്സും മികച്ച പ്രകടനവും ഉറപ്പാക്കുന്നു.
- ബാറ്ററി മാറ്റിസ്ഥാപിക്കൽ: Replace batteries when the display becomes dim or the remote control stops responding. Always replace both batteries at the same time with new ones of the same type.
- വൃത്തിയാക്കൽ: മൃദുവായതും ഉണങ്ങിയതുമായ തുണി ഉപയോഗിച്ച് റിമോട്ട് കൺട്രോൾ തുടയ്ക്കുക. ലിക്വിഡ് ക്ലീനറുകൾ, അബ്രാസീവ് ക്ലീനറുകൾ, കെമിക്കൽ സ്പ്രേകൾ എന്നിവ ഉപയോഗിക്കരുത്, കാരണം ഇവ റിമോട്ടിന്റെ ഉപരിതലത്തിനോ ആന്തരിക ഘടകങ്ങളോ കേടുവരുത്തും.
- സംഭരണം: If the remote control will not be used for an extended period, remove the batteries to prevent leakage and corrosion. Store in a cool, dry place.
6. പ്രശ്നപരിഹാരം
If you encounter issues with your remote control, refer to the following table for common problems and solutions.
| പ്രശ്നം | സാധ്യമായ കാരണം / പരിഹാരം |
|---|---|
| റിമോട്ട് കൺട്രോൾ പ്രവർത്തിക്കുന്നില്ല. |
|
| ഡിസ്പ്ലേ മങ്ങിയതോ ശൂന്യമോ ആണ്. | ബാറ്ററികൾ കുറവാണ്. പുതിയ ബാറ്ററികൾ മാറ്റി സ്ഥാപിക്കുക. |
| AC unit does not respond to specific buttons. | The button function may not be supported by your specific AC unit model, or the remote may require a reset (remove and reinsert batteries). |
7 സ്പെസിഫിക്കേഷനുകൾ
| ഫീച്ചർ | വിശദാംശങ്ങൾ |
|---|---|
| ഉപയോഗിക്കുക | എയർ കണ്ടീഷണർ |
| വയർലെസ് കമ്മ്യൂണിക്കേഷൻ | ഇൻഫ്രാറെഡ് (IR) |
| പിന്തുണ APP | ഇല്ല |
| ചാനൽ | 1 |
| പാക്കേജ് | അതെ |
| ആവൃത്തി | 433 MHz |
| പിന്തുണയ്ക്കുന്ന ഉപകരണങ്ങളുടെ പരമാവധി എണ്ണം | 1 |
| അനുയോജ്യമായ ഉപകരണങ്ങൾ | എയർ കണ്ടീഷണർ |
| പ്രത്യേക ഫീച്ചർ | എർഗണോമിക് |
8. വാറൻ്റിയും പിന്തുണയും
This product is covered by a standard manufacturer's warranty against defects in materials and workmanship. For specific warranty terms and conditions, please refer to the product packaging or contact the seller directly. For technical support or further assistance, please reach out to the point of purchase or the manufacturer's customer service.
Ask a question about this manual
Ask about setup, troubleshooting, compatibility, parts, safety, or missing instructions. Manuals+ will review the question and use this page’s manual context to help answer it.