1. ആമുഖം
This manual provides essential information for the safe and efficient operation of your NEC NP-M271X Projector. Please read this manual thoroughly before using the projector and retain it for future reference. The NEC NP-M271X projector is designed to provide bright, detailed image projection with native XGA resolution, 3200 lumens brightness, and HDMI connectivity, suitable for various presentation and viewപരിസ്ഥിതികൾ.
2 സുരക്ഷാ വിവരങ്ങൾ
സുരക്ഷിതമായ പ്രവർത്തനം ഉറപ്പാക്കുന്നതിനും കേടുപാടുകൾ തടയുന്നതിനും, ഇനിപ്പറയുന്ന മുൻകരുതലുകൾ പാലിക്കുക:
- വൈദ്യുതി വിതരണം: നിർദ്ദിഷ്ട പവർ സപ്ലൈ വോള്യം മാത്രം ഉപയോഗിക്കുകtage. Ensure the power cord is securely connected and not damaged.
- വെൻ്റിലേഷൻ: വെന്റിലേഷൻ തുറസ്സുകൾ തടയരുത്. പ്രൊജക്ടറിന് ചുറ്റും ശരിയായ വായുസഞ്ചാരം ഉറപ്പാക്കി അമിതമായി ചൂടാകുന്നത് തടയുക.
- പ്ലേസ്മെൻ്റ്: Place the projector on a stable, level surface. Avoid locations with high humidity, dust, or extreme temperatures.
- ലെൻസ്: l ചെയ്യുമ്പോൾ പ്രൊജക്ടർ ലെൻസിലേക്ക് നേരിട്ട് നോക്കരുത്amp is on, as this can cause eye damage.
- വൃത്തിയാക്കൽ: Disconnect the power cord before cleaning. Use a soft, dry cloth. Avoid liquid or aerosol cleaners.
- സേവനം: Do not attempt to service the projector yourself. Refer all servicing to qualified service personnel.
3. ഉൽപ്പന്നം കഴിഞ്ഞുview
The NEC NP-M271X projector features a robust design with various input/output ports and user-friendly controls.
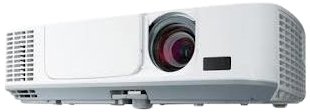
ചിത്രം 3.1: ഫ്രണ്ട് view of the NEC NP-M271X Projector, showing the lens and ventilation grilles.
3.1 ഫ്രണ്ട് പാനൽ
- പ്രൊജക്ഷൻ ലെൻസ്: ചിത്രം സ്ക്രീനിലേക്ക് പ്രൊജക്റ്റ് ചെയ്യുന്നു.
- ഫോക്കസ് റിംഗ്: ചിത്രത്തിന്റെ വ്യക്തത ക്രമീകരിക്കുന്നു.
- സൂം റിംഗ്: ചിത്രത്തിന്റെ വലുപ്പം ക്രമീകരിക്കുന്നു.
- ഐആർ റിസീവർ: റിമോട്ട് കൺട്രോളിൽ നിന്ന് സിഗ്നലുകൾ സ്വീകരിക്കുന്നു.
3.2 പിൻ പാനൽ (കണക്റ്റിവിറ്റി)
The rear panel provides various ports for connecting external devices.
- എച്ച്ഡിഎംഐ ഇൻപുട്ട്: For connecting digital video/audio sources.
- VGA Input (Computer IN): For connecting computers via VGA cable.
- USB പോർട്ട്: For connecting USB devices or for firmware updates.
- ഓഡിയോ ഇൻ/ഔട്ട്: For connecting external audio sources or outputting audio.
- LAN പോർട്ട്: നെറ്റ്വർക്ക് കണക്റ്റിവിറ്റിക്കും നിയന്ത്രണത്തിനും.
- പവർ ഇൻലെറ്റ്: എസി പവർ കോർഡ് ബന്ധിപ്പിക്കുന്നതിന്.
3.3 Top Panel (Controls)
- പവർ ബട്ടൺ: പ്രൊജക്ടർ ഓണാക്കുകയോ ഓഫാക്കുകയോ ചെയ്യുന്നു.
- ഇൻപുട്ട് ബട്ടണുകൾ: ഇൻപുട്ട് ഉറവിടം തിരഞ്ഞെടുക്കുന്നു.
- മെനു ബട്ടൺ: ഓൺ-സ്ക്രീൻ ഡിസ്പ്ലേ (OSD) മെനു ആക്സസ് ചെയ്യുന്നു.
- നാവിഗേഷൻ ബട്ടണുകൾ: മെനുകളിലൂടെ നാവിഗേറ്റ് ചെയ്യാനും ക്രമീകരണങ്ങൾ ക്രമീകരിക്കാനും ഉപയോഗിക്കുന്നു.
- കീസ്റ്റോൺ തിരുത്തൽ: Adjusts image distortion.
4. സജ്ജീകരണം
4.1 പ്രൊജക്ടർ പ്ലേസ്മെന്റ്
Position the projector on a stable surface or mount it securely. Ensure the projector is perpendicular to the screen for optimal image geometry. Adjust the projector's height using the adjustable feet if necessary.
4.2 ബന്ധിപ്പിക്കുന്ന പവർ
- Connect the supplied AC power cord to the projector's power inlet.
- പവർ കോർഡിന്റെ മറ്റേ അറ്റം ഗ്രൗണ്ടഡ് ഇലക്ട്രിക്കൽ ഔട്ട്ലെറ്റിലേക്ക് പ്ലഗ് ചെയ്യുക.
- The power indicator light will illuminate, typically in amber or red, indicating standby mode.
4.3 ഇൻപുട്ട് സ്രോതസ്സുകൾ ബന്ധിപ്പിക്കുന്നു
ഉചിതമായ കേബിൾ ഉപയോഗിച്ച് നിങ്ങളുടെ വീഡിയോ ഉറവിടം (ഉദാ, ലാപ്ടോപ്പ്, ബ്ലൂ-റേ പ്ലെയർ) പ്രൊജക്ടറുമായി ബന്ധിപ്പിക്കുക.
- എച്ച്ഡിഎംഐ: Connect an HDMI cable from your source device to the projector's HDMI input.
- വി.ജി.എ: Connect a VGA cable from your computer to the projector's Computer IN port. If audio is required, connect a separate audio cable from your computer's audio output to the projector's Audio IN port.
- USB: ചില മീഡിയ പ്ലേബാക്ക് അല്ലെങ്കിൽ നിയന്ത്രണ പ്രവർത്തനങ്ങൾക്കായി, USB പോർട്ടിലേക്ക് ഒരു USB ഉപകരണം ബന്ധിപ്പിക്കുക.
5. പ്രൊജക്ടർ പ്രവർത്തിപ്പിക്കൽ
5.1 പവർ ഓൺ/ഓഫ്
- പവർ ഓൺ: Press the Power button on the projector's control panel or remote control. The power indicator will turn green, and the lamp പ്രകാശിപ്പിക്കും.
- പവർ ഓഫ്: Press the Power button again. A confirmation message may appear. Press Power again to confirm shutdown. The projector will enter cooling mode, and the power indicator will return to amber/red. Do not unplug the projector during cooling.
5.2 Basic Image Adjustment
- ഫോക്കസ്: ചിത്രം മൂർച്ചയുള്ളതാകുന്നതുവരെ ലെൻസിലെ ഫോക്കസ് റിംഗ് തിരിക്കുക.
- സൂം: ചിത്രത്തിന്റെ വലുപ്പം ക്രമീകരിക്കുന്നതിന് ലെൻസിലെ സൂം റിംഗ് തിരിക്കുക.
- കീസ്റ്റോൺ തിരുത്തൽ: If the image appears trapezoidal, use the Keystone buttons on the control panel or remote to correct the distortion.
5.3 ഇൻപുട്ട് ഉറവിട തിരഞ്ഞെടുപ്പ്
Press the "Input" or specific input source buttons (e.g., "HDMI", "Computer") on the control panel or remote control to switch between connected devices.
5.4 മെനു നാവിഗേഷൻ
Press the "Menu" button to access the On-Screen Display (OSD) menu. Use the navigation arrows to browse options and the "Enter" button to select. Press "Menu" or "Exit" to close the OSD.
6. പരിപാലനം
പതിവ് അറ്റകുറ്റപ്പണികൾ മികച്ച പ്രകടനം ഉറപ്പാക്കുകയും നിങ്ങളുടെ പ്രൊജക്ടറിന്റെ ആയുസ്സ് വർദ്ധിപ്പിക്കുകയും ചെയ്യുന്നു.
6.1 പ്രൊജക്ടർ ലെൻസ് വൃത്തിയാക്കൽ
ഒപ്റ്റിക്കൽ ലെൻസുകൾക്കായി പ്രത്യേകം രൂപകൽപ്പന ചെയ്ത മൃദുവായ, ലിന്റ് രഹിത തുണി ഉപയോഗിച്ച് ലെൻസ് സൌമ്യമായി തുടയ്ക്കുക. അബ്രസീവ് ക്ലീനറുകളോ അമിതമായ ബലമോ ഉപയോഗിക്കരുത്.
6.2 എയർ ഫിൽട്ടർ വൃത്തിയാക്കൽ
The air filter prevents dust from entering the projector. Clean the filter regularly (e.g., every 100-200 hours of use) by removing it and using a vacuum cleaner or compressed air to remove accumulated dust. Refer to the projector's specific filter access instructions.
6.3 എൽamp മാറ്റിസ്ഥാപിക്കൽ
പ്രൊജക്ടർ എൽamp പരിമിതമായ ആയുസ്സ് ഉണ്ട്. lamp സൂചകം പ്രകാശിക്കുകയോ ഇമേജ് തെളിച്ചം ഗണ്യമായി കുറയുകയോ ചെയ്താൽ, lamp may need replacement. Always use genuine NEC replacement lamps. Consult a qualified technician for lamp replacement if you are unsure.
7. പ്രശ്നപരിഹാരം
നിങ്ങളുടെ പ്രൊജക്ടറിൽ പ്രശ്നങ്ങൾ നേരിടുകയാണെങ്കിൽ, ഇനിപ്പറയുന്ന പൊതുവായ പ്രശ്നങ്ങളും പരിഹാരങ്ങളും പരിശോധിക്കുക:
| പ്രശ്നം | സാധ്യമായ കാരണം | പരിഹാരം |
|---|---|---|
| ചിത്രമൊന്നും പ്രദർശിപ്പിച്ചിട്ടില്ല | Incorrect input source selected, loose cable connection, source device not outputting signal. | Verify input source, check cable connections, ensure source device is on and configured to output. |
| ചിത്രം മങ്ങിയതാണ് | ലെൻസ് ഫോക്കസിന് പുറത്താണ്. | പ്രൊജക്ടർ ലെൻസിൽ ഫോക്കസ് റിംഗ് ക്രമീകരിക്കുക. |
| ചിത്രം ട്രപസോയിഡൽ ആണ് | പ്രൊജക്ടർ സ്ക്രീനിന് ലംബമല്ല. | കീസ്റ്റോൺ തിരുത്തൽ ഉപയോഗിക്കുകയോ പ്രൊജക്ടറിന്റെ സ്ഥാനം മാറ്റുകയോ ചെയ്യുക. |
| പ്രൊജക്ടർ അമിതമായി ചൂടാകുകയും ഓഫാകുകയും ചെയ്യുന്നു | Blocked ventilation, dirty air filter. | Ensure clear ventilation paths, clean the air filter. |
8 സ്പെസിഫിക്കേഷനുകൾ
Key technical specifications for the NEC NP-M271X Projector:
| ഫീച്ചർ | വിശദാംശങ്ങൾ |
|---|---|
| ബ്രാൻഡ് | NEC |
| മോഡലിൻ്റെ പേര് | NP M271X |
| ഉൽപ്പന്ന തരം | എൽസിഡി പ്രൊജക്ടർ |
| നേറ്റീവ് റെസല്യൂഷൻ | 1024 x 768 (XGA) |
| ഡിസ്പ്ലേ റെസല്യൂഷൻ പരമാവധി | 1600 x 1200 |
| തെളിച്ചം | 2700 Lumens (Standard Mode) |
| കോൺട്രാസ്റ്റ് റേഷ്യോ | 3000:1 |
| കണക്റ്റിവിറ്റി ടെക്നോളജി | എച്ച്ഡിഎംഐ, യുഎസ്ബി, വിജിഎ |
| പരമാവധി ഇമേജ് വലുപ്പം | 300 ഇഞ്ച് |
| ഇനത്തിൻ്റെ ഭാരം | 4 കിലോഗ്രാം |
| കൺട്രോളർ തരം | ബട്ടൺ നിയന്ത്രണം |
| വാട്ട്tage | 248 വാട്ട്സ് |
| മൗണ്ടിംഗ് തരം | ടേബിൾടോപ്പ് മൗണ്ട് |
| യുപിസി / ജിടിഐഎൻ | 657768275883 |
9. വാറൻ്റിയും പിന്തുണയും
9.1 വാറൻ്റി വിവരങ്ങൾ
This NEC NP-M271X Projector (Renewed) comes with a 90 ദിവസത്തെ പരിമിത വാറൻ്റി. വാറന്റി ക്ലെയിമുകൾക്കായി നിങ്ങളുടെ വാങ്ങലിന്റെ തെളിവ് സൂക്ഷിക്കുക. സാധാരണ ഉപയോഗത്തിൽ മെറ്റീരിയലുകളിലും വർക്ക്മാൻഷിപ്പിലുമുള്ള വൈകല്യങ്ങൾ വാറന്റി ഉൾക്കൊള്ളുന്നു.
9.2 ഉപഭോക്തൃ പിന്തുണ
For technical assistance, troubleshooting beyond this manual, or warranty service, please contact the seller or refer to the official NEC support channels. You may find additional resources and contact information on the NEC webസൈറ്റ്.