1. ആമുഖം
The LASERLINER VideoPocket HD 082262A is a compact and versatile industrial endoscope designed for visual inspection in hard-to-reach areas. This device allows for real-time viewing, image capture, and video recording, making it an essential tool for professionals in various fields. This manual provides detailed instructions for the safe and effective operation, maintenance, and troubleshooting of your VideoPocket HD.
2. സുരക്ഷാ നിർദ്ദേശങ്ങൾ
- പൊതു സുരക്ഷ: Read all instructions carefully before use. Keep the device away from water, high temperatures, and direct sunlight.
- ബാറ്ററി സുരക്ഷ: Use only specified AA alkaline batteries. Do not mix old and new batteries, or different types of batteries. Remove batteries if the device will not be used for an extended period.
- Camera Cable: Do not bend, pinch, or pull the camera cable excessively. Avoid inserting the camera into live electrical circuits or hazardous environments without proper safety precautions.
- വൃത്തിയാക്കൽ: വൃത്തിയാക്കുന്നതിന് മുമ്പ് വൈദ്യുതി വിച്ഛേദിക്കുക. മൃദുവായതും ഉണങ്ങിയതുമായ തുണി ഉപയോഗിക്കുക. അബ്രസീവ് ക്ലീനറുകളോ ലായകങ്ങളോ ഉപയോഗിക്കരുത്.
- നന്നാക്കൽ: ഉപകരണം സ്വയം തുറക്കാനോ നന്നാക്കാനോ ശ്രമിക്കരുത്. എല്ലാ സേവനങ്ങളും യോഗ്യതയുള്ള ഉദ്യോഗസ്ഥരെ ഏൽപ്പിക്കുക.
3. പാക്കേജ് ഉള്ളടക്കം
നിങ്ങളുടെ പാക്കേജിൽ എല്ലാ ഇനങ്ങളും ഉണ്ടെന്ന് ഉറപ്പാക്കുക:
- LASERLINER VideoPocket HD Main Unit
- Camera Cable with 5.2mm Camera Head (1m length)
- മാഗ്നറ്റ് അറ്റാച്ച്മെൻ്റ്
- മിറർ അറ്റാച്ച്മെന്റ്
- ഹുക്ക് അറ്റാച്ച്മെന്റ്
- Camera Tip Attachments (for securing magnet, mirror, hook)
- ഉപയോക്തൃ മാനുവൽ
4. ഉൽപ്പന്നം കഴിഞ്ഞുview
The VideoPocket HD features a robust design for industrial use, with an integrated display and flexible camera probe.

ചിത്രം 1: LASERLINER VideoPocket HD industrial endoscope handheld unit. This image shows the complete device, highlighting its compact form factor and integrated display.

ചിത്രം 2: Close-up of the 5.2mm camera head with 6 integrated LEDs for illumination. The small diameter allows access into narrow spaces, and the LEDs provide necessary lighting.
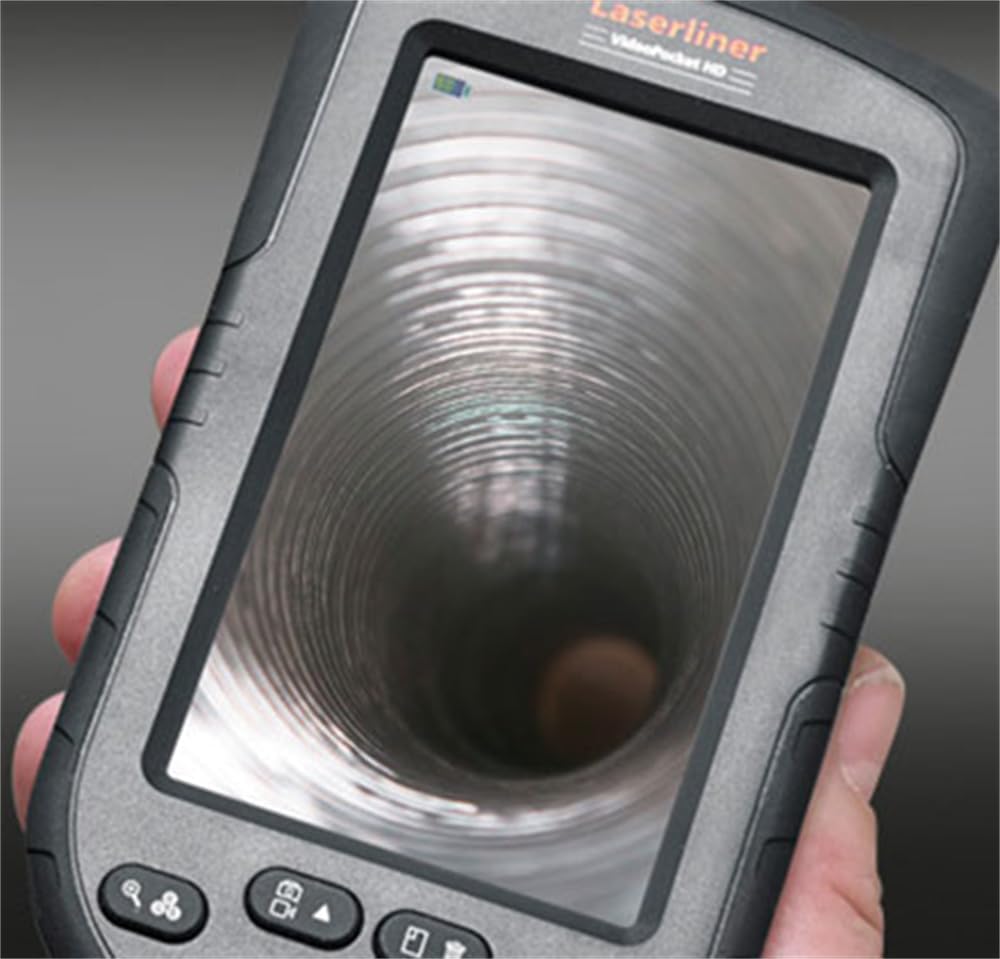
ചിത്രം 3: LASERLINER VideoPocket HD display showing a live view from inside a corrugated pipe. This demonstrates the device's capability to provide clear visuals during inspection.

ചിത്രം 4: വശം view of the VideoPocket HD unit, highlighting the MicroUSB port and microSD card slot. These ports are used for data transfer and memory expansion.

ചിത്രം 5: പിൻഭാഗം view of the LASERLINER VideoPocket HD, showing the integrated storage for the camera cable. This design ensures convenient and secure storage of the probe.
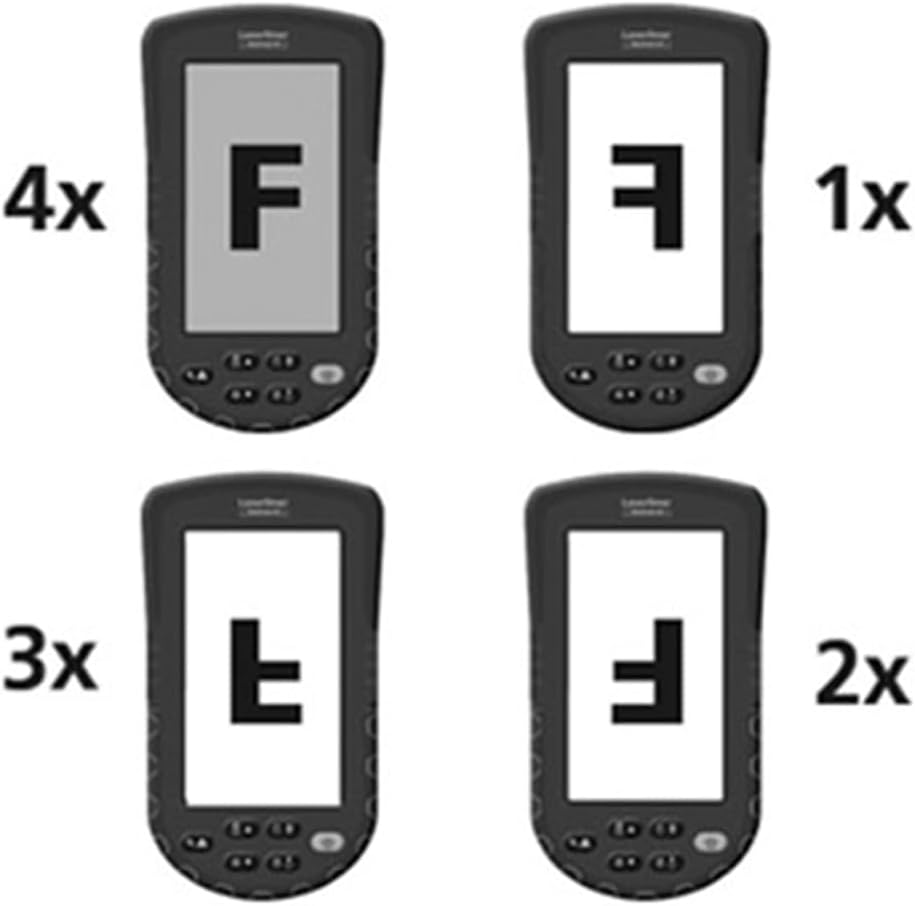
ചിത്രം 6: Diagram illustrating the 4x digital zoom function of the VideoPocket HD, showing different magnification levels. This feature allows for closer examination of details.
5. സജ്ജീകരണം
5.1 ബാറ്ററി ഇൻസ്റ്റാളേഷൻ
- ഉപകരണത്തിന്റെ പിൻഭാഗത്ത് ബാറ്ററി കമ്പാർട്ട്മെന്റ് കവർ കണ്ടെത്തുക.
- Open the cover by sliding or unlatching it.
- Insert four (4) AA alkaline batteries, ensuring correct polarity (+/-) as indicated inside the compartment.
- ബാറ്ററി കമ്പാർട്ട്മെൻ്റ് കവർ സുരക്ഷിതമായി അടയ്ക്കുക.
5.2 മൈക്രോ എസ്ഡി കാർഡ് ചേർക്കൽ
- Locate the microSD card slot on the side of the device (refer to Figure 4).
- Insert a microSD card (up to 32GB, not included) into the slot with the contacts facing down, until it clicks into place.
- നീക്കം ചെയ്യാൻ, കാർഡ് പുറത്തേക്ക് വരുന്നത് വരെ സൌമ്യമായി അകത്തേക്ക് തള്ളുക.
5.3 ആക്സസറികൾ അറ്റാച്ചുചെയ്യുന്നു
The magnet, mirror, and hook attachments can be secured to the camera head using the provided camera tip attachments.
- Select the desired attachment (magnet, mirror, or hook).
- Carefully slide the camera tip attachment over the camera head.
- Ensure the accessory is firmly seated and aligned with the camera lens if necessary (e.g., mirror).
6. പ്രവർത്തന നിർദ്ദേശങ്ങൾ
6.1 പവർ ഓൺ/ഓഫ്
- പവർ ഓൺ: ഡിസ്പ്ലേ പ്രകാശിക്കുന്നത് വരെ പവർ ബട്ടൺ അമർത്തിപ്പിടിക്കുക.
- പവർ ഓഫ്: ഡിസ്പ്ലേ ഓഫാകുന്നതുവരെ പവർ ബട്ടൺ അമർത്തിപ്പിടിക്കുക.
6.2 തത്സമയം View നാവിഗേഷനും
- Once powered on, the device will display a live feed from the camera probe.
- Use the directional buttons (if present) to navigate through menus or adjust settings.
6.3 തെളിച്ചം ക്രമീകരിക്കുന്നു
The camera head features 6 LEDs with 10-stage brightness adjustment.
- Locate the brightness adjustment buttons (often marked with sun icons or up/down arrows).
- Press the appropriate button to increase or decrease the LED illumination intensity.
6.4 ഡിജിറ്റൽ സൂം ഉപയോഗം
The device supports up to 4x digital zoom (refer to Figure 6).
- Press the Zoom button (often marked with a magnifying glass icon) to cycle through zoom levels (1x, 2x, 3x, 4x).
6.5 ചിത്രങ്ങളും വീഡിയോകളും പകർത്തൽ
Ensure a microSD card is inserted before attempting to record.
- ചിത്രം പകർത്തുക: ലൈവിൽ view, press the Photo/Capture button (often marked with a camera icon) to take a still image.
- വീഡിയോ റെക്കോർഡ് ചെയ്യുക: Press the Video/Record button (often marked with a video camera icon) to start recording. Press it again to stop recording.
6.6 Viewറെക്കോർഡ് ചെയ്ത മീഡിയയിൽ
- പ്ലേബാക്ക് മോഡ് നൽകുക (സാധാരണയായി ഒരു പ്രത്യേക ബട്ടൺ അല്ലെങ്കിൽ മെനു ഓപ്ഷൻ വഴി).
- Use the directional buttons to browse through captured images and videos.
- Press the OK/Play button to view an image or play a video.
6.7 ഒരു കമ്പ്യൂട്ടറിലേക്ക് ബന്ധിപ്പിക്കുന്നു
Use the MicroUSB port to transfer fileഒരു കമ്പ്യൂട്ടറിലേക്ക് എസ്.
- Connect the device to your computer using a MicroUSB cable (not included).
- The device should appear as a removable storage device on your computer.
- You can then access and transfer the images and videos stored on the microSD card.
7. പരിപാലനം
7.1 വൃത്തിയാക്കൽ
- പ്രധാന യൂണിറ്റ്: Wipe the main unit and display with a soft, dry, lint-free cloth. For stubborn dirt, a slightly damp തുണി ഉപയോഗിക്കാം, തുടർന്ന് ഉണങ്ങിയ തുണി ഉപയോഗിക്കാം.
- ക്യാമറ ഹെഡ്: Gently clean the camera lens with a soft lens cleaning cloth or cotton swab. Avoid scratching the lens.
- ഉപകരണത്തിന്റെ ഒരു ഭാഗവും വെള്ളത്തിൽ മുക്കരുത്.
7.2 സംഭരണം
- ഉപകരണം തണുത്തതും വരണ്ടതുമായ സ്ഥലത്ത് സൂക്ഷിക്കുക, നേരിട്ടുള്ള സൂര്യപ്രകാശത്തിൽ നിന്നും തീവ്രമായ താപനിലയിൽ നിന്നും അകറ്റി നിർത്തുക.
- ഉപകരണം ദീർഘനേരം ഉപയോഗിക്കുന്നില്ലെങ്കിൽ, ചോർച്ച തടയാൻ ബാറ്ററികൾ നീക്കം ചെയ്യുക.
- Ensure the camera cable is neatly coiled and stored in its designated compartment (refer to Figure 5).
8. പ്രശ്നപരിഹാരം
| പ്രശ്നം | സാധ്യമായ കാരണം | പരിഹാരം |
|---|---|---|
| ഉപകരണം പവർ ഓണാക്കുന്നില്ല. | ബാറ്ററികൾ തീർന്നിരിക്കുന്നു അല്ലെങ്കിൽ തെറ്റായി ചേർത്തിരിക്കുന്നു. | ബാറ്ററികൾ പുതിയ AA ആൽക്കലൈൻ ബാറ്ററികൾ ഉപയോഗിച്ച് മാറ്റിസ്ഥാപിക്കുക, ശരിയായ പോളാരിറ്റി ഉറപ്പാക്കുക. |
| ചിത്രം പ്രദർശിപ്പിച്ചിട്ടില്ല. | Camera cable not properly connected or damaged. | Check the camera cable connection. If problem persists, contact support. |
| ചിത്രങ്ങൾ/വീഡിയോകൾ പകർത്താൻ കഴിയില്ല. | No microSD card inserted or card is full/corrupted. | Insert a valid microSD card. Delete unnecessary files or format the card (this will erase all data). |
| Image is too dark/bright. | LED brightness is not adjusted correctly. | Adjust the LED brightness using the dedicated buttons. |
| ഉപകരണം മരവിക്കുന്നു അല്ലെങ്കിൽ പ്രതികരിക്കുന്നില്ല. | താൽക്കാലിക സോഫ്റ്റ്വെയർ തകരാർ. | ഹാർഡ് റീസെറ്റ് നടത്താൻ ബാറ്ററികൾ നീക്കം ചെയ്ത് വീണ്ടും ചേർക്കുക. |
9 സ്പെസിഫിക്കേഷനുകൾ
| ഫീച്ചർ | സ്പെസിഫിക്കേഷൻ |
|---|---|
| ബ്രാൻഡ് | ലേസർ സർജറി |
| മോഡൽ നമ്പർ | 082262എ |
| ഉൽപ്പന്ന അളവുകൾ (W x H x D) | 8.5 x 15.5 x 3.2 സെ.മീ |
| ഭാരം (ബാറ്ററികൾക്കൊപ്പം) | 370 ഗ്രാം |
| Product Weight (Gross/Shipping) | 810 ഗ്രാം |
| ക്യാമറ ഹെഡ് വ്യാസം | 5.2 മി.മീ |
| Camera Cable Length | 1 മീ |
| ക്യാമറ റെസല്യൂഷൻ | 1280 x 720 പിക്സലുകൾ |
| ഫീൽഡ് View | 65° |
| ഫോക്കൽ ഡിസ്റ്റൻസ് | 3 - 8 സെ.മീ |
| ഡിസ്പ്ലേ തരം | 4.3 ഇഞ്ച് TFT കളർ ഡിസ്പ്ലേ |
| ഡിസ്പ്ലേ റെസല്യൂഷൻ | 480 x 272 പിക്സലുകൾ |
| LED ബ്രൈറ്റ്നസ് അഡ്ജസ്റ്റ്മെന്റ് | 10 സെtages |
| ഡിജിറ്റൽ സൂം | 4x |
| വീഡിയോ ക്യാപ്ചർ റെസല്യൂഷൻ | 1080p (for saved files) |
| മെമ്മറി മീഡിയ | MicroSD കാർഡ് (32GB വരെ) |
| തുറമുഖം | മൈക്രോ യുഎസ്ബി |
| പവർ ഉറവിടം | 4 x AA ആൽക്കലൈൻ ബാറ്ററികൾ |
| ആക്സസറികൾ ഉൾപ്പെടുത്തിയിട്ടുണ്ട് | Magnet, Mirror, Hook, Camera Tip Attachments |
10. വാറൻ്റിയും പിന്തുണയും
10.1 വാറൻ്റി വിവരങ്ങൾ
This LASERLINER VideoPocket HD 082262A comes with a 1 വർഷത്തെ നിർമ്മാതാവിന്റെ വാറന്റി വാങ്ങിയ തീയതി മുതൽ. സാധാരണ ഉപയോഗത്തിലുള്ള മെറ്റീരിയലുകളിലെയും നിർമ്മാണത്തിലെയും വൈകല്യങ്ങൾ ഈ വാറന്റി ഉൾക്കൊള്ളുന്നു. ദുരുപയോഗം, അപകടങ്ങൾ, അനധികൃത പരിഷ്കാരങ്ങൾ, അല്ലെങ്കിൽ സാധാരണ തേയ്മാനം എന്നിവ മൂലമുണ്ടാകുന്ന നാശനഷ്ടങ്ങൾക്ക് ഇത് പരിരക്ഷ നൽകുന്നില്ല. വാറന്റി ക്ലെയിമുകൾക്കായി നിങ്ങളുടെ വാങ്ങലിന്റെ തെളിവ് സൂക്ഷിക്കുക.
10.2 ഉപഭോക്തൃ പിന്തുണ
For technical assistance, troubleshooting beyond this manual, or warranty inquiries, please contact your retailer or visit the official Laserliner website for support contact information. When contacting support, please have your product model number (082262A) and proof of purchase readily available.