
1. ആമുഖം
This manual provides essential information for the setup, operation, maintenance, and troubleshooting of your Voxelab Aquila D1 FDM 3D Printer. Please read this manual thoroughly before operating the device to ensure proper usage and to prevent damage.

ചിത്രം: കഴിഞ്ഞുview of the Voxelab Aquila D1 FDM 3D Printer, highlighting its key features such as 25-point auto leveling, 300°C high-temp nozzle, dual linear guides, all-metal dual gear direct extruder, 5-step quick installation, and support for various filament types.
പ്രധാന സവിശേഷതകൾ:
- 25-point Smart Auto Leveling for precise first layer adhesion.
- 300°C All-Metal Dual Gear Direct Extruder for high-temperature filaments and consistent feeding.
- Dual Z-axis Rails and XY Linear Rails for enhanced stability and printing precision.
- High-Speed Printing capability up to 180mm/s.
- Flexible PEI Magnetic Build Plate for easy model removal.
- Filament Sensor for automatic detection of filament run-out or breakage.
- 4.3-inch Touchscreen for intuitive operation.
- N32 Silent Motherboard for quiet operation.
2. സജ്ജീകരണവും ഇൻസ്റ്റാളേഷനും
The Voxelab Aquila D1 features a modular design for quick and easy assembly. Follow these 5 steps to set up your printer.
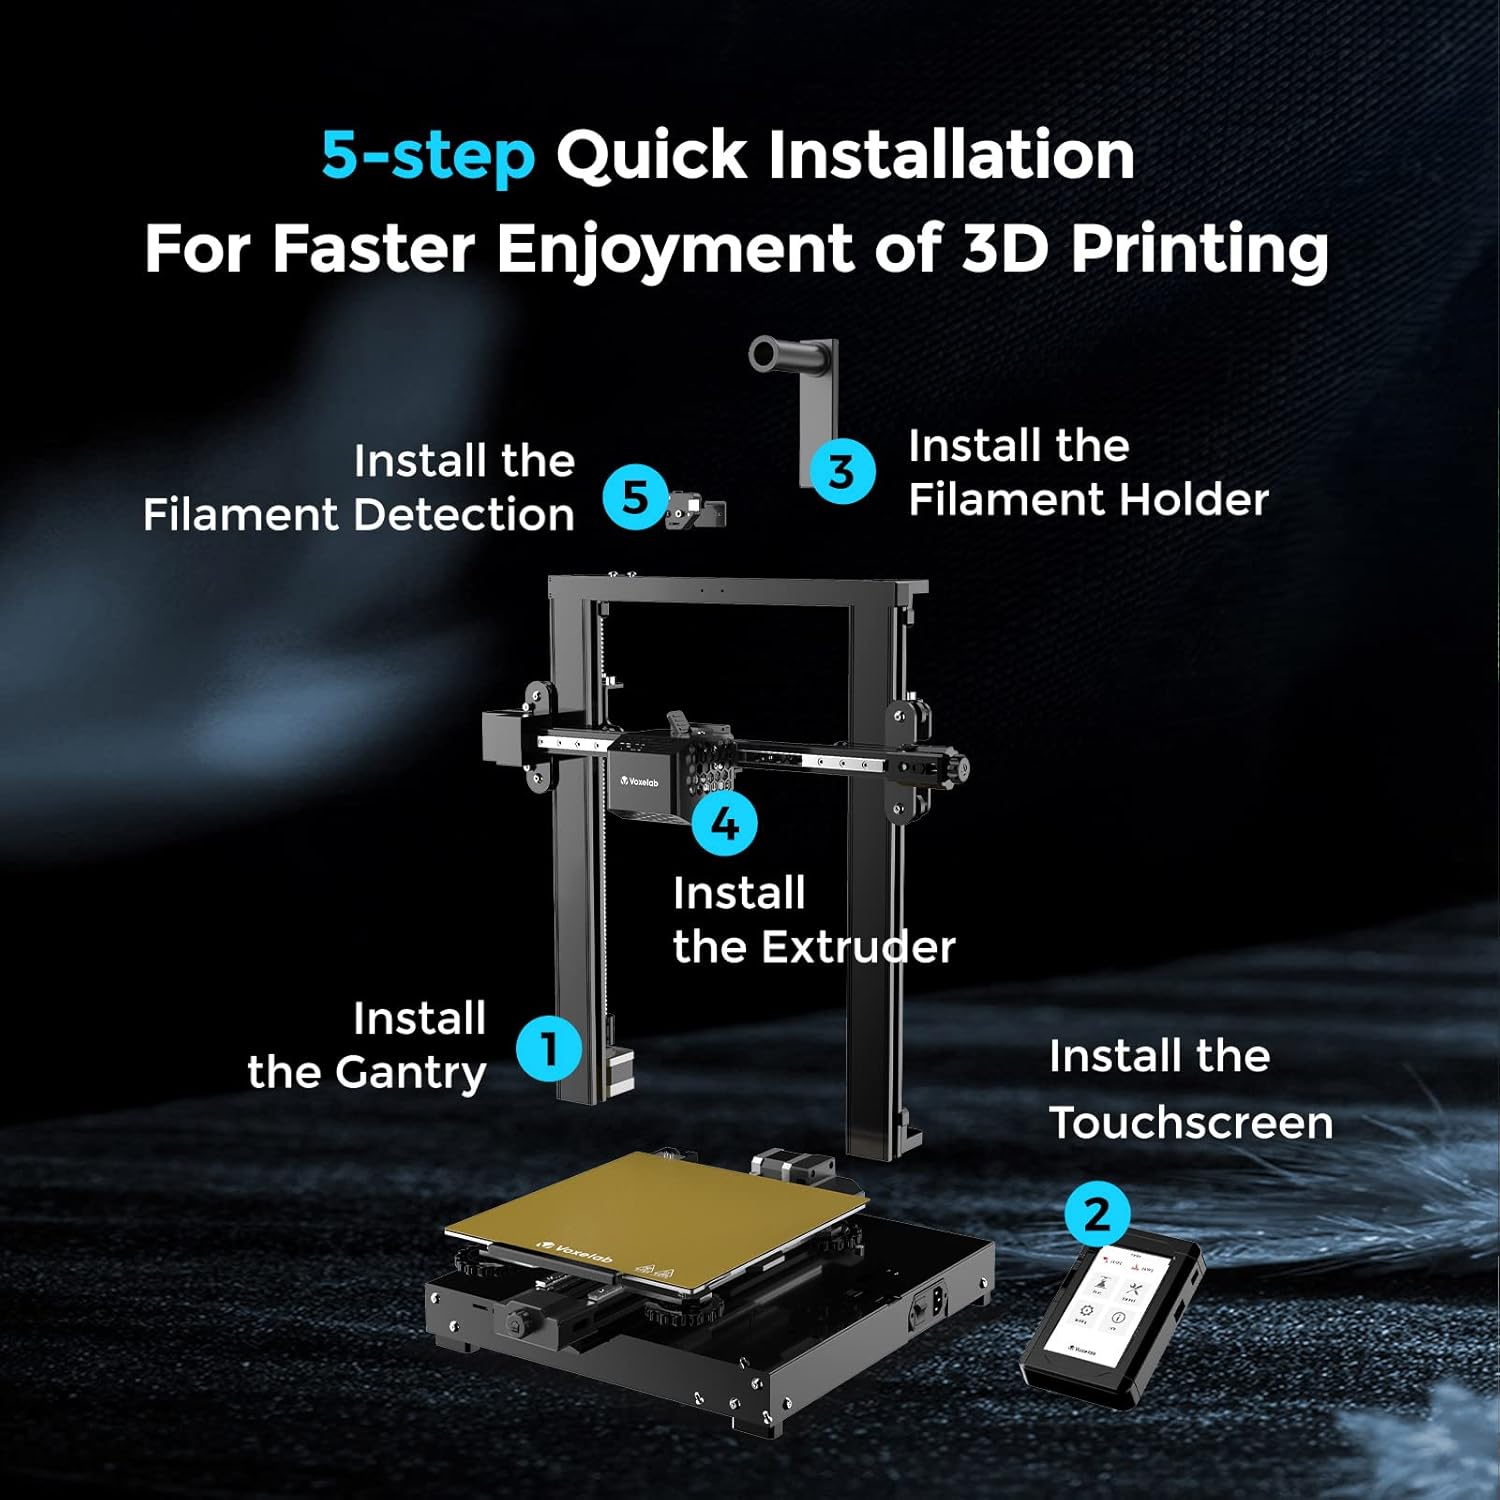
Image: Visual guide for the 5-step quick installation process. Steps include installing the gantry, touchscreen, filament holder, extruder, and filament detection module.
- Install the Gantry: Secure the gantry frame to the printer base.
- Install the Touchscreen: Attach the 4.3-inch touchscreen to its designated port.
- Install the Filament Holder: Mount the filament holder on top of the gantry.
- Install the Extruder: Attach the direct extruder assembly to the X-axis linear rail.
- Install the Filament Detection Module: Connect the filament detection sensor.
After physical assembly, ensure all cables are securely connected according to the included wiring diagram.
3. പ്രവർത്തന നിർദ്ദേശങ്ങൾ
3.1 പവർ ഓണും പ്രാരംഭ സജ്ജീകരണവും
- Connect the power cable and turn on the printer using the switch located at the rear.
- The 4.3-inch touchscreen will display the main interface.
- Navigate through the menu using the touchscreen to access various functions.

Image: The Voxelab Aquila D1 printer with a visual representation of the smart auto-leveling process on the print bed, indicating multiple measurement points.
3.2 Smart Auto Leveling
The Aquila D1 features 25-point smart auto leveling. This system uses magnetic sensors to automatically adjust the printing platform height, ensuring the first layer is always even and accurate. This reduces printing failures and improves overall printing efficiency.
- Access the auto-leveling function through the touchscreen menu.
- Initiate the leveling process. The printer will automatically probe multiple points on the build plate.
- Wait for the process to complete before starting a print.
3.3 Filament Loading and Unloading

Image: Diagram illustrating the layers of the flexible PEI platform: PEI coating, spring steel sheet, and magnetic sticker, with a printed model on top.
- Place the filament spool on the filament holder.
- Feed the filament through the filament sensor and into the direct extruder.
- Use the touchscreen menu to preheat the nozzle and load the filament until it extrudes smoothly.
- To unload, preheat the nozzle and use the menu option to retract the filament.
The filament sensor automatically detects filament run-out or breakage, pausing the print and allowing you to resume after replacing the filament.
3.4 അച്ചടി

Image: The Voxelab Aquila D1 printer in operation, with a visual effect indicating high-speed printing up to 180mm/s.
- Prepare your 3D model using compatible slicing software (VoxelMaker, Cura, Simplify3D).
- അരിഞ്ഞ ജി-കോഡ് സേവ് ചെയ്യുക. file to a memory card.
- Insert the memory card into the printer's card slot.
- ആവശ്യമുള്ളത് തിരഞ്ഞെടുക്കുക file from the touchscreen menu and start printing.
3.5 മൾട്ടി-മെറ്റീരിയൽ പ്രിന്റിംഗ്

Image: A 3D printed scooter model made from multiple materials, with labels indicating supported filament types: PLA, ABS, PETG, TPU, HIPS, ASA.
The Aquila D1 supports a wide range of filaments, including PLA, ABS, PETG, TPU, HIPS, and ASA, allowing for diverse printing applications.
4. പരിപാലനം
പതിവ് അറ്റകുറ്റപ്പണികൾ നിങ്ങളുടെ 3D പ്രിന്ററിന്റെ മികച്ച പ്രകടനവും ദീർഘായുസ്സും ഉറപ്പാക്കുന്നു.
4.1 ബിൽഡ് പ്ലേറ്റ് വൃത്തിയാക്കൽ
- ഓരോ പ്രിന്റിന് ശേഷവും, ബിൽഡ് പ്ലേറ്റ് തണുക്കാൻ അനുവദിക്കുക.
- Gently remove the flexible PEI sheet and flex it to detach the printed model.
- Clean the PEI surface with isopropyl alcohol to remove any residue and maintain adhesion.
4.2 Extruder and Nozzle Maintenance

Image: Close-up of the Voxelab Aquila D1's direct extruder, showing the 300°C all-metal hotend, dual cooling fans, and 70N strong filament feeding structure.
- Periodically check the nozzle for clogs. Use the provided needle to clear any blockages.
- Ensure the dual cooling fans are free from dust and debris to prevent overheating.
- Inspect the dual gear direct extruder for proper filament grip and smooth operation.
4.3 Linear Rail and Z-axis Maintenance
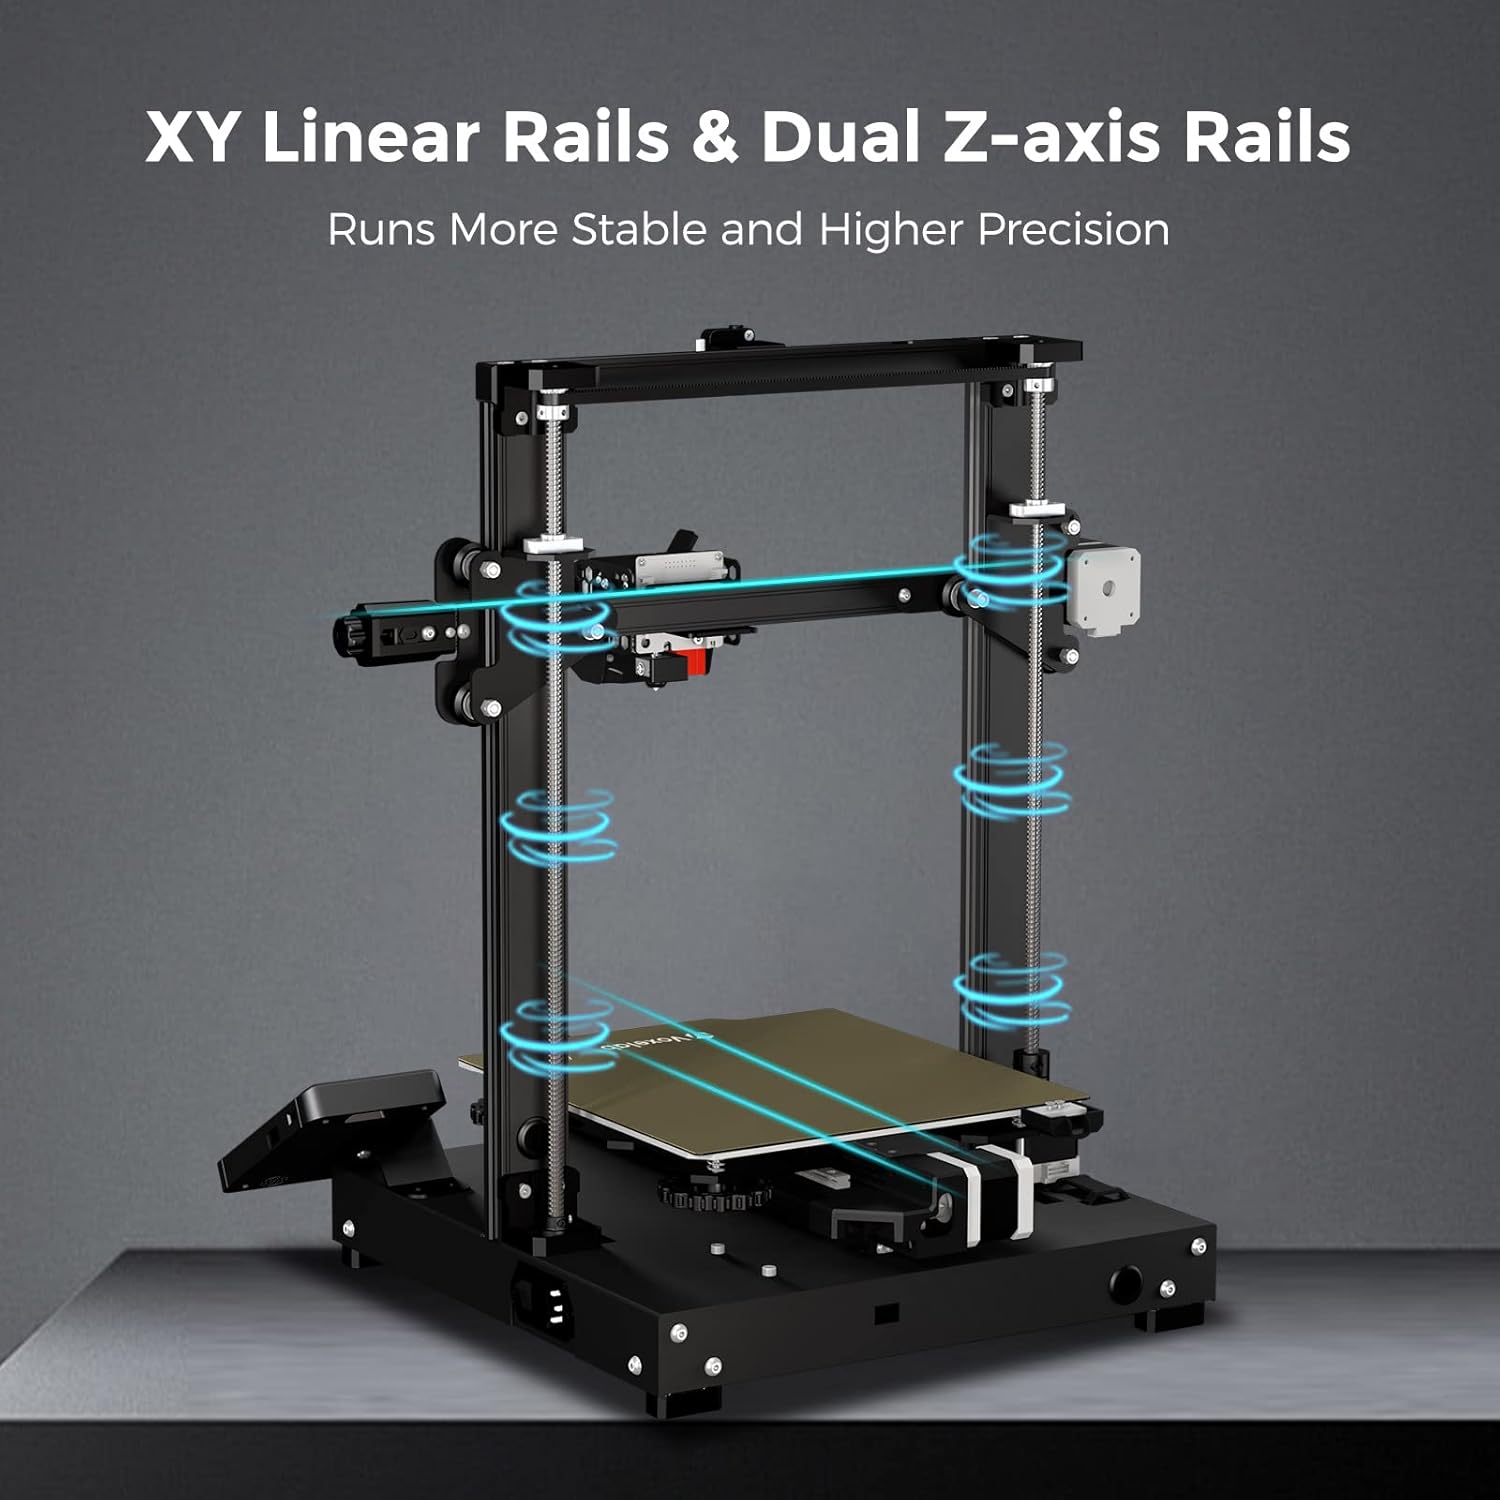
Image: The Voxelab Aquila D1 printer highlighting its XY linear rails and dual Z-axis rails, indicating stable and precise movement.
- Keep the XY linear rails and dual Z-axis rails clean and free of dust.
- Apply a small amount of lubricant to the linear rails and lead screws periodically to ensure smooth movement.
5. പ്രശ്നപരിഹാരം
This section addresses common issues you might encounter with your Voxelab Aquila D1 3D Printer.
- Q: Why is it difficult to clean the PEI platform when printing PETG?
- A: PETG has a unique stickiness that can damage the PEI coating and affect the platform's lifespan. It is recommended to print on the backside of the platform when using PETG.
- Q: What should I do if the printed model appears to be offset?
- A: 1. Check the tightness of the synchronous belt to ensure it is correctly fitted.
2. Re-slice the model.
3. Reduce the printing speed.
4. Ensure the working environment temperature is between 15-30°C. - Q: What should I do if the filament does not come out when printing?
- A: 1. Shorten the retraction length to avoid wear and tear.
2. Make sure that the nozzle is not clogged. If it is, use a needle to clear it.
3. Make sure the filament feed wheel is not stuck. If it is, please clean it up. - Q: What should I do if the screen turns black?
- A: 1. Re-plug the screen cable to see if the screen can be restored to normal.
2. Refresh the firmware to see if the screen can return to normal.
3. ഉപഭോക്തൃ പിന്തുണയുമായി ബന്ധപ്പെടുക.
6 സ്പെസിഫിക്കേഷനുകൾ
Detailed technical specifications for the Voxelab Aquila D1 3D Printer.

Image: The Voxelab Aquila D1 3D Printer with its overall dimensions labeled: 17.3 inches (width), 18.5 inches (depth), and 20.1 inches (height).
| ഫീച്ചർ | വിശദാംശങ്ങൾ |
|---|---|
| മോഡൽ | Voxelab Aquila D1 |
| ബിൽഡ് വോളിയം | 235 x 235 x 250 മിമി (9.3" x 9.3" x 9.8") |
| പ്രിൻ്റിംഗ് ടെക്നോളജി | FDM (ഫ്യൂസ്ഡ് ഡിപ്പോസിഷൻ മോഡലിംഗ്) |
| എക്സ്ട്രൂഡർ അളവ് | 1 |
| പാളി കനം | 0.1 മിമി - 0.4 മിമി |
| നോസൽ വ്യാസം | Standard 0.4mm, optional 0.6mm |
| പ്രിൻ്റിംഗ് പ്രിസിഷൻ | ± 0.02 മി.മീ |
| ഫിലമെൻ്റ് വ്യാസം | 1.75 mm (PLA, PETG, TPU95A, ABS, HIPS, ASA) |
| പിന്തുണച്ചു File ഫോർമാറ്റ് | STL, OBJ, AMF |
| കണക്റ്റിവിറ്റി | മെമ്മറി കാർഡ് ഓഫ്ലൈൻ പ്രിന്റിംഗ് അല്ലെങ്കിൽ ഓൺലൈൻ പ്രിന്റിംഗ് |
| അനുയോജ്യമായ സ്ലൈസിംഗ് സോഫ്റ്റ്വെയർ | VoxelMaker / Cura / Simplify 3D |
| പവർ സ്പെസിഫിക്കേഷൻ | Input: AC100-120V~8A; 200-240V~3.4A Output: DC24V~14.6A 350W |
| മൊത്തം പവർ | 350W |
| ഹോട്ട്ബെഡ് താപനില | ≤110°C |
| നോസൽ താപനില | ≤300°C |
| പവർ ലോസ് റിക്കവറി | അതെ |
| ഭാഷാ സ്വിച്ച് | En/Cn/De/Fr/Es/Ru |
| പിന്തുണയ്ക്കുന്ന ഓപ്പറേറ്റിംഗ് സിസ്റ്റം | Windows 7/10 / Mac OS / Linux |
| പ്രിൻ്റിംഗ് സ്പീഡ് | 10-180mm/s, 50-100mm/s normally |
| ഉൽപ്പന്ന അളവുകൾ | 17.3 x 18.5 x 20.1 ഇഞ്ച് |
| ഇനത്തിൻ്റെ ഭാരം | 29.1 പൗണ്ട് |
| മെറ്റീരിയൽ | ലോഹം |
7. ഉൽപ്പന്നം കഴിഞ്ഞുview വീഡിയോ
വീഡിയോ: ഒരു ഉദ്യോഗസ്ഥൻview of the Voxelab Aquila D1 3D Printer, showcasing its main features, assembly steps, and printing capabilities. This video provides a visual demonstration of the printer's design and functionality.
8. വാറൻ്റിയും പിന്തുണയും
For warranty information, please refer to the documentation included with your product or visit the official Voxelab website. For technical support, troubleshooting assistance, or to report issues, please contact Voxelab customer service.
Voxelab Support: https://www.voxelab3dp.com