1. ആമുഖം
വാങ്ങിയതിന് നന്ദി.asing the MUSE Dual Alarm Clock Radio PLL M-186CMR. This device combines a digital clock, dual alarm functions, and a PLL FM/AM radio into a compact unit, ideal for your bedroom or office. This manual provides detailed instructions for setup, operation, and maintenance to ensure optimal performance and longevity of your device. Please read this manual thoroughly before use and retain it for future reference.
2. പ്രധാന സുരക്ഷാ നിർദ്ദേശങ്ങൾ
വൈദ്യുതാഘാതം, തീപിടുത്തം അല്ലെങ്കിൽ പരിക്ക് എന്നിവയുടെ അപകടസാധ്യത കുറയ്ക്കുന്നതിന്, എല്ലായ്പ്പോഴും ഈ അടിസ്ഥാന സുരക്ഷാ മുൻകരുതലുകൾ പാലിക്കുക:
- ഉപകരണം പ്രവർത്തിപ്പിക്കുന്നതിന് മുമ്പ് എല്ലാ നിർദ്ദേശങ്ങളും വായിക്കുക.
- ഈ ഉപകരണം മഴയിലോ ഈർപ്പത്തിലോ തുറന്നുകാട്ടരുത്.
- വെള്ളത്തിനടുത്ത് ഈ ഉപകരണം ഉപയോഗിക്കരുത്.
- ഉണങ്ങിയ തുണി ഉപയോഗിച്ച് മാത്രം വൃത്തിയാക്കുക.
- വെന്റിലേഷൻ തുറസ്സുകളൊന്നും തടയരുത്. നിർമ്മാതാവിന്റെ നിർദ്ദേശങ്ങൾക്കനുസൃതമായി ഇൻസ്റ്റാൾ ചെയ്യുക.
- റേഡിയറുകൾ, ഹീറ്റ് രജിസ്റ്ററുകൾ, സ്റ്റൗകൾ, അല്ലെങ്കിൽ മറ്റ് ഉപകരണങ്ങൾ (ഉൾപ്പെടെ) പോലെയുള്ള താപ സ്രോതസ്സുകൾക്ക് സമീപം ഇൻസ്റ്റാൾ ചെയ്യരുത്. ampലൈഫയറുകൾ) ചൂട് ഉത്പാദിപ്പിക്കുന്നത്.
- പവർ കോർഡ് നടക്കാനോ നുള്ളിയെടുക്കാനോ സംരക്ഷിക്കുക, പ്രത്യേകിച്ചും പ്ലഗുകൾ, സ re കര്യപ്രദമായ റെസപ്റ്റാക്കലുകൾ, അവർ ഉപകരണത്തിൽ നിന്ന് പുറത്തുകടക്കുന്ന സ്ഥലം.
- നിർമ്മാതാവ് വ്യക്തമാക്കിയ അറ്റാച്ച്മെൻ്റുകൾ/ആക്സസറികൾ മാത്രം ഉപയോഗിക്കുക.
- മിന്നൽ കൊടുങ്കാറ്റുകളുടെ സമയത്തോ ദീർഘനേരം ഉപയോഗിക്കാത്ത സമയത്തോ ഈ ഉപകരണം അൺപ്ലഗ് ചെയ്യുക.
- എല്ലാ സേവനങ്ങളും യോഗ്യതയുള്ള സേവന ഉദ്യോഗസ്ഥരെ ഏൽപ്പിക്കുക. വൈദ്യുതി വിതരണ ചരട് അല്ലെങ്കിൽ പ്ലഗ് കേടായപ്പോൾ, ദ്രാവകം തെറിച്ചുവീണപ്പോൾ അല്ലെങ്കിൽ വസ്തുക്കൾ ഉപകരണത്തിൽ വീണപ്പോൾ, ഉപകരണം മഴയിലോ ഈർപ്പത്തിലോ സമ്പർക്കത്തിൽ വന്നപ്പോൾ, ഉപകരണം സാധാരണയായി പ്രവർത്തിക്കാത്തപ്പോൾ, അല്ലെങ്കിൽ താഴെ വീണപ്പോൾ എന്നിങ്ങനെ ഏതെങ്കിലും വിധത്തിൽ ഉപകരണത്തിന് കേടുപാടുകൾ സംഭവിച്ചപ്പോൾ സേവനം ആവശ്യമാണ്.
3. സജ്ജീകരണം
3.1 അൺപാക്കിംഗ്
Carefully remove the unit from its packaging. Inspect the unit for any signs of damage. Ensure all components are present: the main unit and power adapter.
3.2 പവർ കണക്ഷൻ
This device operates on AC power. Connect the provided power adapter to the DC input jack on the back of the unit, then plug the adapter into a standard wall outlet (AC 230V ~ 50Hz). The unit will power on and the display will illuminate.
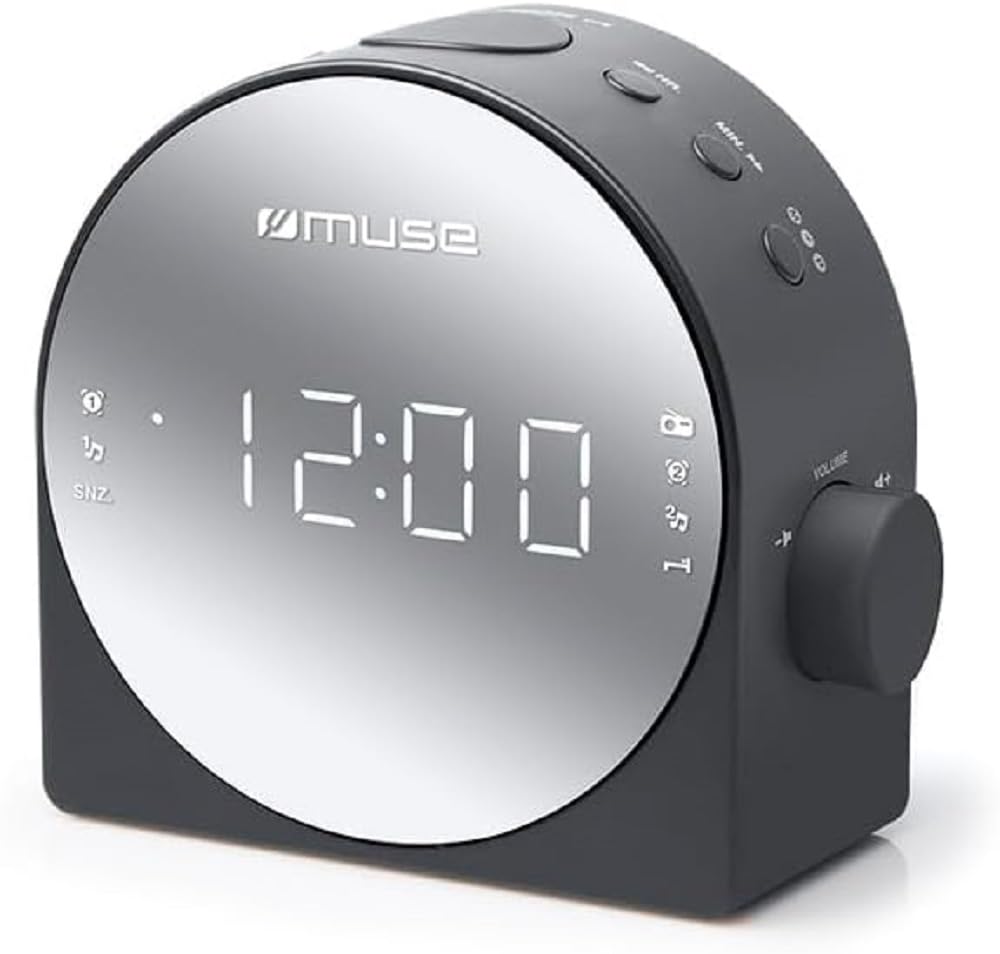
ചിത്രം 1: മുൻഭാഗം view of the MUSE M-186CMR, showing the digital display and control buttons.
3.3 Battery Backup (Not Included)
പവർ ഔട്ട്പുട്ട് സമയത്ത് സമയ, അലാറം ക്രമീകരണ ബാക്കപ്പിനായി യൂണിറ്റിന് 2 x AAA ബാറ്ററികൾ (ഉൾപ്പെടുത്തിയിട്ടില്ല) ആവശ്യമാണ്.tage. Insert the batteries into the battery compartment located on the bottom of the unit, observing the correct polarity (+/-). These batteries do not power the unit for normal operation but preserve settings.
3.4 ആന്റിന സജ്ജീകരണം
For optimal FM radio reception, fully extend the built-in wire antenna. For AM reception, the unit has a built-in ferrite bar antenna. Rotate the unit for the best AM reception.
4. ഓപ്പറേഷൻ
4.1 സമയം ക്രമീകരിക്കുന്നു
- അമർത്തിപ്പിടിക്കുക ടൈം സെറ്റ് ബട്ടൺ. മണിക്കൂർ അക്കങ്ങൾ മിന്നുന്നു.
- അമർത്തുക മണിക്കൂർ മണിക്കൂർ ക്രമീകരിക്കാൻ ആവർത്തിച്ച് ബട്ടൺ അമർത്തുക.
- അമർത്തുക മിനിറ്റ് മിനിറ്റ് ക്രമീകരിക്കാൻ ആവർത്തിച്ച് ബട്ടൺ അമർത്തുക.
- അമർത്തുക ടൈം സെറ്റ് വീണ്ടും സ്ഥിരീകരിച്ച് സമയ ക്രമീകരണ മോഡിൽ നിന്ന് പുറത്തുകടക്കുക.
4.2 അലാറങ്ങൾ സജ്ജീകരിക്കൽ (അലാറം 1 & അലാറം 2)
This unit features two independent alarms.
- അമർത്തിപ്പിടിക്കുക അലാറം 1 സെറ്റ് (അല്ലെങ്കിൽ അലാറം 2 സെറ്റ്) button. The alarm hour digits will flash.
- അമർത്തുക മണിക്കൂർ ആവശ്യമുള്ള അലാറം മണിക്കൂർ സജ്ജമാക്കാൻ ബട്ടൺ.
- അമർത്തുക മിനിറ്റ് ആവശ്യമുള്ള അലാറം മിനിറ്റ് സജ്ജീകരിക്കുന്നതിനുള്ള ബട്ടൺ.
- അമർത്തുക അലാറം 1 സെറ്റ് (അല്ലെങ്കിൽ അലാറം 2 സെറ്റ്) again to confirm the time.
- സമയം സജ്ജീകരിച്ച ഉടനെ, അമർത്തുക ALARM 1 MODE (അല്ലെങ്കിൽ ALARM 2 MODE) button repeatedly to select the alarm source: ബസർ, റേഡിയോ, അല്ലെങ്കിൽ ഓഫ്. The corresponding indicator will light up on the display.
4.3 റേഡിയോ പ്രവർത്തനം
4.3.1 Turning On/Off and Band Selection
- അമർത്തുക റേഡിയോ ഓൺ/ഓഫ് റേഡിയോ ഓണാക്കാനുള്ള ബട്ടൺ.
- അമർത്തുക ബാൻഡ് FM, AM ബാൻഡുകൾക്കിടയിൽ മാറാനുള്ള ബട്ടൺ.
- അമർത്തുക റേഡിയോ ഓൺ/ഓഫ് again to turn the radio off.
4.3.2 മാനുവൽ ട്യൂണിംഗ്
- റേഡിയോ ഓണായിരിക്കുമ്പോൾ, അമർത്തുക ട്യൂൺ + or ട്യൂൺ - ഘട്ടം ഘട്ടമായി ഫ്രീക്വൻസി ക്രമീകരിക്കാൻ ബട്ടണുകൾ ചുരുക്കമായി അമർത്തുക.
4.3.3 Auto Scan Tuning
- While the radio is on, press and hold the ട്യൂൺ + or ട്യൂൺ - buttons for a few seconds. The radio will automatically scan for the next available station.
4.3.4 Setting and Recalling Presets
The unit can store a number of radio stations as presets.
- Tune to your desired station using manual or auto scan tuning.
- അമർത്തിപ്പിടിക്കുക പ്രീസെറ്റ് സെറ്റ് ബട്ടൺ. പ്രീസെറ്റ് നമ്പർ ഫ്ലാഷ് ചെയ്യും.
- അമർത്തുക പ്രീസെറ്റ് + or പ്രീസെറ്റ് - ആവശ്യമുള്ള പ്രീസെറ്റ് നമ്പർ തിരഞ്ഞെടുക്കാൻ ബട്ടണുകൾ ഉപയോഗിക്കുക (ഉദാ. P01, P02).
- അമർത്തുക പ്രീസെറ്റ് സെറ്റ് തിരഞ്ഞെടുത്ത പ്രീസെറ്റിലേക്ക് സ്റ്റേഷൻ സംരക്ഷിക്കാൻ വീണ്ടും.
- ഒരു പ്രീസെറ്റ് സ്റ്റേഷൻ തിരിച്ചുവിളിക്കാൻ, ഹ്രസ്വമായി അമർത്തുക പ്രീസെറ്റ് + or പ്രീസെറ്റ് - ബട്ടണുകൾ.
4.4 Snooze and Sleep Function
4.4.1 സ്നൂസ് ചെയ്യുക
- അലാറം മുഴങ്ങുമ്പോൾ, അമർത്തുക സ്നൂസ് ചെയ്യുക ബട്ടൺ. അലാറം താൽക്കാലികമായി നിലയ്ക്കുകയും ഏകദേശം 9 മിനിറ്റിനുശേഷം വീണ്ടും മുഴങ്ങുകയും ചെയ്യും.
4.4.2 സ്ലീപ്പ് ടൈമർ
- റേഡിയോ ഓണായിരിക്കുമ്പോൾ, അമർത്തുക ഉറങ്ങുക button repeatedly to cycle through sleep timer options (e.g., 90, 60, 30, 15 minutes, OFF). The radio will automatically turn off after the selected time.
4.5 ഡിസ്പ്ലേ തെളിച്ചം
അമർത്തുക ഡിമ്മർ button repeatedly to adjust the brightness of the display to your preference (e.g., High, Medium, Low, Off).
5. പരിപാലനം
5.1 വൃത്തിയാക്കൽ
To clean the unit, wipe it with a soft, dry cloth. Do not use abrasive cleaners, waxes, or solvents as these may damage the surface. Ensure the unit is unplugged before cleaning.
5.2 സംഭരണം
If you plan to store the unit for an extended period, unplug it from the power outlet and remove the backup batteries. Store it in a cool, dry place away from direct sunlight and extreme temperatures.
6. പ്രശ്നപരിഹാരം
| പ്രശ്നം | സാധ്യമായ കാരണം | പരിഹാരം |
|---|---|---|
| യൂണിറ്റ് പവർ ഓണാക്കുന്നില്ല. | പവർ കോർഡ് ശരിയായി ബന്ധിപ്പിച്ചിട്ടില്ല. | പവർ അഡാപ്റ്റർ യൂണിറ്റിലേക്കും വാൾ ഔട്ട്ലെറ്റിലേക്കും സുരക്ഷിതമായി പ്ലഗ് ചെയ്തിട്ടുണ്ടെന്ന് ഉറപ്പാക്കുക. |
| റേഡിയോയിൽ നിന്ന് ശബ്ദമൊന്നുമില്ല. | Volume too low; incorrect band/station; poor reception. | Increase volume. Check if the correct band (FM/AM) is selected. Adjust antenna position or relocate the unit for better reception. |
| അലാറം മുഴങ്ങുന്നില്ല. | Alarm not set; alarm volume too low; alarm mode set to OFF. | Verify alarm time and mode (Buzzer/Radio) are correctly set. Ensure alarm volume is audible. |
| പവർ OU ന് ശേഷം സമയം/ക്രമീകരണങ്ങൾ പുനഃസജ്ജമാക്കുന്നുtage. | Backup batteries are missing or depleted. | ബാറ്ററി കമ്പാർട്ടുമെന്റിൽ പുതിയ AAA ബാറ്ററികൾ സ്ഥാപിക്കുക. |
| ഡിസ്പ്ലേ വളരെ മങ്ങിയതോ വളരെ തെളിച്ചമുള്ളതോ ആണ്. | ഡിസ്പ്ലേ തെളിച്ച ക്രമീകരണം ക്രമീകരിക്കേണ്ടതുണ്ട്. | അമർത്തുക ഡിമ്മർ തെളിച്ച നിലകളിലൂടെ സഞ്ചരിക്കാൻ ബട്ടൺ അമർത്തുക. |
7 സ്പെസിഫിക്കേഷനുകൾ
- മോഡൽ: M-186 CMR
- ഊർജ്ജ സ്രോതസ്സ്: AC 230V ~ 50Hz (Electric with cord)
- ബാറ്ററി ബാക്കപ്പ്: 2 x AAA ബാറ്ററികൾ (ഉൾപ്പെടുത്തിയിട്ടില്ല)
- റേഡിയോ ബാൻഡുകൾ: FM, AM (PLL Tuner)
- അലാറങ്ങൾ: Dual Alarm (Buzzer/Radio)
- ഡിസ്പ്ലേ: ഡിജിറ്റൽ LED
- പ്രത്യേക സവിശേഷതകൾ: Snooze, Sleep Timer, Dimmer
- അളവുകൾ (W x H x D): ഏകദേശം 11.6 x 5.6 x 11.58 സെ.മീ
- ഭാരം: ഏകദേശം 429 ഗ്രാം
- നിർമ്മാതാവ്: മ്യൂസ്
8. വാറൻ്റിയും പിന്തുണയും
This product is covered by a standard manufacturer's warranty. For detailed warranty information, please refer to the documentation provided with your purchase or contact your retailer. For technical support, service, or inquiries, please visit the official Muse webസൈറ്റ് അല്ലെങ്കിൽ അവരുടെ ഉപഭോക്തൃ സേവന വിഭാഗവുമായി ബന്ധപ്പെടുക.
വാറൻ്റി ക്ലെയിമുകൾക്കായി നിങ്ങളുടെ വാങ്ങിയതിൻ്റെ തെളിവ് സൂക്ഷിക്കുക.