1. ആമുഖം
This manual provides essential information for the safe and efficient operation of your Acekool Portable Air Conditioner. This 3-in-1 unit offers cooling, fan, and dehumidification functions, designed to provide comfort in various indoor environments. Please read this manual thoroughly before installation and use, and retain it for future reference.
2 സുരക്ഷാ വിവരങ്ങൾ
ഉപയോക്താവിന് അല്ലെങ്കിൽ മറ്റ് ആളുകൾക്കും വസ്തുവകകൾക്കും കേടുപാടുകൾ സംഭവിക്കാതിരിക്കാൻ, ഇനിപ്പറയുന്ന നിർദ്ദേശങ്ങൾ പാലിക്കണം. നിർദ്ദേശങ്ങൾ അവഗണിക്കുന്നതിനാൽ തെറ്റായ പ്രവർത്തനം ദോഷമോ നാശമോ ഉണ്ടാക്കാം.
- ഇലക്ട്രിക്കൽ സുരക്ഷ: Ensure the power supply matches the unit's requirements (220 Volts). Do not operate with a damaged power cord or plug. Do not share the electrical outlet with other appliances. Always unplug the unit before cleaning or servicing.
- റഫ്രിജറന്റ് (R290): This appliance contains R290 refrigerant, which is flammable. Keep the unit away from open flames, heat sources, and ignition sources. Do not puncture or burn the refrigerant circuit.
- പ്ലേസ്മെൻ്റ്: Place the unit on a flat, stable surface. Maintain a minimum distance of 20 cm from walls or other objects to ensure proper airflow. Do not block air inlets or outlets.
- കുട്ടികളും വളർത്തുമൃഗങ്ങളും: Keep children and pets away from the unit. Do not allow children to play with the appliance or its controls.
- വാട്ടർ ഡ്രെയിനേജ്: Ensure proper drainage of condensed water, especially during dehumidification mode, to prevent water overflow and damage.
- പരിപാലനം: ഈ മാനുവലിൽ വിവരിച്ചിരിക്കുന്നതുപോലെ മാത്രം അറ്റകുറ്റപ്പണികൾ നടത്തുക. അറ്റകുറ്റപ്പണികൾക്കായി, യോഗ്യതയുള്ള സേവന ഉദ്യോഗസ്ഥരെ ബന്ധപ്പെടുക.
3. ബോക്സിൽ എന്താണുള്ളത്?
Carefully unpack the box and ensure all items are present and undamaged. If any items are missing or damaged, contact customer support.
- Portable Air Conditioner Unit (x1)
- വിദൂര നിയന്ത്രണം (x1)
- Exhaust Hose (x1)
- Window Sealing Kit (x1)
- Drain Hose (x1)
- ഉപയോക്തൃ മാനുവൽ (x1)

Image: All components included in the product package, clearly labeled with numbers for identification.
4. സജ്ജീകരണം
മികച്ച പ്രകടനത്തിനായി നിങ്ങളുടെ പോർട്ടബിൾ എയർകണ്ടീഷണർ സജ്ജീകരിക്കാൻ ഈ ഘട്ടങ്ങൾ പാലിക്കുക.
4.1 യൂണിറ്റ് പ്ലേസ്മെന്റ്
- Place the unit on a firm, level surface in the desired room.
- Ensure there is at least 20 cm of space around the unit for proper air circulation.
- എക്സ്ഹോസ്റ്റ് ഹോസ് സ്ഥാപിക്കുന്നതിനായി യൂണിറ്റ് ഒരു ജനാലയ്ക്കോ വാതിലിനോ സമീപം സ്ഥാപിക്കുക.
4.2 എക്സ്ഹോസ്റ്റ് ഹോസ് ഇൻസ്റ്റാളേഷൻ
- Attach the exhaust hose connector to the back of the air conditioner unit.
- എക്സ്ഹോസ്റ്റ് ഹോസ് നീട്ടി വിൻഡോ കിറ്റ് അഡാപ്റ്റർ മറ്റേ അറ്റത്ത് ഘടിപ്പിക്കുക.
- നിങ്ങളുടെ ജനൽ തുറക്കലിന് അനുയോജ്യമായ രീതിയിൽ ജനൽ സീലിംഗ് പ്ലേറ്റ് ക്രമീകരിക്കുക. അത് സ്ഥലത്ത് ഉറപ്പിക്കുക.
- വിൻഡോ സീലിംഗ് പ്ലേറ്റിന്റെ ഓപ്പണിംഗിൽ വിൻഡോ കിറ്റ് അഡാപ്റ്റർ തിരുകുക.
- Ensure the exhaust hose is as straight and short as possible to maximize efficiency. Avoid kinks or sharp bends.

Image: Visual instructions demonstrating the process of connecting the exhaust hose to the unit and installing it in a window.

ചിത്രം: വിശദമായത് view of the exhaust hose connection points, highlighting the ease of installation.
4.3 പവർ കണക്ഷൻ
Plug the power cord into a grounded electrical outlet (220V). Do not use extension cords or adapters.
5. പ്രവർത്തന നിർദ്ദേശങ്ങൾ
Your Acekool Portable Air Conditioner can be operated using the control panel on the unit or the included remote control.
5.1 കൺട്രോൾ പാനൽ ഓവർview
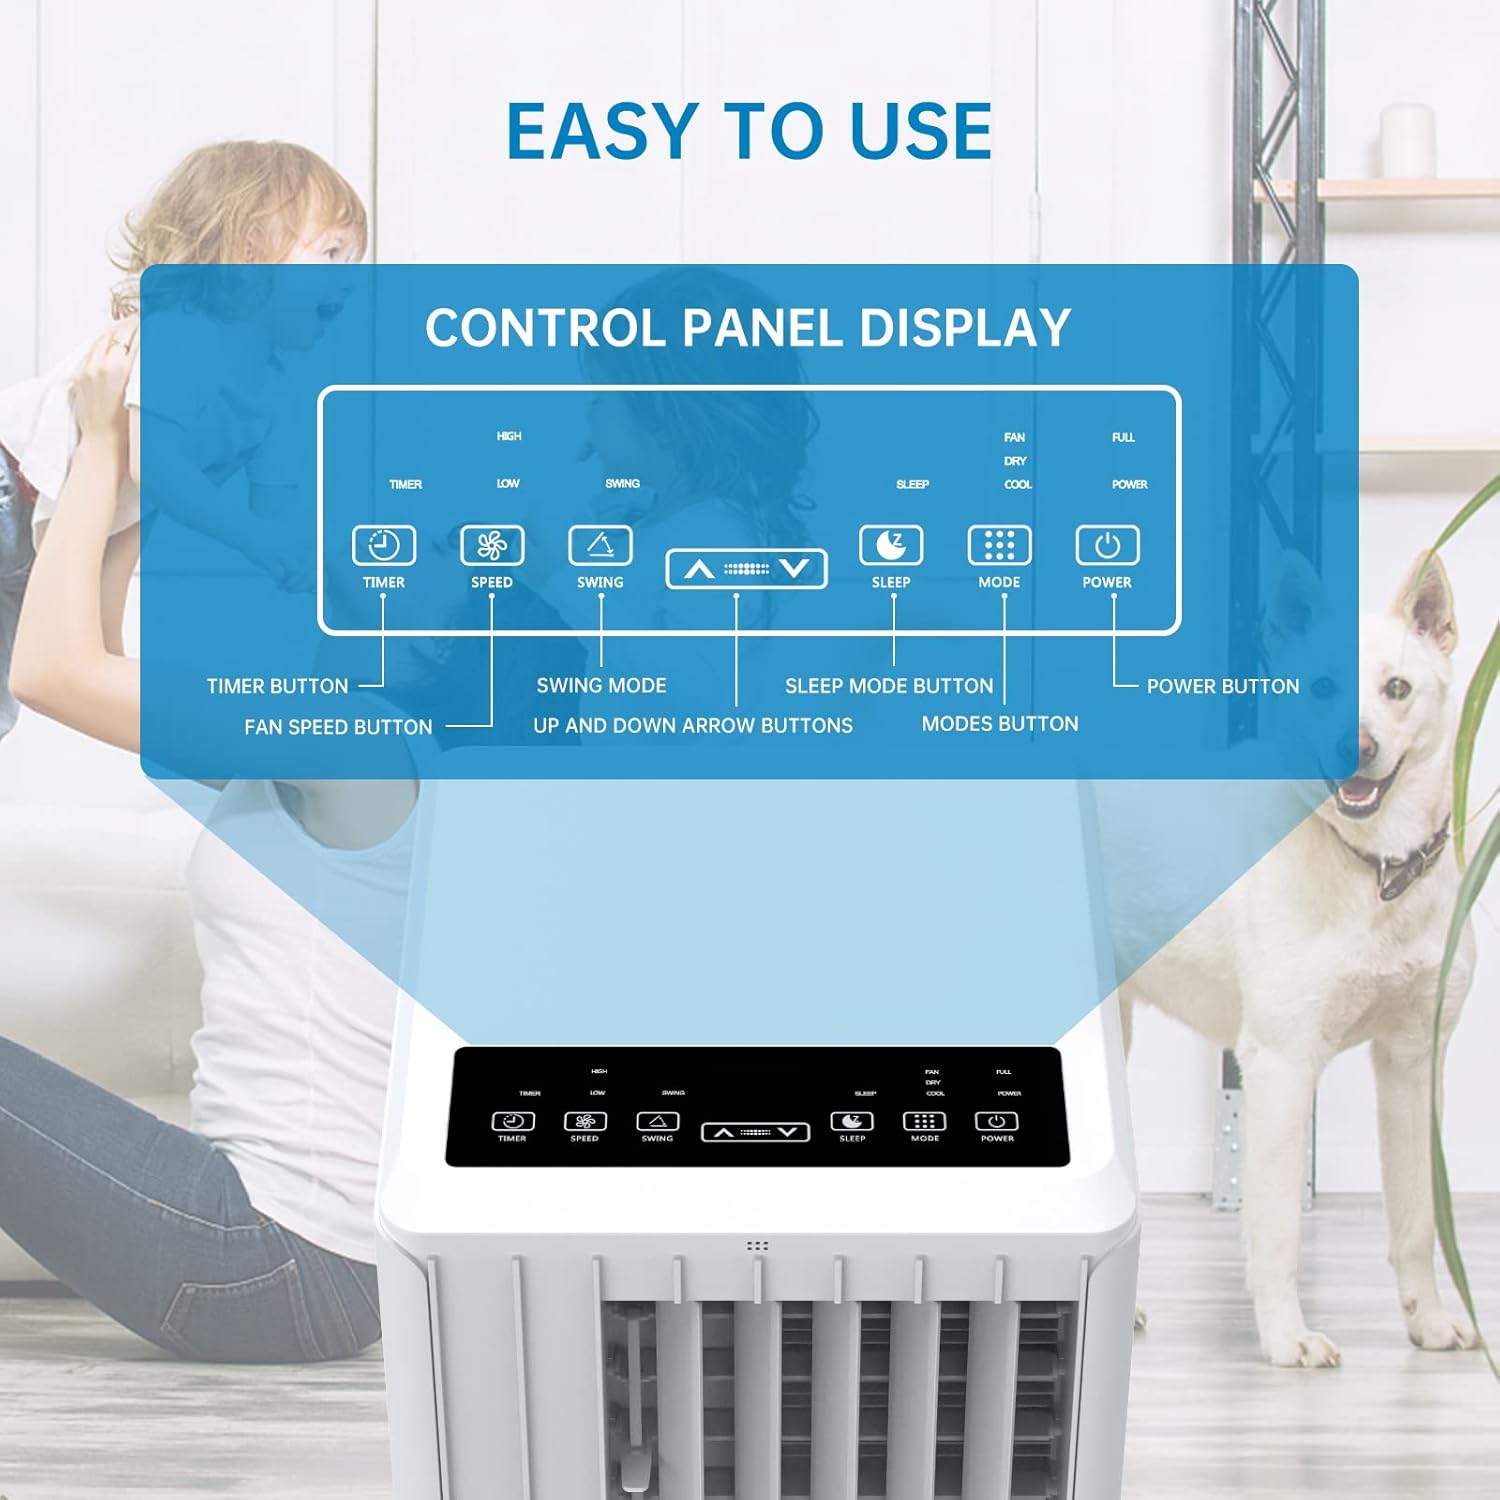
Image: A detailed diagram illustrating the control panel buttons and their functions, including Timer, Speed, Swing, Sleep, Mode, and Power.

Image: A user interacting with the touch-sensitive control panel, demonstrating its intuitive design.
- പവർ ബട്ടൺ: യൂണിറ്റ് ഓണാക്കുകയോ ഓഫാക്കുകയോ ചെയ്യുന്നു.
- മോഡ് ബട്ടൺ: കൂളിംഗ്, ഫാൻ, ഡീഹ്യുമിഡിഫിക്കേഷൻ മോഡുകൾ വഴിയുള്ള സൈക്കിൾസ്.
- സ്പീഡ് ബട്ടൺ: ഫാൻ വേഗത ക്രമീകരിക്കുന്നു (കുറഞ്ഞ, ഇടത്തരം, ഉയർന്ന).
- ടൈമർ ബട്ടൺ: Sets the auto ON/OFF timer (up to 24 hours).
- സ്വിംഗ് ബട്ടൺ: വിശാലമായ വായു വിതരണത്തിനായി ഓട്ടോമാറ്റിക് ലൂവർ സ്വിംഗ് സജീവമാക്കുകയോ നിർജ്ജീവമാക്കുകയോ ചെയ്യുന്നു.
- മുകളിലേക്കും താഴേക്കുമുള്ള അമ്പടയാളങ്ങൾ: Adjusts temperature settings or timer duration.
- സ്ലീപ്പ് ബട്ടൺ: Activates Sleep Mode for quiet operation and energy saving during sleep.
5.2 വിദൂര നിയന്ത്രണം
The remote control provides convenient operation from a distance. Ensure there are no obstructions between the remote and the unit's receiver.

Image: The portable air conditioner unit alongside its remote control, demonstrating the convenience of remote operation and the air swing feature.
5.3 ഓപ്പറേറ്റിംഗ് മോഡുകൾ
The unit offers three primary operating modes:

Image: A graphic illustrating the three distinct modes of operation: Cooling, Dehumidifying, and Fan, with their respective visual effects.
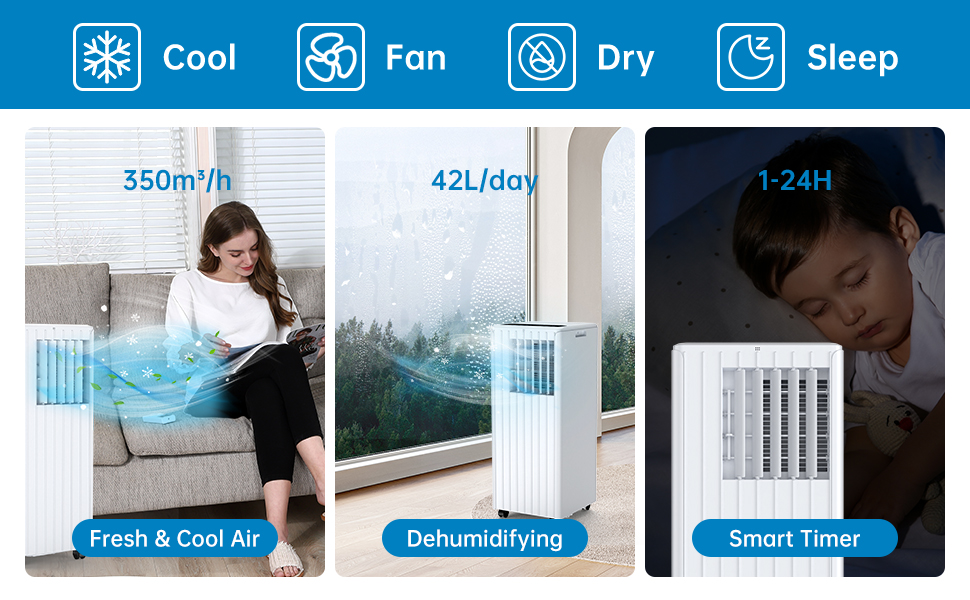
Image: A comprehensive display of the unit's modes, including cooling, fan, dry (dehumidifying), and sleep, along with performance metrics.
- കൂളിംഗ് മോഡ്: Provides powerful cooling. Set your desired temperature using the Up/Down arrows. The unit will cool until the room reaches the set temperature.
- ഫാൻ മോഡ്: Circulates air without cooling. Choose from Low, Medium, or High fan speeds.
- ഡീഹ്യുമിഡിഫിക്കേഷൻ മോഡ്: Removes excess moisture from the air. The unit will operate at a low fan speed. Ensure the continuous drainage hose is connected for prolonged use in this mode.
5.4 സ്ലീപ്പ് മോഡ്
Activate Sleep Mode for quiet operation and energy efficiency during nighttime. In this mode, the fan speed is reduced, and the temperature may gradually increase to ensure comfortable sleep.

Image: The portable air conditioner in a bedroom setting, illustrating its quiet operation and features like automatic shut-off and 24-hour smart timer for undisturbed sleep.

Image: A graph depicting the temperature adjustment curve in Sleep Mode, showing how the temperature gradually rises over several hours to maintain comfort.
6. പരിപാലനം
പതിവ് അറ്റകുറ്റപ്പണികൾ നിങ്ങളുടെ എയർകണ്ടീഷണറിന്റെ ദീർഘായുസ്സും കാര്യക്ഷമമായ പ്രവർത്തനവും ഉറപ്പാക്കുന്നു.
6.1 എയർ ഫിൽറ്റർ ക്ലീനിംഗ്
ഉപയോഗവും വായുവിന്റെ ഗുണനിലവാരവും അനുസരിച്ച് എയർ ഫിൽറ്റർ രണ്ടാഴ്ച കൂടുമ്പോഴോ അതിൽ കൂടുതലോ തവണ വൃത്തിയാക്കണം. വൃത്തികെട്ട ഫിൽറ്റർ തണുപ്പിക്കൽ കാര്യക്ഷമതയും വായുപ്രവാഹവും കുറയ്ക്കും.
- പവർ ഔട്ട്ലെറ്റിൽ നിന്ന് യൂണിറ്റ് അൺപ്ലഗ് ചെയ്യുക.
- യൂണിറ്റിന്റെ പിൻഭാഗത്തോ വശത്തോ നിന്ന് എയർ ഫിൽട്ടർ കണ്ടെത്തി നീക്കം ചെയ്യുക.
- Wash the filter under running water (warm, not hot) or use a vacuum cleaner to remove dust.
- Allow the filter to dry completely before reinserting it into the unit. Do not expose to direct sunlight.

ചിത്രം: ഒരു ക്ലോസ്-അപ്പ് view of the washable filter being easily removed from the unit for maintenance.
6.2 വാട്ടർ ഡ്രെയിനേജ്
The unit has an internal water collection tank. When the tank is full, the unit will stop operating and display an indicator. You will need to drain the water manually.
- യൂണിറ്റ് അൺപ്ലഗ് ചെയ്യുക.
- Place a shallow pan or bucket under the drainage outlet at the bottom rear of the unit.
- Remove the drainage plug and allow the water to drain completely.
- Replace the drainage plug firmly.
For continuous drainage in dehumidification mode, connect the provided drain hose to the continuous drainage outlet.
6.3 പൊതുവായ ശുചീകരണം
ഒരു സോഫ്റ്റ്, ഡി ഉപയോഗിച്ച് യൂണിറ്റിൻ്റെ പുറംഭാഗം തുടയ്ക്കുകamp തുണി. കഠിനമായ രാസവസ്തുക്കളോ, ഉരച്ചിലുകളോ, ലായകങ്ങളോ ഉപയോഗിക്കരുത്.
6.4 സംഭരണം
യൂണിറ്റ് ദീർഘകാലത്തേക്ക് സൂക്ഷിക്കുന്നതിന് മുമ്പ്:
- കണ്ടൻസ് ചെയ്ത വെള്ളം മുഴുവൻ ഊറ്റി കളയുക.
- എയർ ഫിൽട്ടർ വൃത്തിയാക്കുക.
- പവർ കോർഡ് ഊരി വൃത്തിയായി ചുരുട്ടുക.
- നേരിട്ടുള്ള സൂര്യപ്രകാശത്തിൽ നിന്നും തീവ്രമായ താപനിലയിൽ നിന്നും അകന്ന്, വരണ്ടതും തണുത്തതുമായ സ്ഥലത്ത് യൂണിറ്റ് സൂക്ഷിക്കുക.
7. പ്രശ്നപരിഹാരം
നിങ്ങളുടെ എയർ കണ്ടീഷണറിൽ പ്രശ്നങ്ങൾ നേരിടുകയാണെങ്കിൽ, പൊതുവായ പ്രശ്നങ്ങളും പരിഹാരങ്ങളും അറിയാൻ താഴെയുള്ള പട്ടിക പരിശോധിക്കുക.
| പ്രശ്നം | സാധ്യമായ കാരണം | പരിഹാരം |
|---|---|---|
| യൂണിറ്റ് ഓണാക്കുന്നില്ല | വൈദ്യുതി വിതരണം ഇല്ല വാട്ടർ ടാങ്ക് നിറഞ്ഞു ഓവർഹീറ്റ് സംരക്ഷണം സജീവമാക്കി | പവർ പ്ലഗും ഔട്ട്ലെറ്റും പരിശോധിക്കുക വാട്ടർ ടാങ്ക് കളയുക യൂണിറ്റ് 30 മിനിറ്റ് തണുപ്പിക്കാൻ അനുവദിക്കുക. |
| അപര്യാപ്തമായ തണുപ്പിക്കൽ | എയർ ഫിൽട്ടർ വൃത്തികെട്ടതാണ് Exhaust hose blocked or kinked മുറിയുടെ വലിപ്പം വളരെ വലുതാണ് ജനാലകൾ/വാതിലുകൾ തുറന്നിരിക്കുന്നു താപനില ക്രമീകരണം വളരെ ഉയർന്നതാണ് | ശുദ്ധമായ എയർ ഫിൽട്ടർ എക്സ്ഹോസ്റ്റ് ഹോസ് പരിശോധിച്ച് വൃത്തിയാക്കുക മുറിയുടെ വലുപ്പത്തിന് യൂണിറ്റ് അനുയോജ്യമാണെന്ന് ഉറപ്പാക്കുക. എല്ലാ ജാലകങ്ങളും വാതിലുകളും അടയ്ക്കുക സെറ്റ് താപനില കുറയ്ക്കുക |
| വെള്ളം ചോർച്ച | ഡ്രെയിൻ പ്ലഗ് അഴിച്ചു യൂണിറ്റ് ലെവലല്ല Continuous drain hose improperly connected | സുരക്ഷിതമായ ഡ്രെയിൻ പ്ലഗ് ഒരു ലെവൽ പ്രതലത്തിൽ യൂണിറ്റ് സ്ഥാപിക്കുക Ensure drain hose is properly attached and sloped downwards |
| യൂണിറ്റ് ശബ്ദമയമാണ് | യൂണിറ്റ് നിരപ്പായ പ്രതലത്തിലല്ല. ആന്തരിക ഘടകങ്ങൾ വൈബ്രേറ്റ് ചെയ്യുന്നു | യൂണിറ്റ് ഒരു പരന്നതും സ്ഥിരതയുള്ളതുമായ പ്രതലത്തിൽ സ്ഥാപിക്കുക This may be normal operation noise, especially at high fan speeds. Ensure no obstructions. |
| റിമോട്ട് കൺട്രോൾ പ്രവർത്തിക്കുന്നില്ല | ബാറ്ററികൾ ഡെഡ് അല്ലെങ്കിൽ തെറ്റായി ചേർത്തിരിക്കുന്നു റിമോട്ടിനും യൂണിറ്റിനും ഇടയിലുള്ള തടസ്സം | ബാറ്ററികൾ മാറ്റി സ്ഥാപിക്കുക, പോളാരിറ്റി പരിശോധിക്കുക Remove any obstructions, ensure direct line of sight |
8 സ്പെസിഫിക്കേഷനുകൾ
Technical specifications for the Acekool Portable Air Conditioner Model PAC-M09.
| ഫീച്ചർ | സ്പെസിഫിക്കേഷൻ |
|---|---|
| മോഡൽ നമ്പർ | PAC-M09 |
| ബ്രാൻഡ് | അസെക്കൂൾ |
| തണുപ്പിക്കൽ ശേഷി | 9000 ബി.ടി.യു |
| റഫ്രിജറൻ്റ് | R290 |
| വൈദ്യുതി വിതരണം | 220 വോൾട്ട് |
| പരമാവധി ശബ്ദ നില | 55 ഡിബി(എ) |
| ഉൽപ്പന്ന അളവുകൾ (L x W x H) | 38.2 x 35 x 88.5 സെ.മീ |
| ഉൽപ്പന്ന ഭാരം | 26 കി.ഗ്രാം |
| നിർജ്ജലീകരണ ശേഷി | 42 എൽ/ദിവസം |
| ഊർജ്ജ കാര്യക്ഷമത റേറ്റിംഗ് | ക്ലാസ് എ |
| SEER | 2.8 |
| ശുപാർശ ചെയ്യുന്ന കവറേജ് ഏരിയ | 30-40 m² |
9. വാറൻ്റിയും പിന്തുണയും
For warranty information, technical support, or service inquiries, please refer to the warranty card included with your product or contact Acekool customer service through their official website or the retailer where the product was purchased. Please have your model number (PAC-M09) and purchase date ready when contacting support.