
1. ആമുഖം
വാങ്ങിയതിന് നന്ദി.asing the Akozon Portable DV Camcorder. This manual provides essential information for the safe and effective operation of your device. Please read it thoroughly before use and retain it for future reference.
This camcorder is designed for capturing video and still images, featuring a 1080P video resolution, 16MP photo capability, a 2.7-inch rotating TFT screen, and 16x digital zoom. It is suitable for various recording scenarios, including family events, travel, and personal vlogging.
2. ഉൽപ്പന്നം കഴിഞ്ഞുview
2.1 പ്രധാന സവിശേഷതകൾ
- വീഡിയോ മിഴിവ്: 1080P (1920x1080), HD (1280x720), 640x480
- ചിത്ര മിഴിവ്: 16MP (4608x3456), 12MP, 5MP, 1MP, VGA
- ഡിസ്പ്ലേ: 2.7-inch TFT rotating screen
- സൂം: 16x ഡിജിറ്റൽ സൂം
- സംഭരണം: 32GB വരെ മൈക്രോ SD കാർഡ് പിന്തുണയ്ക്കുന്നു (ഉൾപ്പെടുത്തിയിട്ടില്ല)
- കണക്റ്റിവിറ്റി: USB port for PC connection and charging
- പ്രത്യേക സവിശേഷതകൾ: Selfie fill light, self-timer (2s/10s), built-in speakers, HD output, recording while charging
2.2 പാക്കേജ് ഉള്ളടക്കം
- Akozon Portable DV Camcorder
- ലിഥിയം ബാറ്ററി (1020mAh)
- USB കേബിൾ
- റിസ്റ്റ് സ്ട്രാപ്പ്
- ഉപയോക്തൃ മാനുവൽ (ഈ പ്രമാണം)
2.3 Camcorder Components

Figure 2.3.1: Akozon Portable DV Camcorder with included battery and USB cable. This image shows the camcorder, a rechargeable battery, and a USB charging cable, providing a complete view of the product and its essential accessories.
- Video Lens: Main lens for capturing images and videos.
- 2.7-inch TFT Rotating Screen: വേണ്ടി viewing, playback, and menu navigation. Can be rotated for selfie mode.
- Selfie Fill Light: Provides additional illumination for close-up shots and selfies.
- പവർ ബട്ടൺ: To turn the camcorder on or off.
- റെക്കോർഡ്/ഷട്ടർ ബട്ടൺ: To start/stop video recording or take a photo.
- സൂം നിയന്ത്രണങ്ങൾ: For digital zoom in/out.
- മെനു ബട്ടൺ: To access settings and options.
- നാവിഗേഷൻ ബട്ടണുകൾ: For moving through menus and selections.
- USB പോർട്ട്: ചാർജ് ചെയ്യുന്നതിനും കമ്പ്യൂട്ടറിലേക്ക് കണക്റ്റുചെയ്യുന്നതിനും.
- ബാറ്ററി കമ്പാർട്ട്മെൻ്റ്: Houses the rechargeable lithium battery.
- മൈക്രോ എസ്ഡി കാർഡ് സ്ലോട്ട്: മെമ്മറി കാർഡ് ഇടുന്നതിന്.

ചിത്രം 2.3.2: ക്ലോസപ്പ് view of the Akozon DV Camcorder's video lens. This image highlights the camcorder's lens, showing details like "VIDEO LENS" and "Aperture 5.0".
3. സജ്ജീകരണം
3.1 ബാറ്ററി ഇൻസ്റ്റാളേഷൻ
- Locate the battery compartment cover on the camcorder.
- കവർ തുറക്കുക.
- Insert the provided 1020mAh lithium battery, ensuring the correct polarity (+/-) as indicated inside the compartment.
- ബാറ്ററി കമ്പാർട്ട്മെൻ്റ് കവർ സുരക്ഷിതമായി അടയ്ക്കുക.
3.2 മെമ്മറി കാർഡ് ഇൻസ്റ്റലേഷൻ
The camcorder requires a Micro SD card (up to 32GB, not included) to store videos and photos.
- Locate the Micro SD card slot, usually near the battery compartment or on the side.
- Insert the Micro SD card with the gold contacts facing down (or as indicated by a diagram near the slot) until it clicks into place.
- To remove, gently push the card in until it clicks again, then release, and it will spring out.
കുറിപ്പ്: Ensure the camcorder is powered off before inserting or removing the memory card.
3.3 പ്രാരംഭ ചാർജിംഗ്
Before first use, fully charge the camcorder battery.
- Connect the small end of the USB cable to the camcorder's USB port.
- USB കേബിളിന്റെ വലിയ അറ്റം ഒരു USB പവർ അഡാപ്റ്ററുമായി (ഉൾപ്പെടുത്തിയിട്ടില്ല) അല്ലെങ്കിൽ ഒരു കമ്പ്യൂട്ടറിന്റെ USB പോർട്ടുമായി ബന്ധിപ്പിക്കുക.
- ചാർജിംഗ് ഇൻഡിക്കേറ്റർ ലൈറ്റ് പ്രകാശിക്കും. ചാർജിംഗ് പൂർത്തിയാകുമ്പോൾ അത് ഓഫാകും അല്ലെങ്കിൽ നിറം മാറും.
കുറിപ്പ്: The camcorder supports recording while charging.
4. പ്രവർത്തന നിർദ്ദേശങ്ങൾ
4.1 പവർ ഓൺ/ഓഫ്
- പവർ ഓണാക്കാൻ: സ്ക്രീൻ പ്രകാശിക്കുന്നത് വരെ പവർ ബട്ടൺ അമർത്തിപ്പിടിക്കുക.
- പവർ ഓഫ് ചെയ്യാൻ: സ്ക്രീൻ ഓഫാകും വരെ പവർ ബട്ടൺ അമർത്തിപ്പിടിക്കുക.
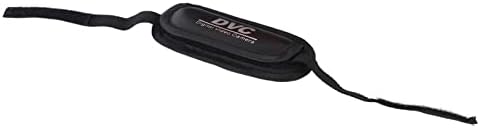
Figure 4.1.1: Akozon DV Camcorder screen displaying the 'Digital Camcorder' startup message. This image shows the camcorder's screen powered on, displaying the initial "Digital Camcorder" text.
4.2 വീഡിയോ റെക്കോർഡിംഗ്
- Ensure the camcorder is in video recording mode (check the icon on the screen). If not, use the Mode button (if available) or menu to switch.
- Frame your subject using the rotating TFT screen.
- Press the Record/Shutter button once to start recording. A red indicator or recording timer will appear on the screen.
- Press the Record/Shutter button again to stop recording. The video file മൈക്രോ എസ്ഡി കാർഡിൽ സേവ് ചെയ്യും.
4.3 ഫോട്ടോ എടുക്കൽ
- Ensure the camcorder is in photo capture mode.
- Frame your subject.
- Press the Record/Shutter button once to take a photo. The image will be saved to the Micro SD card.
4.4 Selfie Mode and Fill Light
The rotating screen allows for easy selfie capture. The front-facing fill light can be used for additional illumination.
- Rotate the TFT screen 180 degrees towards yourself.
- To activate the fill light, navigate to the menu settings or use a dedicated button (if available).
- Utilize the self-timer function (2 seconds or 10 seconds) for hands-free photo or video capture. Access this setting via the menu.

Figure 4.4.1: Akozon Portable DV Camcorder with rotating screen displaying a selfie. This image shows the camcorder's screen rotated, capturing a group selfie, demonstrating its selfie capability.
4.5 പ്ലേബാക്ക്
- Enter Playback mode via the Mode button or menu.
- Use the navigation buttons to browse through your recorded videos and photos.
- Press the Record/Shutter button (or a dedicated Play button) to view തിരഞ്ഞെടുത്തത് file.
4.6 Connecting to a Computer (PC Mode)
You can connect the camcorder to a computer to transfer files or use it as a PC camera.
- കാംകോർഡർ ഓണാണെന്ന് ഉറപ്പാക്കുക.
- Connect the camcorder to your computer using the provided USB cable.
- The camcorder screen may display options like "Mass Storage" (for file transfer) or "PC Camera". Select the desired mode using the navigation buttons and confirm.
- If "Mass Storage" is selected, the camcorder will appear as a removable drive on your computer, allowing you to copy files.
- If "PC Camera" is selected, the camcorder can be used as a webcam with compatible software.
5. പരിപാലനം
- വൃത്തിയാക്കൽ: Use a soft, dry cloth to clean the camcorder body. For the lens, use a specialized lens cleaning cloth and solution. Avoid harsh chemicals.
- സംഭരണം: നേരിട്ടുള്ള സൂര്യപ്രകാശത്തിൽ നിന്നും കടുത്ത താപനിലയിൽ നിന്നും അകന്ന് തണുത്തതും വരണ്ടതുമായ സ്ഥലത്ത് കാംകോർഡർ സൂക്ഷിക്കുക. കൂടുതൽ നേരം സൂക്ഷിച്ചാൽ ബാറ്ററി നീക്കം ചെയ്യുക.
- ബാറ്ററി കെയർ: Do not expose the battery to high temperatures or disassemble it. Recharge the battery regularly, even if not in use, to maintain its lifespan.
- മെമ്മറി കാർഡ്: Periodically back up your files from the Micro SD card to a computer or other storage device.
6. പ്രശ്നപരിഹാരം
| പ്രശ്നം | സാധ്യമായ കാരണം | പരിഹാരം |
|---|---|---|
| കാംകോർഡർ പവർ ഓൺ ചെയ്യുന്നില്ല. | ബാറ്ററി തീർന്നിരിക്കുന്നു അല്ലെങ്കിൽ തെറ്റായി ഇൻസ്റ്റാൾ ചെയ്തിരിക്കുന്നു. | ബാറ്ററി പൂർണ്ണമായും ചാർജ് ചെയ്യുക. ശരിയായ പോളാരിറ്റിയോടെ ബാറ്ററി ചേർത്തിട്ടുണ്ടെന്ന് ഉറപ്പാക്കുക. |
| വീഡിയോ റെക്കോർഡ് ചെയ്യാൻ/ഫോട്ടോ എടുക്കാൻ കഴിയില്ല. | മൈക്രോ എസ്ഡി കാർഡ് ചേർത്തിട്ടില്ല, കാർഡ് നിറഞ്ഞു, അല്ലെങ്കിൽ കാർഡ് പിശക്. | ഒരു മൈക്രോ എസ്ഡി കാർഡ് ഇടുക. അനാവശ്യമായത് ഇല്ലാതാക്കുക. files or replace the card. Format the card (this will erase all data). |
| Computer does not recognize camcorder via USB. | Incorrect USB mode selected, faulty cable, or driver issue. | Ensure "Mass Storage" or "PC Camera" mode is selected on the camcorder. Try a different USB port or cable. Restart both camcorder and computer. |
| മോശം ഇമേജ്/വീഡിയോ നിലവാരം. | Insufficient lighting, dirty lens, or incorrect settings. | Ensure adequate lighting. Clean the lens. Check resolution settings in the menu. |
7 സ്പെസിഫിക്കേഷനുകൾ
| ഫീച്ചർ | സ്പെസിഫിക്കേഷൻ |
|---|---|
| മോഡൽ നമ്പർ | Akozon3v6tcg2u7b-12 |
| ബ്രാൻഡ് | അകോസോൺ |
| ഇമേജ് സെൻസർ ടെക്നോളജി | CMOS |
| വീഡിയോ റെക്കോർഡിംഗ് റെസല്യൂഷൻ | 1080p (FHD), HD, 640x480 |
| Effective Capture Resolution | 16 മെഗാപിക്സലുകൾ |
| ഫ്ലാഷ് മെമ്മറി തരം | Micro SD (supports up to 32GB) |
| വീഡിയോ ക്യാപ്ചർ ഫോർമാറ്റ് | എ.വി.ഐ |
| ഇമേജ് ഫോർമാറ്റ് | JPEG |
| സ്ക്രീൻ വലിപ്പം | 2.7 Inches (TFT rotating screen) |
| ഡിജിറ്റൽ സൂം | 16x |
| കണക്റ്റിവിറ്റി ടെക്നോളജി | USB |
| പ്രത്യേക സവിശേഷതകൾ | Selfie fill light, Rotating screen |
| ബാറ്ററി | 1020mAh Lithium Battery (included) |
| സ്വയം ടൈമർ | 2 സെക്കൻഡ്, 10 സെക്കൻഡ് |
| ടിവി പുറത്ത് | NTSC 30fps, PAL 25fps |
| ഉൽപ്പന്ന അളവുകൾ | 12.5 x 10.5 x 7.2 സെ.മീ; 210 ഗ്രാം |
| മാതൃരാജ്യം | ചൈന |
8. വാറൻ്റിയും പിന്തുണയും
For warranty information and technical support, please refer to the documentation provided at the time of purchase or contact your retailer. You may also visit the official Akozon webകൂടുതൽ സഹായത്തിനുള്ള സൈറ്റ്.
ഏതെങ്കിലും വാറന്റി ക്ലെയിമുകൾക്കായി നിങ്ങളുടെ വാങ്ങിയതിന്റെ തെളിവ് സൂക്ഷിക്കുക.