
Della 048-OPAC-6H
Della 10000 BTU Portable Air Conditioner User Manual
Model: 048-OPAC-6H | Brand: Della
1 പ്രധാനപ്പെട്ട സുരക്ഷാ വിവരങ്ങൾ
Please read this manual carefully before operating your portable air conditioner. Keep this manual for future reference. Always follow basic safety precautions to reduce the risk of fire, electric shock, or injury.
- ടിപ്പിംഗ് തടയാൻ യൂണിറ്റ് പരന്നതും സ്ഥിരതയുള്ളതുമായ ഒരു പ്രതലത്തിൽ സ്ഥാപിച്ചിട്ടുണ്ടെന്ന് ഉറപ്പാക്കുക.
- കേടായ ചരടോ പ്ലഗോ ഉപയോഗിച്ച് യൂണിറ്റ് പ്രവർത്തിപ്പിക്കരുത്.
- എയർ ഇൻലെറ്റിലോ ഔട്ട്ലെറ്റിലോ വിരലുകളോ വസ്തുക്കളോ തിരുകരുത്.
- കത്തുന്ന വസ്തുക്കളിൽ നിന്നും തുറന്ന തീജ്വാലകളിൽ നിന്നും യൂണിറ്റ് അകറ്റി നിർത്തുക.
- വൃത്തിയാക്കുന്നതിനോ അറ്റകുറ്റപ്പണികൾ നടത്തുന്നതിനോ മുമ്പ് എല്ലായ്പ്പോഴും യൂണിറ്റ് അൺപ്ലഗ് ചെയ്യുക.
- ഈ ഉപകരണം, അവരുടെ സുരക്ഷയ്ക്ക് ഉത്തരവാദിയായ ഒരു വ്യക്തി ഉപകരണത്തിൻ്റെ ഉപയോഗത്തെ സംബന്ധിച്ച മേൽനോട്ടമോ നിർദ്ദേശമോ നൽകിയിട്ടില്ലെങ്കിൽ, ശാരീരികമോ ഇന്ദ്രിയപരമോ മാനസികമോ ആയ കഴിവുകൾ കുറഞ്ഞതോ അനുഭവത്തിൻ്റെയും അറിവിൻ്റെയും അഭാവം ഉള്ള വ്യക്തികൾക്ക് (കുട്ടികൾ ഉൾപ്പെടെ) ഉപയോഗിക്കാൻ ഉദ്ദേശിച്ചുള്ളതല്ല.
2. ഉൽപ്പന്നം കഴിഞ്ഞുview
The Della 10000 BTU Portable Air Conditioner is a versatile unit designed to provide cooling, heating, dehumidification, and fan functions for spaces up to 450 sq. ft. It features smart WiFi connectivity for convenient control via a mobile app, a remote control, and an intuitive soft-touch control panel.

Image: Della Portable Air Conditioner unit, remote control, and smartphone displaying the control app.
Key components include the main unit with integrated handle, exhaust hose, window installation kit, and remote control.

Image: Diagram showing the dimensions of the portable air conditioner: 12.2 inches (width) x 12.2 inches (depth) x 27.6 inches (height).
3. സജ്ജീകരണം
3.1 അൺപാക്കിംഗ്
Carefully remove the unit and all accessories from the packaging. Retain the original packaging for future storage or transport. Allow the unit to stand upright for at least 24 hours before initial use to allow the refrigerant to settle.
3.2 പ്ലേസ്മെൻ്റ്
Place the air conditioner on a firm, level surface in a location that allows for proper air circulation. Ensure there is at least 20 inches (50 cm) of space from walls or other objects to allow for adequate airflow around the unit.
3.3 വിൻഡോ കിറ്റ് ഇൻസ്റ്റാളേഷൻ
The included window kit is designed for easy installation in both horizontal and vertical sliding windows. No drilling is required.

Image: Diagrams illustrating the installation of the window kit in both horizontal and vertical sliding windows, showing compatibility with window openings from 25.5 to 64.1 inches.
- Assemble the window slider kit by sliding the adjustable panels together to fit your window opening. The kit is compatible with window sizes from 25.5 to 64.1 inches.
- Secure the panels with the provided screws.
- Open the window and place the assembled window kit into the window frame. Extend the panels to fit snugly and close the window against the kit to secure it.
- Ensure the window kit is sealed properly to prevent air leakage. Use foam seals if necessary.
3.4 എക്സ്ഹോസ്റ്റ് ഹോസ് കണക്ഷൻ
- Attach the exhaust hose connector to one end of the exhaust hose.
- എക്സ്ഹോസ്റ്റ് ഹോസിന്റെ മറ്റേ അറ്റത്ത് വിൻഡോ കിറ്റ് അഡാപ്റ്റർ ഘടിപ്പിക്കുക.
- Insert the exhaust hose connector into the exhaust outlet on the back of the air conditioner unit.
- Insert the window kit adapter into the opening on the window slider kit.
- Ensure all connections are secure to prevent hot air from re-entering the room.
3.5 പവർ കണക്ഷൻ
Plug the power cord into a grounded 115V/60Hz electrical outlet. Do not use extension cords or power strips.
4. പ്രവർത്തന നിർദ്ദേശങ്ങൾ
4.1 നിയന്ത്രണ പാനൽ
The unit features an intuitive soft-touch control panel on the top of the unit.
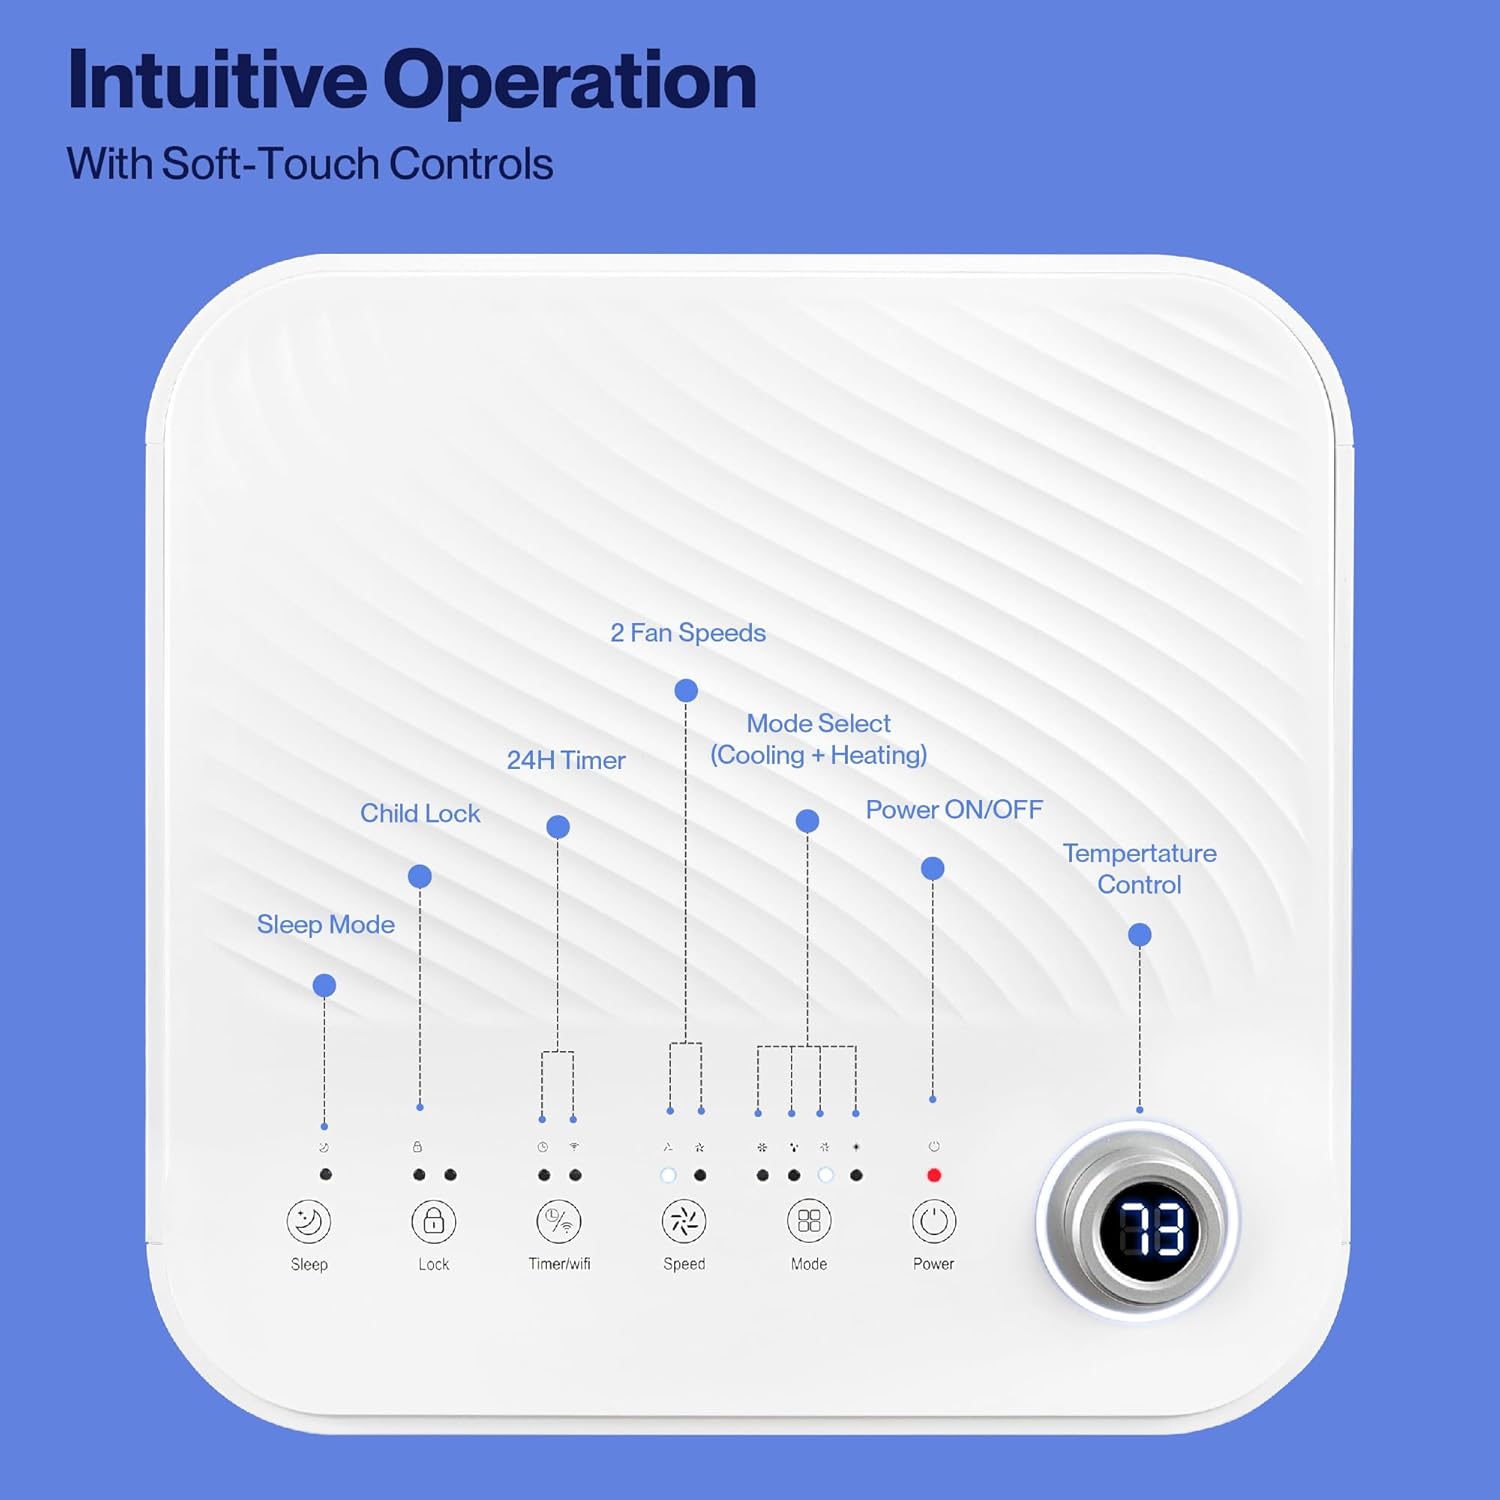
Image: Detailed diagram of the control panel with labels for each button: Sleep, Child Lock, Timer/WiFi, Fan Speed, Mode Select (Cooling + Heating), Power ON/OFF, and Temperature Control with digital display.
- പവർ ഓൺ/ഓഫ്: യൂണിറ്റ് ഓണാക്കാനോ ഓഫാക്കാനോ അമർത്തുക.
- മോഡ് തിരഞ്ഞെടുക്കുക: Cycle through Cooling, Heating, Dehumidification, Ventilation (Fan), and Sleep modes.
- താപനില നിയന്ത്രണം: ആവശ്യമുള്ള താപനില ക്രമീകരിക്കാൻ മുകളിലേക്കും താഴേക്കുമുള്ള അമ്പടയാളങ്ങൾ ഉപയോഗിക്കുക.
- ഫാൻ വേഗത: Select between 2 fan speeds (Low, High).
- ടൈമർ: ഓട്ടോമാറ്റിക് ഓൺ/ഓഫ് പ്രവർത്തനത്തിനായി 24 മണിക്കൂർ ടൈമർ സജ്ജമാക്കുക.
- ചൈൽഡ് ലോക്ക്: Activates or deactivates the child lock function.
- സ്ലീപ്പ് മോഡ്: കൂടുതൽ നിശബ്ദമായ പ്രവർത്തനത്തിനും ക്രമേണ താപനില ക്രമീകരണത്തിനുമായി സ്ലീപ്പ് മോഡ് സജീവമാക്കുന്നു.
4.2 വിദൂര നിയന്ത്രണം
The unit comes with a remote control for convenient operation from a distance. All functions available on the control panel can be accessed via the remote.
4.3 WiFi/Smart App Control
Control your Della Portable Air Conditioner from anywhere using the free DELLA+ app on your smartphone. The unit is compatible with Google Assistant and Amazon Alexa for voice control.

Image: A person relaxing on a couch, using a smartphone to control the air conditioner, with text indicating compatibility with Google Assistant and Amazon Alexa.
- Download the DELLA+ app from your smartphone's app store.
- നിങ്ങളുടെ എയർകണ്ടീഷണർ നിങ്ങളുടെ വീട്ടിലെ വൈഫൈ നെറ്റ്വർക്കിലേക്ക് ബന്ധിപ്പിക്കുന്നതിന് ആപ്പിലെ നിർദ്ദേശങ്ങൾ പാലിക്കുക.
- Once connected, you can control modes, temperature, fan speed, and set schedules remotely.
The app also supports Smart Geo Location, allowing the unit to automatically turn on or off based on your proximity to home.

Image: A smartphone screen showing a map with a car icon and a notification indicating the AC unit automatically turned on due to Smart Geo Location.
5. പരിപാലനം
Regular maintenance ensures optimal performance and extends the lifespan of your unit. Always unplug the unit before cleaning.
5.1 എയർ ഫിൽട്ടർ വൃത്തിയാക്കൽ
ഉപയോഗവും വായുവിന്റെ ഗുണനിലവാരവും അനുസരിച്ച് എയർ ഫിൽറ്റർ രണ്ടാഴ്ച കൂടുമ്പോഴോ അതിലധികമോ തവണ വൃത്തിയാക്കണം.
- Locate the air filter panel (usually on the back or side of the unit).
- ഫിൽട്ടർ നീക്കം ചെയ്യുക.
- ഫിൽട്ടർ ചൂടുള്ള, സോപ്പ് വെള്ളത്തിൽ കഴുകുക. നന്നായി കഴുകിയ ശേഷം വീണ്ടും ഇടുന്നതിനുമുമ്പ് പൂർണ്ണമായും വായുവിൽ ഉണങ്ങാൻ അനുവദിക്കുക.
5.2 വെള്ളം വറ്റിക്കൽ
The unit has a self-evaporating system, but in high humidity conditions, water may accumulate. The "Water-full indicator" will illuminate when the water tank needs draining.
- ഡ്രെയിൻ പോർട്ടിനടിയിൽ (യൂണിറ്റിന്റെ താഴെ പിൻഭാഗത്ത് സ്ഥിതിചെയ്യുന്നത്) ഒരു ആഴം കുറഞ്ഞ പാൻ അല്ലെങ്കിൽ ട്രേ സ്ഥാപിക്കുക.
- ഡ്രെയിൻ പ്ലഗ് നീക്കം ചെയ്യുക.
- Allow all accumulated water to drain out.
- ഡ്രെയിൻ പ്ലഗ് സുരക്ഷിതമായി മാറ്റിസ്ഥാപിക്കുക.
5.3 സംഭരണം
യൂണിറ്റ് ദീർഘനേരം സൂക്ഷിക്കുകയാണെങ്കിൽ:
- കെട്ടിക്കിടക്കുന്ന വെള്ളം മുഴുവൻ വറ്റിച്ചുകളയുക.
- എയർ ഫിൽട്ടർ വൃത്തിയാക്കുക.
- ഇന്റീരിയർ ഉണങ്ങാൻ യൂണിറ്റ് ഫാൻ-ഒൺലി മോഡിൽ കുറച്ച് മണിക്കൂർ പ്രവർത്തിപ്പിക്കുക.
- പവർ കോർഡ് ഊരി വൃത്തിയായി ചുരുട്ടുക.
- യൂണിറ്റ് തണുത്തതും വരണ്ടതുമായ സ്ഥലത്ത് സൂക്ഷിക്കുക, വെയിലത്ത് അതിന്റെ യഥാർത്ഥ പാക്കേജിംഗിൽ.
6. പ്രശ്നപരിഹാരം
പൊതുവായ പ്രശ്നങ്ങളും അവയുടെ പരിഹാരങ്ങളും അറിയാൻ ഈ വിഭാഗം കാണുക.
| പ്രശ്നം | സാധ്യമായ കാരണം | പരിഹാരം |
|---|---|---|
| യൂണിറ്റ് ഓണാക്കുന്നില്ല | വൈദ്യുതിയില്ല; പവർ കോർഡ് ഊരിവച്ചു; സർക്യൂട്ട് ബ്രേക്കർ ട്രിപ്പ് ചെയ്തു; വാട്ടർ ടാങ്ക് നിറഞ്ഞു | പവർ ഔട്ട്ലെറ്റ് പരിശോധിക്കുക; പവർ കോർഡ് പ്ലഗ് ഇൻ ചെയ്യുക; സർക്യൂട്ട് ബ്രേക്കർ പുനഃസജ്ജമാക്കുക; വാട്ടർ ടാങ്ക് കളയുക. |
| യൂണിറ്റ് ഫലപ്രദമായി തണുപ്പിക്കുന്നില്ല. | Air filter dirty; Exhaust hose not properly installed; Room too large; Doors/windows open; Temperature setting too high | Clean air filter; Ensure exhaust hose is sealed; Close doors/windows; Lower temperature setting |
| യൂണിറ്റ് ശബ്ദമയമാണ് | Unit not on level surface; Air filter dirty; Obstruction in fan | Place unit on level surface; Clean air filter; Check for obstructions |
| വെള്ളം ചോർച്ച | Drain plug loose or missing; Unit tilted | ഡ്രെയിൻ പ്ലഗ് സുരക്ഷിതമാക്കുക; യൂണിറ്റ് ലെവലാണെന്ന് ഉറപ്പാക്കുക. |
| വൈഫൈ കണക്ഷൻ പ്രശ്നങ്ങൾ | Incorrect WiFi password; Unit too far from router; Router issues | Verify password; Move unit closer to router; Restart router |
ഈ പരിഹാരങ്ങൾ പരീക്ഷിച്ചതിന് ശേഷവും പ്രശ്നം നിലനിൽക്കുകയാണെങ്കിൽ, ദയവായി ഉപഭോക്തൃ പിന്തുണയുമായി ബന്ധപ്പെടുക.
7 സ്പെസിഫിക്കേഷനുകൾ
| ഫീച്ചർ | സ്പെസിഫിക്കേഷൻ |
|---|---|
| മോഡൽ നമ്പർ | 048-OPAC-6H |
| തണുപ്പിക്കൽ ശേഷി | 10000 ബി.ടി.യു |
| കവറേജ് ഏരിയ | 450 ചതുരശ്ര അടി വരെ അടി. |
| പ്രവർത്തനങ്ങൾ | Cooling, Heating, Dehumidifier, Fan, Sleep Mode |
| വാല്യംtage | 115 വോൾട്ട് |
| ശബ്ദ നില | 54 ഡി.ബി |
| റഫ്രിജറൻ്റ് | R 410A |
| അളവുകൾ (L x W x H) | 12.2 x 12.2 x 27.6 ഇഞ്ച് |
| മെറ്റീരിയൽ | എബിഎസ് പ്ലാസ്റ്റിക് |
| പ്രത്യേക സവിശേഷതകൾ | Portable, Dehumidifier, WiFi Enabled, Remote Control, Built-in Handle, 24-hour timer, Child Lock |
8. വാറണ്ടിയും ഉപഭോക്തൃ പിന്തുണയും
For warranty information or technical assistance, please refer to the warranty card included with your product or visit the official Della website. You may also contact Della customer support directly for further assistance with troubleshooting or parts replacement.
Ask a question about this manual
Ask about setup, troubleshooting, compatibility, parts, safety, or missing instructions. Manuals+ will review the question and use this page’s manual context to help answer it.