
1. ആമുഖം
This manual provides comprehensive instructions for the safe and effective operation, setup, and maintenance of your Docreate 8000W Handheld Spot Welder. Please read this manual thoroughly before using the device to ensure proper function and to prevent injury or damage.
2 സുരക്ഷാ വിവരങ്ങൾ
WARNING: Electrical tools can be dangerous if not handled properly. Always follow safety precautions.
- സുരക്ഷാ ഗ്ലാസുകൾ, കയ്യുറകൾ, സംരക്ഷണ വസ്ത്രങ്ങൾ എന്നിവയുൾപ്പെടെ ഉചിതമായ വ്യക്തിഗത സംരക്ഷണ ഉപകരണങ്ങൾ (പിപിഇ) ധരിക്കുക.
- ജോലിസ്ഥലം നന്നായി വായുസഞ്ചാരമുള്ളതും കത്തുന്ന വസ്തുക്കളിൽ നിന്ന് മുക്തവുമാണെന്ന് ഉറപ്പാക്കുക.
- Do not operate the spot welder in wet conditions or near liquids.
- കുട്ടികളെയും അനധികൃത വ്യക്തികളെയും പ്രവർത്തന മേഖലയിൽ നിന്ന് അകറ്റി നിർത്തുക.
- ഏതെങ്കിലും അറ്റകുറ്റപ്പണികൾ അല്ലെങ്കിൽ ക്രമീകരണങ്ങൾ നടത്തുന്നതിന് മുമ്പ് വൈദ്യുതി വിതരണം വിച്ഛേദിക്കുക.
- Do not attempt to weld materials other than those specified (nickel strips, iron sheets, stainless steel sheets).
- Always ensure proper contact between the welding pens and the workpiece to avoid arcing or damage.
- The device should be fully charged before first use. Charge immediately if the display shows voltage 7.3V-ന് താഴെ.
3. പാക്കേജ് ഉള്ളടക്കം
താഴെ കൊടുത്തിരിക്കുന്ന എല്ലാ ഇനങ്ങളും നിങ്ങളുടെ പാക്കേജിൽ ഉണ്ടെന്ന് ഉറപ്പാക്കുക:
- Docreate 8000W Handheld Spot Welder Unit
- Spot Welding Pens (integrated with cables)
- കാൽ പെഡൽ സ്വിച്ച്
- പവർ അഡാപ്റ്റർ/ചാർജർ
- Nickel Strip Sample
- ഉപയോക്തൃ മാനുവൽ (ഈ പ്രമാണം)

Image 3.1: Contents of the Docreate 8000W Handheld Spot Welder package, including the main unit, welding pens, foot pedal, power adapter, and nickel strip.
4. ഉൽപ്പന്നം കഴിഞ്ഞുview
The Docreate 8000W Handheld Spot Welder is designed for precise spot welding of various battery types and thin metal sheets. It features a compact design and adjustable power output.
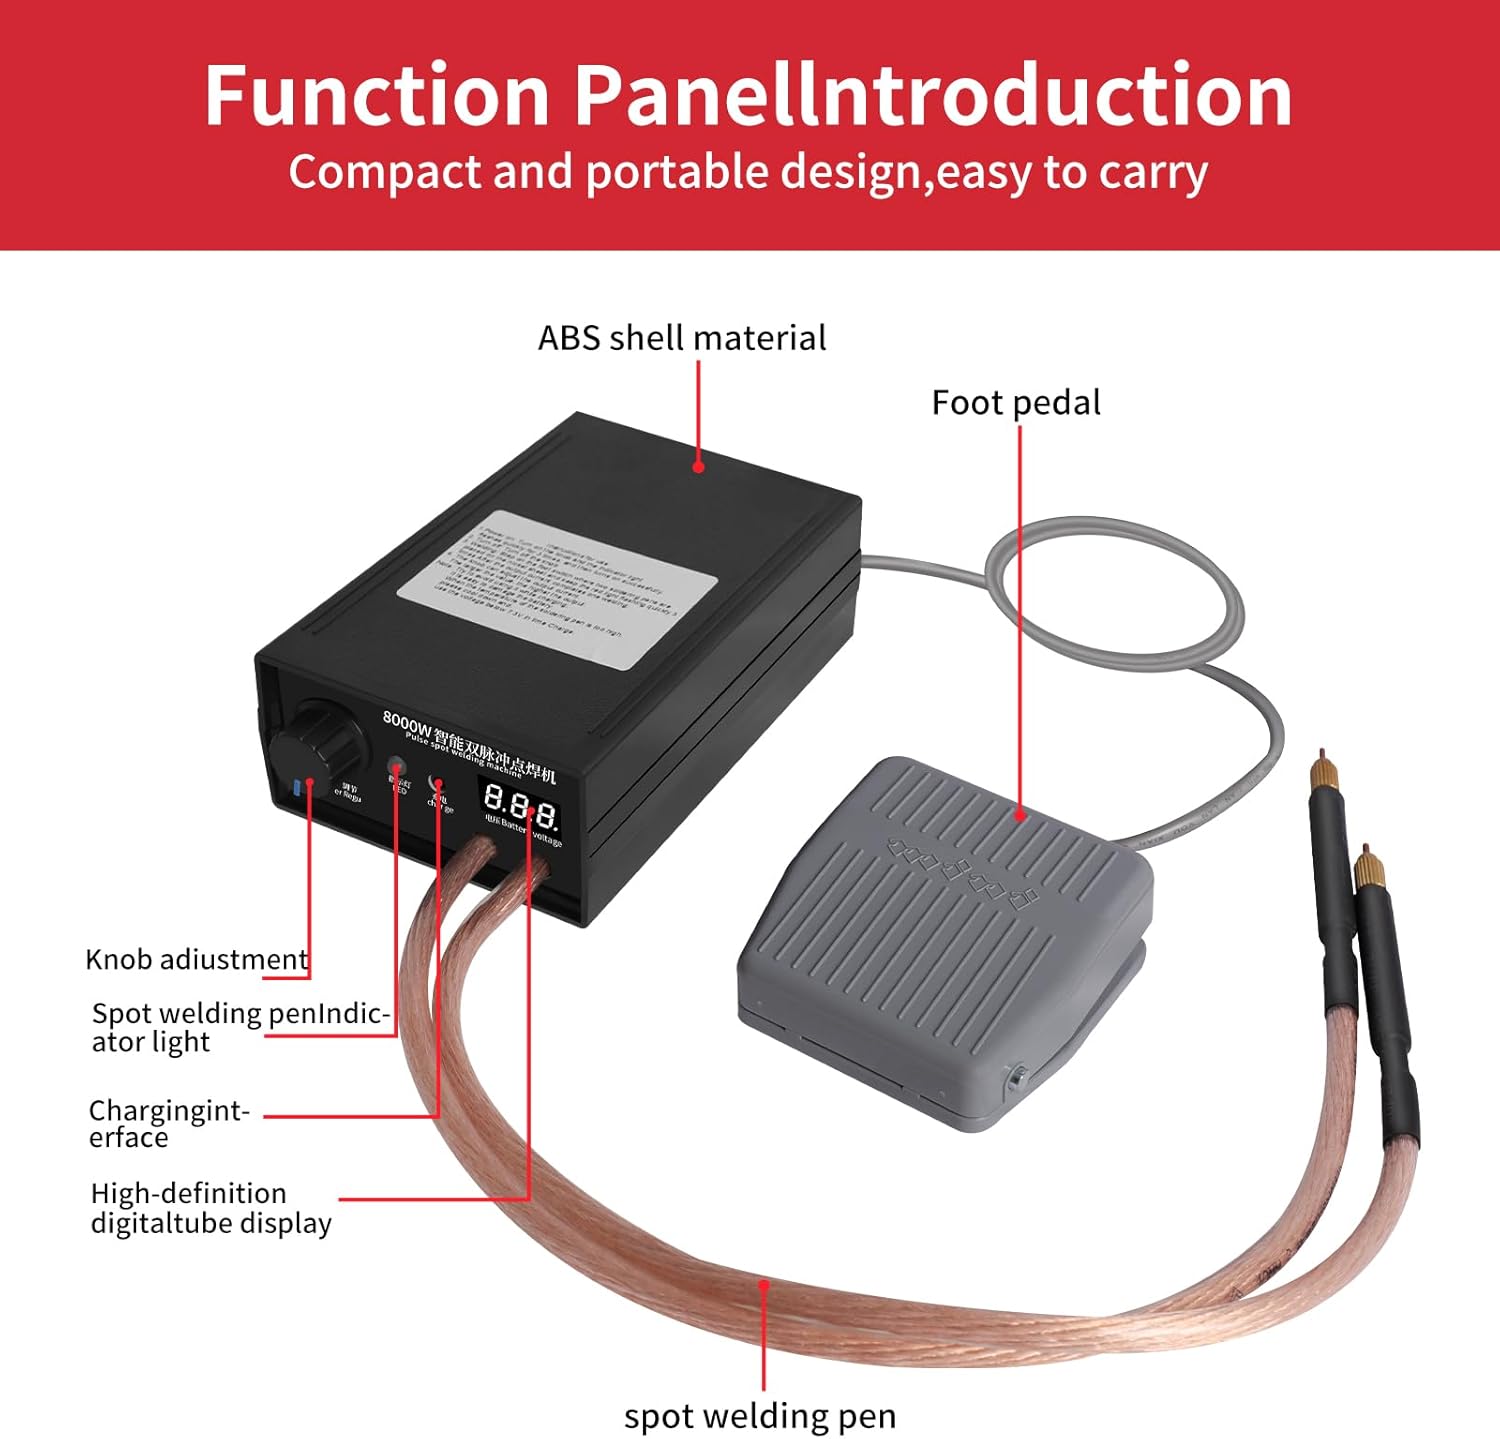
Image 4.1: Diagram illustrating the main components of the spot welder, including the ABS shell, foot pedal connection, knob adjustment, spot welding pen indicator, charging interface, and digital tube display.
പ്രധാന ഘടകങ്ങൾ:
- പ്രധാന യൂണിറ്റ്: Houses the control circuitry, battery, and display.
- Spot Welding Pens: Connected via flexible cables, these pens deliver the welding current to the workpiece. The pins are removable and replaceable.
- കാൽ പെഡൽ സ്വിച്ച്: Activates the welding process, allowing for precise positioning of the pens.
- പവർ അഡ്ജസ്റ്റ്മെന്റ് നോബ്: Controls the output power from 1 to 9 levels (0-800A).
- ഡിജിറ്റൽ ഡിസ്പ്ലേ: Shows the internal battery voltagഇ തത്സമയം.
- ചാർജിംഗ് ഇൻ്റർഫേസ്: For connecting the power adapter to recharge the internal battery.
5. സജ്ജീകരണം
- പ്രാരംഭ ചാർജ്: Before first use, fully charge the spot welder. Connect the power adapter to the charging interface on the unit and plug it into a suitable power outlet. The digital display will show the battery voltage. Charge until the voltage stabilizes at its maximum level.
- ഘടകങ്ങൾ ബന്ധിപ്പിക്കുക: Ensure the spot welding pens are securely connected to the main unit. Connect the foot pedal switch to its designated port.
- ജോലിസ്ഥലം തയ്യാറാക്കൽ: Set up your work area on a stable, non-flammable surface. Ensure adequate lighting and ventilation. Keep all necessary materials (nickel strips, batteries, etc.) within reach.

Image 5.1: The spot welder connected to its power adapter for charging. Ensure the device is fully charged before operation.
6. പ്രവർത്തന നിർദ്ദേശങ്ങൾ
6.1 പവർ ഓൺ/ഓഫ്
The device typically powers on automatically when the knob is turned from the 'OFF' position. To power off, turn the knob fully counter-clockwise to the 'OFF' position.
6.2 Adjusting Welding Power
The spot welder features a 1-9 level knob adjustment for output power, ranging from 0-800A. Turn the knob clockwise to increase the output power. A higher setting is generally required for thicker nickel strips or stronger welds. Start with a lower setting and gradually increase as needed for your specific material.

Image 6.1: The power adjustment knob on the front panel of the spot welder. Rotate to select the desired welding power level.
6.3 വെൽഡിംഗ് പ്രക്രിയ
- വർക്ക്പീസ് തയ്യാറാക്കുക: Ensure the nickel strip and battery terminals (or other materials) are clean and free of oxidation.
- Position Pens: Place the two spot welding pens firmly onto the nickel strip, ensuring good contact with the material to be welded. The pens should be positioned close together but not touching each other.
- വെൽഡിംഗ് ആരംഭിക്കുക: While maintaining firm pressure on the pens, press and hold the foot pedal switch.
- Observe Indicator: The red light on the unit will blink three times quickly, indicating the welding cycle is in progress. After approximately 0.5 seconds, the unit will output a current to complete the weld.
- Release Pedal: Release the foot pedal switch once the weld is complete.
- വെൽഡിംഗ് പരിശോധിക്കുക: Carefully inspect the welded joint for strength and appearance. Adjust the power setting if the weld is too weak or if it burns through the material.

Image 6.2: Proper placement of the spot welding pens on a nickel strip, ready for welding. The foot pedal is used to initiate the weld.
Tip for Beginners: ബാറ്ററി വോള്യംtage level displayed on the LCD screen is crucial. Ensure the voltage is above 7.3V for optimal welding performance. If it drops below this, recharge the unit.
7. പരിപാലനം
- വൃത്തിയാക്കൽ: Regularly clean the welding pens and the main unit with a dry, soft cloth. Ensure no metal dust or debris accumulates on the welding tips.
- Welding Pen Tips: The tips of the welding pens are consumable. If they become worn or pitted, they can be removed and replaced to maintain optimal welding performance.
- സംഭരണം: Store the spot welder in a cool, dry place away from direct sunlight and moisture. Ensure the unit is powered off before storage.
- ബാറ്ററി കെയർ: To prolong battery life, avoid completely discharging the unit. Recharge when the voltage display indicates a low level (below 7.3V).
8. പ്രശ്നപരിഹാരം
| പ്രശ്നം | സാധ്യമായ കാരണം | പരിഹാരം |
|---|---|---|
| ദുർബലമായ അല്ലെങ്കിൽ പൊരുത്തമില്ലാത്ത വെൽഡിങ്ങുകൾ | കുറഞ്ഞ ബാറ്ററി വോള്യംtage, insufficient power setting, poor contact with workpiece, dirty welding tips. | Recharge the unit (if voltage is below 7.3V). Increase power setting. Ensure firm and clean contact. Clean or replace welding tips. |
| യൂണിറ്റ് പവർ ഓണാക്കുന്നില്ല | Battery fully discharged, power knob in 'OFF' position. | Connect to charger. Turn power knob clockwise to an active setting. |
| Welds burn through material | പവർ സെറ്റിംഗ് വളരെ ഉയർന്നതാണ്. | Decrease the power setting using the adjustment knob. |
| Foot pedal unresponsive | Foot pedal not properly connected, faulty pedal. | Check foot pedal connection. If issue persists, contact support. |
9 സ്പെസിഫിക്കേഷനുകൾ
- മോഡൽ: SKU930645-US
- പവർ ഔട്ട്പുട്ട്: 8000W (പീക്ക്)
- Welding Thickness: 0.1mm - 0.3mm (Nickel Sheets)
- ഔട്ട്പുട്ട് കറൻ്റ്: 0-800A (Adjustable, 9 levels)
- സ്ക്രീൻ വലിപ്പം: 2.5 x 1 സെ.മീ
- Soldering Pen Length: 350 മിമി (ഏകദേശം 13.8 ഇഞ്ച്)
- യൂണിറ്റ് അളവുകൾ (LxWxH): 15 x 9.5 x 6 സെ.മീ (ഏകദേശം 5.9 x 3.7 x 2.4 ഇഞ്ച്)
- ഇനത്തിൻ്റെ ഭാരം: 1.9 പൗണ്ട് (ഏകദേശം 0.86 കിലോഗ്രാം)
- ഊർജ്ജ സ്രോതസ്സ്: AC/DC (Internal rechargeable battery)
- അപേക്ഷകൾ: 18650 lithium battery packs, iron sheets, stainless steel sheets, 0.1-0.15mm nickel plated steel, 0.1mm pure nickel sheet.
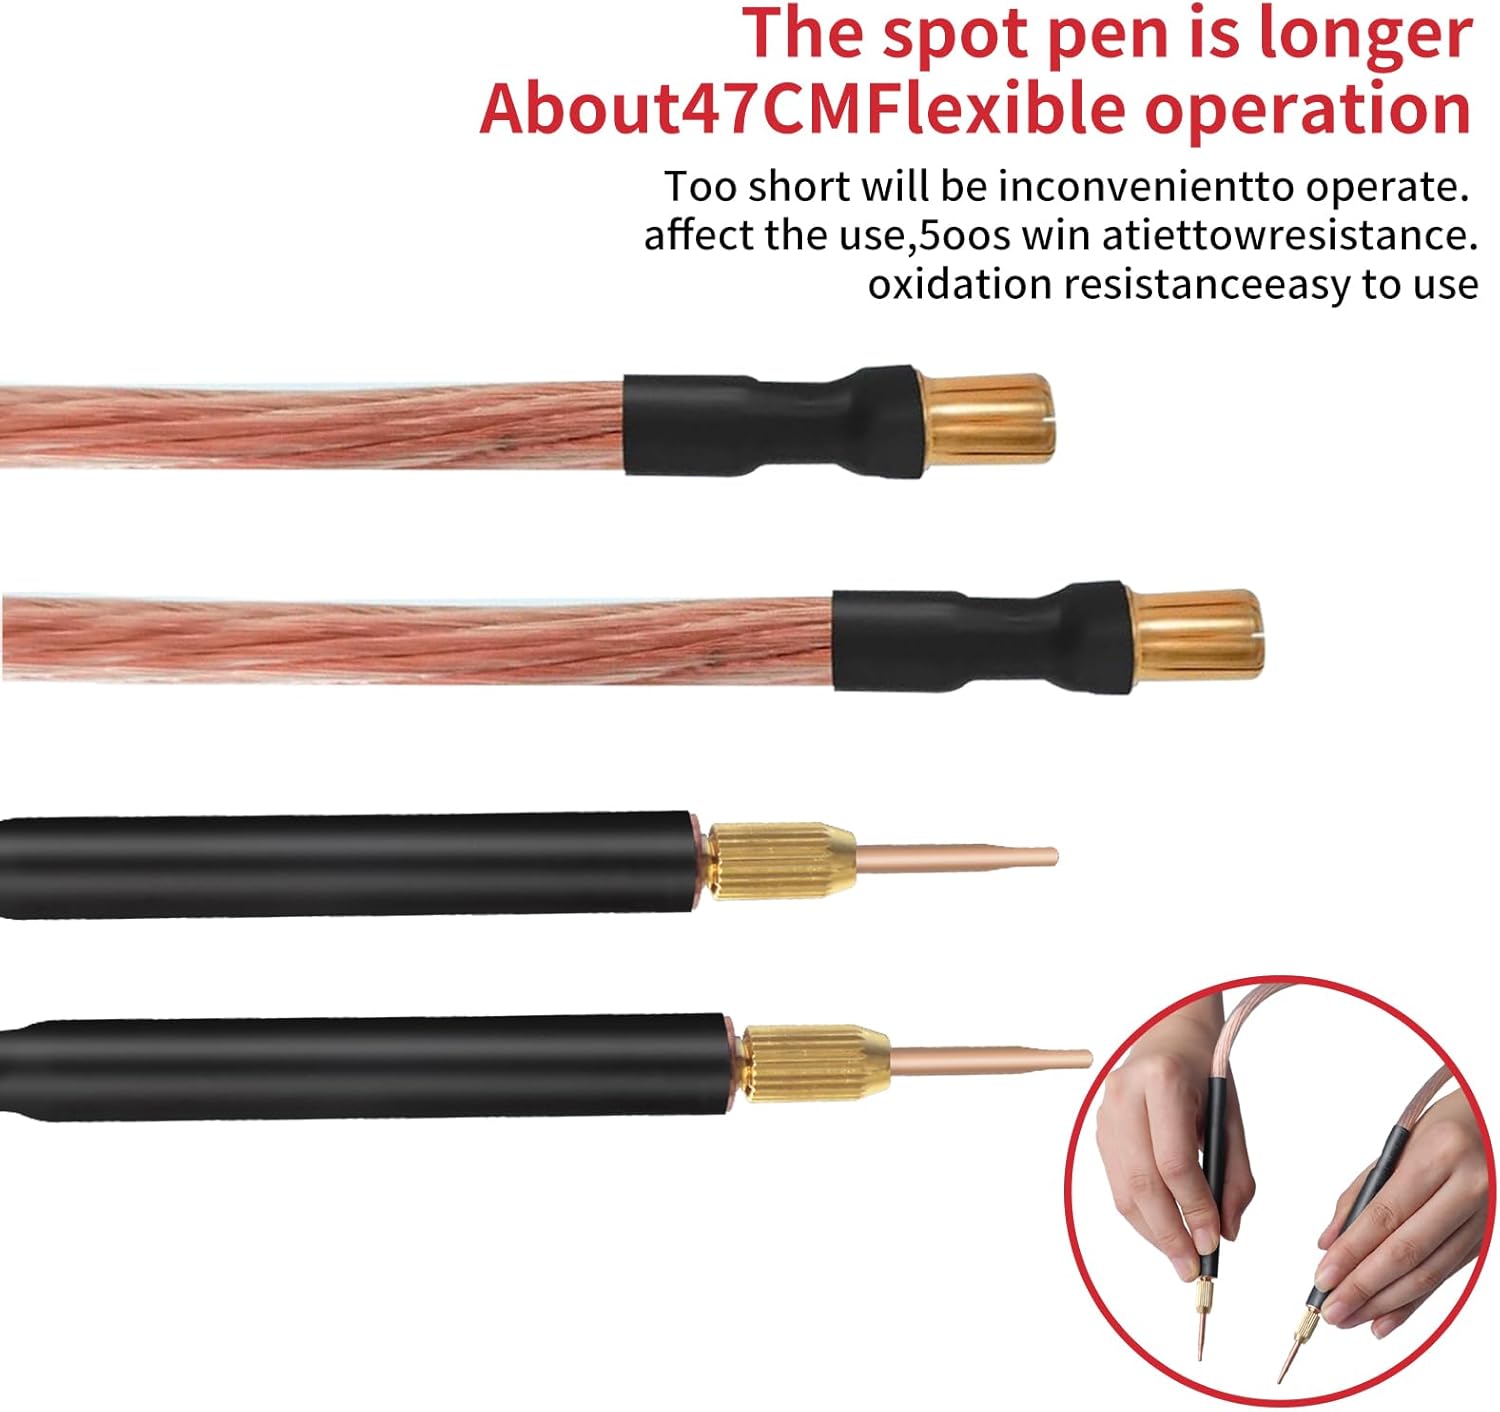
Image 9.1: Detailed dimensions for the spot welding pen cables and the welding pens themselves.
10. വാറൻ്റിയും പിന്തുണയും
For any questions or concerns regarding your Docreate 8000W Handheld Spot Welder, please contact the seller or manufacturer directly. Refer to your purchase documentation for specific warranty terms and contact information.
The manufacturer is Docreate.