
1. ആമുഖം
Thank you for choosing the XREXS 18-inch RGB Digital Wall Clock. This manual provides detailed instructions for the proper setup, operation, and maintenance of your new clock. Please read this manual thoroughly before use to ensure optimal performance and longevity of the product. Keep this manual for future reference.
2. ഉൽപ്പന്നം കഴിഞ്ഞുview
പ്രധാന സവിശേഷതകൾ
- Large 18-inch Display: Features clear, high-contrast 5.7-inch (14.5 cm) digits for easy readability from a distance.
- RGB നിറം മാറുന്നു: Offers 6 monochrome modes, 4 dynamic RGB color-changing modes, and a unique daily color-changing mode.
- മൾട്ടി-ഫങ്ഷണൽ ഡിസ്പ്ലേ: Shows time, temperature, humidity, date, and day of the week.
- 8 Language Support: Day of the week display available in English, German, French, Italian, Spanish, Dutch, Russian, and Danish.
- ഒന്നിലധികം മോഡുകൾ: Functions as a digital clock, alarm clock, large digital timer, stopwatch, and countdown timer (up to 29 hours, 59 minutes, 59 seconds).
- ക്രമീകരിക്കാവുന്ന തെളിച്ചം: 4-level manual brightness adjustment and an integrated auto-dimming sensor.
- Automatic Daylight Saving Time (DST): DST-യ്ക്കായി യാന്ത്രികമായി ക്രമീകരിക്കുന്നു.
- റിമോട്ട് കൺട്രോൾ: ദൂരെ നിന്ന് ക്രമീകരണങ്ങൾ സൗകര്യപ്രദമായി ക്രമീകരിക്കുക.
- മെമ്മറി പ്രവർത്തനം: Built-in memory retains settings during power outages with backup batteries.
- ബഹുമുഖ പ്ലെയ്സ്മെന്റ്: Can be wall-mounted or placed on a table using the foldable stand.
പാക്കേജ് ഉള്ളടക്കം
- XREXS 18-inch RGB Digital Wall Clock (Model 099-RGB)
- റിമോട്ട് കൺട്രോൾ
- പവർ അഡാപ്റ്റർ
- 2 x AAA Batteries (for memory backup)
- Mounting Aid
- ഉപയോക്തൃ മാനുവൽ

ചിത്രം 2.1: The XREXS 18-inch RGB Digital Wall Clock displaying time, temperature, humidity, date, and day, with its remote control.

ചിത്രം 2.2: A diagram illustrating the clock's features including alarm, temperature, humidity, DST, time, day, and date display.
3. സജ്ജീകരണം
3.1 പവർ കണക്ഷൻ
- Connect the provided power adapter to the DC input port on the back of the clock.
- Plug the power adapter into a standard electrical outlet. The clock will power on and display the default time.
കുറിപ്പ്: The clock requires continuous AC power to operate. The included AAA batteries are for memory backup only and do not power the display.
3.2 Battery Installation (Memory Backup)
- ക്ലോക്കിന്റെ പിൻഭാഗത്ത് ബാറ്ററി കമ്പാർട്ട്മെന്റ് കണ്ടെത്തുക.
- ശരിയായ പോളാരിറ്റി (+/-) ഉറപ്പാക്കിക്കൊണ്ട് 2 AAA ബാറ്ററികൾ ഇടുക.
- Close the battery compartment cover. These batteries will preserve your settings (time, alarm, etc.) in case of a power interruption.
3.3 മൗണ്ടിംഗ് ഓപ്ഷനുകൾ
The clock can be either wall-mounted or placed on a flat surface.
- മതിൽ മൗണ്ടിംഗ്: Use the two keyhole slots on the back of the clock. A mounting aid is provided to assist with proper spacing for screws or nails.
- ഡെസ്ക് പ്ലേസ്മെന്റ്: Extend the foldable stand located on the back of the clock to place it securely on a table or desk.
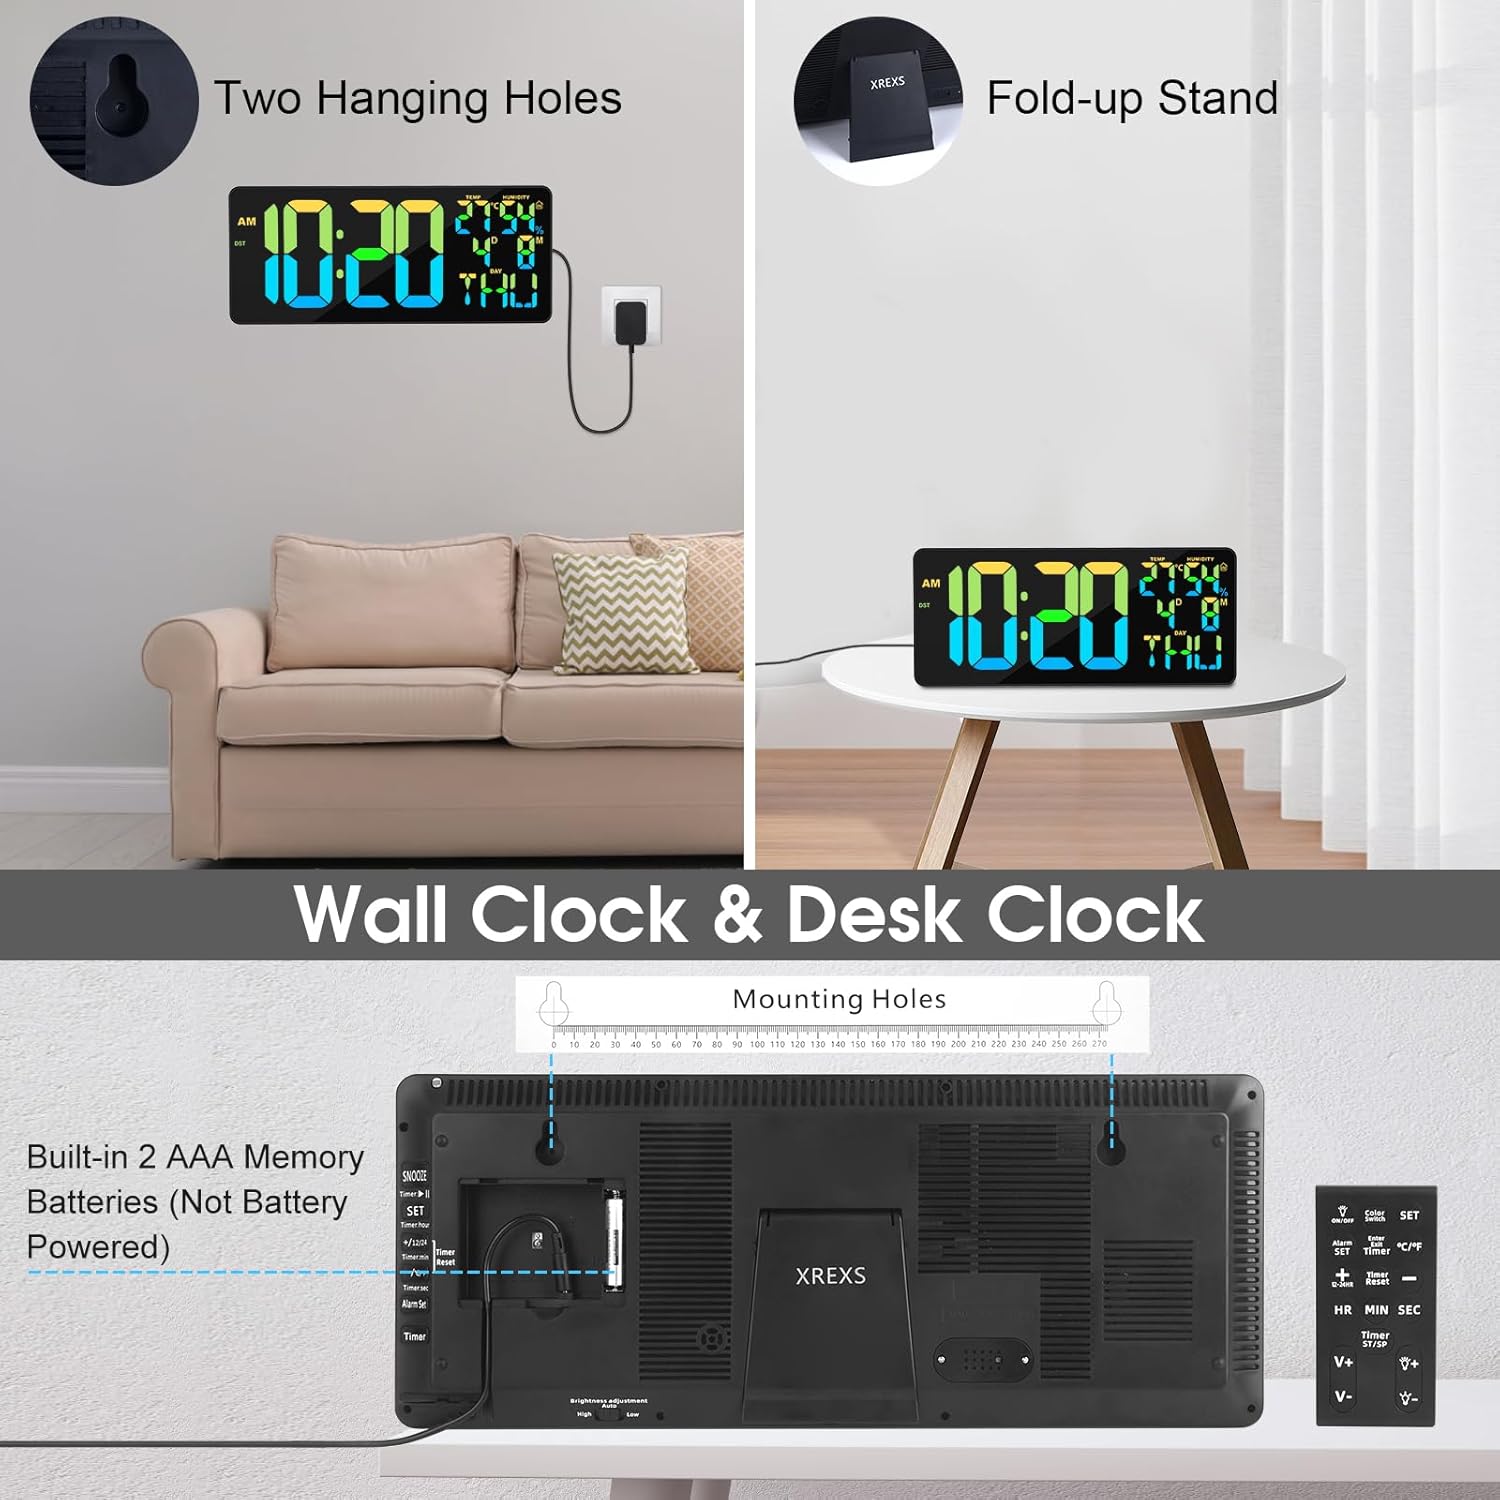
ചിത്രം 3.1: The back of the clock, illustrating the two hanging holes for wall mounting and the foldable stand for desk placement. The battery compartment is also visible.

ചിത്രം 3.2: The clock connected to its power adapter, with the remote control shown for setting adjustments.
4. പ്രവർത്തന നിർദ്ദേശങ്ങൾ
The clock can be operated using the remote control or the buttons on the back of the unit.
4.1 Basic Settings (Time Format, Temperature Unit, Language)
- Time Format (12/24 Hour): Press the '12/24H' button on the remote to switch between 12-hour and 24-hour display. In 12-hour format, 'AM' or 'PM' will be displayed.
- താപനില യൂണിറ്റ് (°C/°F): Press the '°C/°F' button on the remote to toggle between Celsius and Fahrenheit.
- Day Language: Press the 'LANG' button on the remote to cycle through the 8 available languages for the day of the week display.
4.2 സമയവും തീയതിയും ക്രമീകരിക്കുക
- Press the 'SET' button on the remote control. The hour digits will start flashing.
- മണിക്കൂർ ക്രമീകരിക്കാൻ 'മുകളിലേക്ക്' അല്ലെങ്കിൽ 'താഴേക്ക്' ബട്ടണുകൾ ഉപയോഗിക്കുക.
- Press 'SET' again to move to the minute digits. Use 'UP' or 'DOWN' to adjust minutes.
- Continue pressing 'SET' to cycle through year, month, and day settings, adjusting each with 'UP' or 'DOWN'.
- Press 'SET' one last time or wait a few seconds for the settings to be saved.
4.3 അലാറം സജ്ജമാക്കുന്നു
- Press the 'ALARM SET' button on the remote. The alarm hour digits will flash.
- ആവശ്യമുള്ള അലാറം മണിക്കൂർ സജ്ജീകരിക്കാൻ 'മുകളിലേക്ക്' അല്ലെങ്കിൽ 'താഴേക്ക്' ഉപയോഗിക്കുക.
- Press 'ALARM SET' again. The alarm minute digits will flash.
- Use 'UP' or 'DOWN' to set the desired alarm minutes.
- സ്ഥിരീകരിക്കാൻ വീണ്ടും 'ALARM SET' അമർത്തുക.
- To activate/deactivate the alarm, press the 'ALARM ON/OFF' button. An alarm icon will appear/disappear on the display.
- When the alarm sounds, press any button on the remote or the clock to snooze or turn off.
4.4 Timer, Countdown, and Stopwatch Functions
Press the 'MODE' button on the remote to cycle through the different functions: Clock -> Alarm -> Timer -> Stopwatch -> Countdown.
- ടൈമർ: In Timer mode, press 'SET' to set the desired time (hours, minutes, seconds) using 'UP'/'DOWN'. Press 'START/STOP' to begin/pause. Press 'RESET' to clear.
- കൗണ്ട്ഡൗൺ: In Countdown mode, press 'SET' to set the desired countdown time (up to 29 hours, 59 minutes, 59 seconds). Press 'START/STOP' to begin/pause. Press 'RESET' to clear. An audible alert will sound when the countdown reaches zero.
- സ്റ്റോപ്പ് വാച്ച്: In Stopwatch mode, press 'START/STOP' to begin/pause. Press 'RESET' to clear.
4.5 തെളിച്ചം ക്രമീകരിക്കൽ

ചിത്രം 4.1: The clock demonstrating its auto-dimming feature and the four levels of manual brightness adjustment.
- മാനുവൽ അഡ്ജസ്റ്റ്മെൻ്റ്: Press the 'BRIGHTNESS' button on the remote to cycle through 4 levels of brightness (Lv.4, Lv.3, Lv.2, Lv.1) and OFF.
- ഓട്ടോ-ഡിമ്മിംഗ്: The clock has a built-in light sensor that can automatically adjust the display brightness based on ambient light conditions. To activate/deactivate auto-dimming, press the 'AUTO DIM' button on the remote.
4.6 RGB കളർ മോഡുകൾ

ചിത്രം 4.2: Examples of the dynamic RGB color-changing modes and single color options available on the clock.
The clock offers 11 color modes:
- 6 Monochrome Colors (Red, Green, Blue, Yellow, Purple, Light Blue)
- 4 Dynamic RGB Changing Colors (RGB Changing, RGB Left to Right Flowing, RGB Top Downward Flowing, Random Color)
- 1 Daily Color Change Mode
Press the 'COLOR' button on the remote to cycle through these color modes. The 11th mode provides a unique daily color change for variety.
4.7 പകൽ വെളിച്ച ലാഭിക്കൽ സമയം (DST)
To activate or deactivate the automatic Daylight Saving Time function, press the 'DST' button on the remote control. When activated, the clock will automatically adjust its time forward or backward by one hour as required by DST.

ചിത്രം 4.3: The XREXS clock shown in various settings, demonstrating its use as a wall clock, a countdown timer for exercise, and an alarm clock in a bedroom.
5. പരിപാലനം
- വൃത്തിയാക്കൽ: ക്ലോക്ക് വൃത്തിയാക്കാൻ, ഡിസ്പ്ലേ സൌമ്യമായി തുടച്ച് സി.asing with a soft, dry cloth. Do not use abrasive cleaners, solvents, or chemical sprays, as these may damage the surface.
- ശക്തി: Ensure the power adapter is securely connected. If the clock will not be used for an extended period, unplug it from the power outlet.
- ബാറ്ററി മാറ്റിസ്ഥാപിക്കൽ: Replace the AAA backup batteries annually or if you notice settings are not retained during power outages.
- പരിസ്ഥിതി: Avoid placing the clock in direct sunlight, near heat sources, or in areas with high humidity to prevent damage.
6. പ്രശ്നപരിഹാരം
| പ്രശ്നം | സാധ്യമായ കാരണം | പരിഹാരം |
|---|---|---|
| ക്ലോക്ക് ഡിസ്പ്ലേ ശൂന്യമാണ് അല്ലെങ്കിൽ പ്രവർത്തിക്കുന്നില്ല. | പവർ അല്ലെങ്കിൽ പവർ അഡാപ്റ്റർ പ്രശ്നമില്ല. | Ensure the power adapter is securely plugged into the clock and a working electrical outlet. Check if the outlet has power. |
| റിമോട്ട് കൺട്രോൾ പ്രതികരിക്കുന്നില്ല. | Remote batteries are dead or incorrect orientation. Obstruction between remote and clock. | Replace the remote control batteries. Ensure there are no obstacles between the remote and the clock's sensor. Point the remote directly at the clock. |
| പവർ ഓഫാക്കിയ ശേഷം സമയം/ക്രമീകരണങ്ങൾ നഷ്ടപ്പെടും.tage. | ബാക്കപ്പ് ബാറ്ററികൾ തീർന്നിരിക്കുന്നു അല്ലെങ്കിൽ ഇൻസ്റ്റാൾ ചെയ്തിട്ടില്ല. | Install 2 new AAA batteries in the battery compartment on the back of the clock, ensuring correct polarity. |
| ഡിസ്പ്ലേ വളരെ മങ്ങിയതോ വളരെ തെളിച്ചമുള്ളതോ ആണ്. | Brightness setting needs adjustment or auto-dimming is active/inactive. | Press the 'BRIGHTNESS' button on the remote to manually adjust. Press 'AUTO DIM' to toggle automatic brightness control. |
| താപനില/ഈർപ്പനില അളവുകൾ കൃത്യമല്ലെന്ന് തോന്നുന്നു. | Clock placed near heat/cold source or in an area with fluctuating humidity. | Relocate the clock to a more stable environment, away from direct sunlight, vents, or high humidity areas. Allow time for readings to stabilize. |
7 സ്പെസിഫിക്കേഷനുകൾ
| ഫീച്ചർ | സ്പെസിഫിക്കേഷൻ |
|---|---|
| ബ്രാൻഡ് | XREXS |
| മോഡൽ നമ്പർ | 099-RGB |
| ഡിസ്പ്ലേ വലിപ്പം | 18 ഇഞ്ച് (45.7 സെ.മീ) |
| അക്ക ഉയരം | 5.7 ഇഞ്ച് (14.5 സെ.മീ) |
| ഉൽപ്പന്ന അളവുകൾ (L x W x H) | 43 x 3.81 x 17.8 സെ.മീ (16.9 x 1.5 x 7 ഇഞ്ച്) |
| ഇനത്തിൻ്റെ ഭാരം | 1.32 കിലോഗ്രാം (2.91 പൗണ്ട്) |
| മെറ്റീരിയൽ | പ്ലാസ്റ്റിക് |
| നിറം | RGB (മൾട്ടി-കളർ) |
| പവർ ഉറവിടം | AC Adapter (required for operation) |
| ബാക്കപ്പ് ബാറ്ററികൾ | 2 x AAA (included, for memory function only) |
| ശൈലി | ആധുനികം |
| ആകൃതി | ദീർഘചതുരം |
8. വാറൻ്റിയും പിന്തുണയും
For warranty information or technical support, please refer to the contact details provided with your purchase or visit the official XREXS webസൈറ്റ്. ഏതെങ്കിലും വാറന്റി ക്ലെയിമുകൾക്ക് വാങ്ങിയതിന്റെ തെളിവായി നിങ്ങളുടെ വാങ്ങൽ രസീത് സൂക്ഷിക്കുക.