Asnxcju Newest 2-Light
Asnxcju Modern Outdoor Ceiling Light Fixtures User Manual
Model: Newest 2-Light
1 പ്രധാനപ്പെട്ട സുരക്ഷാ വിവരങ്ങൾ
Please read and understand all instructions before beginning installation. Failure to do so may result in electric shock, fire, or other injuries that could be fatal or cause serious damage.
- Always turn off power at the main circuit breaker before installation or maintenance.
- ഇൻസ്റ്റാളേഷൻ പ്രക്രിയയെക്കുറിച്ച് നിങ്ങൾക്ക് ഉറപ്പില്ലെങ്കിൽ യോഗ്യതയുള്ള ഒരു ഇലക്ട്രീഷ്യനെ സമീപിക്കുക.
- This fixture is designed for 120 Volts. Ensure your electrical supply matches this requirement.
- ഗ്ലാസ് ഘടകങ്ങൾ പൊട്ടിപ്പോകാതിരിക്കാൻ ശ്രദ്ധയോടെ കൈകാര്യം ചെയ്യുക.
- While designed for outdoor use under eaves, avoid direct exposure to heavy rain or standing water.
- പരമാവധി വാട്ട് കവിയരുത്tagഒരു ബൾബിന് 60 വാട്ട്സ്.
- എല്ലാ കണക്ഷനുകളും സുരക്ഷിതവും ശരിയായി ഇൻസുലേറ്റ് ചെയ്തതുമാണെന്ന് ഉറപ്പാക്കുക.
2. പാക്കേജ് ഉള്ളടക്കം
ഇൻസ്റ്റാളേഷനുമായി മുന്നോട്ടുപോകുന്നതിനുമുമ്പ് എല്ലാ ഘടകങ്ങളും നിലവിലുണ്ടെന്നും കേടുപാടുകൾ സംഭവിച്ചിട്ടില്ലെന്നും ഉറപ്പാക്കുക.
- 1 x 2-Light Black Flush Mount Ceiling Light Fixture
- 1 x Mounting Hardware Kit (screws, wire nuts, mounting bracket)
- 2 x E26 ST64 4W LED Bulbs
- 1 x ഇൻസ്റ്റലേഷൻ ഇൻസ്ട്രക്ഷൻ മാനുവൽ

Image: The Asnxcju Modern Outdoor Ceiling Light Fixture, showcasing its black metal frame, clear glass panels, and two included vintagഇ-സ്റ്റൈൽ എൽഇഡി ബൾബുകൾ.
3 സ്പെസിഫിക്കേഷനുകൾ
| ഫീച്ചർ | വിശദാംശങ്ങൾ |
|---|---|
| ബ്രാൻഡ് | Asnxcju |
| മോഡലിൻ്റെ പേര് | Newest 2-Light |
| അളവുകൾ (L x W x H) | 9.84" x 9.84" x 4.92" (25സെ.മീ x 25സെ.മീ x 12.5സെ.മീ) |
| മെറ്റീരിയൽ | മെറ്റൽ, ഗ്ലാസ് |
| ഫിനിഷ് തരം | മാറ്റ് ബ്ലാക്ക് |
| പ്രകാശ സ്രോതസ്സ് തരം | LED, എനർജി എഫിഷ്യൻ്റ്, ഇൻകാൻഡസെൻ്റ്, ഹാലൊജൻ |
| ബൾബ് ബേസ് | E26 |
| മാക്സ് വാട്ട്tagബൾബിന് ഇ | 60 വാട്ട്സ് |
| വാല്യംtage | 120 വോൾട്ട് |
| ഉൾപ്പെടുത്തിയ ബൾബുകൾ | 2 x E26 ST64 4W LED (2700K Warm White) |
| ഇൻസ്റ്റലേഷൻ തരം | ഫ്ലഷ് മ .ണ്ട് |
| ഇൻഡോർ/ഔട്ട്ഡോർ ഉപയോഗം | Outdoor (under eaves), Indoor |
| പ്രത്യേക ഫീച്ചർ | ഡിമ്മബിൾ (അനുയോജ്യമായ ഡിമ്മർ സ്വിച്ച് ഉപയോഗിച്ച്) |
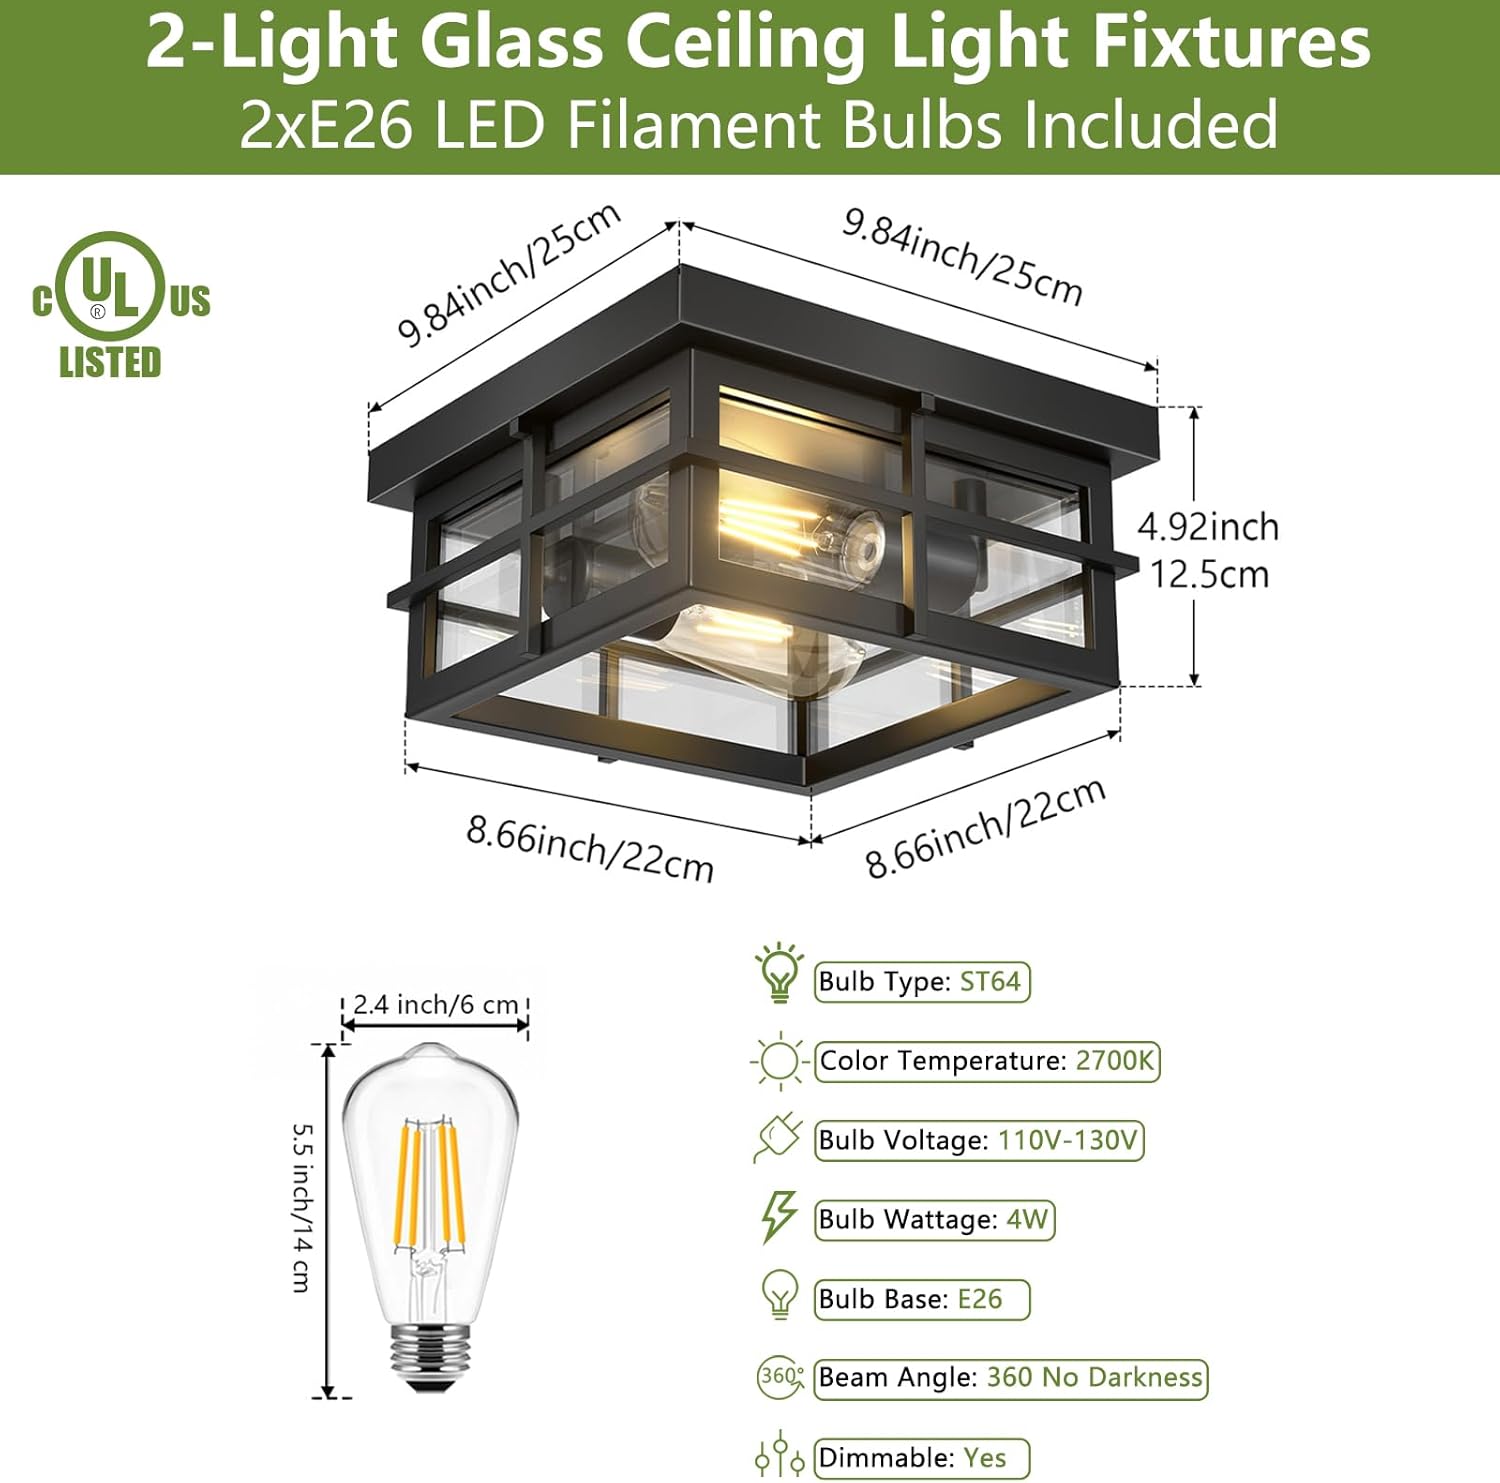
Image: Detailed specifications and dimensions of the Asnxcju ceiling light fixture and its included E26 ST64 LED bulbs.
4. സജ്ജീകരണവും ഇൻസ്റ്റാളേഷനും
Follow these steps carefully for safe and proper installation. It is recommended to have two people for installation.
4.1 ആവശ്യമായ ഉപകരണങ്ങൾ (ഉൾപ്പെടുത്തിയിട്ടില്ല)
- ഫിലിപ്സ് ഹെഡ് സ്ക്രൂഡ്രൈവർ
- ഫ്ലാറ്റ് ഹെഡ് സ്ക്രൂഡ്രൈവർ
- വയർ സ്ട്രിപ്പറുകൾ
- ഇലക്ട്രിക്കൽ ടേപ്പ്
- ഗോവണി
- സുരക്ഷാ ഗ്ലാസുകൾ
4.2 ഇൻസ്റ്റലേഷൻ ഘട്ടങ്ങൾ
- പവർ ഓഫ് ചെയ്യുക: Before starting, ensure the power to the circuit you are working on is turned off at the main circuit breaker or fuse box.
- മൗണ്ടിംഗ് ഉപരിതലം തയ്യാറാക്കുക: നിലവിലുള്ള ഒരു ഫിക്സ്ചർ മാറ്റിസ്ഥാപിക്കുകയാണെങ്കിൽ, അത് ശ്രദ്ധാപൂർവ്വം നീക്കം ചെയ്യുക. ജംഗ്ഷൻ ബോക്സ് സുരക്ഷിതമായി ഘടിപ്പിച്ചിട്ടുണ്ടെന്നും ഫിക്സ്ചറിന്റെ ഭാരം താങ്ങാൻ കഴിവുള്ളതാണെന്നും ഉറപ്പാക്കുക.
- മൗണ്ടിംഗ് ബ്രാക്കറ്റ് ഘടിപ്പിക്കുക: Secure the mounting bracket (included in hardware kit) to the junction box using the provided screws. Ensure the bracket is firm and level.
- വയർ കണക്ഷനുകൾ:
- ബന്ധിപ്പിക്കുക പച്ച അല്ലെങ്കിൽ നഗ്നമായ ചെമ്പ് ഗ്രൗണ്ട് വയർ ഫിക്സ്ചറിൽ നിന്ന് ഗ്രൗണ്ട് വയർ from the junction box using a wire nut.
- ബന്ധിപ്പിക്കുക വെളുത്ത (നിഷ്പക്ഷ) വയർ ഫിക്സ്ചറിൽ നിന്ന് വെളുത്ത (നിഷ്പക്ഷ) വയർ from the junction box using a wire nut.
- ബന്ധിപ്പിക്കുക കറുത്ത (ലൈവ്) വയർ ഫിക്സ്ചറിൽ നിന്ന് കറുത്ത (ലൈവ്) വയർ from the junction box using a wire nut.
- Ensure all wire nuts are tightly secured and connections are insulated with electrical tape if necessary.
- ഫിക്സ്ചർ മൌണ്ട് ചെയ്യുക: Carefully align the fixture with the mounting bracket and secure it using the provided screws. Ensure the fixture is flush against the ceiling and stable.
- ബൾബുകൾ സ്ഥാപിക്കുക: Gently screw the two E26 ST64 LED bulbs into the lamp ഹോൾഡറുകൾ. അമിതമായി മുറുക്കരുത്.
- പവർ പുന ore സ്ഥാപിക്കുക: Once the fixture is securely installed and bulbs are in place, turn the power back on at the main circuit breaker. Test the light fixture.

ചിത്രം: വിശദമായത് view of the fixture's components, including the robust metal frame, clear glass, ceramic lamp holder, and adjustable lamp cap, which are key for installation and durability.
5. പ്രവർത്തന നിർദ്ദേശങ്ങൾ
The Asnxcju Modern Outdoor Ceiling Light Fixture is designed for simple operation.
- പവർ ഓൺ/ഓഫ്: Control the light fixture using a standard wall switch connected to the circuit.
- മങ്ങിയ പ്രവർത്തനം: This fixture is dimmable. To utilize dimming capabilities, ensure you have a compatible dimmer switch installed on your wall and use dimmable E26 bulbs (the included bulbs are dimmable).
- ബൾബ് മാറ്റിസ്ഥാപിക്കൽ: The open bottom design allows for easy bulb replacement. Simply unscrew the old bulb and screw in a new E26 base bulb (max 60W).

ചിത്രം: ഉദാamples of the light fixture's versatile application in a kitchen, living room, and bedroom, demonstrating its aesthetic appeal in different indoor environments.

Image: The light fixture installed on a covered outdoor porch, highlighting its suitability for exterior areas protected from direct weather.
6. പരിപാലനം
നിങ്ങളുടെ ലൈറ്റ് ഫിക്ചറിന്റെ രൂപവും പ്രവർത്തനക്ഷമതയും സംരക്ഷിക്കാൻ പതിവ് അറ്റകുറ്റപ്പണികൾ സഹായിക്കും.
- വൃത്തിയാക്കൽ: Turn off the power before cleaning. Use a soft, dry cloth to wipe down the metal frame. For glass panels, a mild glass cleaner can be used, applied to the cloth first, not directly to the fixture. Avoid abrasive cleaners or solvents.
- ബൾബ് മാറ്റിസ്ഥാപിക്കൽ: As needed, replace E26 bulbs. Ensure the power is off before replacing bulbs.
- പരിശോധന: Periodically check for any loose connections or signs of wear. If any damage is observed, discontinue use and consult a qualified electrician.
7. പ്രശ്നപരിഹാരം
നിങ്ങളുടെ ലൈറ്റ് ഫിക്ചറിൽ പ്രശ്നങ്ങൾ നേരിടുകയാണെങ്കിൽ, ഇനിപ്പറയുന്ന പൊതുവായ പ്രശ്നങ്ങളും പരിഹാരങ്ങളും പരിശോധിക്കുക:
| പ്രശ്നം | സാധ്യമായ കാരണം | പരിഹാരം |
|---|---|---|
| ലൈറ്റ് ഓണാക്കില്ല. |
|
|
| അപ്രതീക്ഷിതമായി വെളിച്ചം മിന്നിമറയുകയോ മങ്ങുകയോ ചെയ്യുന്നു. |
|
|
| ഫിക്സ്ചറിൽ നിന്ന് മൂളൽ ശബ്ദം. |
|
|
ഈ പരിഹാരങ്ങൾ പരീക്ഷിച്ചതിന് ശേഷവും പ്രശ്നം നിലനിൽക്കുകയാണെങ്കിൽ, ദയവായി ഉപഭോക്തൃ പിന്തുണയുമായി ബന്ധപ്പെടുക.
8. വാറൻ്റിയും പിന്തുണയും
Asnxcju is committed to providing high-quality products and excellent customer service.
- വാറൻ്റി: If your farmhouse light fixture experiences defects or malfunctions within 1 year of purchase, Asnxcju is dedicated to replacing the entire product.
- ഉപഭോക്തൃ പിന്തുണ: If you encounter any problems with the product, please contact us. We aim to provide a satisfactory solution within 24 hours.
- For further assistance, please visit the official Asnxcju Store: Asnxcju Store on Amazon.
Ask a question about this manual
Ask about setup, troubleshooting, compatibility, parts, safety, or missing instructions. Manuals+ will review the question and use this page’s manual context to help answer it.