ആർട്ടിലറി സൈഡ്വൈൻഡർ X3 പ്രോ
ആർട്ടിലറി സൈഡ്വൈൻഡർ X3 പ്രോ 3D പ്രിന്റർ ഉപയോക്തൃ മാനുവൽ
മോഡൽ: സൈഡ്വൈൻഡർ X3 പ്രോ
ഉൽപ്പന്നം കഴിഞ്ഞുview
തുടക്കക്കാർക്കും പരിചയസമ്പന്നരായ ഉപയോക്താക്കൾക്കും വേണ്ടി രൂപകൽപ്പന ചെയ്തിരിക്കുന്ന ഉയർന്ന പ്രകടനമുള്ള 3D പ്രിന്ററാണ് ആർട്ടിലറി സൈഡ്വൈൻഡർ X3 പ്രോ. കൃത്യവും കാര്യക്ഷമവുമായ മോഡൽ സൃഷ്ടി ഉറപ്പാക്കുന്നതിന് ശക്തമായ ബിൽഡ്, അതിവേഗ പ്രിന്റിംഗ് കഴിവുകൾ, നൂതന പ്രവർത്തനങ്ങൾ എന്നിവ ഇതിന്റെ സവിശേഷതയാണ്.

ചിത്രം 1: ആർട്ടിലറി സൈഡ്വൈൻഡർ X3 പ്രോ 3D പ്രിന്റർ, ഷോക്asing അതിന്റെ ഒതുക്കമുള്ളതും ഉറപ്പുള്ളതുമായ ഡിസൈൻ.
- അൾട്രാ-ക്വയറ്റ് ഹൈ-സ്പീഡ് പ്രിന്റിംഗ്: ഉയർന്ന കൃത്യത നിലനിർത്തിക്കൊണ്ട് 300 mm/s വേഗതയിൽ അച്ചടിക്കാൻ കഴിയും.
- 49-പോയിന്റ് ഓട്ടോ ബെഡ് ലെവലിംഗ്: ബിൽഡ് പ്ലാറ്റ്ഫോമിന്റെ വേഗത്തിലുള്ളതും കൃത്യവുമായ ലെവലിംഗ് ഉറപ്പാക്കുന്നു, സജ്ജീകരണ പ്രക്രിയ ലളിതമാക്കുന്നു.
- ഡയറക്ട് ഡ്രൈവ് എക്സ്ട്രൂഡർ: ഉയർന്ന ഡ്രൈവ് അനുപാതത്തിനും ശക്തമായ എക്സ്ട്രൂഷൻ ഫോഴ്സിനുമായി ഡ്യുവൽ ഗിയർ സെറ്റുള്ള പുതുതായി വികസിപ്പിച്ചെടുത്ത മെറ്റൽ ഡയറക്ട് ഡ്രൈവ് എക്സ്ട്രൂഡർ ഇതിൽ ഉൾപ്പെടുന്നു, ഇത് കൂടുതൽ കൃത്യമായ എക്സ്ട്രൂഷനിലേക്ക് നയിക്കുന്നു.
- ഡ്യുവൽ ഇസഡ്-ആക്സിസുകളും ഡ്യുവൽ മോട്ടോറുകളും: പ്രിന്റുകളിലെ വരകളും വരമ്പുകളും കുറച്ചുകൊണ്ട് സ്ഥിരതയും പ്രിന്റിംഗ് കൃത്യതയും വർദ്ധിപ്പിക്കുന്നു.
- റെസ്യൂമെ പ്രിന്റിംഗ് ഫംഗ്ഷൻ: ഫിലമെന്റ് റൺഔട്ട്, പൊട്ടൽ അല്ലെങ്കിൽ വൈദ്യുതി നഷ്ടം എന്നിവ കണ്ടെത്തുന്നു, വീണ്ടെടുക്കലിനുശേഷം പ്രിന്റിംഗ് പുനരാരംഭിക്കാൻ അനുവദിക്കുന്നു, മെറ്റീരിയൽ പാഴാകുന്നത് തടയുന്നു.
സജ്ജീകരണവും അസംബ്ലിയും
ആർട്ടിലറി സൈഡ്വൈൻഡർ X3 പ്രോ 95% മുൻകൂട്ടി ഇൻസ്റ്റാൾ ചെയ്തിട്ടുള്ളതാണ്, ഇത് പ്രാരംഭ സജ്ജീകരണം എളുപ്പമാക്കുന്നു. തുടക്കക്കാർക്ക് പോലും, ആദ്യ പ്രിന്റിലേക്കുള്ള ഇൻസ്റ്റാളേഷന് സാധാരണയായി 4 ഘട്ടങ്ങളും ഏകദേശം 10 മിനിറ്റും മാത്രമേ ആവശ്യമുള്ളൂ.

ചിത്രം 2: സൈഡ്വൈൻഡർ X3 പ്രോയ്ക്കുള്ള അസംബ്ലി ഘട്ടങ്ങളുടെ ചിത്രീകരണം, പ്രാരംഭ സജ്ജീകരണത്തിന് ആവശ്യമായ ഏറ്റവും കുറഞ്ഞ പരിശ്രമം എടുത്തുകാണിക്കുന്നു.
പ്രാരംഭ ഘട്ടങ്ങൾ:
- അൺപാക്ക് ചെയ്യുന്നു: പാക്കേജിംഗിൽ നിന്ന് എല്ലാ ഘടകങ്ങളും ശ്രദ്ധാപൂർവ്വം നീക്കം ചെയ്യുക. പാക്കിംഗ് ലിസ്റ്റിൽ ലിസ്റ്റ് ചെയ്തിരിക്കുന്ന എല്ലാ ഭാഗങ്ങളും ഉണ്ടെന്ന് ഉറപ്പാക്കുക.
- ബേസ് ആൻഡ് ഗാൻട്രി അസംബ്ലി: നൽകിയിരിക്കുന്ന സ്ക്രൂകൾ ഉപയോഗിച്ച് പ്രിന്റർ ബേസിലേക്ക് ഗാൻട്രി ഘടിപ്പിക്കുക.
- കേബിൾ കണക്ഷനുകൾ: ആവശ്യമായ എല്ലാ കേബിളുകളും ബന്ധിപ്പിക്കുക, അവ സുരക്ഷിതമായി ഉറപ്പിച്ചിട്ടുണ്ടെന്ന് ഉറപ്പാക്കുക. ഹോട്ടെൻഡ്, എക്സ്ട്രൂഡർ കണക്ഷനുകളിൽ ശ്രദ്ധ ചെലുത്തുക.
- ഫിലമെൻ്റ് ലോഡിംഗ്: നിങ്ങൾ തിരഞ്ഞെടുത്ത ഫിലമെന്റ് ഡയറക്ട് ഡ്രൈവ് എക്സ്ട്രൂഡറിലേക്ക് ലോഡ് ചെയ്യുക.
- പവർ ഓൺ: പവർ കോർഡ് ബന്ധിപ്പിച്ച് പ്രിന്റർ ഓണാക്കുക.
പ്രവർത്തന നിർദ്ദേശങ്ങൾ
ഉപയോക്തൃ ഇൻ്റർഫേസ്:
സൈഡ്വൈൻഡർ X3 പ്രോയിൽ വലിയ ഐക്കണുകളുള്ള 4.3 ഇഞ്ച് പൂർണ്ണ വർണ്ണ ടച്ച്സ്ക്രീൻ ഉണ്ട്, ഇത് തെറ്റായ പ്രവർത്തനം തടയാൻ സഹായിക്കുന്ന ലളിതവും സവിശേഷതകളാൽ സമ്പന്നവുമായ ഇന്റർഫേസ് നൽകുന്നു.

ചിത്രം 3: അവബോധജന്യമായ നാവിഗേഷനായി രൂപകൽപ്പന ചെയ്തിരിക്കുന്ന സൈഡ്വൈൻഡർ X3 പ്രോയുടെ 4.3 ഇഞ്ച് പൂർണ്ണ വർണ്ണ ടച്ച്സ്ക്രീൻ ഇന്റർഫേസ്.
ഓട്ടോ ബെഡ് ലെവലിംഗ്:
പുതുതായി നവീകരിച്ച 49-പോയിന്റ് ഓട്ടോ ബെഡ് ലെവലിംഗ് സിസ്റ്റം ബിൽഡ് പ്ലാറ്റ്ഫോം വേഗത്തിലും കൃത്യമായും ലെവൽ ചെയ്യുന്നുവെന്ന് ഉറപ്പാക്കുന്നു, ഇത് വിജയകരമായ ആദ്യ ലെയറുകൾക്കും മൊത്തത്തിലുള്ള പ്രിന്റ് ഗുണനിലവാരത്തിനും നിർണായകമാണ്.

ചിത്രം 4: പ്രിന്റ് ബെഡ് സ്വയമേവ അളക്കുകയും ക്രമീകരിക്കുകയും ചെയ്യുന്ന 49-പോയിന്റ് സ്മാർട്ട് ഓട്ടോ-ലെവലിംഗ് പ്രക്രിയയുടെ ദൃശ്യ പ്രാതിനിധ്യം.
ഹൈ-സ്പീഡ് പ്രിന്റിംഗ്:
സൈഡ്വൈൻഡർ X3 പ്രോ അതിവേഗ പ്രിന്റിംഗിനായി രൂപകൽപ്പന ചെയ്തിരിക്കുന്നതാണ്, 300 mm/s വരെ വേഗത കൈവരിക്കുന്നതിനാൽ കൃത്യതയിൽ വിട്ടുവീഴ്ച ചെയ്യാതെ പ്രിന്റുകൾ വേഗത്തിൽ പൂർത്തിയാക്കാൻ കഴിയും.
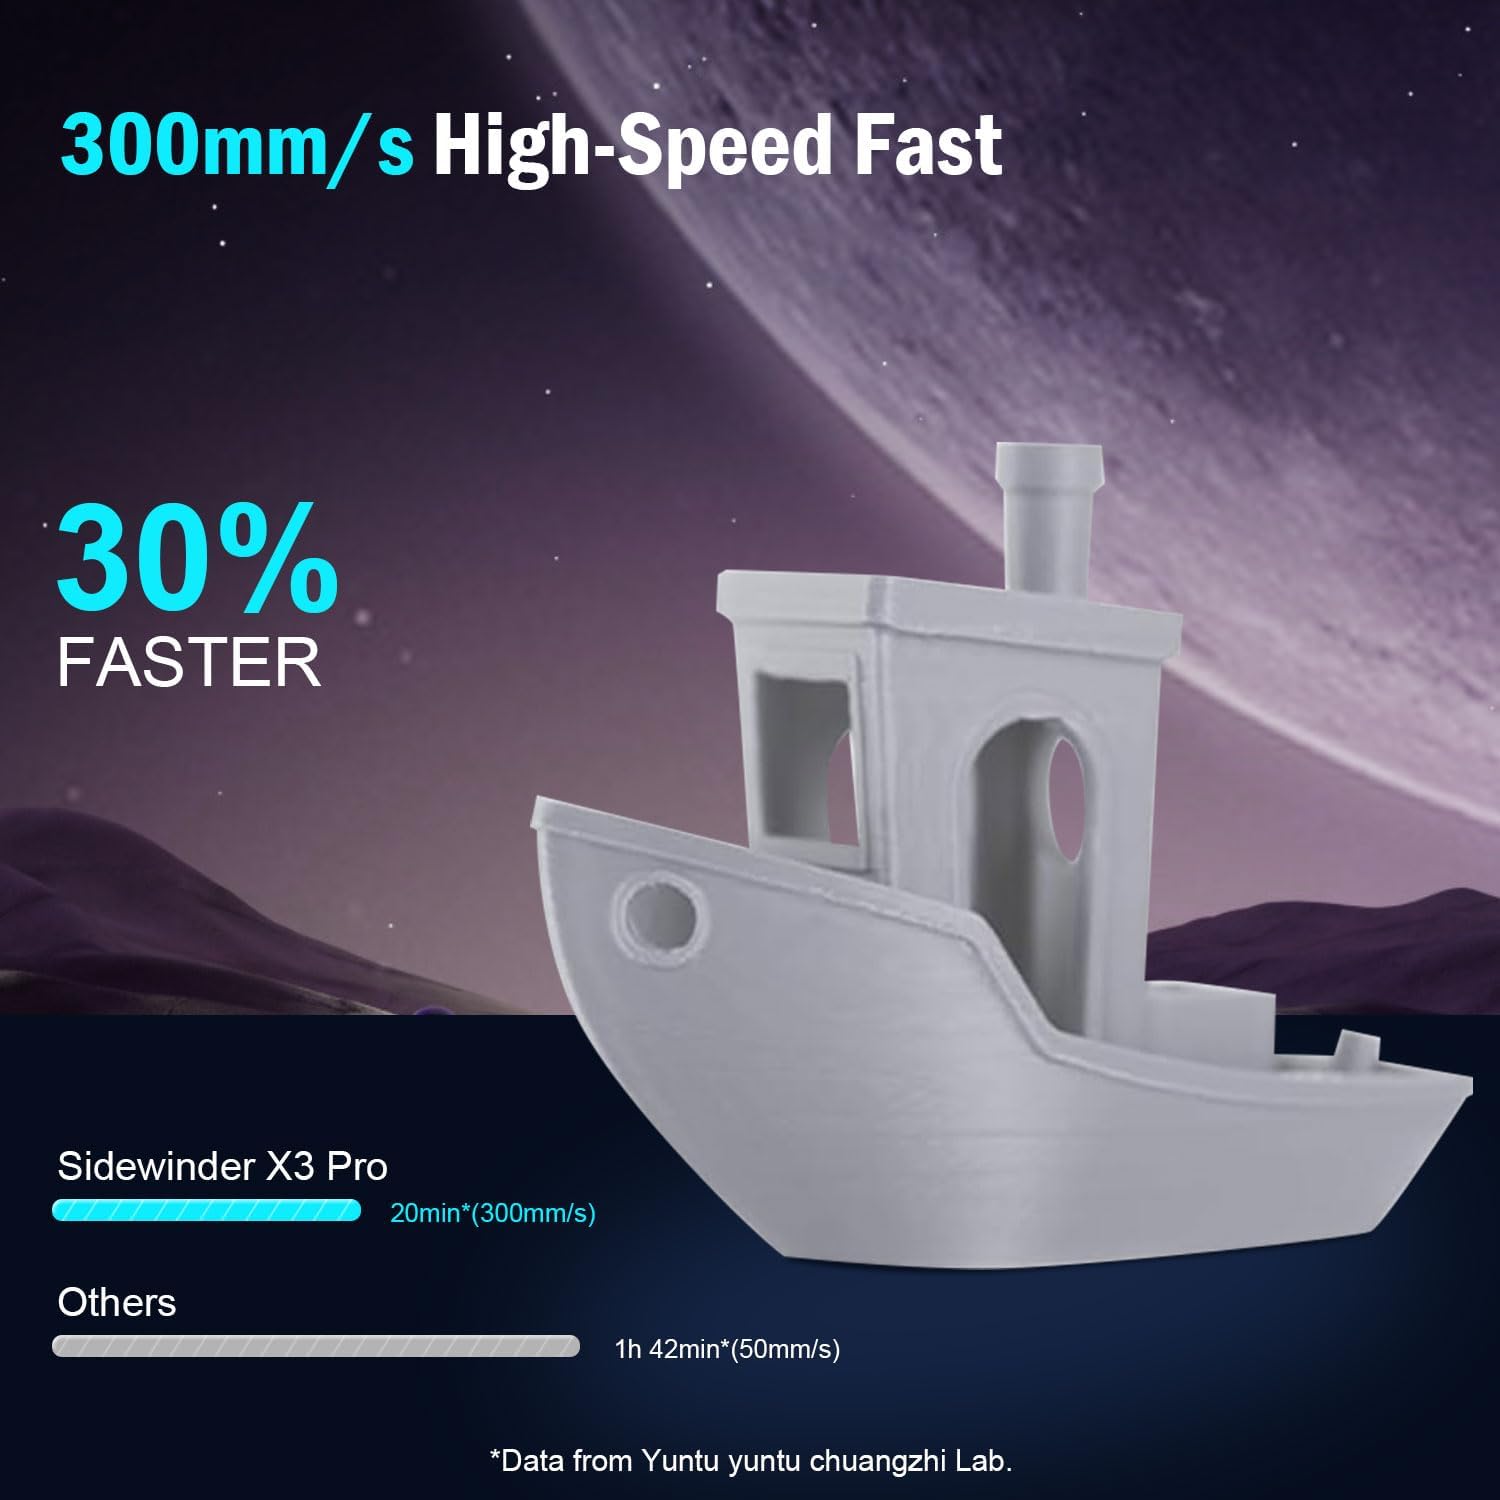
ചിത്രം 5: വേഗത നേട്ടം ചിത്രീകരിക്കുന്ന താരതമ്യം.tagവേഗത കുറഞ്ഞ പ്രിന്ററുകളെ അപേക്ഷിച്ച് സൈഡ്വൈൻഡർ X3 പ്രോയുടെ 300mm/s വേഗത.
എക്സ്ട്രൂഷൻ സിസ്റ്റം:
ഡ്യുവൽ-ഗിയർ ഡയറക്ട് എക്സ്ട്രൂഡർ കൊണ്ട് സജ്ജീകരിച്ചിരിക്കുന്ന ഈ പ്രിന്റർ ശക്തവും സുഗമവുമായ ഫിലമെന്റ് ഫീഡിംഗ് നൽകുന്നു, ഇത് സ്ഥിരവും ഉയർന്ന നിലവാരമുള്ളതുമായ പ്രിന്റുകൾക്ക് അത്യാവശ്യമാണ്. ഓൾ-മെറ്റൽ ഓട്ടോമാറ്റിക് ക്ലീനിംഗ് ഹോട്ടെൻഡ് 300°C വരെയുള്ള പ്രിന്റിംഗ് താപനിലയെ പിന്തുണയ്ക്കുന്നു.
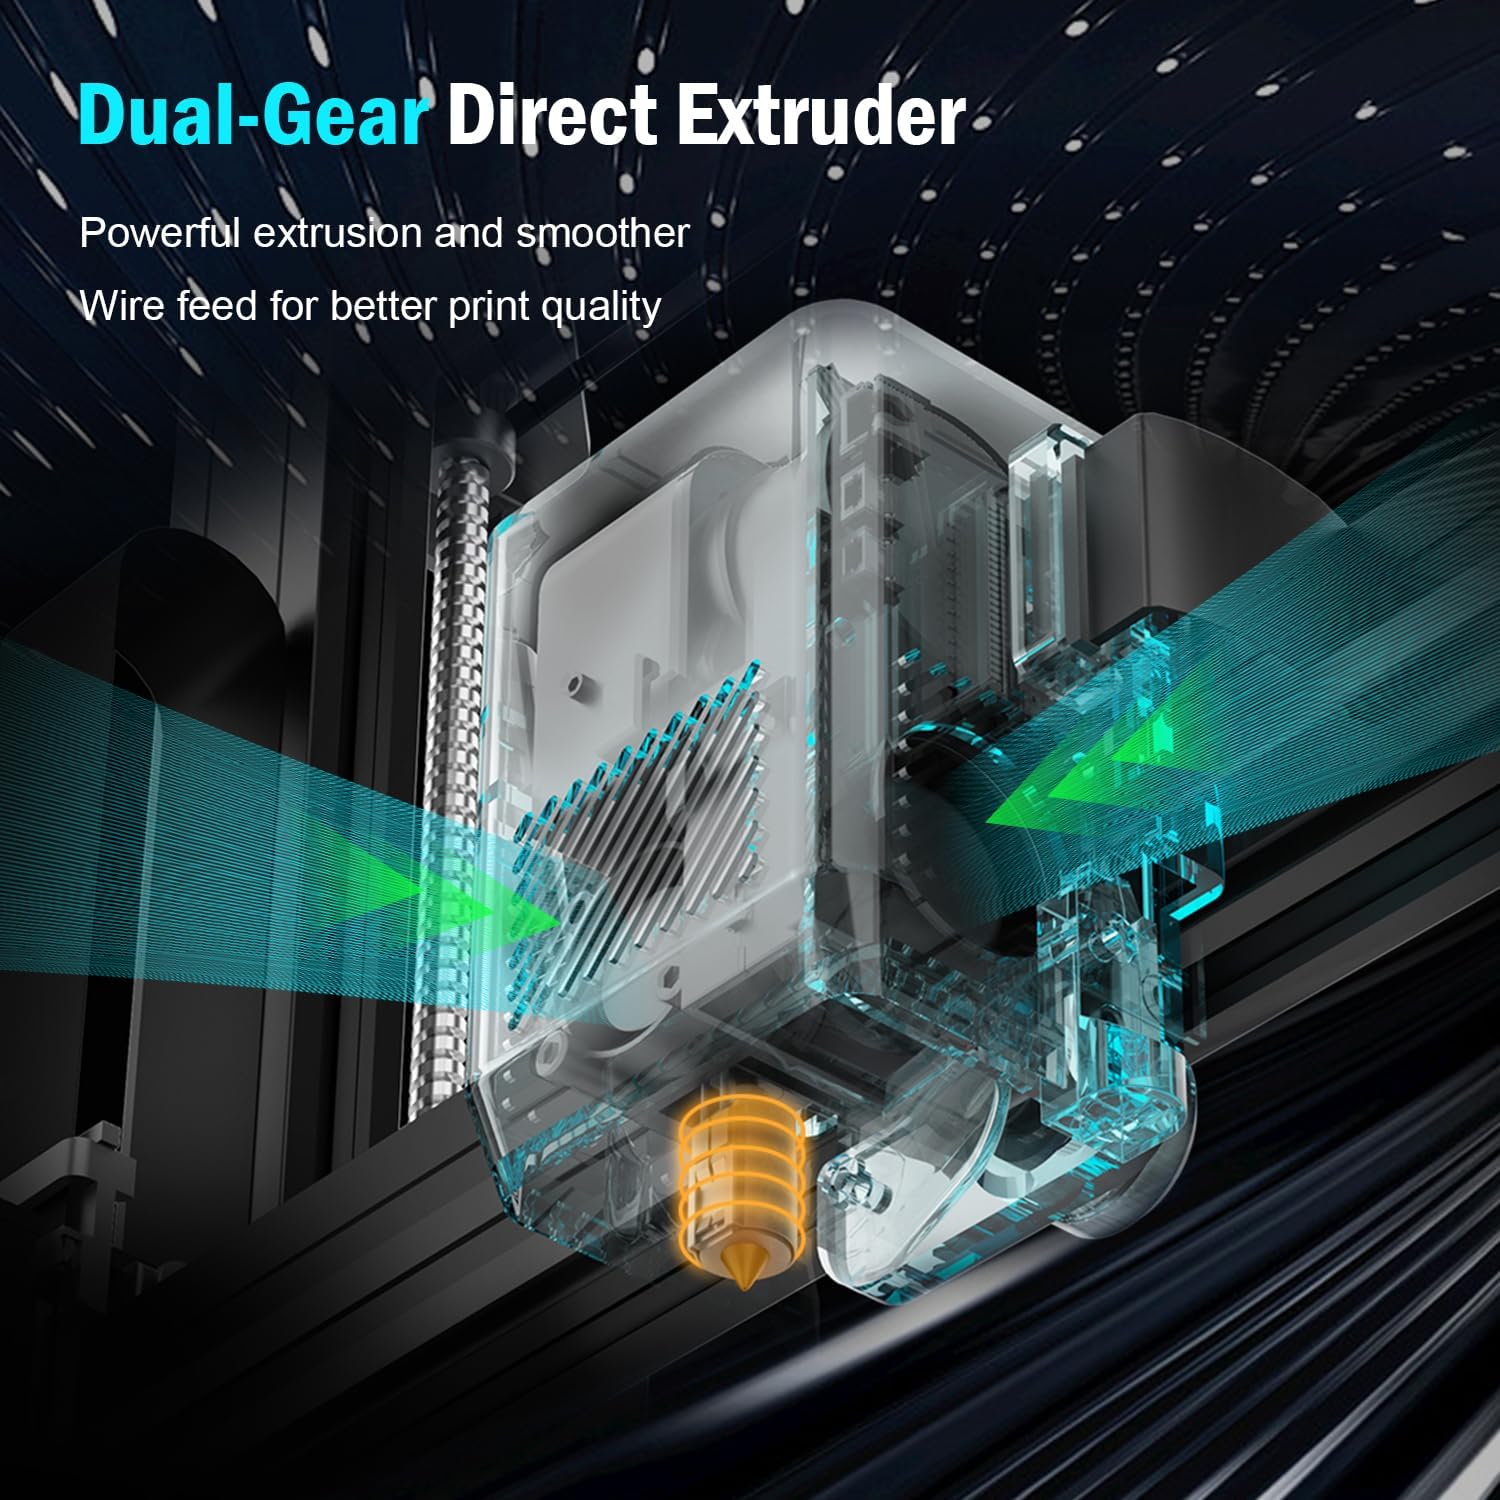
ചിത്രം 6: വിശദമായി view ശക്തവും കൃത്യവുമായ ഫിലമെന്റ് എക്സ്ട്രൂഷനായി രൂപകൽപ്പന ചെയ്തിരിക്കുന്ന ഡ്യുവൽ-ഗിയർ ഡയറക്ട് എക്സ്ട്രൂഡറിന്റെ.

ചിത്രം 7: 300°C വരെ താപനിലയിൽ എത്താൻ കഴിവുള്ള, പൂർണ്ണമായും ലോഹം നിറഞ്ഞ ഓട്ടോമാറ്റിക് ക്ലീനിംഗ് ഹോട്ടെൻഡിന്റെ ചിത്രീകരണം.
പ്രിന്റ് സ്ഥിരതയും കൃത്യതയും:
ഡ്യുവൽ ഇസഡ്-ആക്സിസുകളുടെയും ഡ്യുവൽ മോട്ടോറുകളുടെയും രൂപകൽപ്പന പ്രിന്റ് ഹെഡിന്റെ സ്ഥിരതയുള്ള ചലനം ഉറപ്പാക്കുകയും നിങ്ങളുടെ പ്രിന്റുകളിലെ വരകൾ, വരമ്പുകൾ പോലുള്ള ആർട്ടിഫാക്റ്റുകൾ കുറയ്ക്കുന്നതിലൂടെ ഉയർന്ന പ്രിന്റിംഗ് കൃത്യതയ്ക്ക് സംഭാവന നൽകുകയും ചെയ്യുന്നു.

ചിത്രം 8: പ്രിന്റ് ചെയ്യുമ്പോൾ മെച്ചപ്പെട്ട സ്ഥിരതയും കൃത്യതയും നൽകുന്ന ഡ്യുവൽ Z-ആക്സിസുകളും ഡ്യുവൽ മോട്ടോറുകളും കാണിക്കുന്ന ഡയഗ്രം.
വോളിയം പ്രിന്റ് ചെയ്ത് പ്ലേറ്റ് നിർമ്മിക്കുക:
ഈ പ്രിന്റർ 9.44" x 9.44" x 10.23" (240mm x 240mm x 260mm) പ്രിന്റ് സൈസ് വാഗ്ദാനം ചെയ്യുന്നു, ഇത് വിവിധ പ്രോജക്ടുകൾക്ക് അനുയോജ്യമാണ്. പരമാവധി ഹോട്ട്ബെഡ് താപനില 100°C ഉള്ള ഒരു PEI മാഗ്നറ്റിക് പ്ലാറ്റ്ഫോമാണ് ഇതിന്റെ സവിശേഷത. പ്ലാറ്റ്ഫോം തണുപ്പിച്ചുകഴിഞ്ഞാൽ ചെറുതായി വളച്ചുകൊണ്ട് മോഡലുകൾ എളുപ്പത്തിൽ നീക്കം ചെയ്യാൻ കഴിയും.

ചിത്രം 9: പ്രിന്റ് വോളിയം അളവുകളുടെയും PEI മാഗ്നറ്റിക് ബിൽഡ് പ്ലാറ്റ്ഫോമിന്റെയും ചിത്രീകരണം, എളുപ്പത്തിൽ പ്രിന്റ് നീക്കംചെയ്യൽ കാണിക്കുന്നു.
മെയിൻ്റനൻസ്
പതിവ് അറ്റകുറ്റപ്പണികൾ നിങ്ങളുടെ ആർട്ടിലറി സൈഡ്വൈൻഡർ X3 പ്രോ 3D പ്രിന്ററിന്റെ ദീർഘായുസ്സും ഒപ്റ്റിമൽ പ്രകടനവും ഉറപ്പാക്കുന്നു.
- ഹോട്ടല് ക്ലീനിംഗ്: പ്രിന്ററിൽ ഒരു ഓട്ടോമാറ്റിക് ക്ലീനിംഗ് ഹോട്ടെൻഡ് ഉണ്ട്. ഇടയ്ക്കിടെ നോസിൽ എന്തെങ്കിലും അവശിഷ്ടങ്ങളോ കട്ടകളോ ഉണ്ടോ എന്ന് പരിശോധിക്കുക.
- ബിൽഡ് പ്ലേറ്റ് കെയർ: തുടർന്നുള്ള പ്രിന്റുകൾക്ക് നല്ല ഒട്ടിപ്പിടിക്കൽ ഉറപ്പാക്കാൻ ഓരോ പ്രിന്റിന് ശേഷവും PEI മാഗ്നറ്റിക് ബിൽഡ് പ്ലേറ്റ് വൃത്തിയാക്കുക. മികച്ച ഫലങ്ങൾക്കായി ഐസോപ്രോപൈൽ ആൽക്കഹോൾ ഉപയോഗിക്കുക.
- ലൂബ്രിക്കേഷൻ: സുഗമമായ ചലനം ഉറപ്പാക്കാൻ, Z-ആക്സിസ് ലെഡ് സ്ക്രൂകളിലും മിനുസമാർന്ന റോഡുകളിലും ഇടയ്ക്കിടെ ചെറിയ അളവിൽ ലൂബ്രിക്കന്റ് പുരട്ടുക.
- ഫേംവെയർ അപ്ഡേറ്റുകൾ: ഔദ്യോഗിക പീരങ്കിപ്പട പരിശോധിക്കുക webനിങ്ങളുടെ പ്രിന്ററിൽ ഏറ്റവും പുതിയ സവിശേഷതകളും ബഗ് പരിഹാരങ്ങളും ഉണ്ടെന്ന് ഉറപ്പാക്കാൻ ലഭ്യമായ ഏതെങ്കിലും ഫേംവെയർ അപ്ഡേറ്റുകൾക്കായി സൈറ്റ് സന്ദർശിക്കുക.
- പൊതുവായ ശുചീകരണം: പ്രിന്റർ പൊടിയിൽ നിന്നും ഫിലമെന്റ് അവശിഷ്ടങ്ങളിൽ നിന്നും മുക്തമായി സൂക്ഷിക്കുക. എത്തിച്ചേരാൻ പ്രയാസമുള്ള സ്ഥലങ്ങൾ വൃത്തിയാക്കാൻ കംപ്രസ് ചെയ്ത വായു ഉപയോഗിക്കുക.
ട്രബിൾഷൂട്ടിംഗ്
നിങ്ങളുടെ സൈഡ്വൈൻഡർ X3 പ്രോ പ്രവർത്തിക്കുമ്പോൾ നിങ്ങൾ നേരിട്ടേക്കാവുന്ന സാധാരണ പ്രശ്നങ്ങൾക്കുള്ള പരിഹാരങ്ങൾ ഈ വിഭാഗം നൽകുന്നു.
| പ്രശ്നം | സാധ്യമായ കാരണം | പരിഹാരം |
|---|---|---|
| പ്രിന്റ് കിടക്കയിൽ പറ്റിപ്പിടിക്കുന്നില്ല | കിടക്ക നിരപ്പാക്കൽ ശരിയല്ല, വൃത്തികെട്ട ബിൽഡ് പ്ലേറ്റ്, കിടക്കയിലെ താപനില തെറ്റാണ്. | ഓട്ടോ ബെഡ് ലെവലിംഗ് നടത്തുക. ഐസോപ്രോപൈൽ ആൽക്കഹോൾ ഉപയോഗിച്ച് ബിൽഡ് പ്ലേറ്റ് വൃത്തിയാക്കുക. ഫിലമെന്റ് തരം അനുസരിച്ച് ബെഡ് താപനില ക്രമീകരിക്കുക. |
| ഫിലമെന്റ് പുറത്തെടുക്കുന്നില്ല | അടഞ്ഞുപോയ നോസൽ, കുഴഞ്ഞ ഫിലമെന്റ്, തെറ്റായ ഹോട്ടെൻഡ് താപനില, എക്സ്ട്രൂഡർ പ്രശ്നം. | ഹോട്ടെൻഡ് താപനില പരിശോധിക്കുക. സൂചി ഉപയോഗിച്ചോ കോൾഡ് പുൾ ഉപയോഗിച്ചോ നോസലിന്റെ തടസ്സം നീക്കം ചെയ്യുക. ഫിലമെന്റ് സ്പൂൾ സ്വതന്ത്രവും കുരുക്കില്ലാത്തതുമാണെന്ന് ഉറപ്പാക്കുക. ശരിയായ പ്രവർത്തനത്തിനായി എക്സ്ട്രൂഡർ പരിശോധിക്കുക. |
| പ്രിന്റർ പ്രിന്റ് ചെയ്യൽ പകുതിയിൽ നിർത്തുന്നു | ഫിലമെന്റ് റൺഔട്ട്/പൊട്ടൽ, പവർ നഷ്ടം, കേടായ ജി-കോഡ്. | റെസ്യൂമെ പ്രിന്റിംഗ് ഫംഗ്ഷൻ പ്രയോജനപ്പെടുത്തുക. ഫിലമെന്റ് പാത്ത് പരിശോധിക്കുക. സ്ഥിരതയുള്ള പവർ സപ്ലൈ ഉറപ്പാക്കുക. ജി-കോഡ് മുറിച്ച് വീണ്ടും അപ്ലോഡ് ചെയ്യുക. |
| മോശം പ്രിന്റ് നിലവാരം (ലെയർ ഷിഫ്റ്റുകൾ, സ്ട്രിംഗിംഗ്) | അയഞ്ഞ ബെൽറ്റുകൾ, തെറ്റായ പ്രിന്റ് വേഗത, പിൻവലിക്കൽ ക്രമീകരണങ്ങൾ, താപനില. | ബെൽറ്റുകൾ പരിശോധിച്ച് മുറുക്കുക. പ്രിന്റ് വേഗത ക്രമീകരിക്കുക. സ്ലൈസറിൽ പിൻവലിക്കൽ ക്രമീകരണങ്ങൾ കാലിബ്രേറ്റ് ചെയ്യുക. ഹോട്ടെൻഡ് താപനില ഒപ്റ്റിമൈസ് ചെയ്യുക. |
| ടച്ച്സ്ക്രീൻ പ്രതികരിക്കുന്നില്ല/തെറ്റായ ഭാഷ | സോഫ്റ്റ്വെയർ തകരാർ, കണക്ഷൻ നഷ്ടപ്പെട്ടു, ഫേംവെയർ കേടായി. | പ്രിന്റർ പുനരാരംഭിക്കുക. ഡിസ്പ്ലേ കേബിൾ കണക്ഷനുകൾ പരിശോധിക്കുക. പ്രശ്നം നിലനിൽക്കുകയാണെങ്കിൽ ഫേംവെയർ വീണ്ടും ഫ്ലാഷ് ചെയ്യുന്നത് പരിഗണിക്കുക (ആർട്ടിലറി പിന്തുണ കാണുക). |
കൂടുതൽ സങ്കീർണ്ണമായ പ്രശ്നങ്ങൾക്കോ അല്ലെങ്കിൽ പ്രശ്നം നിലനിൽക്കുകയാണെങ്കിൽ, ബന്ധപ്പെടാനുള്ള വിവരങ്ങൾക്ക് വാറന്റി, പിന്തുണ വിഭാഗം പരിശോധിക്കുക.
സ്പെസിഫിക്കേഷനുകൾ
| ഫീച്ചർ | വിശദാംശങ്ങൾ |
|---|---|
| മോഡൽ | സൈഡ്വിൻഡർ X3 പ്രോ |
| ബ്രാൻഡ് | പീരങ്കിപ്പട |
| ഉൽപ്പന്ന അളവുകൾ | 17.6 x 9.76 x 19.7 ഇഞ്ച് (447 x 248 x 500 മിമി) |
| ഇനത്തിൻ്റെ ഭാരം | 24 പൗണ്ട് (10.89 കി.ഗ്രാം) |
| മെറ്റീരിയൽ | ലോഹം |
| നിറം | കറുപ്പ് |
| പരമാവധി പ്രിന്റ് വേഗത | 300 മിമി/സെ |
| ഓട്ടോ ലെവലിംഗ് | 49-പോയിൻ്റ് ഓട്ടോ ബെഡ് ലെവലിംഗ് |
| എക്സ്ട്രൂഡർ തരം | ഡ്യുവൽ-ഗിയർ ഡയറക്ട് ഡ്രൈവ് എക്സ്ട്രൂഡർ |
| പരമാവധി ഹോട്ടെൻഡ് താപനില | 300°C (പൂർണ്ണമായും ലോഹം കൊണ്ടുള്ള ഹോട്ടലെൻഡ്) |
| പ്ലേറ്റ് നിർമ്മിക്കുക | PEI മാഗ്നറ്റിക് സ്പ്രിംഗ് സ്റ്റീൽ |
| പരമാവധി ഹോട്ട്ബെഡ് താപനില | 100°C |
| Z-ആക്സിസ് ഡിസൈൻ | ഡ്യുവൽ ഇസഡ്-ആക്സസുകളും ഡ്യുവൽ മോട്ടോറുകളും |
| കണക്റ്റിവിറ്റി | SD കാർഡ്, USB (കരുതുന്നു) |
| ഉപയോക്തൃ ഇൻ്റർഫേസ് | 4.3-ഇഞ്ച് ഫുൾ-കളർ ടച്ച്സ്ക്രീൻ |

ചിത്രം 10: ഡൈമൻഷണൽ ഓവർview ആർട്ടിലറി സൈഡ്വൈൻഡർ X3 പ്രോ 3D പ്രിന്ററിന്റെ.
വാറൻ്റിയും പിന്തുണയും
സൈഡ്വൈൻഡർ X3 പ്രോ 3D പ്രിന്ററിന് ആർട്ടിലറി ഒരു വർഷത്തെ വാറന്റി നൽകുന്നു. കൂടാതെ, നിങ്ങൾക്ക് നേരിടേണ്ടിവരുന്ന ഏതൊരു അന്വേഷണങ്ങൾക്കും പ്രശ്നങ്ങൾക്കും സഹായിക്കുന്നതിന് 24 മണിക്കൂർ വിൽപ്പനാനന്തര സേവനവും ലഭ്യമാണ്.
സാങ്കേതിക പിന്തുണ, വാറന്റി ക്ലെയിമുകൾ അല്ലെങ്കിൽ പൊതുവായ അന്വേഷണങ്ങൾ എന്നിവയ്ക്കായി, ദയവായി ആർട്ടിലറിയുടെ ഔദ്യോഗിക ചാനലുകൾ വഴി ഉപഭോക്തൃ സേവനവുമായി ബന്ധപ്പെടുക. ഉൽപ്പന്ന പാക്കേജിംഗ് അല്ലെങ്കിൽ ഔദ്യോഗിക ആർട്ടിലറി കാണുക. webഏറ്റവും കാലികമായ ബന്ധപ്പെടാനുള്ള വിവരങ്ങൾക്കായി സൈറ്റ്.
വാറന്റി ആവശ്യങ്ങൾക്കായി വാങ്ങിയതിന്റെ തെളിവായി നിങ്ങളുടെ വാങ്ങൽ രസീത് സൂക്ഷിക്കാൻ ശുപാർശ ചെയ്യുന്നു.
Ask a question about this manual
Ask about setup, troubleshooting, compatibility, parts, safety, or missing instructions. Manuals+ will review the question and use this page’s manual context to help answer it.