
1. ആമുഖവും അവസാനവുംview
The LR-G200 Integrated Rebar Scanner is a sophisticated instrument designed for the non-destructive testing of reinforced concrete structures. Its primary function is to detect the position, distribution, and direction of rebar, measure the thickness of concrete cover, and estimate the diameter of rebar within concrete. This manual provides comprehensive instructions for the setup, operation, and maintenance of the LR-G200, ensuring accurate and reliable data acquisition.

Figure 1: The LR-G200 Integrated Rebar Scanner, showing its compact design and user interface.
2 പ്രധാന സവിശേഷതകൾ
- Integrated Structure: The instrument sensor features an integrated structure, ensuring a small size and easy operation.
- High Accuracy and Resolution: Testing is carried out with a combination of a high-power transmitting coil and multiple small coils, ensuring superior accuracy and resolution in detection.
- Precise Displacement Scanning: Utilizes a high-accuracy grating sensor for precise displacement scanning and rebar distance measurement.
- ബഹുമുഖ സ്കാനിംഗ് മോഡുകൾ: Provides different types of scanning to suit various measurement cases and structural requirements.
- Extensive Testing Range and Data Storage: Permits large and small-range testing, with a scanning distance of up to 65 meters maximum. The instrument itself can store data for up to 4000 components.
3. സജ്ജീകരണം
Before operating the LR-G200, ensure all components are present and properly connected. The device is designed for ease of use, with minimal setup required.
3.1 അൺപാക്കിംഗും ഘടക തിരിച്ചറിയലും
Carefully unpack the LR-G200 and identify the following components:
- LR-G200 Main Unit
- യുഎസ്ബി ഡാറ്റ കേബിൾ
- USB Flash Drive (for software and data transfer)
- പവർ അഡാപ്റ്റർ/ചാർജർ
- ചുമക്കുന്ന കേസ്
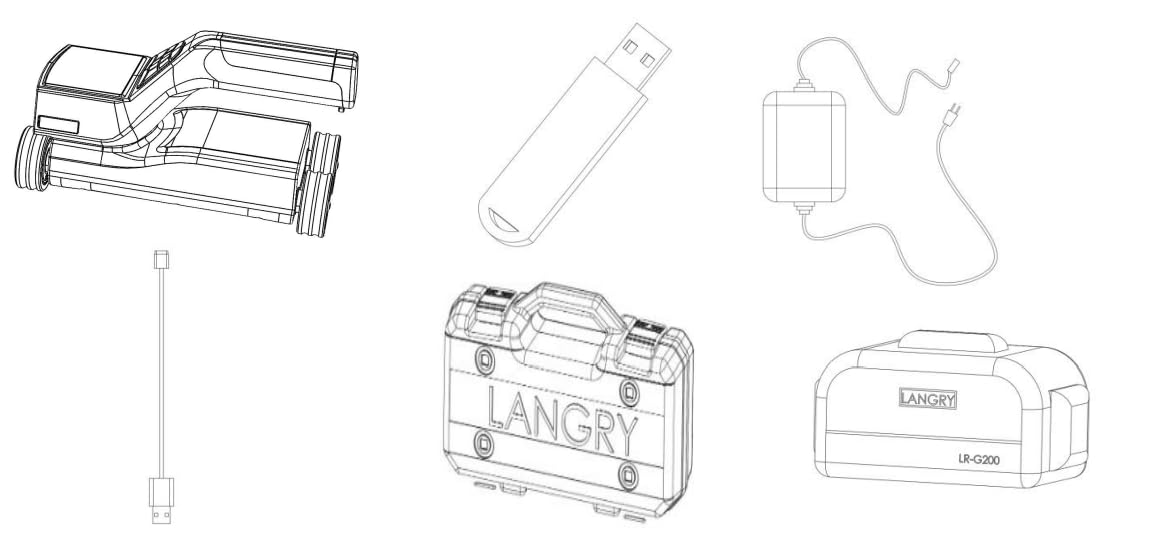
Figure 2: Illustrated components of the LR-G200 system, including the main unit, data transfer accessories, and power supply.
3.2 ഉപകരണം ചാർജ് ചെയ്യുന്നു
Before first use, fully charge the LR-G200 using the provided power adapter. Connect the adapter to the charging port on the device and plug it into a standard power outlet. The charging indicator on the device will show its status.
4. പ്രവർത്തന നിർദ്ദേശങ്ങൾ
The LR-G200 features an intuitive interface for easy navigation and operation. Follow these steps for effective rebar detection.
4.1 Powering On and Main Menu
Press and hold the power button to turn on the device. The main menu will appear, offering various options for scanning and data management.

Figure 3: The LR-G200's main menu, displaying various scanning modes such as Quick, Profile, and Grid, alongside data management options.
4.2 സ്കാനിംഗ് മോഡുകൾ
The LR-G200 offers several scanning modes to suit different detection requirements:
- Quick Scan: For rapid assessment of rebar presence and approximate depth.
- പ്രൊഫfile സ്കാൻ ചെയ്യുക: Provides a cross-sectional view of rebar distribution.
- Grid Scan: Creates a grid pattern for comprehensive mapping of rebar networks.
- Fine Scan: For detailed analysis of specific rebar locations and diameters.
- Image Scan: Captures a visual representation of the scanned area.

ചിത്രം 4: ഉദാamples of detailed scan results from various modes, illustrating rebar depth, diameter, and positional data.
4.3 Data Display and Analysis
After scanning, the device displays the collected data, including rebar depth, diameter, and distribution. This data can be reviewed directly on the device or transferred to a computer for further analysis using the dedicated software.

Figure 5: The data display interface of the LR-G200, providing comprehensive details of detected rebar, including dimensions and eligibility.
5. Software for Data Analysis
The LR-G200 comes with a dedicated rebar detection data analysis software developed by Jinan Langrui Detection Technology Co., Ltd. This multi-function analysis software is designed for processing the rebar detection data and runs on XP/Win7/Win10 operating systems, offering a user-friendly interface.
5.1 Software Capabilities
- Component Information Management: Manages all component information and detection data at each measuring point.
- Analysis and Evaluation: Conducts analysis and evaluation of detection data according to construction quality acceptance criteria.
- Graphic Data Display: Displays component data in a clear graphic format for easy interpretation.
- ഡാറ്റ File സംയോജനം: Generates a detection data file by integrating several individual files, allowing easy addition or removal of detection data.
- Reporting and Export: Supports printing of previews and exporting of treatment results.
- Easy Data Import: Facilitates easy import of rebar scanner data into the computer for further analysis and archiving.
- ഓട്ടോമാറ്റിക് റിപ്പോർട്ട് ജനറേഷൻ: Automatically generates detection reports in Word format (.docx).
ഡാറ്റ files saved in the software have the file extension `.xgjy`. The automatically generated detection reports use the `.docx` format.

ചിത്രം 6: ഓവർview of the rebar detection data analysis software interface, demonstrating its capabilities for data visualization and report generation.
6. പരിപാലനം
Proper maintenance ensures the longevity and accuracy of your LR-G200 scanner.
- വൃത്തിയാക്കൽ: Use a soft, dry cloth to clean the device. Do not use abrasive cleaners or solvents. Ensure the sensor area is free from dust and debris.
- സംഭരണം: Store the device in its carrying case in a cool, dry place when not in use. Avoid extreme temperatures and high humidity.
- ബാറ്ററി കെയർ: മികച്ച ബാറ്ററി ലൈഫിന്, ബാറ്ററി ഇടയ്ക്കിടെ പൂർണ്ണമായും ഡിസ്ചാർജ് ചെയ്യുന്നത് ഒഴിവാക്കുക. ദീർഘനേരം സൂക്ഷിക്കുകയാണെങ്കിൽ, കുറച്ച് മാസങ്ങൾ കൂടുമ്പോൾ ബാറ്ററി ഏകദേശം 50% വരെ ചാർജ് ചെയ്യുക.
- സോഫ്റ്റ്വെയർ അപ്ഡേറ്റുകൾ: ഒപ്റ്റിമൽ പ്രകടനവും പുതിയ സവിശേഷതകളിലേക്കുള്ള ആക്സസും ഉറപ്പാക്കാൻ, നിർമ്മാതാവിൽ നിന്നുള്ള സോഫ്റ്റ്വെയർ അപ്ഡേറ്റുകൾക്കായി ഇടയ്ക്കിടെ പരിശോധിക്കുക.
7. പ്രശ്നപരിഹാരം
This section addresses common issues you might encounter with the LR-G200.
- ഉപകരണം പവർ ചെയ്യുന്നില്ല:
- ബാറ്ററി ആവശ്യത്തിന് ചാർജ്ജ് ചെയ്തിട്ടുണ്ടെന്ന് ഉറപ്പാക്കുക. ചാർജർ കണക്റ്റ് ചെയ്ത് വീണ്ടും പവർ ഓൺ ചെയ്യാൻ ശ്രമിക്കുന്നതിന് മുമ്പ് കുറച്ച് മിനിറ്റ് കാത്തിരിക്കുക.
- Check the power button for any physical obstruction.
- കൃത്യമല്ലാത്ത വായനകൾ:
- Ensure the sensor surface is clean and free from dirt or moisture.
- Verify that the scanning technique is consistent with the instructions.
- Calibrate the device if a calibration option is available in the settings menu.
- സോഫ്റ്റ്വെയർ കണക്റ്റിവിറ്റി പ്രശ്നങ്ങൾ:
- യുഎസ്ബി കേബിൾ ഉപകരണത്തിലേക്കും കമ്പ്യൂട്ടറിലേക്കും സുരക്ഷിതമായി ബന്ധിപ്പിച്ചിട്ടുണ്ടെന്ന് ഉറപ്പാക്കുക.
- നിങ്ങളുടെ കമ്പ്യൂട്ടറിൽ മറ്റൊരു USB പോർട്ട് പരീക്ഷിക്കുക.
- ഉപകരണവും കമ്പ്യൂട്ടറും പുനരാരംഭിക്കുക.
- Ensure the correct drivers are installed for the device on your computer.
- Data Transfer Failure:
- USB കണക്ഷൻ പരിശോധിക്കുക.
- Ensure there is sufficient storage space on the USB flash drive or computer.
- Verify that the software is running correctly and is not blocked by a firewall or antivirus program.
If you encounter issues not listed here or if the problem persists, please contact customer support.
8 സ്പെസിഫിക്കേഷനുകൾ
| ആട്രിബ്യൂട്ട് | മൂല്യം |
|---|---|
| ബ്രാൻഡ് | ജനറിക് |
| നിർമ്മാതാവ് | Vinculum Labs |
| മോഡൽ നമ്പർ | LR-G200 |
| നിറം | നീല |
| Number of Memory Sticks | 1 |
| ഉൽപ്പന്ന അളവുകൾ (LxWxH) | 51 x 32.8 x 21.5 സെൻ്റീമീറ്റർ |
| ഇനത്തിന്റെ ഉയരം | 21.5 സെൻ്റീമീറ്റർ |
| ഇനത്തിൻ്റെ വീതി | 32.8 സെൻ്റീമീറ്റർ |
| ASIN | B0CPYTX5D5 |
| ആദ്യ തീയതി ലഭ്യമാണ് | 10 ഡിസംബർ 2023 |
9. വാറൻ്റിയും പിന്തുണയും
For warranty information and technical support, please refer to the documentation provided with your purchase or contact the manufacturer, Vinculum Labs, directly. Ensure you have your product model number (LR-G200) and purchase details ready when seeking support.
Manufacturer Contact: Vinculum labs, New Delhi