
ആമുഖം
This manual provides detailed instructions for the installation, operation, and maintenance of your Geloo 85MM Boat RPM Tachometer Gauge. Please read this manual thoroughly before installation and use to ensure proper function and longevity of the product.
ഉൽപ്പന്നം കഴിഞ്ഞുview വീഡിയോ
Video 1: Geloo 85MM RPM Tachometer Gauge Overview. This video demonstrates the physical characteristics of the Geloo tachometer, including its waterproof capabilities and backlight color options. (Duration: 0:44)
ഉൽപ്പന്ന സവിശേഷതകൾ
- വിശാലമായ അനുയോജ്യത: This tachometer is designed to be compatible with various RPM sensors and is suitable for a broad range of vehicles and machinery, including cars, trucks, boats, diesel generator engines, gasoline engines, construction machinery, and agricultural machinery.
- നീണ്ടുനിൽക്കുന്ന നിർമ്മാണം: Manufactured with a 316 stainless steel bezel, PVC, ABS, and curved glass, ensuring high quality and stable performance.
- IP67 Waterproof and Anti-Fog: Features an IP67 waterproof rating and anti-fog curved glass, allowing for clear data readability and normal operation even in harsh, humid, or acidic environments.
- എളുപ്പമുള്ള ഇൻസ്റ്റാളേഷൻ: Designed for straightforward installation, requiring an 85mm (3 3/8") panel opening and a 55mm clearance behind the panel. The secure harness connector ensures proper function even under strong vibration.
- RPM Range and Voltage: Reads RPM from 0 to 6,000. Operates on 9-32V power systems and is compatible with 4, 6, 8, 10, or 12 cylinder gas-powered engines.
- Multi-Color Backlight: Features seven backlight colors (red, green, blue, white, yellow, cyan, purple) with an illuminated red needle for clear visibility at night. The backlight color can be changed manually or set to automatically cycle.

ചിത്രം 4: ഈട് സവിശേഷതകൾ. This image highlights the dustproof and IP67 waterproof capabilities of the tachometer, ensuring reliable performance in various conditions.
സ്പെസിഫിക്കേഷനുകൾ
| ആട്രിബ്യൂട്ട് | മൂല്യം |
|---|---|
| ബ്രാൻഡ് | Geloo |
| മോഡൽ നമ്പർ | CX8150 |
| മെറ്റീരിയൽ | Acrylonitrile Butadiene Styrene (ABS), Glass, Stainless Steel |
| ഇനത്തിന്റെ അളവുകൾ (L x W x H) | 4.5 x 4.5 x 3.11 ഇഞ്ച് |
| ഇനത്തിൻ്റെ ഭാരം | 0.5 പൗണ്ട് |
| ഇനങ്ങളുടെ എണ്ണം | 1 |
| RPM ശ്രേണി | 0-6000 ആർപിഎം |
| ഓപ്പറേറ്റിംഗ് വോളിയംtage | 9-32V |
| Panel Opening Size | 85 മിമി (3 3/8") |
| ബാക്ക്ലൈറ്റ് നിറങ്ങൾ | Red, Green, Blue, White, Yellow, Cyan, Purple |
| വാട്ടർപ്രൂഫ് റേറ്റിംഗ് | IP67 |

ചിത്രം 5: ഉൽപ്പന്ന അളവുകൾ. A detailed diagram illustrating the measurements of the tachometer gauge for installation planning.
ഇൻസ്റ്റലേഷൻ നിർദ്ദേശങ്ങൾ
Follow these steps for proper installation of your Geloo Tachometer Gauge:
- മൗണ്ടിംഗ് ഹോൾ തയ്യാറാക്കുക: To install the gauge, you will need to create a circular opening in your panel. The required diameter for this hole is 85mm (3 3/8 inches). Ensure there is at least 55mm of clear space behind the panel for the gauge's body and wiring.
- Insert the Gauge: Carefully insert the tachometer gauge into the prepared hole from the front of the panel.
- ഗേജ് സുരക്ഷിതമാക്കുക: Use the provided mounting hardware (typically a retaining ring and nuts) to secure the gauge firmly in place from the back of the panel.
- വയറിംഗ് കണക്ഷനുകൾ: Connect the wiring harness to the back of the gauge. Refer to the wiring diagram below for correct connections. The harness connector is designed to snap securely, providing a stable connection even under vibration.
വയറിംഗ് കണക്ഷനുകൾ
വയറുകൾ ഇനിപ്പറയുന്ന രീതിയിൽ ബന്ധിപ്പിക്കുക:
- ബ്ലാക്ക് വയർ: ഗ്രൗണ്ടിലേക്ക് കണക്റ്റുചെയ്യുക (-)
- റെഡ് വയർ: Connect to 9-32VDC Power (+)
- നീല വയർ: Connect to RPM Signal Input
- മഞ്ഞ വയർ: Connect to Backlight Power (+)
ഷോർട്ട് സർക്യൂട്ടുകൾ തടയാൻ എല്ലാ കണക്ഷനുകളും സുരക്ഷിതമാണെന്നും ഇൻസുലേറ്റ് ചെയ്തിട്ടുണ്ടെന്നും ഉറപ്പാക്കുക.

Figure 1: Wiring Diagram. This diagram illustrates the necessary electrical connections for the tachometer. Ensure correct polarity and signal wire connection for accurate readings.

ചിത്രം 2: ഉദാampലെ ഇൻസ്റ്റലേഷൻ. The image shows the tachometer gauge properly installed on a boat dashboard, demonstrating its flush fit and clear visibility.
പ്രവർത്തന നിർദ്ദേശങ്ങൾ
Once installed and powered, the tachometer will display the engine's RPM. The digital display at the bottom shows accumulated operating hours (H).
Backlight Color Adjustment
The tachometer features multiple backlight colors. To change the backlight color:
- Locate the small button on the back of the gauge (refer to Figure 3).
- ഷോർട്ട് പ്രസ്സ്: Briefly press the button to cycle through the available backlight colors: Red (default) → Green → Blue → White → Yellow → Cyan → Purple → Automatic cycle.
- യാന്ത്രിക മോഡ്: In automatic mode, the backlight color will switch automatically every 1 minute.
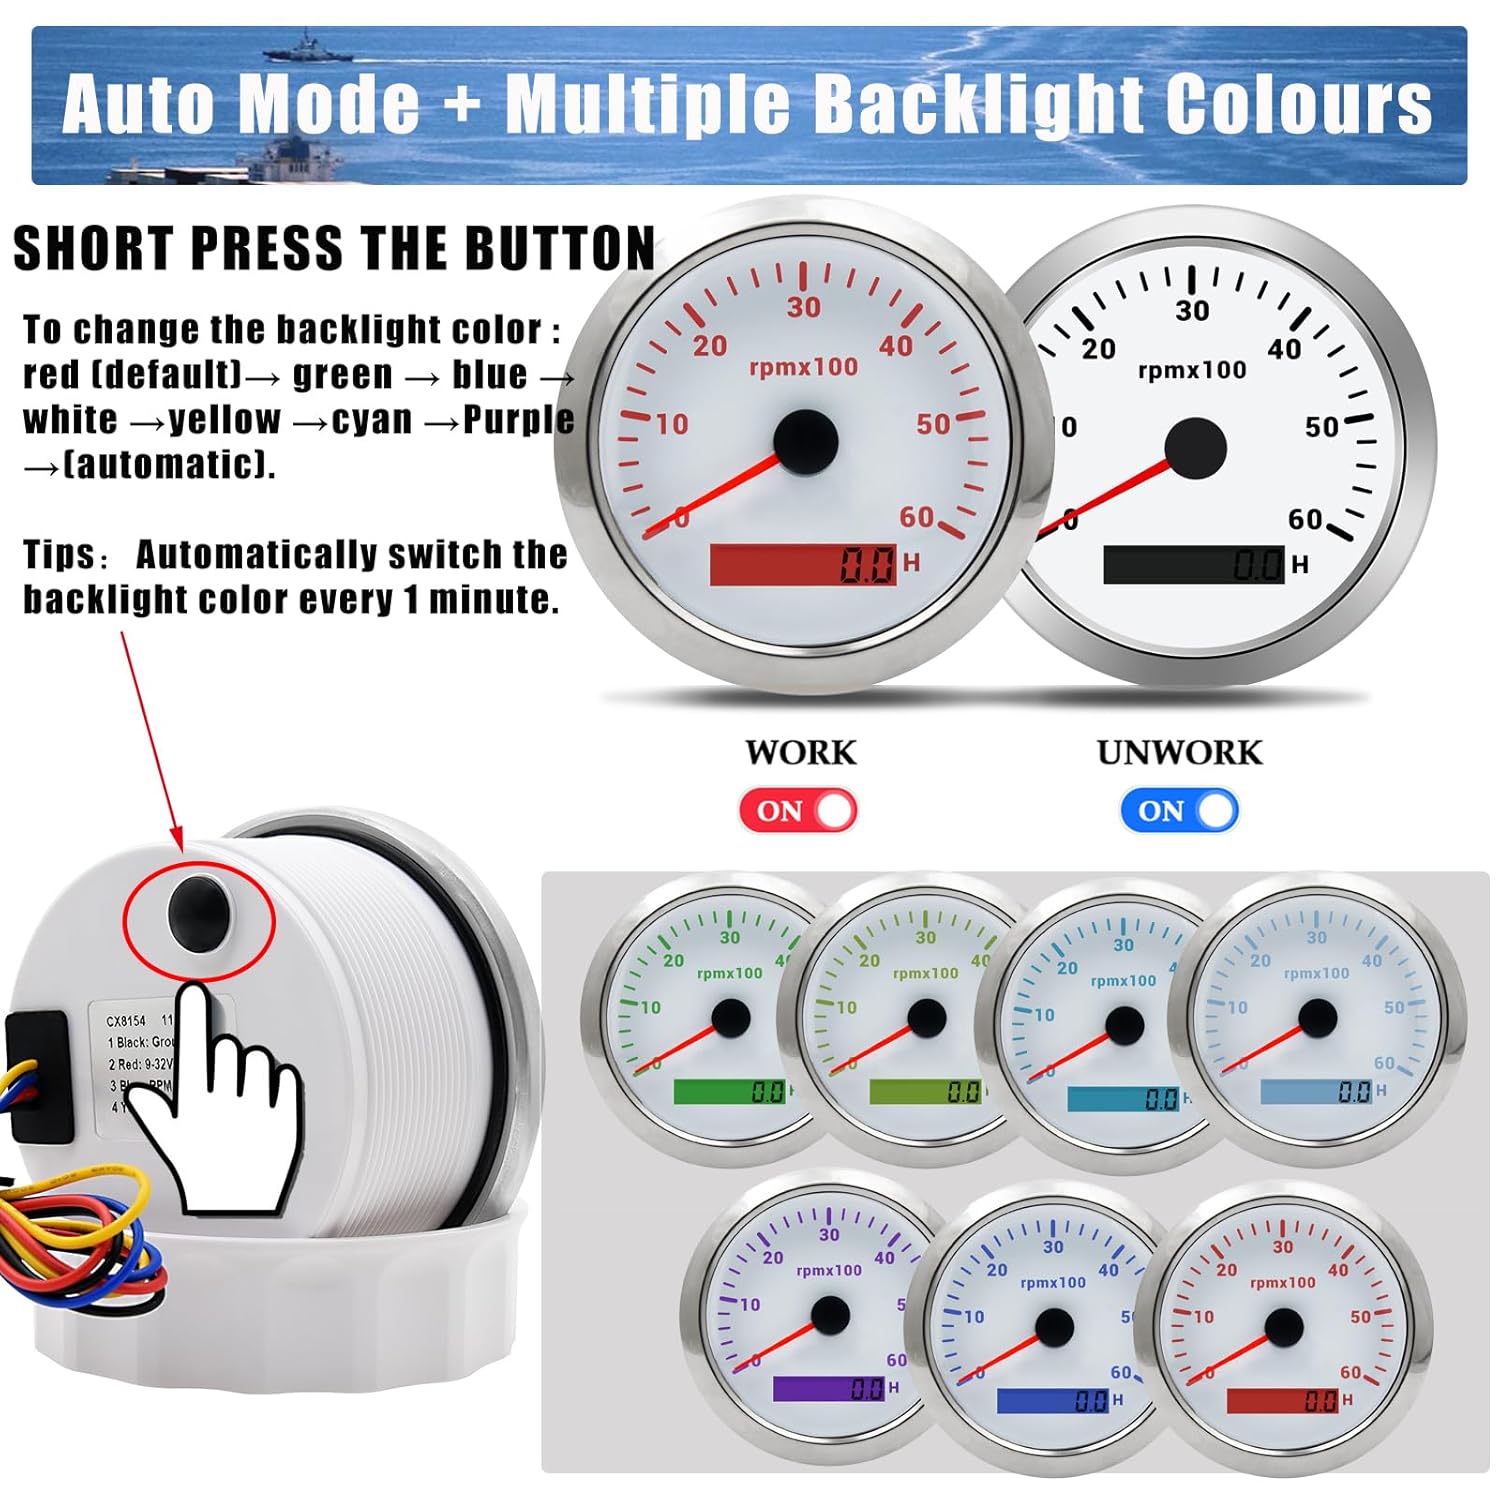
Figure 3: Backlight Control. This image highlights the button on the back of the gauge used to change backlight colors and illustrates the different color options.
മെയിൻ്റനൻസ്
The Geloo Tachometer Gauge is designed for durability and requires minimal maintenance. To ensure optimal performance and longevity:
- വൃത്തിയാക്കൽ: Wipe the gauge's front face with a soft, damp cloth. Avoid abrasive cleaners or solvents that could damage the curved glass or bezel.
- പരിശോധന: Periodically check the wiring connections for any signs of corrosion or looseness. Ensure the gauge remains securely mounted in the panel.
- പരിസ്ഥിതി സംരക്ഷണം: While the gauge is IP67 waterproof and anti-fog, prolonged exposure to extreme conditions beyond its design specifications should be avoided.
ട്രബിൾഷൂട്ടിംഗ്
If you encounter issues with your tachometer, consider the following common troubleshooting steps:
- പവർ/ഡിസ്പ്ലേ ഇല്ല:
- Check the power (red wire) and ground (black wire) connections. Ensure they are securely connected and receiving the correct voltagഇ (9-32V).
- Verify that the vehicle's battery is charged and providing adequate power.
- Incorrect RPM Reading:
- Ensure the RPM signal wire (blue wire) is correctly connected to the engine's tachometer output or ignition coil.
- Confirm that the tachometer is compatible with the number of engine cylinders (4, 6, 8, 10, 12 cylinder gas engines) for your vehicle. If issues persist, consult a professional.
- ബാക്ക്ലൈറ്റ് പ്രവർത്തിക്കുന്നില്ല/മാറ്റുന്നു:
- Check the backlight power wire (yellow wire) connection.
- Ensure the button on the back of the gauge is functioning correctly when pressed.
- Fogging on Display:
- While designed to be anti-fog, extreme temperature changes or prolonged exposure to high humidity might temporarily affect visibility. Allow the gauge to acclimate to ambient conditions. If persistent, check for proper sealing during installation.
If these steps do not resolve the issue, please contact Geloo customer support for further assistance.
വാറൻ്റിയും പിന്തുണയും
Geloo stands behind the quality of its products. Every gauge undergoes strict quality inspection before leaving the factory.
For any questions regarding the product, installation, or troubleshooting, please contact Geloo customer support. Refer to your purchase documentation or the official Geloo webനിർദ്ദിഷ്ട വാറന്റി നിബന്ധനകൾക്കും ബന്ധപ്പെടാനുള്ള വിവരങ്ങൾക്കും സൈറ്റ്.