
ഷാർക്ക് X3PRO ആക്രമിക്കുക
അറ്റാക്ക് ഷാർക്ക് X3PRO 4K/8K ലൈറ്റ്വെയ്റ്റ് വയർലെസ് ഗെയിമിംഗ് മൗസ് യൂസർ മാനുവൽ
Model: X3PRO | Brand: ATTACK SHARK
1. ആമുഖം
This manual provides detailed instructions for the setup, operation, and maintenance of your ATTACK SHARK X3PRO Wireless Gaming Mouse. The X3PRO features tri-mode connectivity (wired, 2.4GHz wireless, Bluetooth), a Pixart PAW3395 optical sensor, and adjustable DPI up to 26,000.
2. പാക്കേജ് ഉള്ളടക്കം
പാക്കേജിൽ എല്ലാ ഇനങ്ങളും ഉണ്ടെന്ന് ഉറപ്പാക്കുക:
- ATTACK SHARK X3PRO Wireless Gaming Mouse
- USB ചാർജിംഗ് കേബിൾ (USB-C)
- യുഎസ്ബി റിസീവർ (2.4GHz)
- Grip Tape (optional, if included with your model)
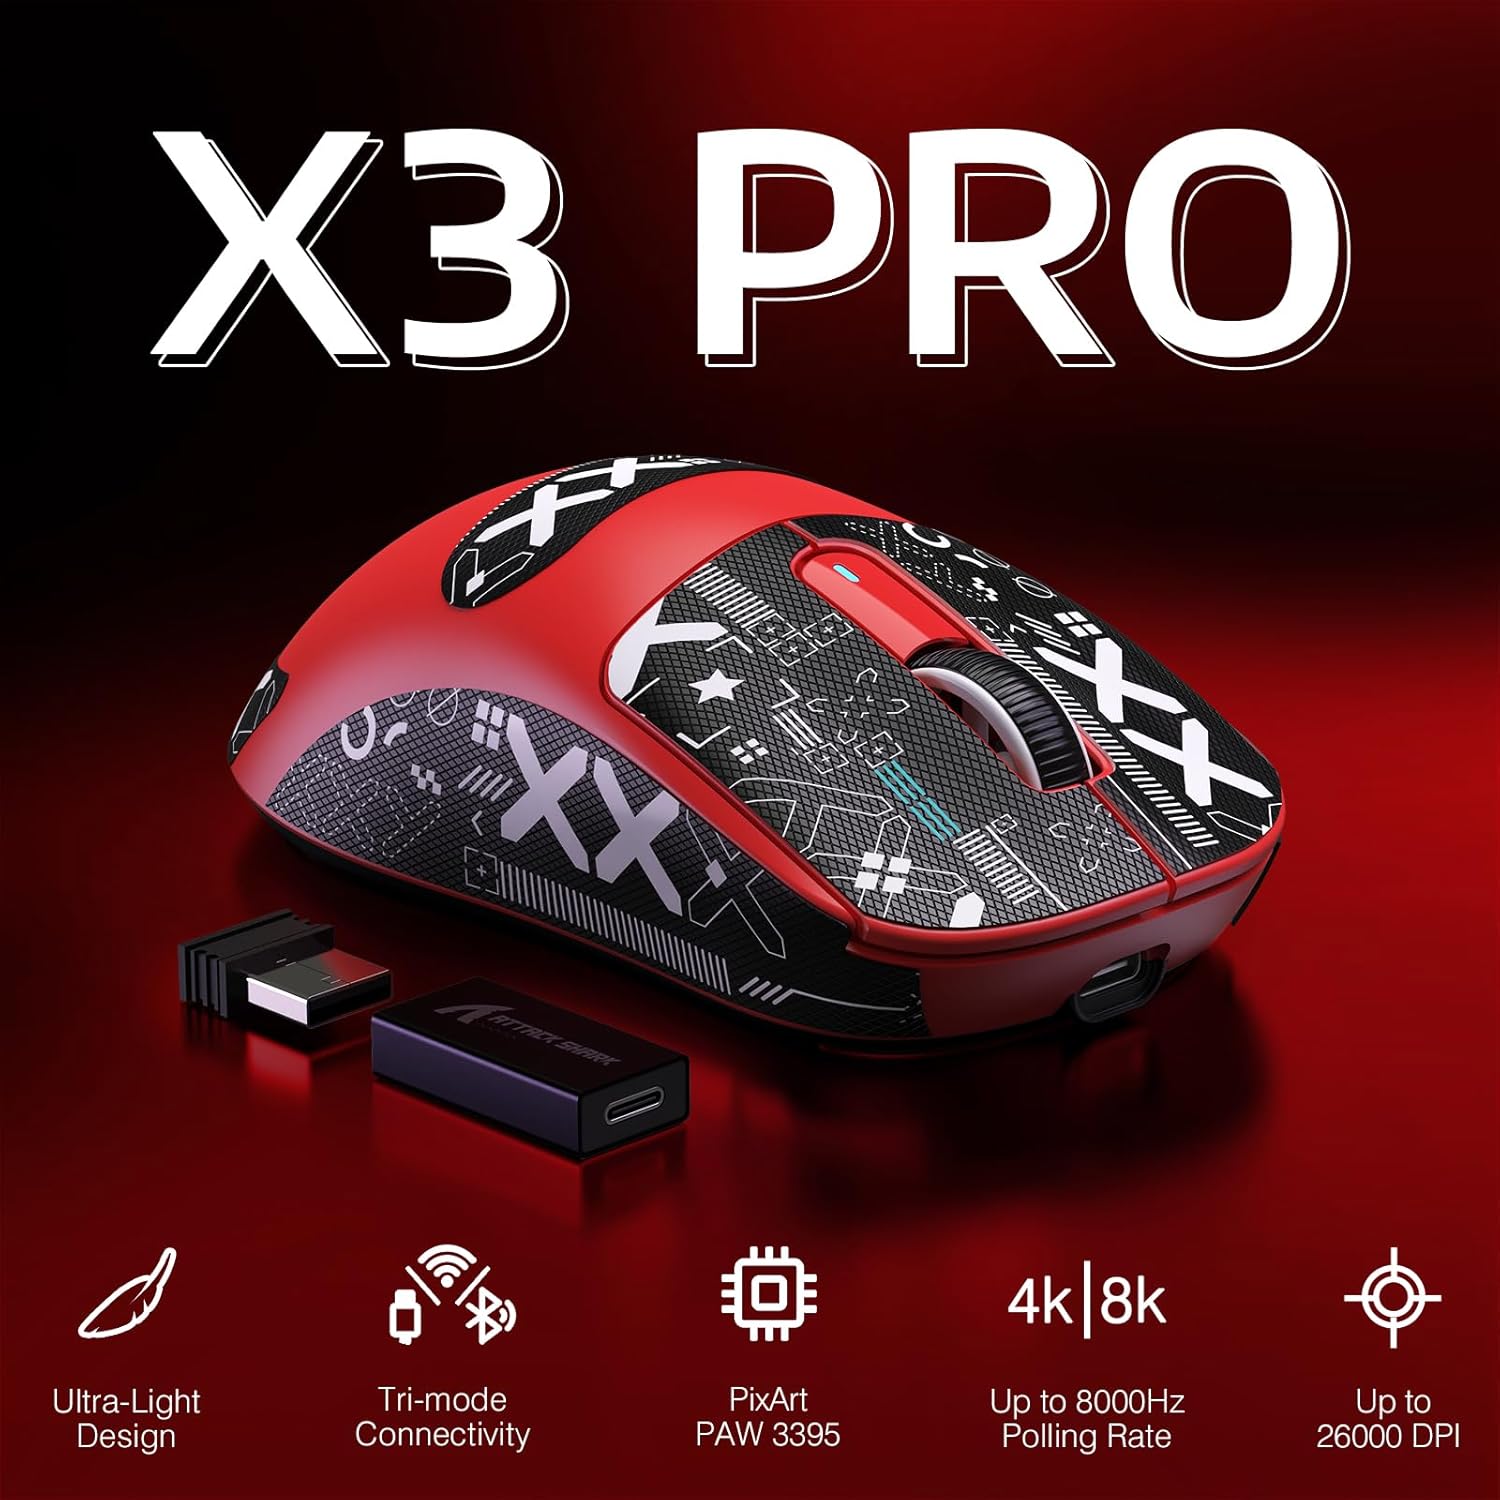
Image: ATTACK SHARK X3PRO mouse with its included USB receiver, USB-C cable, and grip tape.
3. ഉൽപ്പന്നം കഴിഞ്ഞുview
Familiarize yourself with the components of your X3PRO mouse:

Image: Detailed diagram showing the DPI indicator light, flexible paracord cable, DPI button, USB receiver, mode switch button, mode indicator light, and Type-C to USB-A adapter. The mouse dimensions are 118.5*39.7*61 mm.
- DPI ബട്ടൺ: മൗസ് സെൻസിറ്റിവിറ്റി (DPI) ക്രമീകരിക്കുന്നു.
- DPI ഇൻഡിക്കേറ്റർ ലൈറ്റ്: Shows the current DPI setting.
- മോഡ് സ്വിച്ച് ബട്ടൺ: Toggles between 2.4G wireless, Bluetooth, and Off modes.
- മോഡ് ഇൻഡിക്കേറ്റർ ലൈറ്റ്: Indicates the active connection mode.
- USB റിസീവർ: Stores securely under a cover on the mouse's underside for 2.4G wireless connection.
- യുഎസ്ബി-സി പോർട്ട്: വയർഡ് കണക്ഷനും ചാർജിംഗിനും.
- സൈഡ് ബട്ടണുകൾ: Programmable buttons for custom functions.
4. സജ്ജീകരണം
4.1. 2.4GHz വയർലെസ് കണക്ഷൻ
- Open the cover on the underside of the mouse and remove the USB receiver.
- നിങ്ങളുടെ കമ്പ്യൂട്ടറിൽ ലഭ്യമായ USB പോർട്ടിലേക്ക് USB റിസീവർ ചേർക്കുക.
- Slide the mode switch button on the mouse to the "2.4G" position. The mode indicator light will illuminate.
- Your computer should automatically detect the mouse.
4.2. ബ്ലൂടൂത്ത് കണക്ഷൻ
- Slide the mode switch button on the mouse to the "BT" position. The mode indicator light will flash, indicating pairing mode.
- നിങ്ങളുടെ കമ്പ്യൂട്ടറിൽ, ബ്ലൂടൂത്ത് ക്രമീകരണങ്ങളിലേക്ക് നാവിഗേറ്റ് ചെയ്ത് പുതിയ ഉപകരണങ്ങൾക്കായി തിരയുക.
- ജോടിയാക്കാൻ ലഭ്യമായ ഉപകരണങ്ങളുടെ പട്ടികയിൽ നിന്ന് "ATTACK SHARK X3PRO" തിരഞ്ഞെടുക്കുക.
- The mode indicator light will become solid once connected.
4.3. വയർഡ് കണക്ഷൻ
- Connect the provided USB-C cable to the mouse's USB-C port.
- USB-C കേബിളിന്റെ മറ്റേ അറ്റം നിങ്ങളുടെ കമ്പ്യൂട്ടറിൽ ലഭ്യമായ ഒരു USB പോർട്ടിലേക്ക് ബന്ധിപ്പിക്കുക.
- മൗസ് യാന്ത്രികമായി വയേർഡ് മോഡിലേക്ക് മാറുകയും ചാർജ് ചെയ്യാൻ തുടങ്ങുകയും ചെയ്യും.
5. പ്രവർത്തന നിർദ്ദേശങ്ങൾ
5.1. കണക്ഷൻ മോഡുകൾ മാറ്റുന്നു
Use the mode switch button on the underside of the mouse to cycle between 2.4G wireless, Bluetooth, and wired (when connected via cable) modes. The mode indicator light will confirm the active mode.
5.2. ഡിപിഐ (സെൻസിറ്റിവിറ്റി) ക്രമീകരിക്കൽ
Press the DPI button on the underside of the mouse to cycle through the preset DPI levels (800/1600/2400/3200/5000/26000). The DPI indicator light will change to reflect the current setting.
5.3. പോളിംഗ് നിരക്ക്
The X3PRO supports up to 4000Hz wireless polling rate and 8000Hz wired polling rate. Higher polling rates reduce input delay. To utilize 4K/8K polling rates, your computer should have an Intel Core i5 or higher CPU, AMD Ryzen 5 or higher CPU, and a USB 3.0 or higher port.
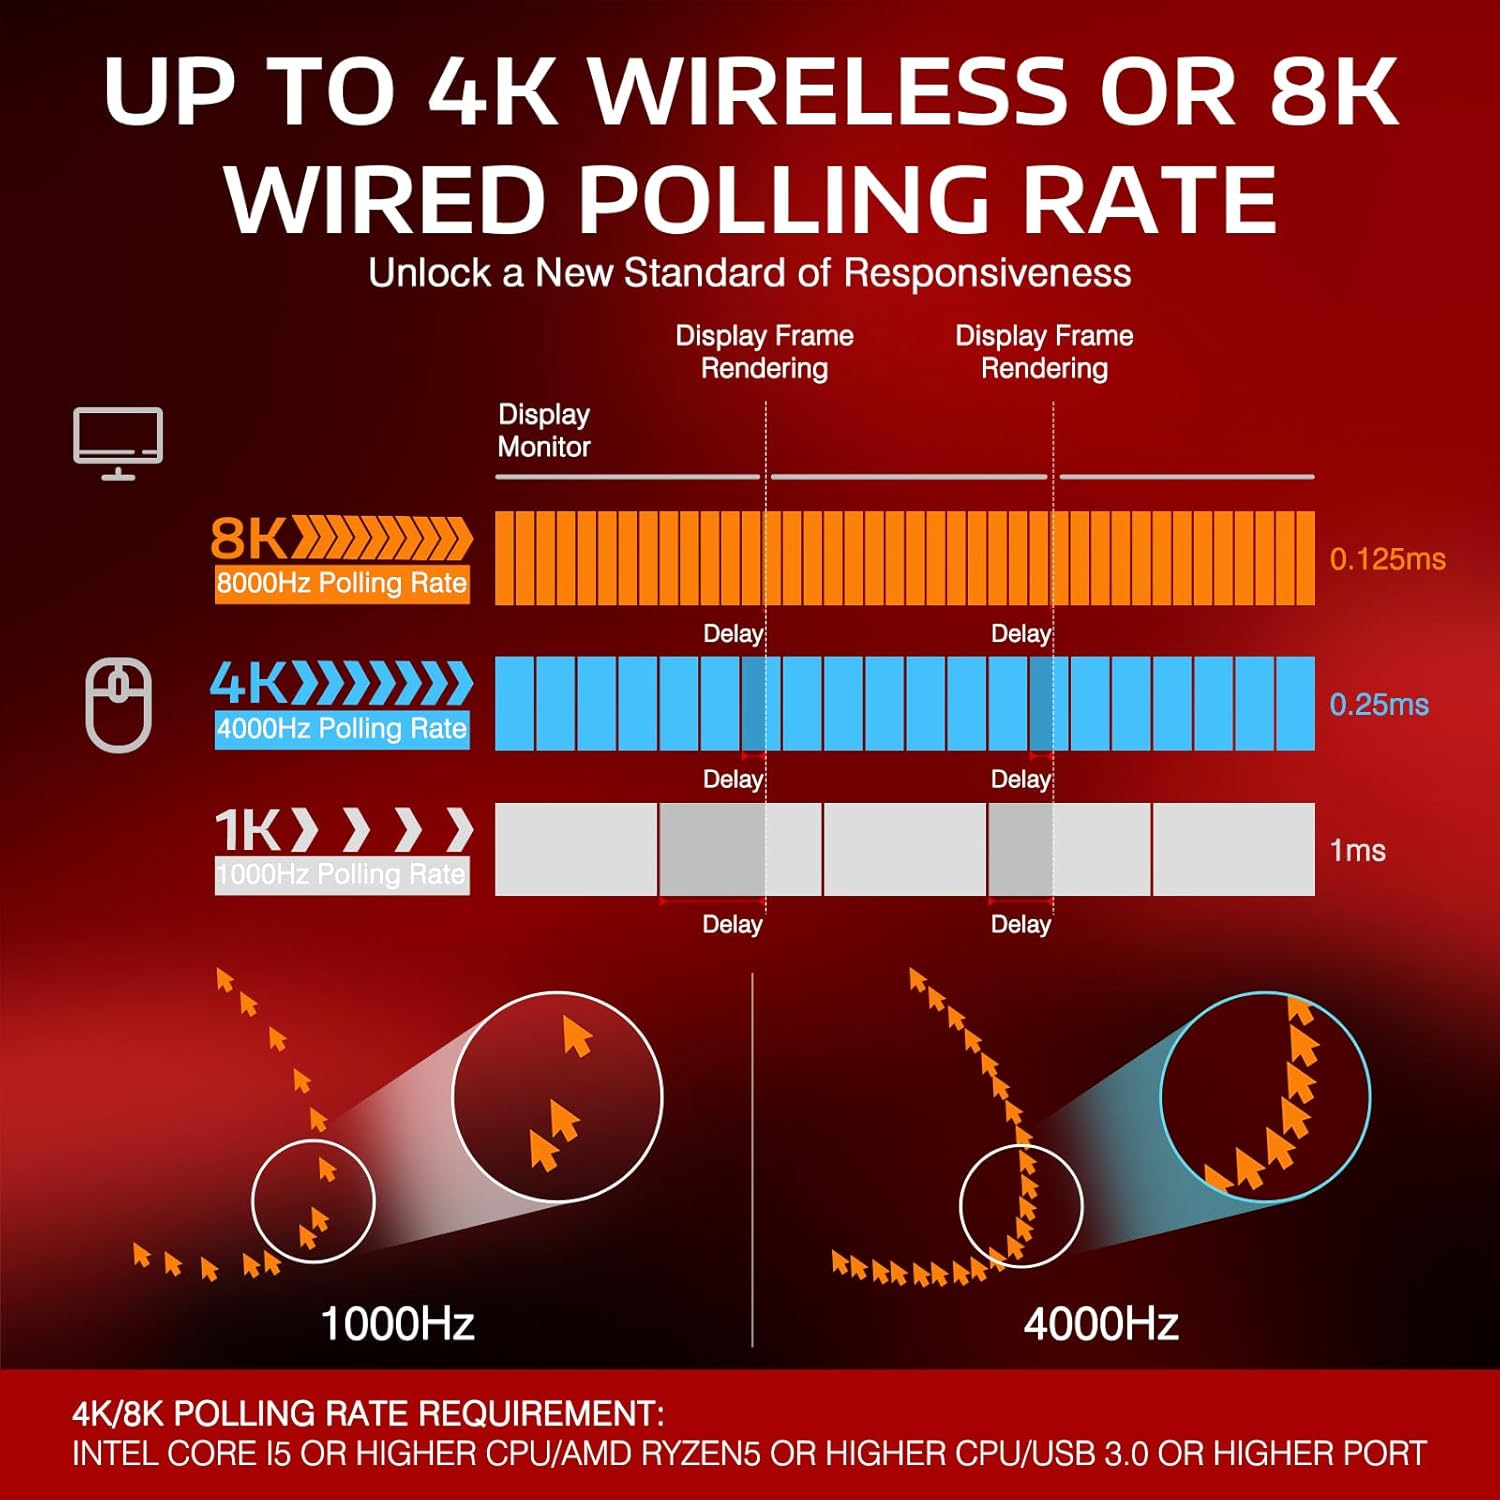
Image: Diagram illustrating the difference in delay between 1000Hz, 4000Hz, and 8000Hz polling rates, showing reduced delay with higher rates.
5.4. മൗസ് ചാർജ് ചെയ്യുന്നു
Connect the mouse to your computer using the provided USB-C cable. The mouse will charge while connected. A full charge can provide up to 68 hours of continuous use.

Image: The ATTACK SHARK X3PRO mouse with an overlay indicating up to 68 hours of battery life.
5.5. പ്രോഗ്രാം ചെയ്യാവുന്ന ബട്ടണുകൾ
The X3PRO features 5 programmable buttons. Download the official ATTACK SHARK software to customize DPI settings, polling rate, Lift-Off Distance (LOD), shortcuts, and macros.
6. പരിപാലനം
- വൃത്തിയാക്കൽ: മൗസ് വൃത്തിയാക്കാൻ മൃദുവായതും ഉണങ്ങിയതുമായ തുണി ഉപയോഗിക്കുക. കഠിനമായ രാസവസ്തുക്കളോ ഉരച്ചിലുകളോ ഉള്ള വസ്തുക്കൾ ഒഴിവാക്കുക.
- സംഭരണം: ഉപയോഗത്തിലില്ലാത്തപ്പോൾ തണുത്തതും വരണ്ടതുമായ സ്ഥലത്ത് മൗസ് സൂക്ഷിക്കുക.
- ബാറ്ററി കെയർ: To prolong battery life, avoid fully discharging the mouse frequently. Charge it when the battery level is low.
- PTFE അടി: The mouse features 100% virgin grade PTFE feet for smooth gliding. Avoid scratching or damaging them.

Image: The underside of the ATTACK SHARK X3PRO mouse, highlighting the 100% virgin grade PTFE feet for consistent glide.
7. പ്രശ്നപരിഹാരം
| പ്രശ്നം | പരിഹാരം |
|---|---|
| Mouse not responding in 2.4G wireless mode. |
|
| ബ്ലൂടൂത്ത് വഴി മൗസ് കണക്റ്റ് ചെയ്യുന്നില്ല. |
|
| Inconsistent tracking or movement. |
|
| മൗസ് ചാർജ് ചെയ്യുന്നില്ല. |
|
8 സ്പെസിഫിക്കേഷനുകൾ
| ഫീച്ചർ | വിശദാംശങ്ങൾ |
|---|---|
| ബ്രാൻഡ് | അറ്റാക്ക് സ്രാവ് |
| മോഡൽ | X3PRO |
| കണക്റ്റിവിറ്റി ടെക്നോളജി | ബ്ലൂടൂത്ത്, 2.4GHz വയർലെസ്, USB-C വയേർഡ് |
| സെൻസർ | Pixart PAW3395 Optical Sensor |
| DPI (സെൻസിറ്റിവിറ്റി) | Adjustable: 800/1600/2400/3200/5000/26000 |
| പോളിംഗ് നിരക്ക് | Up to 4000Hz (Wireless), Up to 8000Hz (Wired) |
| ട്രാക്കിംഗ് സ്പീഡ് | 650 ഐ.പി.എസ് |
| ത്വരണം | 50G |
| സ്വിച്ചുകൾ | Kailh GM8.0 Micro Switches (80 million click lifespan) |
| എൻകോഡർ | TTC Scroll Wheel Encoder |
| ബട്ടണുകൾ | 7 (5 പ്രോഗ്രാമബിൾ) |
| ഭാരം | 49 ഗ്രാം |
| ബാറ്ററി ലൈഫ് | 68 മണിക്കൂർ വരെ (തുടർച്ചയായ ഉപയോഗം) |
| അനുയോജ്യമായ ഓപ്പറേറ്റിംഗ് സിസ്റ്റങ്ങൾ | Windows XP / VISTA / 7 / 8 / 10 / MAC |
9. Product Demonstration
ഒരു വിഷ്വൽ ഓവറിനായി ഈ വീഡിയോ കാണുകview of the ATTACK SHARK X3PRO Wireless Gaming Mouse.
Video: A demonstration of the ATTACK SHARK X3PRO 4K/8K Lightweight Wireless Gaming Mouse, showcasing അതിന്റെ സവിശേഷതകളും രൂപകൽപ്പനയും.
10. വാറൻ്റിയും പിന്തുണയും
വാറന്റി വിവരങ്ങൾ, സാങ്കേതിക പിന്തുണ, അല്ലെങ്കിൽ ഏറ്റവും പുതിയ സോഫ്റ്റ്വെയറും ഡ്രൈവറുകളും ഡൗൺലോഡ് ചെയ്യുന്നതിന്, ദയവായി ഔദ്യോഗിക ATTACK SHARK സന്ദർശിക്കുക. webസൈറ്റിൽ ബന്ധപ്പെടുക അല്ലെങ്കിൽ അവരുടെ ഉപഭോക്തൃ സേവനവുമായി ബന്ധപ്പെടുക. വാറന്റി ക്ലെയിമുകൾക്കായി നിങ്ങളുടെ വാങ്ങൽ രസീത് സൂക്ഷിക്കുക.
ഉദ്യോഗസ്ഥൻ Webസൈറ്റ്: ആമസോണിലെ അറ്റാക്ക് ഷാർക്ക് സ്റ്റോർ
Ask a question about this manual
Ask about setup, troubleshooting, compatibility, parts, safety, or missing instructions. Manuals+ will review the question and use this page’s manual context to help answer it.