
ആമുഖം
This manual provides detailed instructions for the installation, operation, and maintenance of your Aigo Darkflash DK353 ARGB Mid-Tower Gaming PC Case. Please read this manual carefully before proceeding with installation to ensure proper setup and optimal performance.

ചിത്രം 1: വശം view of the Aigo Darkflash DK353 PC case, showcasing the tempered glass side panel and internal components.
പ്രധാന സവിശേഷതകൾ
- മദർബോർഡ് പിന്തുണ: ATX / M-ATX / ITX
- സൈഡ് പാനൽ: ടെമ്പർഡ് ഗ്ലാസ്
- I/O പോർട്ടുകൾ: 1 x USB 3.0, 2 x USB 2.0, HD ഓഡിയോ
- ഡ്രൈവ് ബേസ്: 2 x HDD / 4 x SSD
- വിപുലീകരണ സ്ലോട്ടുകൾ: 7
- ആരാധക പിന്തുണ: Front: 3 x 120mm; Top: 2 x 120mm or 2 x 140mm; PSU Cover: 2 x 120mm; Rear: 1 x 120mm
- ലിക്വിഡ് കൂളിംഗ് സപ്പോർട്ട്: Front: 360mm / 240mm / 120mm radiators
- Max VGA Length: 340 മി.മീ
- പരമാവധി സിപിയു കൂളർ ഉയരം: 165 മി.മീ
- പവർ സപ്ലൈ സപ്പോർട്ട്: Bottom mount, up to 200mm length
- ഉൾപ്പെടുത്തിയ ആരാധകർ: 4 x CL6 ARGB Fans (120x120x25mm, 1100 RPM, 26.0dB max noise)
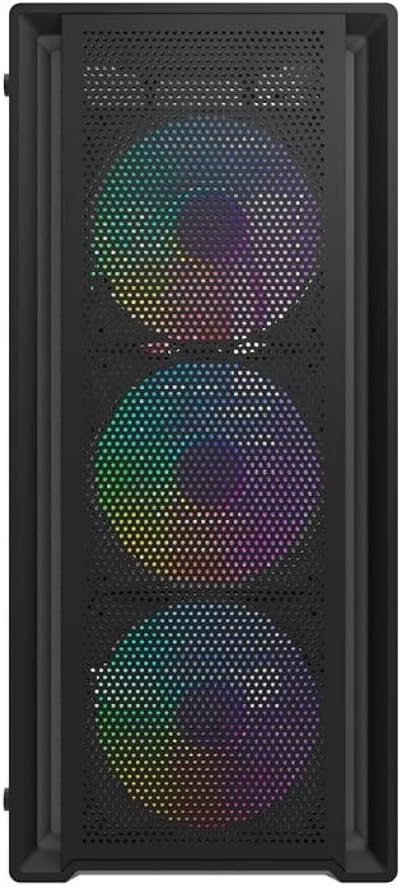
ചിത്രം 2: മുൻഭാഗം view of the Aigo Darkflash DK353 PC case, highlighting the mesh front panel and the three pre-installed ARGB fans.
പാക്കേജ് ഉള്ളടക്കം
പാക്കേജിൽ എല്ലാ ഇനങ്ങളും ഉണ്ടെന്ന് ദയവായി പരിശോധിക്കുക:
- Aigo Darkflash DK353 PC Case
- ഉപയോക്തൃ മാനുവൽ (ഈ പ്രമാണം)
- Accessory Screws Kit
- 4 x CL6 ARGB Fans
സജ്ജീകരണ നിർദ്ദേശങ്ങൾ
Follow these steps to set up your Aigo Darkflash DK353 PC case:
- അൺപാക്ക് ചെയ്യുന്നു: Carefully remove the PC case from its packaging. Inspect for any damage during transit.
- സൈഡ് പാനൽ നീക്കംചെയ്യൽ: Locate and remove the screws securing the tempered glass side panel. Gently slide or pivot the panel to remove it. Repeat for the solid side panel if necessary.
- മദർബോർഡ് ഇൻസ്റ്റാളേഷൻ: Install the appropriate standoffs for your motherboard form factor (ATX, M-ATX, ITX). Carefully place your motherboard into the case and secure it with screws.
- പവർ സപ്ലൈ ഇൻസ്റ്റാളേഷൻ: Install your power supply unit (PSU) into the dedicated compartment at the bottom of the case. Secure it with screws from the rear.
- ഡ്രൈവ് ഇൻസ്റ്റാളേഷൻ: Install your HDDs and SSDs into the designated drive bays. Refer to the case's internal layout for specific bay locations.
- ഘടകം ഇൻസ്റ്റാളേഷൻ: Install your CPU cooler, graphics card (VGA), and any other expansion cards into their respective slots. Ensure maximum length and height clearances are respected.
- Fan and Radiator Installation: The case comes with 4 pre-installed ARGB fans. If installing additional fans or liquid cooling radiators, refer to the fan support section for compatible sizes and locations.
- കേബിൾ മാനേജുമെന്റ്: Route all power and data cables neatly behind the motherboard tray to ensure optimal airflow and a clean build.
- ഫ്രണ്ട് പാനൽ കണക്ഷനുകൾ: Connect the front panel I/O cables (USB 3.0, USB 2.0, HD Audio, Power, Reset, LED) to the corresponding headers on your motherboard.
- അന്തിമ അസംബ്ലി: Reattach the side panels, ensuring they are securely fastened.

ചിത്രം 3: പൊട്ടിത്തെറിച്ചു view of the Aigo Darkflash DK353 PC case, illustrating the removable tempered glass side panel, solid side panel, and internal layout for component installation.
നിങ്ങളുടെ പിസി കേസ് പ്രവർത്തിപ്പിക്കുന്നു
Once all components are installed and connected, you can power on your system. The Aigo Darkflash DK353 case is designed to provide optimal airflow and aesthetics for your gaming PC.
- പവർ ബട്ടൺ: Press the power button on the front I/O panel to turn on your computer.
- ARGB ലൈറ്റിംഗ്: The included CL6 ARGB fans feature customizable lighting. Connect the ARGB cables to a compatible motherboard header or a dedicated ARGB controller (if included or purchased separately) to manage lighting effects.
- USB പോർട്ടുകൾ: Use the front panel USB 3.0 and USB 2.0 ports for connecting peripherals and external devices.
- ഓഡിയോ ജാക്കുകൾ: The HD Audio jacks allow for easy connection of headphones and microphones.

Figure 4: Angled top-front view of the Aigo Darkflash DK353 PC case, highlighting the accessible front I/O panel with USB ports and audio jacks, and the top ventilation mesh.
മെയിൻ്റനൻസ്
നിങ്ങളുടെ പിസി കേസിന്റെയും ഘടകങ്ങളുടെയും ദീർഘായുസ്സും പ്രകടനവും ഉറപ്പാക്കാൻ പതിവ് അറ്റകുറ്റപ്പണികൾ സഹായിക്കുന്നു.
- പൊടി വൃത്തിയാക്കൽ: Periodically clean dust filters (if present) and internal components using compressed air or a soft brush. Ensure the system is powered off and unplugged before cleaning.
- ബാഹ്യ ശുചീകരണം: ഒരു മൃദുവായ, ഡി ഉപയോഗിച്ച് ബാഹ്യ പ്രതലങ്ങൾ തുടയ്ക്കുകamp cloth. Avoid abrasive cleaners or solvents that may damage the finish or tempered glass.
- കേബിൾ മാനേജ്മെന്റ് പരിശോധന: വായുപ്രവാഹത്തിനോ ഫാനിന്റെ പ്രവർത്തനത്തിനോ കേബിളുകൾ തടസ്സമാകുന്നില്ലെന്ന് ഉറപ്പാക്കാൻ ഇടയ്ക്കിടെ കേബിൾ റൂട്ടിംഗ് പരിശോധിക്കുക.
ട്രബിൾഷൂട്ടിംഗ്
നിങ്ങളുടെ പിസി കേസിൽ പ്രശ്നങ്ങൾ നേരിടുകയാണെങ്കിൽ, ഇനിപ്പറയുന്ന പൊതുവായ പരിഹാരങ്ങൾ പരിഗണിക്കുക:
- ശക്തിയില്ല:
- Ensure the power supply is properly connected and switched on.
- മുൻ പാനലിലെ പവർ ബട്ടൺ കേബിൾ മദർബോർഡുമായി ശരിയായി ബന്ധിപ്പിച്ചിട്ടുണ്ടെന്ന് ഉറപ്പാക്കുക.
- Fans Not Spinning/No ARGB Lighting:
- ഫാൻ പവർ കേബിളുകൾ മദർബോർഡുമായോ ഫാൻ കൺട്രോളറുമായോ സുരക്ഷിതമായി ബന്ധിപ്പിച്ചിട്ടുണ്ടോയെന്ന് പരിശോധിക്കുക.
- Ensure ARGB cables are properly connected to a compatible ARGB header or controller.
- Consult your motherboard manual for ARGB software control.
- Front USB/Audio Ports Not Working:
- Verify that the front panel USB and HD Audio cables are correctly connected to the corresponding headers on your motherboard.
- Check your motherboard's BIOS/UEFI settings to ensure USB/Audio ports are enabled.
സ്പെസിഫിക്കേഷനുകൾ
| ഫീച്ചർ | വിശദാംശങ്ങൾ |
|---|---|
| മോഡൽ | DK353-BK |
| മെറ്റീരിയൽ | 0.5mm SPCC Steel, Tempered Glass |
| മദർബോർഡ് പിന്തുണ | ATX / M-ATX / ITX |
| സൈഡ് പാനൽ | ടെമ്പർഡ് ഗ്ലാസ് |
| I/O പോർട്ടുകൾ | 1 x USB 3.0, 2 x USB 2.0, HD ഓഡിയോ |
| ഡ്രൈവ് ബേകൾ | 2 x HDD / 4 x SSD |
| വിപുലീകരണ സ്ലോട്ടുകൾ | 7 |
| ഫാൻ സപ്പോർട്ട് (മുന്നിൽ) | 3 x 120 മി.മീ |
| ആരാധക പിന്തുണ (മുകളിൽ) | 2 x 120 mm അല്ലെങ്കിൽ 2 x 140 mm |
| Fan Support (PSU Cover) | 2 x 120 മി.മീ |
| ഫാൻ സപ്പോർട്ട് (പിൻഭാഗം) | 1 x 120 മി.മീ |
| Liquid Cooling Support (Front) | 360mm / 240mm / 120mm |
| Max VGA Length | 340 മി.മീ |
| പരമാവധി സിപിയു കൂളർ ഉയരം | 165 മി.മീ |
| PSU പിന്തുണ | Bottom, up to 200 mm |
| അളവുകൾ (L x W x H) | 385 x 195 x 449 മിമി |
| ഉൾപ്പെടുത്തിയ ആരാധകർ | 4 x CL6 ARGB Fans |
| ഫാൻ മാനങ്ങൾ | 120 x 120 x 25 മിമി |
| ഫാൻ വേഗത | 1100 ± 10% ആർപിഎം |
| ഫാൻ ശബ്ദ നില | 26.0dB (MAX) |
| ഫാൻ എയർഫ്ലോ | 32.18 CFM |
| ഫാൻ സ്റ്റാറ്റിക് മർദ്ദം | 0.62 mm H²O |
| ഫാൻ ബെയറിംഗ് തരം | റൈഫിൾ |
വാറൻ്റിയും പിന്തുണയും
വാറന്റി വിവരങ്ങൾക്കും സാങ്കേതിക പിന്തുണയ്ക്കും, ദയവായി നിർമ്മാതാവിന്റെ ഉദ്യോഗസ്ഥനെ കാണുക. webസൈറ്റിൽ ബന്ധപ്പെടുക അല്ലെങ്കിൽ അവരുടെ ഉപഭോക്തൃ സേവനവുമായി ബന്ധപ്പെടുക. വാറന്റി ക്ലെയിമുകൾക്കായി നിങ്ങളുടെ വാങ്ങിയതിന്റെ തെളിവ് സൂക്ഷിക്കുക.
നിർമ്മാതാവ്: ഐഗോ