
ആമുഖം
This manual provides comprehensive instructions for the safe and efficient operation, maintenance, and troubleshooting of your Generic 3-Thread Overlock Sewing Machine, models GN10 and QXGN11D. Please read this manual thoroughly before using the machine to ensure proper function and longevity.
സുരക്ഷാ നിർദ്ദേശങ്ങൾ
- Always unplug the machine from the electrical outlet when not in use, before cleaning, or when performing any maintenance.
- Keep fingers away from all moving parts, especially around the needle and looper area.
- നിർമ്മാതാവ് ശുപാർശ ചെയ്യുന്ന ആക്സസറികൾ മാത്രം ഉപയോഗിക്കുക.
- Do not operate the machine if the cord or plug is damaged, or if the machine is not working properly.
- പ്രവർത്തന സമയത്ത് കുട്ടികളെയും വളർത്തുമൃഗങ്ങളെയും മെഷീനിൽ നിന്ന് അകറ്റി നിർത്തുക.
ഉൽപ്പന്നം കഴിഞ്ഞുview
The Generic GN10/QXGN11D is a heavy-duty, semi-industrial 3-thread overlock sewing machine designed for both simple and more elaborate sewing tasks. It offers enhanced power and durability compared to typical household or portable overlock machines.

ചിത്രം 1: ഫ്രണ്ട് view of the overlock sewing machine, highlighting the needle and work area.

ചിത്രം 2: കോണാകൃതിയിലുള്ള മുൻഭാഗം view, illustrating the thread path and tension controls.

ചിത്രം 3: വശം view, revealing the motor and belt mechanism.

ചിത്രം 4: പിൻ ആംഗിൾ view, showing the machine's back panel and power connection.

ചിത്രം 5: ടോപ്പ് ഡൗൺ view, detailing the thread spool pins and upper assembly.
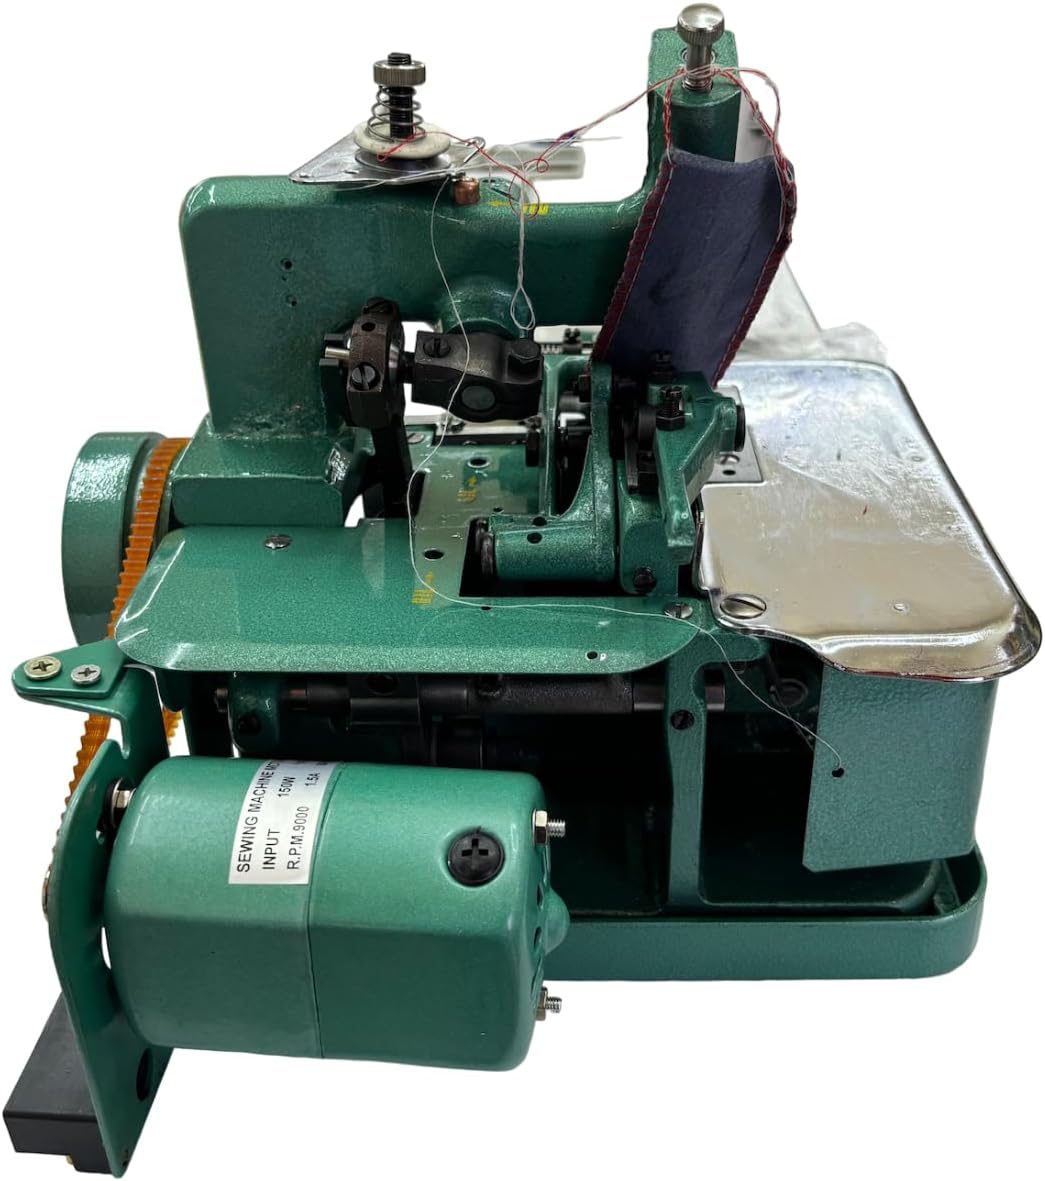
ചിത്രം 6: Alternate side view, providing a closer look at the motor and drive belt.

ചിത്രം 7: The foot pedal, used to control the machine's speed.
സജ്ജമാക്കുക
അൺപാക്കിംഗും പ്ലേസ്മെന്റും
- മെഷീൻ അതിന്റെ പാക്കേജിംഗിൽ നിന്ന് ശ്രദ്ധാപൂർവ്വം നീക്കം ചെയ്യുക.
- മതിയായ വെളിച്ചമുള്ള, സ്ഥിരതയുള്ളതും പരന്നതുമായ ഒരു പ്രതലത്തിൽ മെഷീൻ സ്ഥാപിക്കുക.
- സുഖകരമായ പ്രവർത്തനത്തിനും തുണി കൈകാര്യം ചെയ്യലിനും മെഷീനിന് ചുറ്റും മതിയായ ഇടമുണ്ടെന്ന് ഉറപ്പാക്കുക.
പവർ കണക്ഷൻ
- Connect the foot pedal to the machine's power input.
- Plug the machine into a suitable electrical outlet. Ensure the voltage മെഷീനിന്റെ ആവശ്യകതകളുമായി പൊരുത്തപ്പെടുന്നു.
മെഷീൻ ത്രെഡിംഗ്
Proper threading is crucial for correct stitch formation. Refer to the diagrams below for the correct threading path for each of the three threads.
- പ്രഷർ ഫൂട്ടും സൂചിയും ഏറ്റവും ഉയർന്ന സ്ഥാനത്തേക്ക് ഉയർത്തുക.
- Follow the numbered thread guides for each thread (upper looper, lower looper, and needle thread).
- Ensure threads pass through all tension discs correctly.
- സൂചി മുന്നിൽ നിന്ന് പിന്നിലേക്ക് ത്രെഡ് ചെയ്യുക.
പ്രവർത്തന നിർദ്ദേശങ്ങൾ
അടിസ്ഥാന പ്രവർത്തനം
- പവർ സ്വിച്ച് ഓണാക്കുക.
- പ്രഷർ പാദത്തിനടിയിൽ തുണി വയ്ക്കുക.
- പ്രഷർ കാൽ താഴ്ത്തുക.
- Gently press the foot pedal to start sewing. Control speed by varying pressure on the pedal.
- മെഷീനിലൂടെ തുണി സുഗമമായി കൊണ്ടുപോകുക.
Adjusting Stitch Length and Differential Feed
The machine features controls for adjusting stitch length and differential feed, allowing for various fabric types and desired stitch effects.
- തുന്നൽ നീളം: Adjust the dial to increase or decrease the length of each stitch. Longer stitches are suitable for thicker fabrics, shorter for finer details.
- ഡിഫറൻഷ്യൽ ഫീഡ്: This control helps prevent stretching or puckering of fabric. Adjust it to match the fabric type: higher settings for stretching fabrics, lower for gathering.
ടെൻഷൻ അഡ്ജസ്റ്റ്മെൻ്റ്
Correct thread tension is vital for balanced stitches. Each thread has its own tension dial. Adjust them as needed to achieve a flat, even seam without loops or skipped stitches.
മെയിൻ്റനൻസ്
വൃത്തിയാക്കൽ
- Regularly clean lint and dust from the machine, especially around the needle plate, feed dogs, and looper area. Use a small brush or vacuum cleaner.
- Wipe the exterior with a soft, dry cloth. Do not use harsh chemicals.
Lubrication (Oiling)
Periodically oil the moving parts of the machine as indicated in the machine's internal diagrams (if applicable) or as recommended by a service technician. Use only high-quality sewing machine oil.
സൂചി മാറ്റിസ്ഥാപിക്കൽ
- Always use the correct type and size of needles for overlock machines.
- Replace bent, dull, or damaged needles immediately to prevent skipped stitches or fabric damage.
ട്രബിൾഷൂട്ടിംഗ്
| പ്രശ്നം | സാധ്യമായ കാരണം | പരിഹാരം |
|---|---|---|
| ഒഴിവാക്കിയ തുന്നലുകൾ | തെറ്റായ സൂചി, വളഞ്ഞ സൂചി, തെറ്റായ നൂൽ കുത്തൽ, തെറ്റായ ടെൻഷൻ. | സൂചി മാറ്റിസ്ഥാപിക്കുക, മെഷീൻ വീണ്ടും ത്രെഡ് ചെയ്യുക, ടെൻഷൻ ക്രമീകരിക്കുക. |
| ത്രെഡ് ബ്രേക്കേജ് | ഉയർന്ന ടെൻഷൻ, മോശം ഗുണനിലവാരമുള്ള നൂൽ, നൂൽ പാതയിലെ കേടുപാട്, തെറ്റായ നൂൽവിന്യാസം. | പിരിമുറുക്കം കുറയ്ക്കുക, ഗുണനിലവാരമുള്ള ത്രെഡ് ഉപയോഗിക്കുക, തടസ്സങ്ങൾക്കായി ത്രെഡ് പാത്ത് പരിശോധിക്കുക, വീണ്ടും ത്രെഡ് ചെയ്യുക. |
| തുണി പക്കറിംഗ് | Incorrect differential feed setting, too much tension. | Adjust differential feed, reduce tension. |
| മെഷീൻ ആരംഭിക്കുന്നില്ല | Not plugged in, power switch off, foot pedal issue. | Check power connection, ensure switch is on, inspect foot pedal. |
സ്പെസിഫിക്കേഷനുകൾ
- മോഡൽ: GN10, QXGN11D
- ബ്രാൻഡ്: ജനറിക്
- തരം: 3-Thread Overlock Sewing Machine, Semi-Industrial
- നിറം: പച്ച
- മെറ്റീരിയൽ: സ്റ്റെയിൻലെസ്സ് സ്റ്റീൽ
- ഉൽപ്പന്ന അളവുകൾ: 30 x 30 x 30 സെ.മീ (11.8 x 11.8 x 11.8 ഇഞ്ച്)
- ഉൽപ്പന്ന ഭാരം: 10 കി.ഗ്രാം (22 പൗണ്ട്)
- പ്രത്യേക സവിശേഷതകൾ: മാനുവൽ പ്രവർത്തനം
വാറൻ്റിയും പിന്തുണയും
For warranty information and technical support, please refer to the documentation included with your purchase or contact Generic customer service. Keep your purchase receipt as proof of purchase.
ഉപഭോക്തൃ സേവന കോൺടാക്റ്റ്: Please refer to the seller's contact information on your purchase platform or the product packaging for support.