
ആമുഖം
This manual provides detailed instructions for the safe and effective use of your Andoer Portable Digital Camera. Please read this manual thoroughly before operating the device and retain it for future reference.
പാക്കേജ് ഉള്ളടക്കം
താഴെ ലിസ്റ്റ് ചെയ്തിരിക്കുന്ന എല്ലാ ഇനങ്ങളും നിങ്ങളുടെ പാക്കേജിൽ ഉൾപ്പെടുത്തിയിട്ടുണ്ടെന്ന് ഉറപ്പാക്കുക:
- 1 x Andoer Digital Camera
- 1 x 32GB മെമ്മറി കാർഡ്
- 1 x യുഎസ്ബി കേബിൾ (ടൈപ്പ്-സി)
- 1 x ക്ലീനിംഗ് തുണി
- 1 x ലാനിയാർഡ്
- 1 x സ്റ്റോറേജ് ബാഗ്
- 1 x ഉപയോക്തൃ മാനുവൽ
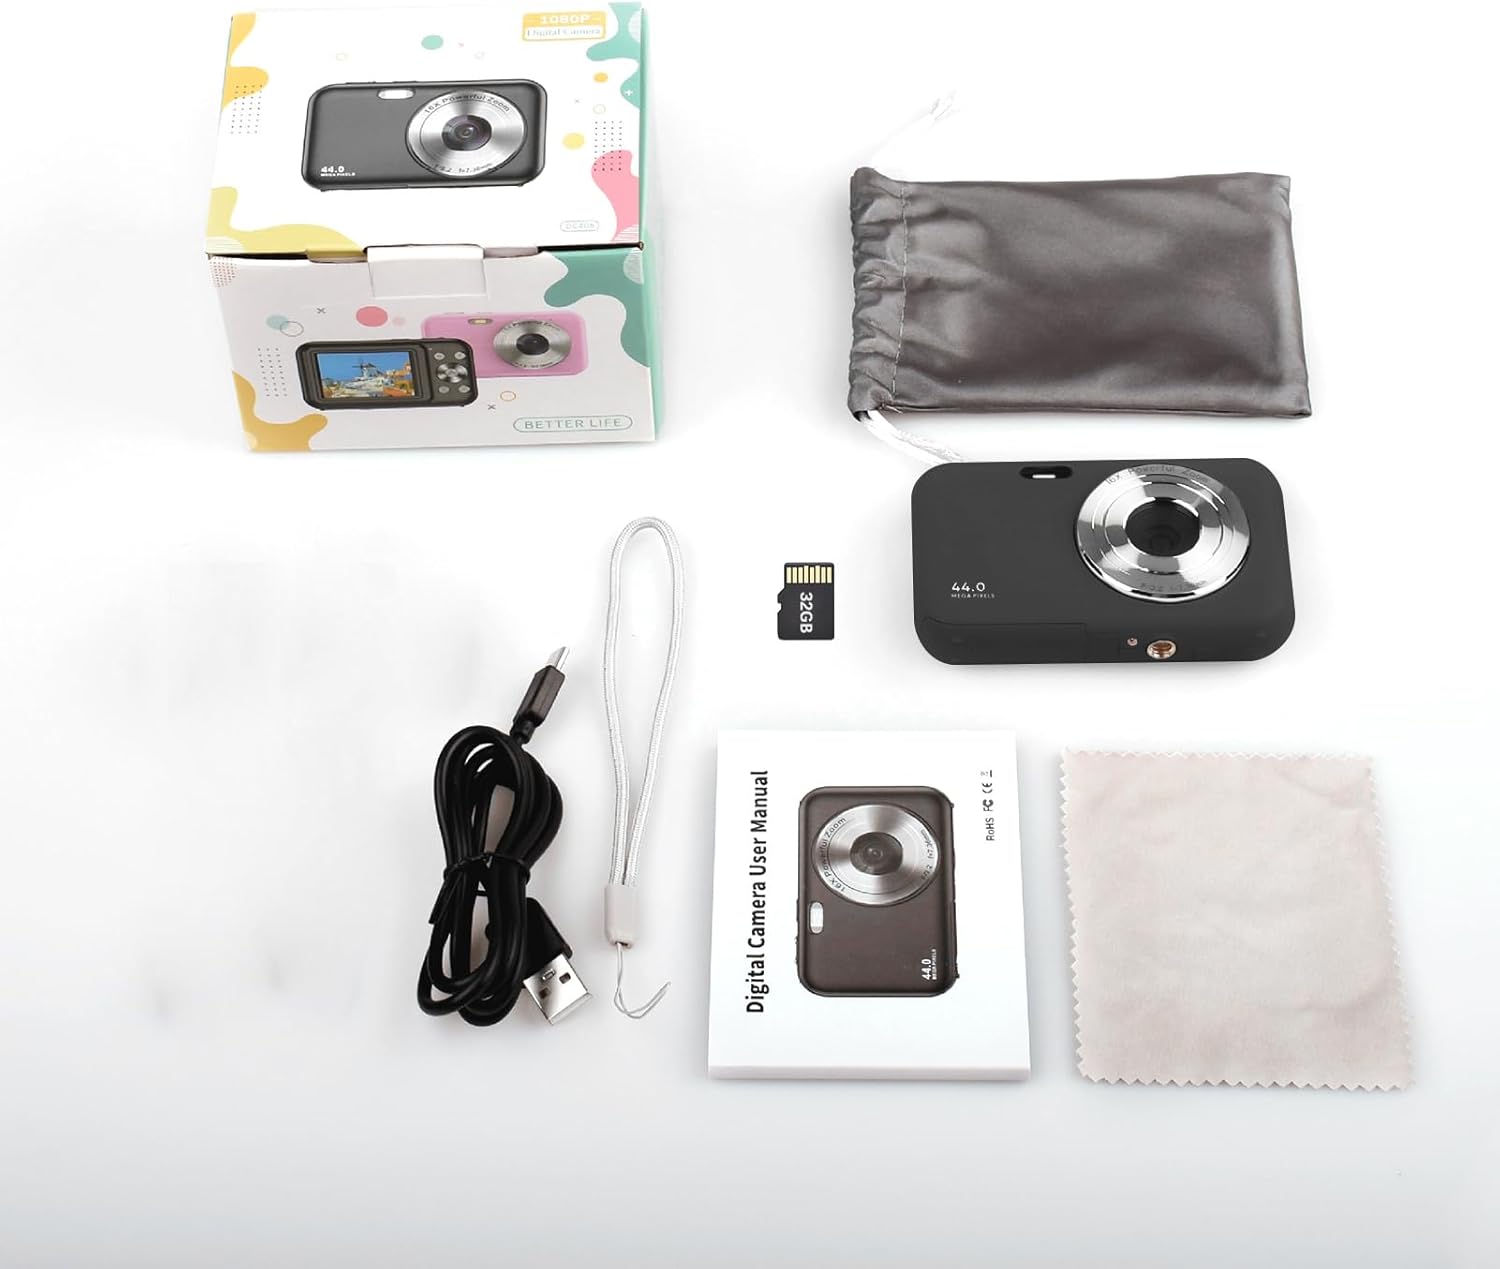
Image: Contents of the Andoer Digital Camera package.
ക്യാമറ ഓവർview
നിങ്ങളുടെ ക്യാമറയുടെ വിവിധ ഭാഗങ്ങളുമായി പരിചയപ്പെടുക.

Image: Multi-angle view of the Andoer Digital Camera, highlighting its compact design and button layout.
- മുൻഭാഗം: ലെൻസ്, ഫ്ലാഷ്, മൈക്രോഫോൺ.
- മുകളിൽ: Power Button, Shutter Button.
- തിരികെ: 2.4-inch IPS Screen, Navigation Buttons (Up, Down, Left, Right, OK), Menu Button, Mode Button, Zoom (W/T).
- വശം: USB Type-C Port.
- താഴെ: Battery/Memory Card Compartment.
സജ്ജമാക്കുക
1 ബാറ്ററി ചാർജ് ചെയ്യുന്നു
The camera is equipped with a built-in 700mAh rechargeable lithium battery. Before first use, fully charge the battery.
- Connect the included USB Type-C cable to the camera's USB port.
- USB കേബിളിന്റെ മറ്റേ അറ്റം ഒരു USB പവർ അഡാപ്റ്ററുമായി (ഉൾപ്പെടുത്തിയിട്ടില്ല) അല്ലെങ്കിൽ ഒരു കമ്പ്യൂട്ടറിന്റെ USB പോർട്ടുമായി ബന്ധിപ്പിക്കുക.
- ചാർജിംഗ് ഇൻഡിക്കേറ്റർ ലൈറ്റ് പ്രകാശിക്കും. ചാർജിംഗ് പൂർത്തിയായിക്കഴിഞ്ഞാൽ അത് ഓഫാകും അല്ലെങ്കിൽ നിറം മാറും.
കുറിപ്പ്: The camera can be used while charging. A full charge provides approximately 150 minutes of continuous shooting or 90 minutes of video recording.

Image: Battery life information for the 700mAh battery.
2. മെമ്മറി കാർഡ് ചേർക്കുന്നു
The camera supports a 32GB memory card (included). Ensure the camera is powered off before inserting or removing the memory card.
- Locate the battery/memory card compartment cover on the bottom of the camera.
- കവർ തുറക്കുക.
- Insert the 32GB memory card into the designated slot with the metal contacts facing the correct direction (refer to the diagram inside the compartment if available) until it clicks into place.
- കമ്പാർട്ട്മെൻ്റ് കവർ സുരക്ഷിതമായി അടയ്ക്കുക.
പ്രധാനപ്പെട്ടത്: Format the memory card in the camera's settings menu before first use to ensure optimal performance.
പ്രവർത്തന നിർദ്ദേശങ്ങൾ
1. പവർ ഓൺ/ഓഫ്
- പവർ ഓണാക്കാൻ, അമർത്തിപ്പിടിക്കുക പവർ ബട്ടൺ on the top of the camera.
- പവർ ഓഫ് ചെയ്യുന്നതിന്, അമർത്തിപ്പിടിക്കുക പവർ ബട്ടൺ again. The camera also features an auto power-off function (configurable in settings).
2. ഫോട്ടോ എടുക്കൽ
The camera captures photos up to 44MP resolution.
- ക്യാമറ ഓണാക്കുക.
- Ensure the camera is in photo mode (indicated on the 2.4-inch IPS screen). If not, press the മോഡ് ബട്ടൺ മാറാൻ.
- Frame your shot using the IPS screen.
- അമർത്തുക ഷട്ടർ ബട്ടൺ halfway down to focus, then press it fully to take the picture.

ചിത്രം: ഉദാample of a high-resolution photo taken with the 44MP camera.
3. വീഡിയോകൾ റെക്കോർഡുചെയ്യുന്നു
The camera records videos in 1080P resolution.
- ക്യാമറ ഓണാക്കുക.
- അമർത്തുക മോഡ് ബട്ടൺ to switch to video recording mode.
- അമർത്തുക ഷട്ടർ ബട്ടൺ to start recording. A red indicator will typically appear on the screen.
- അമർത്തുക ഷട്ടർ ബട്ടൺ റെക്കോർഡിംഗ് നിർത്താൻ വീണ്ടും.

ചിത്രം: സ്ക്രീൻ view during 1080P video recording.
4. ഡിജിറ്റൽ സൂം ഉപയോഗം
The camera features 16X digital zoom.
- In photo or video mode, press the T (Telephoto) button സൂം ഇൻ ചെയ്യാൻ.
- അമർത്തുക W (Wide-angle) button സൂം ഔട്ട് ചെയ്യാൻ.

Image: Comparison of 1x and 16x digital zoom effects.
5. മറ്റ് പ്രവർത്തനങ്ങൾ
- സ്വയം-ടൈമർ: Set a delay (e.g., 2s, 5s, 10s) before a photo is taken. Access this option in the camera's menu.
- തുടർച്ചയായ ഷൂട്ടിംഗ്: Take multiple photos in quick succession. This setting is also found in the menu.
- ആന്റി ഷെയ്ക്കിംഗ്: Digital image stabilization helps reduce blur from camera movement. This feature is typically enabled by default or can be toggled in settings.
- പ്ലേബാക്ക്: അമർത്തുക പ്ലേബാക്ക് ബട്ടൺ (often indicated by a triangle icon) to view photos and videos. Use the navigation buttons to browse.
- മെനു ക്രമീകരണങ്ങൾ: അമർത്തുക മെനു ബട്ടൺ to access various camera settings, including resolution, white balance, exposure, date/time, and formatting the memory card.
കൈമാറുന്നു Files to a Computer or Phone
You can transfer photos and videos from the camera to a computer or a mobile phone.
1. Via USB Cable (to Computer)
- Connect the camera to your computer using the provided USB Type-C cable.
- ക്യാമറ ഓൺ ചെയ്യുക.
- The camera should appear as a removable disk or media device on your computer.
- Open the camera's folder and copy the desired fileനിങ്ങളുടെ കമ്പ്യൂട്ടറിലേക്ക് എസ്.
2. Via Memory Card Reader (to Computer/Phone)
For direct transfer from the memory card, you can use a card reader.
- Remove the memory card from the camera.
- Insert the memory card into a compatible card reader.
- Connect the card reader to your computer or mobile phone (via an OTG adapter if necessary).
- ആക്സസ് ചെയ്യുക files on the memory card and transfer them.

Image: OTG usage diagram for transferring files from memory card to phone.
മെയിൻ്റനൻസ്
- ക്യാമറ ബോഡി വൃത്തിയാക്കൽ: ക്യാമറ ബോഡി തുടയ്ക്കാൻ മൃദുവായതും ഉണങ്ങിയതുമായ തുണി ഉപയോഗിക്കുക. കഠിനമായ അഴുക്കിന്, ചെറുതായി dampതുണിയിൽ വെള്ളം ഒഴിക്കുക. കഠിനമായ രാസവസ്തുക്കൾ ഒഴിവാക്കുക.
- ലെൻസ് വൃത്തിയാക്കൽ: Use the included cleaning cloth or a specialized lens cleaning cloth. Gently wipe the lens in a circular motion. Do not use abrasive materials.
- സ്ക്രീൻ കെയർ: The 2.4-inch IPS screen can be cleaned with a soft, lint-free cloth. Avoid pressing too hard.
- സംഭരണം: When not in use for extended periods, store the camera in the provided storage bag in a cool, dry place, away from direct sunlight and extreme temperatures.
- ബാറ്ററി കെയർ: Recharge the battery regularly, even if the camera is not used frequently, to maintain battery health. Avoid fully discharging the battery for long periods.
ട്രബിൾഷൂട്ടിംഗ്
| പ്രശ്നം | സാധ്യമായ കാരണം | പരിഹാരം |
|---|---|---|
| ക്യാമറ പവർ ഓൺ ചെയ്യുന്നില്ല. | Battery is depleted or not properly inserted. | ബാറ്ററി പൂർണ്ണമായും ചാർജ് ചെയ്യുക. ബാറ്ററി ശരിയായി ചേർത്തിട്ടുണ്ടെന്ന് ഉറപ്പാക്കുക. |
| ഫോട്ടോകൾ എടുക്കാനോ വീഡിയോകൾ റെക്കോർഡ് ചെയ്യാനോ കഴിയില്ല. | മെമ്മറി കാർഡ് നിറഞ്ഞിരിക്കുന്നു, ചേർത്തിട്ടില്ല, അല്ലെങ്കിൽ കേടായിരിക്കുന്നു. | Check memory card insertion. Delete unnecessary files or replace the card. Format the card (this will erase all data). |
| ചിത്രങ്ങൾ അവ്യക്തമാണ്. | Lens is dirty, insufficient light, or camera shake. | Clean the lens. Ensure adequate lighting. Hold the camera steady or enable anti-shaking. |
| ക്യാമറ മരവിക്കുന്നു അല്ലെങ്കിൽ പ്രതികരിക്കുന്നില്ല. | സോഫ്റ്റ്വെയർ തകരാറ് അല്ലെങ്കിൽ കുറഞ്ഞ ബാറ്ററി. | Remove and reinsert the battery (if possible) or press and hold the power button for 10 seconds to force a shutdown. Recharge the battery. |
| കൈമാറാൻ കഴിയില്ല fileകമ്പ്യൂട്ടറിലേക്ക്. | തെറ്റായ USB കണക്ഷൻ അല്ലെങ്കിൽ ഡ്രൈവർ പ്രശ്നം. | Ensure the USB cable is securely connected. Try a different USB port or computer. Check if the camera is recognized as a device. |
സ്പെസിഫിക്കേഷനുകൾ
| ഫീച്ചർ | വിശദാംശങ്ങൾ |
|---|---|
| പ്രദർശിപ്പിക്കുക | 2.4 ഇഞ്ച് ഐപിഎസ് സ്ക്രീൻ |
| വീഡിയോ റെസല്യൂഷൻ | 1080P/720P/480P |
| ചിത്ര മിഴിവ് | 44MP/42MP/36MP/24MP (Effective Still Resolution: 44 MP) |
| File ഫോർമാറ്റ് | JPG (Image), AVI (Video) |
| ഇലക്ട്രോണിക് സൂം | 16X |
| USB പോർട്ട് | ടൈപ്പ്-സി |
| ബാറ്ററി | 3.7V/ 700mAh Rechargeable Lithium Battery |
| ഫോക്കൽ ലെങ്ത് | f=7.36mm |
| അപ്പേർച്ചർ | F/3.2 |
| പവർ സേവ് | Auto power off in 1Min/2Mins/3Mins/4Mins/5Mins/10Mins |
| പിന്തുണയ്ക്കുന്ന സിസ്റ്റം | Windows XP, Vista, 7, 8, 10, Mac 10.2 and above |
| മെമ്മറി സ്റ്റോറേജ് കപ്പാസിറ്റി | 32 GB (ഉൾപ്പെടുന്നു) |
| ഓട്ടോ ഫോക്കസ് ടെക്നോളജി | കോൺട്രാസ്റ്റ് ഡിറ്റക്ഷൻ |
| ഇമേജ് സ്റ്റെബിലൈസേഷൻ | ഡിജിറ്റൽ |
| പ്രായ പരിധി വിവരണം | കുട്ടി |
വാറൻ്റിയും പിന്തുണയും
For warranty information and technical support, please refer to the contact details provided with your purchase documentation or visit the official Andoer webസൈറ്റ്. വാറന്റി ക്ലെയിമുകൾക്കായി നിങ്ങളുടെ വാങ്ങലിന്റെ തെളിവ് സൂക്ഷിക്കുക.