
TechniSat 0000/3996
TechniSat TECHNIRADIO SOLAR 2 User Manual
മോഡൽ: 0000/3996
ആമുഖം
The TechniSat TECHNIRADIO SOLAR 2 is a versatile and environmentally conscious portable radio designed for reliable performance in various conditions. Featuring DAB+ and FM radio reception, multiple charging options including solar and crank power, an integrated LED flashlight, and a power bank function, this device is an ideal companion for outdoor adventures, emergencies, or everyday use. Its robust, splash-proof design (IPX4) and construction from 87% marine plastic underscore its commitment to durability and sustainability.
സുരക്ഷാ നിർദ്ദേശങ്ങൾ
- ഉപകരണത്തെ തീവ്രമായ താപനിലയിലോ, ദീർഘനേരം നേരിട്ട് സൂര്യപ്രകാശത്തിലോ (ചാർജ് ചെയ്യുന്നതിനപ്പുറം) ഉയർന്ന ആർദ്രതയിലോ തുറന്നുകാട്ടരുത്.
- ശക്തമായ ആഘാതങ്ങൾക്ക് ഉപകരണം ഇടുകയോ ഇടുകയോ ചെയ്യുന്നത് ഒഴിവാക്കുക.
- ഉപകരണം സ്വയം ഡിസ്അസംബ്ലിംഗ് ചെയ്യുകയോ നന്നാക്കാൻ ശ്രമിക്കുകയോ ചെയ്യരുത്. എല്ലാ സേവനങ്ങളും യോഗ്യതയുള്ള ഉദ്യോഗസ്ഥരെ ഏൽപ്പിക്കുക.
- Keep the device away from water sources, despite its splash-proof rating (IPX4). It is not designed for submersion.
- ഏതെങ്കിലും കേബിളുകൾ ബന്ധിപ്പിക്കുന്നതിന് മുമ്പ് യുഎസ്ബി പോർട്ടുകൾ വരണ്ടതാണെന്ന് ഉറപ്പാക്കുക.
- When using the power bank function, ensure the connected device is compatible and that the charging cable is in good condition.
- പ്രാദേശിക നിയന്ത്രണങ്ങൾ അനുസരിച്ച് ബാറ്ററിയും ഉപകരണവും ഉത്തരവാദിത്തത്തോടെ നിർമാർജനം ചെയ്യുക.
ഉൽപ്പന്നം കഴിഞ്ഞുview
Familiarize yourself with the components and controls of your TECHNIRADIO SOLAR 2.

ചിത്രം 1: ഫ്രണ്ട് view of the TechniSat TECHNIRADIO SOLAR 2, showing the speaker grille, digital display, and control buttons for volume, info/menu, mode, and OK/scan. The flashlight is visible on the left side.
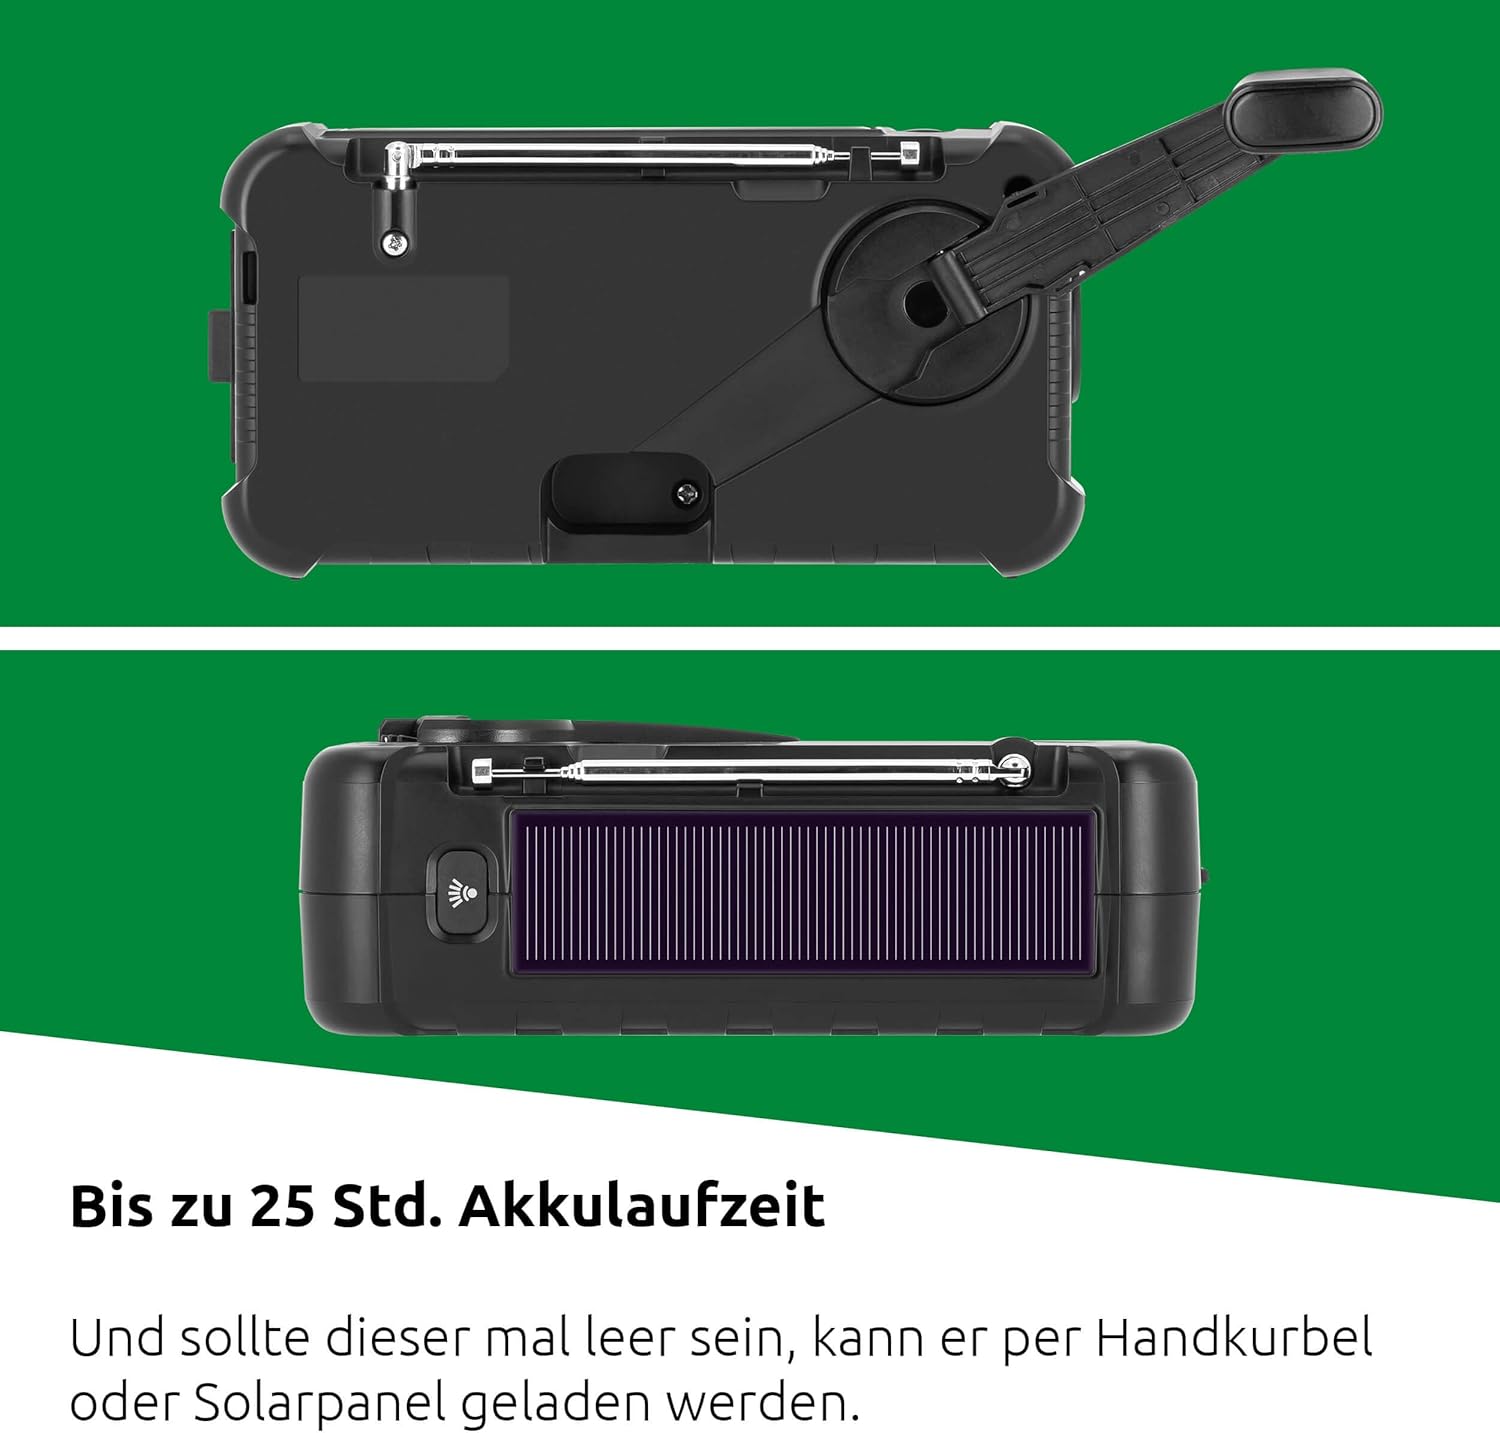
ചിത്രം 2: മുകളിൽ view of the radio highlighting the integrated solar panel. The rear view shows the foldable hand crank for manual power generation.

ചിത്രം 3: വശം view of the radio with the protective cover open, revealing the DC OUT (USB-A) port for power bank function, DC IN (USB-C) port for charging the radio, and a 3.5mm headphone jack.
നിയന്ത്രണങ്ങളും തുറമുഖങ്ങളും:
- ഡിസ്പ്ലേ: Shows station information, time, battery status, and menu options.
- പവർ ബട്ടൺ: റേഡിയോ ഓൺ/ഓഫ് ചെയ്യുന്നു.
- VOL +/- ബട്ടണുകൾ: വോളിയം ക്രമീകരിക്കുന്നു.
- INFO/MENU Button: Accesses information display and menu settings.
- മോഡ് ബട്ടൺ: Switches between DAB+ and FM radio modes.
- OK/SCAN Button: Confirms selections or initiates station scans.
- പ്രീസെറ്റ് ബട്ടണുകൾ (1-5+): സംരക്ഷിച്ച പ്രിയപ്പെട്ട സ്റ്റേഷനുകളിലേക്ക് ദ്രുത പ്രവേശനം.
- ഫ്ലാഷ്ലൈറ്റ് ബട്ടൺ: LED ഫ്ലാഷ്ലൈറ്റ് സജീവമാക്കുന്നു.
- സോളാർ പാനൽ: Located on top for solar charging.
- ഹാൻഡ് ക്രാങ്ക്: Foldable crank on the rear for manual power generation.
- USB-C Input (DC IN 5V 2.3A): റേഡിയോയുടെ ആന്തരിക ബാറ്ററി ചാർജ് ചെയ്യുന്നതിന്.
- USB-A Output (DC OUT 5V 1A): ബാഹ്യ ഉപകരണങ്ങൾ ചാർജ് ചെയ്യുന്നതിന് (പവർ ബാങ്ക് പ്രവർത്തനം).
- 3.5 എംഎം ഹെഡ്ഫോൺ ജാക്ക്: സ്വകാര്യ ശ്രവണത്തിനായി.
- ടെലിസ്കോപ്പിക് ആന്റിന: ഒപ്റ്റിമൽ റേഡിയോ സ്വീകരണത്തിനായി നീട്ടുക.
സജ്ജമാക്കുക
പ്രാരംഭ ചാർജിംഗ്
Before first use, it is recommended to fully charge the internal battery. The radio offers multiple charging methods:
- USB-C ചാർജിംഗ്: Connect the included USB-C cable to the DC IN port on the side of the radio and to a standard USB power adapter (not included) or a computer USB port. A full charge takes approximately 4 hours.
- സോളാർ ചാർജിംഗ്: Place the radio with the solar panel facing direct sunlight. The solar panel will slowly charge the internal battery. This method is ideal for maintaining charge or for emergency charging in daylight.
- ഹാൻഡ് ക്രാങ്ക് ചാർജിംഗ്: Unfold the hand crank on the rear of the radio. Rotate the crank clockwise or counter-clockwise at a steady pace. Approximately 1 minute of cranking can provide enough power for a few minutes of radio playback or flashlight use. This method is for emergency power generation.
ചിത്രം 4: The solar panel on top and the hand crank on the rear are primary methods for sustainable charging.
The battery indicator on the display will show the charging status. A fully charged battery provides up to 25 hours of playback time.
പ്രവർത്തന നിർദ്ദേശങ്ങൾ
Turning On/Off and Volume
- അമർത്തുക പവർ ബട്ടൺ to turn the radio on or off.
- ഉപയോഗിക്കുക VOL+ ഒപ്പം വോളിയം - ശ്രവണ ശബ്ദം ക്രമീകരിക്കാൻ ബട്ടണുകൾ.
Radio Operation (DAB+/FM)
ഒപ്റ്റിമൽ റിസപ്ഷനായി ടെലിസ്കോപ്പിക് ആന്റിന നീട്ടുക.

ചിത്രം 5: The TECHNIRADIO SOLAR 2 supports both DAB+ and FM radio for a wide range of listening options.
- അമർത്തുക മോഡ് button to switch between DAB+ and FM radio modes.
- ഓട്ടോമാറ്റിക് സ്റ്റേഷൻ സ്കാൻ: In either mode, press and hold the OK/SCAN button to initiate an automatic scan for available stations. The radio will store found stations.
- മാനുവൽ ട്യൂണിംഗ് (FM): In FM mode, short press the OK/SCAN button to manually tune frequencies.
- സ്റ്റേഷനുകൾ തിരഞ്ഞെടുക്കുന്നു: ഉപയോഗിക്കുക VOL+ ഒപ്പം വോളിയം - buttons (or dedicated tuning buttons if available) to navigate through the scanned stations.
- Saving Favorite Stations:
- ആവശ്യമുള്ള സ്റ്റേഷനിലേക്ക് ട്യൂൺ ചെയ്യുക.
- Press and hold one of the numbered preset buttons (1-5+). The display will confirm the station has been saved.
- To recall a favorite station, simply short press the corresponding numbered preset button. The radio supports 10 favorite stations for DAB+ and 10 for FM.
- INFO/MENU: അമർത്തുക വിവരം / മെനു button to cycle through different information displays (e.g., program type, signal strength, time) or to access the radio's settings menu.
ഫ്ലാഷ്ലൈറ്റ് ഫംഗ്ഷൻ
The integrated LED flashlight provides illumination in two brightness levels.

ചിത്രം 6: The powerful LED flashlight offers two brightness settings for various lighting needs.
- സമർപ്പിച്ചിരിക്കുന്നത് അമർത്തുക ഫ്ലാഷ്ലൈറ്റ് ബട്ടൺ (located near the flashlight lens) once for the first brightness level.
- Press it again for the second, brighter level.
- ഫ്ലാഷ്ലൈറ്റ് ഓഫ് ചെയ്യാൻ മൂന്നാമതും അമർത്തുക.
പവർ ബാങ്ക് പ്രവർത്തനം
The TECHNIRADIO SOLAR 2 can charge external devices like smartphones via its USB-A output port.

ചിത്രം 7: Use the power bank function to charge your mobile devices on the go, ensuring you stay connected.
- Open the protective cover on the side of the radio to access the USB-A output port (DC OUT 5V 1A).
- നിങ്ങളുടെ ഉപകരണത്തിന്റെ ചാർജിംഗ് കേബിൾ ഈ പോർട്ടിലേക്ക് ബന്ധിപ്പിക്കുക.
- Charging will begin automatically if the radio has sufficient battery power.
- Close the protective cover when not in use to maintain IPX4 splash protection.
മെയിൻ്റനൻസ്
- വൃത്തിയാക്കൽ: മൃദുവായതും ഉണങ്ങിയതുമായ തുണി ഉപയോഗിച്ച് ഉപകരണം തുടയ്ക്കുക. കഠിനമായ അഴുക്കിന്, അല്പം d ഉപയോഗിക്കുക.amp cloth and mild detergent, then dry thoroughly. Do not use abrasive cleaners or solvents.
- സംഭരണം: When not in use for extended periods, store the radio in a cool, dry place. It is advisable to charge the battery fully every few months to maintain its lifespan.
- പാരിസ്ഥിതിക ഉത്തരവാദിത്തം: The radio's housing is made from 87% marine plastic, and its packaging is 100% plastic-free, reflecting an eco-friendly design.

ചിത്രം 8: The TECHNIRADIO SOLAR 2 is designed with environmental sustainability in mind, utilizing recycled marine plastic for its casing.
ട്രബിൾഷൂട്ടിംഗ്
| പ്രശ്നം | സാധ്യമായ കാരണം | പരിഹാരം |
|---|---|---|
| റേഡിയോ ഓൺ ആകുന്നില്ല. | ബാറ്ററി തീർന്നു. | Charge the radio using the USB-C cable, solar panel, or hand crank. |
| മോശം റേഡിയോ റിസപ്ഷൻ (DAB+/FM). | ആന്റിന വികസിതമല്ല അല്ലെങ്കിൽ ദുർബലമായ സിഗ്നൽ ഏരിയ. | Fully extend the telescopic antenna. Try repositioning the radio or moving to an area with better signal. Perform a new station scan. |
| ടോർച്ച് പ്രവർത്തിക്കുന്നില്ല. | Battery is too low or flashlight button not pressed correctly. | Charge the radio. Ensure you press the flashlight button firmly. |
| Power bank function not charging external device. | Radio battery is too low, incorrect cable, or device incompatibility. | Ensure the radio's battery is sufficiently charged. Use a compatible charging cable. Some devices may draw too much power or are not compatible with 5V 1A output. |
സ്പെസിഫിക്കേഷനുകൾ

ചിത്രം 9: Dimensions of the TechniSat TECHNIRADIO SOLAR 2.
| ഫീച്ചർ | വിശദാംശങ്ങൾ |
|---|---|
| മോഡൽ നമ്പർ | 0000/3996 |
| റേഡിയോ ബാൻഡുകൾ പിന്തുണയ്ക്കുന്നു | DAB+, FM (with RDS and PLL) |
| Favorite Station Memory | 10 for DAB+, 10 for FM |
| പവർ ഉറവിടം | Integrated Li-ion Battery (3.7V, 3000mAh, 11.11W), Solar Panel, Hand Crank, USB-C (DC IN 5V 2.3A) |
| ബാറ്ററി ലൈഫ് (പ്ലേബാക്ക്) | 25 മണിക്കൂർ വരെ |
| ബാറ്ററി ചാർജ് സമയം | ഏകദേശം 4 മണിക്കൂർ (USB-C വഴി) |
| പവർ ബാങ്ക് ഔട്ട്പുട്ട് | USB-A (DC OUT 5V 1A) |
| ഫ്ലാഷ്ലൈറ്റ് | Integrated LED with 2 brightness levels |
| സ്പീക്കർ | 1W (RMS) Mono Speaker |
| ഹെഡ്ഫോൺ ജാക്ക് | 3.5 മി.മീ |
| ജല സംരക്ഷണ റേറ്റിംഗ് | IPX4 (സ്പ്ലാഷ്-പ്രൂഫ്) |
| ഹൗസിംഗ് മെറ്റീരിയൽ | 87% Recycled Marine Plastic |
| അളവുകൾ (L x W x H) | 17 സെ.മീ x 5.5 സെ.മീ x 9.5 സെ.മീ |
| ഉൾപ്പെടുത്തിയ ഘടകങ്ങൾ | TECHNIRADIO SOLAR 2, USB-C Charging Cable (110 cm), User Manual |
വാറൻ്റിയും പിന്തുണയും
For warranty information and technical support, please refer to the official TechniSat webനിങ്ങളുടെ പ്രാദേശിക റീട്ടെയിലറെ ബന്ധപ്പെടുക അല്ലെങ്കിൽ സൈറ്റിൽ ബന്ധപ്പെടുക. വാറന്റി ക്ലെയിമുകൾക്കായി നിങ്ങളുടെ വാങ്ങിയതിന്റെ തെളിവ് സൂക്ഷിക്കുക.
Ask a question about this manual
Ask about setup, troubleshooting, compatibility, parts, safety, or missing instructions. Manuals+ will review the question and use this page’s manual context to help answer it.